To avoid these ads, REGISTER NOW!

What did you do "IN" your garage today?

To avoid these ads, REGISTER NOW!

Old Man Roger

Well-known member
Joined
Apr 6, 2017
Messages
17,701
Location
Palm Coast Florida
 

WildBill

ALLIANCE MEMBER
Joined
Aug 20, 2021
Messages
2,024
Location
PNW
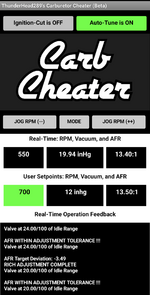
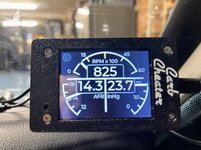
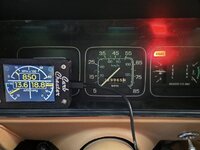
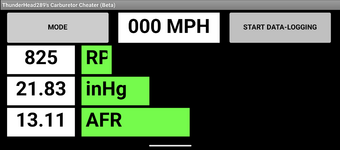
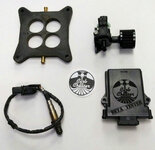
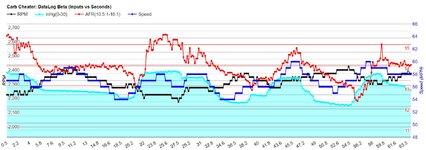
I installed a Carb Cheater on my 67 Cougar today, coolest thing ever. I don't have any pics but its basically a controlled air bleed valve with a little air filter, a small brain box with GPS and vacuum sensor, and an oxygen sensor. You replace your carb spacer (or add one) with his, it has a front and back port and passages inside to direct the inlet air to each barrel that you connect to the air valve. This device lets me see and set an idle and highway AFR, control a couple of switching outputs and mixture based on RPM, set a rev limiter, and see vacuum level, AFR, speed, RPM etc. on an android app. You can also use it for controlling a line lock or controlling a flame setup among other things with the programmable outputs. And you can graph everything out and look at it later if you want to help tune. He sells a little square device you can use for a permanently mounted customizable display or any android device works. It uses Bluetooth to talk to the device. My old **** phone worked fine.

When I first hooked it up I could see it was opening the valve about 30% because my idle was too rich, I tweaked it a little to get to the default 13.5 AFR and the valve doesn't need to open much at idle anymore. Then on the highway I could see when I was cruising at a steady speed I was sitting at around 12.3 when the default is 14.5, so it opened and kept me at 14.5. Some people go leaner on the highway but that seemed good. I need to go down a jet size I guess to get closer without it working. You can set those AFR values to whatever you want, and also use it for a choke if you set everything up with that in mind. And easily turn the auto tune feature off/on with a button push to help see what's happening, and it always shows what percentage the air bleed is open which really helps. So now changing temps and/or elevation will be automatically compensated for by it, which is pretty neat. My AFR was also dropping down to about 11.2 under hard acceleration, which is lower than ideal for peak power, so it opened to help get that to about 12.7 when I floor it, I could feel the difference turning auto tuning off and on.

Its as handy as a normal AFR meter for tuning your carb but with auto tuning and a bunch of other neat features. And if it dies you can still drive fine, unlike some of the buggy fuel injection systems I've watched my friends fight with on their muscle cars.

The base system is about $300, I think the one with everything is $400. This is a decent amount of money but I really like the carb I have and to do fuel inject I would be around $1k with the pump and everything else to make it work. Plus if this dies I can keep on driving.

Here is the webpage and pics/details. https://thecarbcheater.com

Edit- here are some pics I stole from the series of tubes, there are a bunch of different modes/views you can choose on your phone or you can get the little display that is customizable -
SettingsScreen.pngStandalone.jpgStandalone2.jpgGaugeScreen.png
carbcheat.jpg
Datalog.jpg
 
Last edited:

bugnut

ALLIANCE MEMBER
Joined
Jul 14, 2012
Messages
3,961
Location
Central Ohio
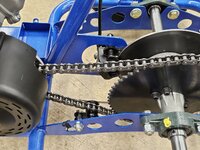
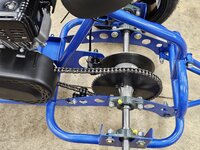
Moved things outdoors before more rain, proceeded to back out the riding mower and test. It seems to be working, so take the win. Than started to work on the chain for the grandsons newest shop toy. Think I got the chain shortened and everything reset. Quick handful of trips around the yard and that's done also.
 

Attachments

  • 20250728_135238.jpg
    20250728_135238.jpg
    896.4 KB · Views: 42
  • 20250728_135234.jpg
    20250728_135234.jpg
    1.1 MB · Views: 52

KwikFab

Well-known member
Joined
Jul 27, 2024
Messages
1,209
Location
Central Valley, CA
Few parts arrived from McMaster Carr so I cut them down to size

20250729_145347.jpg

I've had this bandsaw for well over 3 years and I got it for free. Spent a grand total of $47 bringing it back up to snuff and it's still cutting everything I throw at it on the same blade.

I cut everything from thick square tube, round, solid rod, all in mild steel and stainless.

20250729_150001.jpg

Need to buy some 3/16" steel to cut out a stool cushion mount and legs, but I've got most of the stuff I need to make another stool.

20250729_151658.jpg

Inclined to make myself another one in a different leather color.
 

niget2002

Well-known member
Joined
Oct 2, 2012
Messages
11,164
Location
Josephine, TX
There are more dangerous and harder ways to make a living, but the constant judgement from non creative people approving or disapproving of your work, the hours, the constant grind, the feast or famine of account management was trying at times for sure.

However for a lot of years, I loved it.
My wife was a graphic design artist for a marketing firm for years. She's a teacher now.
 

Beerhippie

Well-known member
Joined
Oct 13, 2023
Messages
9,920
Location
Far NE Oregon
Worked outside 'til it got too hot. Went to the hardware store for some paint supplies and had a really hard time leaving--it's got AC. I guess if you want to sit in a chair in the store and read a book while sipping a cold barley pop, they expect you to buy the damned chair. Awful narrow-minded, you ask me.
 
Last edited:
To avoid these ads, REGISTER NOW!

Skyman

Well-known member
Joined
Nov 9, 2021
Messages
1,208
Location
Central Maryland
I installed a Carb Cheater on my 67 Cougar today, coolest thing ever. I don't have any pics but its basically a controlled air bleed valve with a little air filter, a small brain box with GPS and vacuum sensor, and an oxygen sensor. You replace your carb spacer (or add one) with his, it has a front and back port and passages inside to direct the inlet air to each barrel that you connect to the air valve. This device lets me see and set an idle and highway AFR, control a couple of switching outputs and mixture based on RPM, set a rev limiter, and see vacuum level, AFR, speed, RPM etc. on an android app. You can also use it for controlling a line lock or controlling a flame setup among other things with the programmable outputs. And you can graph everything out and look at it later if you want to help tune. He sells a little square device you can use for a permanently mounted customizable display or any android device works. It uses Bluetooth to talk to the device. My old **** phone worked fine.

When I first hooked it up I could see it was opening the valve about 30% because my idle was too rich, I tweaked it a little to get to the default 13.5 AFR and the valve doesn't need to open much at idle anymore. Then on the highway I could see when I was cruising at a steady speed I was sitting at around 12.3 when the default is 14.5, so it opened and kept me at 14.5. Some people go leaner on the highway but that seemed good. I need to go down a jet size I guess to get closer without it working. You can set those AFR values to whatever you want, and also use it for a choke if you set everything up with that in mind. And easily turn the auto tune feature off/on with a button push to help see what's happening, and it always shows what percentage the air bleed is open which really helps. So now changing temps and/or elevation will be automatically compensated for by it, which is pretty neat. My AFR was also dropping down to about 11.2 under hard acceleration, which is lower than ideal for peak power, so it opened to help get that to about 12.7 when I floor it, I could feel the difference turning auto tuning off and on.

Its as handy as a normal AFR meter for tuning your carb but with auto tuning and a bunch of other neat features. And if it dies you can still drive fine, unlike some of the buggy fuel injection systems I've watched my friends fight with on their muscle cars.

The base system is about $300, I think the one with everything is $400. This is a decent amount of money but I really like the carb I have and to do fuel inject I would be around $1k with the pump and everything else to make it work. Plus if this dies I can keep on driving.

Here is the webpage and pics/details. https://thecarbcheater.com

Edit- here are some pics I stole from the series of tubes, there are a bunch of different modes/views you can choose on your phone or you can get the little display that is customizable -

It's pretty cool to see that somebody brought this concept back to life as an aftermarket product. Thanks for posting this.
 

SMOKEYBEAR

Well-known member
Joined
Jan 3, 2016
Messages
459
Simple boat/ Mercury work while I wait for parts.

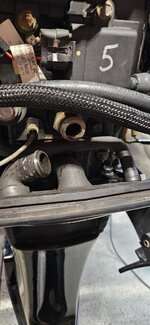
Noticed water coming out of the lower cowl while using the wash down. Easy find, significant leak and pretty easy fix. Hose is supposed to be here Friday, I already have the Oetiker clamps. Removed the old one and waiting...

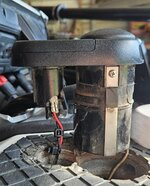
Removed the front navigation light/ horn combo...age caught up to it. New one is on the way.

I have 20 min worth of work to get it back together once the parts arrive.
 

Attachments

  • NAV1.jpg
    NAV1.jpg
    233.2 KB · Views: 25
  • WD4.jpg
    WD4.jpg
    89.1 KB · Views: 23
  • WD3.jpg
    WD3.jpg
    235.2 KB · Views: 21
  • WD2.jpg
    WD2.jpg
    68.1 KB · Views: 21
  • WD1.jpg
    WD1.jpg
    403.1 KB · Views: 19

DGersic

Well-known member
Joined
Mar 12, 2017
Messages
6,348
Location
DeKalb, IL
Finished this phase of the door refinishing project.

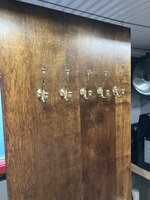
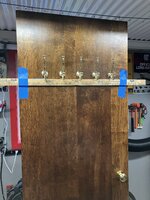
The bedroom closet door had this crappy plastic coat hook set on it. I used it to mark about where it was and taped a yardstick level.

IMG_7651.jpeg

I found a set of bright brass coat hooks on Amazon. Marked and mounted.

IMG_7652.jpegIMG_7653.jpeg

Reinstalled the knobs and latches. Reinstalled the hinges.

IMG_7654.jpeg

Then hauled them in to the house and re-hung them. Three more done, three more to go.
 

nadogail

Well-known member
Joined
Jan 23, 2009
Messages
32,007
Location
Coronado, CA
Looked at a box that i put together yesterday and added glue to a gap in a joint.
Decided that the exterior of the box would look better if it was sanded, so took a look at the 12" Harbor Freight sander, on the bottom shelf of a cabinet.
Decided that the Disk Sander should be put on a table or stand, decided to wait until I have some muscle to pick it up.
Checked my lumber pile and found half of what i will need to build a rolling stand for the Sander, made a mental shopping list.
 

BetterDays

Well-known member
Joined
Mar 26, 2005
Messages
2,945
Location
Ohio
Small progress of disassembling the old bench and putting totes in the new bench. I can fit 5 wide or arrange them 2 deep to fit 7 per shelf. May depend on what is being stored.
Old bench is now torn down and ready to burn / scrap metal.
Progress is progress
 

Attachments

  • 20250730_214517.jpg
    20250730_214517.jpg
    971.7 KB · Views: 32

Beerhippie

Well-known member
Joined
Oct 13, 2023
Messages
9,920
Location
Far NE Oregon
While I was at it, I lit up Red Frank:

54689331657_9d18ba6276_o.jpg

As I hadn't done it yet.

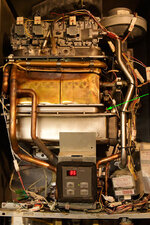
And... found that two of my three Rinnai C199s are leaking. I cleaned one today and it's not unusual for that to trigger a leak... usually just an o-ring... not this time. It'll take full on thoracic surgery to fix this, and likely means it's time for heart-lung transplant. The other one is a spontaneous leak, but a simple o-ring to fix. I think....
 

LeonardY

Well-known member
Joined
Apr 16, 2011
Messages
5,073
Location
Southern California
Out front of the garage. Washed the truck and did some minor detailing.

I lit a mosquito punk in the garage. I must have killed 10 or 15 mosquitos last night. I thought I got them all. As soon as the punk got going 2 more came out of hiding. Zapped them. I didn't see any this evening in the garage.
 

Beerhippie

Well-known member
Joined
Oct 13, 2023
Messages
9,920
Location
Far NE Oregon
Here's the patient:

54689357652_fa74aca11c_o.jpg

The green arrow points to a pretty bad aneurysm. I could solder it, but I'll have to remove the entire guts of the unit-from the stainless part at the bottom to the aluminum part at the top--to get to it, and it likely indicates that the copper bit in the middle there, which is the primary heat exchanger, is shot through and leaking. Fortunately, I have an entire spare Rinnai that I can just remove all the guts from and transplant them. Easy four hour job....
 

PhantomEB

Well-known member
Joined
Feb 6, 2006
Messages
6,787
Location
Medicine Hat, AB, Canuckistan
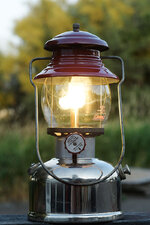
I finished the 5/'37 220B I found yesterday. She's been rode hard and put up wet, but not too bad.

So you don't have to go looking for it, here's the before:

54680866070_939b11d0ea_o.jpg

And after:

54682004002_da59bdfdf3_o.jpg

The original vent was bashed in on top and it didn't have a globe. I stole both from a 220E. The B vent is a darker green, but we'll just keep that between ourselves, OK?

I did get a nice globe, if not exactly period-correct:

54682830711_67eda5ec61_o.jpg

I might still finish one 200A today, but I'm easily distracted by shiny nickel-plate.

Maybe I'll light 'er up when it cools off some.

TFL--

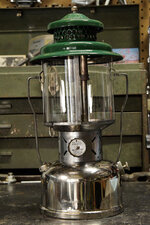
Another one down:

54682995921_8da1ae120d_o.jpg

This is a 10/'59 200A--Coleman's most produced model of single-burner lanterns, from 1951 to '83.

Now I need to start trying to sell a few more of these....
What do you use to restore these? Not so worried about paint codes but the rust removal, glass source…..I have a few out in the garage that need to be cleaned up.
 

PhantomEB

Well-known member
Joined
Feb 6, 2006
Messages
6,787
Location
Medicine Hat, AB, Canuckistan
Finally got power steering done on the bronco.

There was a hiccup of reversed lines on the steering box which was found thru a schematic being wrong. Major death wobble and knuckle busting erratic steering wheel could of led to months with a broken finger or worse.

Fixed the lines and bang I now have steering with a finger.

Time to clean up shop and pack for camping this weekend. It my brothers birthday as well I need some reset time.

When I get back it will be install the fittings for the steering ram and go after leaks. Then all that’s left is brakes and wiring.
 

Beerhippie

Well-known member
Joined
Oct 13, 2023
Messages
9,920
Location
Far NE Oregon
What do you use to restore these? Not so worried about paint codes but the rust removal, glass source…..I have a few out in the garage that need to be cleaned up.
Everything that isn't pained or aluminum goes into the USC with a hot lye solution for a half hour, gets a rinse with very hot water, then back into the USC with a hot sodium citrate solution. Painted and aluminum parts get a scrub with a soft pad and dishsoap.

The ventilator (hat) is porcelain enamel, not paint. Mild acids will etch it and leave it with a matte finish--permanently--but the citrate just gets it nice and gleaming.

I finish up the nickel-plated parts with Mother Mag and Aluminum polish using another soft pad, then a quick finish with a very soft and slow rag buffing wheel--NO ROUGE! Rouge will cut through the thin nickel plate almost instantly!

Then everything that doesn't get hot gets waxed with Mother's California Synthetic--but use your favorite.

Put it back together the same way it came apart, unless that was wrong.

For parts, glass, etc, check out Old Coleman Parts online: https://www.oldcolemanparts.com/

For a lot more information, go to: https://colemancollectorsforum.com/index.php?sid=448089e55e3c4e7ae4f8172627253e89

Tell 'em the Hippie and Outlaw sent you.
 
Last edited:
To avoid these ads, REGISTER NOW!
Top Bottom