To avoid these ads, REGISTER NOW!

What did you do "IN" your garage today?

To avoid these ads, REGISTER NOW!

larry4406

Well-known member
Joined
Jan 27, 2006
Messages
19,436
Location
Northern Virginia
Was driveway.

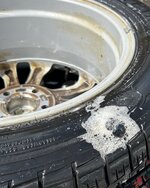
Determined that slow leak on tire was inside sidewall about 1.25” from tread. Ugh.

Put it back on car without plug attempt.

Dealer could not find leak last week.

Tire still tons of miles left.

Past 3+ months been inflating each weekend.

No leak at 25 psi (low point it stops). I had to inflate to 60 psi to find it.

I think I’m back to weekly maintenance.

IMG_1127.jpeg
 
Last edited:

SMOKEYBEAR

Well-known member
Joined
Jan 3, 2016
Messages
459
You ask, I deliver. Different project but here I am...:ROFLMAO:

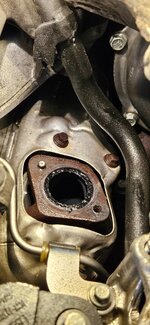
Coolant, EGR cooler, EGT probe and associated work on the 6.7 Ford. 6mx1.0 titanium bolts in cast iron manifold, thanks Ford. Nothing I can't sort out, but I would of had it done last night otherwise. It's a well known challenge, there's 8 total, these two in the manifold being the worst, At least it's only 1 of them. I'll be back on it after work today.
No pictures, but I have this complete. Waiting for the EGT probe to arrive Monday, but the broken bolt has been removed and repaired. Sheesh it tested me though , tools and mostly patience. It's been drilled and tapped to a larger size without a helicoil or timesert, I'm satisfied with the repair.

All the "faults" of the Milwaukee M12 90 degree drill make it the perfect tool for the job. Drilled without removing the upper intake, small enough to fit in the tight space and under powered just right to drill slow and not break drill bits. That titanium bolt is a MFER to drill
 

Attachments

  • MFER1.jpg
    MFER1.jpg
    129.8 KB · Views: 32

imagineer

Well-known member
Joined
Dec 13, 2015
Messages
1,017
Location
Ohio
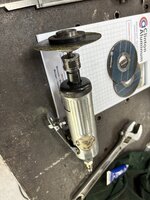
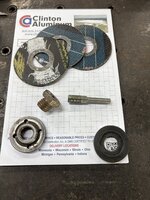
Not a very technical project, but it helps get full usefulness from cutting disks. I made an arbor with a 1/4" shank that will hold standard cutting disks with a 7/8" hole.

Earlier today, I was using an angle grinder to cut some 1/8" steel for a project. I needed to make 8 linear feet of cut and ended up going through three 4.5" x .065" thick cutting disks. Given the configuration of the head on the angle grinder, the cutting disks need to be replaced when they worn to about 2.875" diameter. It bothers me to have to toss out a cutting disks when there's still some life left in it.

Not sure if all angle grinders ship with threaded adapters, but the Hercules angle grinders come with internally treaded adapters. The adapters have a standard angle grinder 5/8-11 external threading and a 10mm (either 1.5 or 1.25TPI) internal thread.

I found a 10mm x 1.25 bolt, cut the head off then lathe turned the shank down to 1/4" diameter. I installed the adapter onto the threads using some Locktite. Using a spare angle grinder backing plate and top nut now I have an arbor for my small pneumatic grinders that can use up the partially worn cutting disks.
 

Attachments

  • IMG_0501.jpg
    IMG_0501.jpg
    717.8 KB · Views: 26
  • IMG_0500.jpg
    IMG_0500.jpg
    942.7 KB · Views: 17
  • IMG_0499.jpg
    IMG_0499.jpg
    857.8 KB · Views: 20

KwikFab

Well-known member
Joined
Jul 27, 2024
Messages
1,209
Location
Central Valley, CA
Not a very technical project, but it helps get full usefulness from cutting disks. I made an arbor with a 1/4" shank that will hold standard cutting disks with a 7/8" hole.

Earlier today, I was using an angle grinder to cut some 1/8" steel for a project. I needed to make 8 linear feet of cut and ended up going through three 4.5" x .065" thick cutting disks. Given the configuration of the head on the angle grinder, the cutting disks need to be replaced when they worn to about 2.875" diameter. It bothers me to have to toss out a cutting disks when there's still some life left in it.

Not sure if all angle grinders ship with threaded adapters, but the Hercules angle grinders come with internally treaded adapters. The adapters have a standard angle grinder 5/8-11 external threading and a 10mm (either 1.5 or 1.25TPI) internal thread.

I found a 10mm x 1.25 bolt, cut the head off then lathe turned the shank down to 1/4" diameter. I installed the adapter onto the threads using some Locktite. Using a spare angle grinder backing plate and top nut now I have an arbor for my small pneumatic grinders that can use up the partially worn cutting disks.

Oxyfuel or plasma cutter would make super quick work of cutting down that steel.
 

KwikFab

Well-known member
Joined
Jul 27, 2024
Messages
1,209
Location
Central Valley, CA
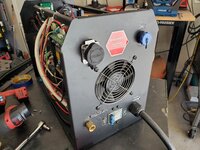
I have a plasma (Razorweld Cut45) installed on a Langmuir Crossfire table. Its a nuisance to disconnect the torch & cable from the table and control wiring.

Small world - I'm a moderator on the FB group.

Why not run a hand torch to the plasma cutter?

It was even more difficult disconnecting a PrimeWeld plasma cutter from a table because you have to run raw for THC voltage. This means running wires directly to the lugs in the machine, but I had modified the plasma cutter to run a plug to said raw voltage.

Some old pictures -

20230918_161639.jpg

20231015_130409.jpg

20231015_132141.jpg

That meant I could easily disconnect the VIM and pull it off via the velcro.

20231015_135120.jpg

20231015_135127.jpg

Worked perfect for trailer fixes and cutting down big sheets.

I say this in case you also went raw since Razorweld has built-in ports for torch on/off as well as divided voltage.

Stupid convenient having multiple torches!
 

Skyman

Well-known member
Joined
Nov 9, 2021
Messages
1,207
Location
Central Maryland
Was driveway.

Determined that slow leak on tire was inside sidewall about 1.25” from tread. Ugh.

Put it back on car without plug attempt.

Dealer could not find leak last week.

Tire still tons of miles left.

Past 3+ months been inflating each weekend.

No leak at 25 psi (low point it stops). I had to inflate to 60 psi to find it.

I think I’m back to weekly maintenance.

IMG_1127.jpeg

Might try an inner tube?
 

kaymccampbell

Well-known member
Joined
Feb 27, 2015
Messages
29,583
Location
Upstate New York
Who well would that work with a tubeless tire and TPM sensor? I am thinking it won't.
You could try sticking a plug in it to slow down the leak, or putting a patch inside. I've plugged and patched plenty of sidewalls on otherwise perfectly good tires. They both seem to have had about the same efficacy. Plugs are easier.
 

larry4406

Well-known member
Joined
Jan 27, 2006
Messages
19,436
Location
Northern Virginia
You could try sticking a plug in it to slow down the leak, or putting a patch inside. I've plugged and patched plenty of sidewalls on otherwise perfectly good tires. They both seem to have had about the same efficacy. Plugs are easier.

Yep the plug won't do any more damage then is already done.
Yeah my brother was encouraging me to plug it.

I don't have the ability to dismount tire for an inside patch.
 

Snip's

Well-known member
Joined
Apr 29, 2017
Messages
1,859
Location
Ohio
There is a FORD recall on this trim item...
I took my wife's 2017 Explorer in to the dealer because the RH side a-pillar plastic trim became partially disconnected...Flapping in the wind...
I got tired of waiting on the FORD recall...
I've been waiting for over a year to get a call from the dealer that the part is available for the install...
The OEM supplier for this part has vacated the scene... FORD is saying they are trying to establish a new source...

Screen Shot 2025-08-10 at 10.14.19 AM.png
Amazon to the rescue... Part was a perfect fit
Screen Shot 2025-08-10 at 10.22.11 AM.png

Took me about 1/2 hour to do the repair...
IMG_5015.jpg
 
To avoid these ads, REGISTER NOW!

LeeG

Well-known member
Joined
Nov 29, 2012
Messages
1,529
Location
Phoenix, AZ
Sometimes multiple problems can solve each other.
  1. I have a nice little single axle utility trailer that was my Dad's, and I've done quite a bit of work to it, but I just don't use it much anymore, and it costs about $75/mo to store it.
  2. We are planning on moving back to Iowa in the next few years, and it's going to be a pain to move all my stuff.
  3. I am also totally out of room. I have a bunch of tools I picked up for specific jobs, and now just take up space, but I don't want to get rid of them as I expect to need them after the move.
  4. I was unable to make my normal trip back to Iowa this summer.
So, I am rescheduling my trip for early fall. I rented a 5x10 storage unit, which, coincidentally is the size of my trailer. This weekend I mostly emptied the shed, moved stuff I don't plan on using for the next few years into storage, and went through all the tubs there (in the A/C) and got things organized and brought back the stuff that is going to stay, and started getting the other stuff ready to haul. My sister has plenty of indoor storage space, and a secure lot to park my trailer, so that's my plan.

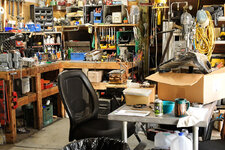
By moving stuff off the shelves in back, I was able to move about 15 Systainers of tools onto the shelves, I think I freed up about 15 sq ft of floor space, which doesn't sound like much, but the shed is only 10x12 with only 7x10 of floor space (shelves on the sides), its a significant chunk. I am expecting to take back about 2 pallets worth of stuff once I get it all gathered.

What did I move? All my pipe threading tools, including a tri-stand vise, all of my corded tools (I still have all my original Milwaukee tools in steel boxes), antique tools that belonged to my Dad and Grandfather that I don't have room to display, portable air compressor, concrete tools, demolition hammers, and that sort of stuff. It gives me practice for when I have to move the shop. I can tell already that it is going to be more work than I thought.

The summer temps here didn't help any, but by starting at 3am, I was able to get most of the shed work done before it was too unbearable.

Lee
 

Fixr

Well-known member
Joined
Dec 23, 2012
Messages
9,708
Location
SW VA
Livestock matting. It's made for concrete-floor barns, where the hard floor is bad for hooves and for trailers, where horseshoes are bad for floors. At around 3/4" thick and made to take the weight of ton-plus critters concentrated over a few square inches, it'll do the job.
I have used a fair bit of that and I concur.
 

Beerhippie

Well-known member
Joined
Oct 13, 2023
Messages
9,914
Location
Far NE Oregon
Back to the never-ending Battle of the Rinnais.

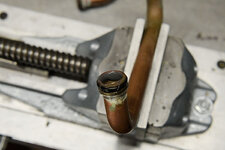
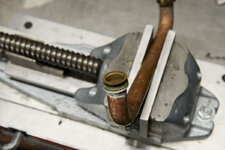
The drain tube of the primary heat exchanger of one of our Rinnia C199s sprung a leak a week ago. I was able to salvage parts from anothe one, retired for other problems. Friday, the second one sprung a leak--this time, from deep inside the primary HX.

I had cut the drain tube off the first (it isn't necessary and the newer C199s don't even have it) and attempted to solder up the leak, which was where the tube was soldered/brazed into another tube. It turned out to be one of those whack-a-mole jobs, where the leak just kept moving. So today, I went with Plan B:

54712277849_69158c84a1_o.jpg

Two layers of Cold Weld, flowed in with a heat gun. That should get it. I don't think it had any other leaks.

Now to be sure it's the only leak:

54712386035_8594fa3ef7_o.jpg

Full line pressure. The water is from where one of the hose/hose clamp junctions is leaking--not the HX itself.

I'll leave it under pressure while I go for lunch. If it doesn't leak, I have my work cut out for the afternoon. We have a big brew day scheduled tomorrow so I need all three Rinnais up and cooking.
 
Last edited:

larry4406

Well-known member
Joined
Jan 27, 2006
Messages
19,436
Location
Northern Virginia
I have plugged sidewalls with some success, and a few failures. I don't know that I would do it on a freeway vehicle but I wouldn't hesitate on my trash hauler.
It’s my daily driver.

60-80 miles each day via highway and residential roads.

Once it drops to 25 psi or so it just stays there.

So I think it’s going to be weekend pump up and keep running it till it wears out vs attempt a sketchy repair.
 

Beerhippie

Well-known member
Joined
Oct 13, 2023
Messages
9,914
Location
Far NE Oregon
I got back from lunch at noon. No leakage from the refurb/modded HX, so here we go.

Pulled all the internals out of the Rinnai (again) and started stripping down to the HX:

54712635304_cbe0282d96_o.jpg

It looks like there's been some horrible crime against a water heater--parts are scattered all over the shop. The HX on the Workmate is the one that I just patched.

Now to get it back together, installed, tested and hopefully fill the 1,200 gallon hot water tank to get it up to temp for tomorrow....

As soon as I finish this smoke.
 

KwikFab

Well-known member
Joined
Jul 27, 2024
Messages
1,209
Location
Central Valley, CA
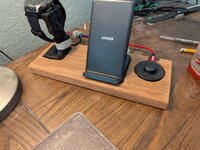
Cut a piece of wood and practiced hand routing shapes to make a little organizer for my nightstand charging devices.

#builtnotbought

Would probably be worth $40 on Etsy if I used the word "rustic" in the description.

1000004096.jpg

Drag it on the ground to put some scratches in it and you can sell it for double and calling it "vintage"
 

rharman

Well-known member
Joined
Apr 22, 2012
Messages
8,870
Location
SoCal
Cut a piece of wood and practiced hand routing shapes to make a little organizer for my nightstand charging devices.

#builtnotbought

Would probably be worth $40 on Etsy if I used the word "rustic" in the description.

1000004096.jpg

Drag it on the ground to put some scratches in it and you can sell it for double and calling it "vintage"

Put it outside, hose it down once in a while, and leave it to dry. That adds "Patina". Another doubling of the price.
 

Beerhippie

Well-known member
Joined
Oct 13, 2023
Messages
9,914
Location
Far NE Oregon
Y'know how it is--just cruisin' along, top down, some good music on... and then you hit that pothole you didn't even see?

54712525926_feaebbef56_o.jpg

It's not supposed to look like that. The groove is where an o-ring lives, and while the o-ring technically seals against the part that isn't missing, it just ain't gonna make anything better.

Fortunately, I was able to recover before I even lost lane control:

54711690717_ddcce11174_o.jpg

I cleaned the inside with a 3/8" Mill Rose brush, put a well-greased o-ring in the groove and used some more Cold Weld epoxy. After the epoxy had partially set, I trimmed it back so it doesn't add to turbulence or restriction. I think.

Back to cruisin'

54712754269_804f9ac0d1_o.jpg

Everything back together but the exhaust unifold, which goes on the back.

It's now all back together, looking and working like a Rinnai should and heating tomorrow's brew water.

Some heroes of the battle:

54711690742_81c9acc2ac_o.jpg

I needed a long--1 foot or so--screwdriver that fit JIS screws well enough to stick them waaay back into the case. The Crafty was the best fit of anything I had--including a couple of JIS screwdrivers--and, with a little dab of pipe dope on the tip, performed honorably. The Ullman o-ring hook is the best design I've used.

Beer thirty!
 
Last edited:
To avoid these ads, REGISTER NOW!
Top Bottom