Even better.I used to save my old coffee grounds and boil wood and bone that I wanted to age with them. Produces the "buried for eons" look.


You are using an out of date browser. It may not display this or other websites correctly.
You should upgrade or use an alternative browser.
You should upgrade or use an alternative browser.
What did you do "IN" your garage today?
- Thread starter mayhemman
- Start date
Another old school technique is to bury it in the *ahem* compost pile behind a barn, after beating it with a chain and walking over it.I used to save my old coffee grounds and boil wood and bone that I wanted to age with them. Produces the "buried for eons" look.
niget2002
Well-known member
If you're ever in this part of the country, I'll buy you a beverage of your choice just for providing the good chuckle.At this point we're practically investors, entitled to a 33% share of this item's exponentially rising value
I have advice to offer on how to disguise handheld router nibble marks. Send a self-addressed envelope and a 20 dollar bill to my address...If you're ever in this part of the country, I'll buy you a beverage of your choice just for providing the good chuckle.
Beerhippie
Well-known member
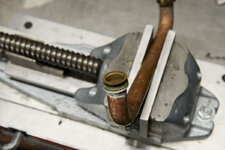
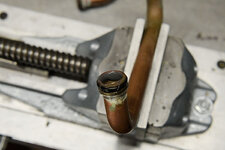
Just so's y'all know--these Bubba fixes are totally temporary (but working damned well, thank you). I have new parts for all the rotten parts on the way--should be here this week--but we're brewing tomorrow, so....Y'know how it is--just cruisin' along, top down, some good music on... and then you hit that pothole you didn't even see?
It's not supposed to look like that. The groove is where an o-ring lives, and while the o-ring technically seals against the part that isn't missing, it just ain't gonna make anything better.
Fortunately, I was able to recover before I even lost lane control:
I cleaned the inside with a 3/8" Mill Rose brush, put a well-greased o-ring in the groove and used some more Cold Weld epoxy. After the epoxy had partially set, I trimmed it back so it doesn't add to turbulence or restriction. I think.
Back to cruisin'
Everything back together but the exhaust unifold, which goes on the back.
It's now all back together, looking and working like a Rinnai should and heating tomorrow's brew water.
Some heroes of the battle:
I needed a long--1 foot or so--screwdriver that fit JIS screws well enough to stick them waaay back into the case. The Crafty was the best fit of anything I had--including a couple of JIS screwdrivers--and, with a little dab of pipe dope on the tip, performed honorably. The Ullman o-ring hook is the best design I've used.
Beer thirty!


BH, am I mistaken, or all of your Rinnais running on patched HXs?Just so's y'all know--these Bubba fixes are totally temporary (but working damned well, thank you). I have new parts for all the rotten parts on the way--should be here this week--but we're brewing tomorrow, so....
Beerhippie
Well-known member
Two out of three--one of the two isn't patched, just salvaged. It takes time to get parts out here--especially for discontinued models.BH, am I mistaken, or all of your Rinnais running on patched HXs?
As stated, new primary HXs and other parts should be here sometime this week... hopefully. We're brewing tomorrow and not again 'til next week--and a weekend off would be kinda different.
“Cold Weld“ epoxy? Different than JB weld or MetalSet?I cleaned the inside with a 3/8" Mill Rose brush, put a well-greased o-ring in the groove and used some more Cold Weld epoxy. After the epoxy had partially set, I trimmed it back so it doesn't add to turbulence or restriction. I think.
You probably mentioned that three posts ago, and I've blinked since then.Two out of three--one of the two isn't patched, just salvaged. It takes time to get parts out here--especially for discontinued models.
As stated, new primary HXs and other parts should be here sometime this week... hopefully. We're brewing tomorrow and not again 'til next week--and a weekend off would be kinda different.
Beerhippie
Well-known member
Permatex brand. Like JB weld, without the metal flakes. Good stuff, and I think JB Weld and Permatex--and LocTite--are now the same mother ship.“Cold Weld“ epoxy? Different than JB weld or MetalSet?
Beerhippie
Well-known member
One has a wonky burner that throws codes. The other has the Bubba'd HX. The third... well, it's the newest, and really can't do the whole recirc game--it doesn't like hot water on the input side.You probably mentioned that three posts ago, and I've blinked since then.
If we ever replace these, they sure as hell won't be Rinnais (which wold also kinda **** with the time I've spent learning these things and the reserve of parts I have). I think Navian might make a better product, but I'd need to see one in operation. What we're doing with these is definitely off-label.
So what you seem to be saying is that learning a whole new system could be uncomfortable. Other than that, what do you think of the likely long-term outcome? Better ultimate results, even with a few BH and other's FUs along the way? Or would sticking with the disappointing Rinnais make better business sense?One has a wonky burner that throws codes. The other has the Bubba'd HX. The third... well, it's the newest, and really can't do the whole recirc game--it doesn't like hot water on the input side.
If we ever replace these, they sure as hell won't be Rinnais (which wold also kinda **** with the time I've spent learning these things and the reserve of parts I have). I think Navian might make a better product, but I'd need to see one in operation. What we're doing with these is definitely off-label.
DGersic
Well-known member
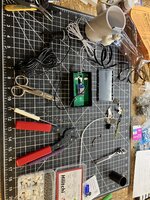
Somebody here mentioned using MySpool monitors a while back. I need something monitored, so I thought I’d investigate their offerings. Got the “water” monitor, which comes with a float switch, and can do alerts on rising or falling (not both) level, depending on how the float switch is installed.
Set it up on my bench to play around with. Seems to work as advertised. The included instructions are kinda lame, but adequate. One thing that they mention is that there are more docs on their web site, including one on how to remove the WiFi settings to move it to another network. Web site says to push the ”clear” button.
Looked all over the small black plastic case, there is no button. Just one visible LED. It does not have a “no user serviceable parts inside” sticker, so I pried the case open. It’s just snap closers. Found the clear button inside. Also found the connection for the float switch, and … a second port.
Some quick checking confirms that the float switch is just a NO switch that closes to indicate rising water level. And the second port can be enabled and configured on their web site.
What I wanted to monitor isn’t level, it’s flow. Found a 2” PVC flow switch on Amazon. It’s for something other than this, but seems like it’ll work. It’s a NO switch that closes when water flows through the pipe.
Some digging reveals that the two sensor ports are “JST” 2.5mm two pin headers. Bought a box of 2.5mm JST parts from Amazon.
Some minor assembly later, I have two monitored ports, for level and flow.
Set it up on my bench to play around with. Seems to work as advertised. The included instructions are kinda lame, but adequate. One thing that they mention is that there are more docs on their web site, including one on how to remove the WiFi settings to move it to another network. Web site says to push the ”clear” button.
Looked all over the small black plastic case, there is no button. Just one visible LED. It does not have a “no user serviceable parts inside” sticker, so I pried the case open. It’s just snap closers. Found the clear button inside. Also found the connection for the float switch, and … a second port.
Some quick checking confirms that the float switch is just a NO switch that closes to indicate rising water level. And the second port can be enabled and configured on their web site.
What I wanted to monitor isn’t level, it’s flow. Found a 2” PVC flow switch on Amazon. It’s for something other than this, but seems like it’ll work. It’s a NO switch that closes when water flows through the pipe.
Some digging reveals that the two sensor ports are “JST” 2.5mm two pin headers. Bought a box of 2.5mm JST parts from Amazon.
Some minor assembly later, I have two monitored ports, for level and flow.
The whole assembly is a little flakey. I have mine on a 1994 F 250, probably the same tailgate as yours. I have used it for several years, mostly for firewood, and just live with the shortcomings. Tighten the straps as much as possible every time you use it. Spend a little time getting the brackets adjusted as close as possible. If your truck is a straight work vehicle, and you don’t mind abusing it, you could probably bolt the brackets solidly to the tailgate.Thought I'd give a report on the recent expenditure I was obligated to spend as a result of the LoadHandler link a week or so back.
The good news is assembly was easy then I hauled and, easily, unloaded 3, 2-yard loads of mulch on Tuesday. Only took a couple minutes per load. Actually unloaded 4 but one was done manually off my trailer, left there from last week because it started raining.
The not-so-good news is the mounting brackets don't fit properly on the tailgate of my 1994 F350. The instructions say it should be 'snug' but it is very loose such that when pressure is applied the whole things drops down degrading the effectiveness of the thing. So, each load we had to spend time messing with the thing to get it 'rolling' correctly. With that going on the mat rolled up off center which mashed it up on one end.
I plan to call them to see if I did something wrong or there's just an inherent problem with my particular tailgate size.
The mat will start disintegrating very soon, as the edges are just heat sealed, and not hemmed in any way. Just keep cutting off the loose threads. The ends of the crossways threads are no problem. Mine has lost at least three inches on each side.
kaymccampbell
Well-known member
I bet that's a setting. I've noticed similar issues in newer models of lick-n-stick WHs, where they default to cold water input, and have to be set to booster or hot water recirc mode.The third... well, it's the newest, and really can't do the whole recirc game--it doesn't like hot water on the input side.
kaymccampbell
Well-known member
That flow switch looks like one for a pool chlorinator.Somebody here mentioned using MySpool monitors a while back. I need something monitored, so I thought I’d investigate their offerings. Got the “water” monitor, which comes with a float switch, and can do alerts on rising or falling (not both) level, depending on how the float switch is installed.
Set it up on my bench to play around with. Seems to work as advertised. The included instructions are kinda lame, but adequate. One thing that they mention is that there are more docs on their web site, including one on how to remove the WiFi settings to move it to another network. Web site says to push the ”clear” button.
Looked all over the small black plastic case, there is no button. Just one visible LED. It does not have a “no user serviceable parts inside” sticker, so I pried the case open. It’s just snap closers. Found the clear button inside. Also found the connection for the float switch, and … a second port.
Some quick checking confirms that the float switch is just a NO switch that closes to indicate rising water level. And the second port can be enabled and configured on their web site.
What I wanted to monitor isn’t level, it’s flow. Found a 2” PVC flow switch on Amazon. It’s for something other than this, but seems like it’ll work. It’s a NO switch that closes when water flows through the pipe.
Some digging reveals that the two sensor ports are “JST” 2.5mm two pin headers. Bought a box of 2.5mm JST parts from Amazon.
Some minor assembly later, I have two monitored ports, for level and flow.
Also, if you want to have fun, that black box processor looks like an Esp-32. Which means you could learn about Arduino or micro-Python or Espressif-ide. Then you could code your own little IoT horrors.
DGersic
Well-known member
That flow switch looks like one for a pool chlorinator.
Also, if you want to have fun, that black box processor looks like an Esp-32. Which means you could learn about Arduino or micro-Python or Espressif-ide. Then you could code your own little IoT horrors.
Yes, I think it is, or something like that.
I could, but probably won’t, at least not for this one. Off the shelf, ready to use, with minor modifications is all I have time for right now on this.
I have played around with the Raspberry Pi ecosystem. May do some more with it some day.
rd65
Well-known member
Used tire from a wrecking yard an option?It’s my daily driver.
60-80 miles each day via highway and residential roads.
Once it drops to 25 psi or so it just stays there.
So I think it’s going to be weekend pump up and keep running it till it wears out vs attempt a sketchy repair.
larry4406
Well-known member
Possibly but I doubt I could find a matching tire.Used tire from a wrecking yard an option?
Beerhippie
Well-known member
From what I understand, the Navians have stainless steel primary and secondary HXs. That right there would be a game-changer. The Rinnai has an all-copper primary HX, and with the abuse we subject them to (high carbonate hardness water, heating on recirculation to 185F), I have to descale them with the least corrosive chemical I can find--inhibited sulfomic acid--which eventually corrodes the copper parts away. Not to mention that the high-carbonate water itself is corrosive, as calcium bicarbonate breaks down to calcium carbonate (line scale) and CO2.So what you seem to be saying is that learning a whole new system could be uncomfortable. Other than that, what do you think of the likely long-term outcome? Better ultimate results, even with a few BH and other's FUs along the way? Or would sticking with the disappointing Rinnais make better business sense?
But I would like to see a Navian used in a similar manner as we use ours just to be sure I'm not going down another rabbit hole. We don't have a Navian dealer local to us--one of the reasons we went with the Rinnia in the first place--so I absolutely need to be able to do all repairs/etc myself.
I'm sure I've already checked that, but I'll take another look. It's a slightly different model from the older C199 units. There is a DIP switch board that allows some custom settings.I bet that's a setting. I've noticed similar issues in newer models of lick-n-stick WHs, where they default to cold water input, and have to be set to booster or hot water recirc mode.
Of course, somewhere out there is some technical documentation for the Rinnais--to which I'm not privvy All I have is the owner/installer manuals, which skip some of the details. The nearest real Rinnai tech isn't very helpful either, and he's a five-hour drive away.
Last edited:
Dancing Bear
Well-known member
On Saturday, I brought my 2012 Focus into the garage to remove the ABS pump/module assembly in order to install my new (used) module purchased from eBay. Shout out to Ford for shoving this bulky mess way up under the wiper cowl, making it a royal PITA to access with barely any room to get a wrench at the brake lines. Took me the better part of 6 hours to remove the old assembly, install the new one and program it, only to discover a leak at one of the lines on the ABS pump when I went to bleed the brakes. Either my lack of experience with brake lines or the crappy placement of this unit contributed to a cross-threaded line, but luckily the flare was okay and not damaged.
Sunday, my friend who was a mechanic for several years came over to provide assistance. The second set of hands and his knowledge helped greatly, as we swapped the damaged pump for my original one and reinstalled everything in about two hours start to finish. The repair will have to be finalized once I have time to roll it outside and perform the ABS bleeding procedure due to lack of room to lift the car safely in the garage.
Sunday, my friend who was a mechanic for several years came over to provide assistance. The second set of hands and his knowledge helped greatly, as we swapped the damaged pump for my original one and reinstalled everything in about two hours start to finish. The repair will have to be finalized once I have time to roll it outside and perform the ABS bleeding procedure due to lack of room to lift the car safely in the garage.
02Xterra
Well-known member
The weather this week was supposed to be nice, so I swapped to my tube doors yesterday. Turns out it's supposed to rain most of the days now 

Wrench97
Well-known member
I know a guy that bought a used tire from a used tire shop(yea there are lots of them in the city) because he had a hole in the sidewall only to find out a year later the one he bought had a repaired sidewall.......Possibly but I doubt I could find a matching tire.
LeonardY
Well-known member
Opened the garage door to cool the garage down. Lit a couple of mosquito punks to keep them at bay.
Took the ladder down. Put away some tools.
Put the ladder back up.
Took the ladder down. Put away some tools.
Put the ladder back up.
Beerhippie
Well-known member
Mosquito Punks is a great band name!Opened the garage door to cool the garage down. Lit a couple of mosquito punks to keep them at bay.
Took the ladder down. Put away some tools.
Put the ladder back up.
Yep. I had hopes that the garden would dry out and give the drowning roots a break.The weather this week was supposed to be nice, so I swapped to my tube doors yesterday. Turns out it's supposed to rain most of the days now
coldh2o
Well-known member
Mosquito Punks is a great band name!
They're all the buzz in the music biz!
Beerhippie
Well-known member
Well... of course, after working through the weekend to cobble together enough Rinnais to get us through a big brew day, the parts came in today.

Nice shiny new burner and tube to replace the one I epoxied/Bubba'd.
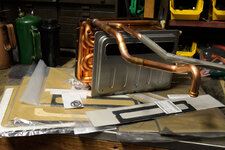
Shiny new primary HX to replace the one I epoxied/Bubba'd, plus all the associated gaskets and not quite enough o-rings to do the job--but enough screws to do it twice.

Another burner assembly, another tube. Another HX will be here tomorrow.
I guess I know what I'll be doing the next couple of days....
Good news is, the Bubba jobs got us through a 12-hour brew day! I may be a hack, but I'm a damned good hack!
Nice shiny new burner and tube to replace the one I epoxied/Bubba'd.
Shiny new primary HX to replace the one I epoxied/Bubba'd, plus all the associated gaskets and not quite enough o-rings to do the job--but enough screws to do it twice.
Another burner assembly, another tube. Another HX will be here tomorrow.
I guess I know what I'll be doing the next couple of days....
Good news is, the Bubba jobs got us through a 12-hour brew day! I may be a hack, but I'm a damned good hack!
Slednut
Well-known member
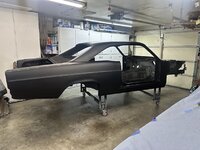
Sprayed some epoxy and urethane primer.
Old Man Roger
Well-known member
I heard they ****.They're all the buzz in the music biz!
Gangly
Well-known member
"Broke-In" a shop chair today. Apparently $5 chairs dont handle 6'-7" 300lbs guys very well. My wife caught a picture before I could protest, haha.
After driving this for awhile I'm really impressed with this setup. Took 99% of the play out of the steering and isn't hard at all to turn anymore, even though I still have the PS gearbox and haven't changed any other parts yet. The PS box is nice because it has 1 less turn lock to lock than the manual box, so a sportier feel.I pulled the rotted power steering **** off my 1967 cougar and replaced it with a cool doohookie that lets you leave everything else alone and convert to manual. Don't even need an alignment after as it doesn't mess with tie rods or anything. I also put in a roller bearing idler arm at the same time to make it easier to steer. I have a bunch of other bearing suspension parts (spring perch/control arms, etc.) going in that will also help and make it handle/steer better. I had about 4" of play in the steering before but don't have any now.
Everything in the pic was replaced by the two lower right parts. Mostly by the one little conversion part. It works on most old fords and is super easy to install, pretty neat. I drove the car last fall with the power steering disconnected and it wasn't horrible, only tough when sitting still. Should be much easier now without all the junk and not fighting the rock hard idler arm rubber, I stood on the old one and couldn't get it to rotate.

They make the little adapter piece for a bunch of different 60s american cars, not just Mustangs and Cougars. I highly recommend it and a roller idler arm if you want to pull off your old leaking PS setup. Much cheaper than buying all the parts to do a full manual conversion, and takes only about 20 minutes to install with no alignment needed on Ford's, should be the same on other brands. Here is where I got it and the roller idler arm but they sell the adapters all over. https://opentrackerracing.com/shop/power-steering-manual-steering-adapter-1967-1970-mustang
DGersic
Well-known member
After driving this for awhile I'm really impressed with this setup. Took 99% of the play out of the steering and isn't hard at all to turn anymore, even though I still have the PS gearbox and haven't changed any other parts yet. The PS box is nice because it has 1 less turn lock to lock than the manual box, so a sportier feel.
They make the little adapter piece for a bunch of different 60s american cars, not just Mustangs and Cougars. I highly recommend it and a roller idler arm if you want to pull off your old leaking PS setup. Much cheaper than buying all the parts to do a full manual conversion, and takes only about 20 minutes to install with no alignment needed on Ford's, should be the same on other brands. Here is where I got it and the roller idler arm but they sell the adapters all over. https://opentrackerracing.com/shop/power-steering-manual-steering-adapter-1967-1970-mustang
So what’s in the adapter thingy that’s providing this change? Too small to be a gear reduction, and that would increase your number of turns lock-to-lock.
kaymccampbell
Well-known member
Nothing. It replaces the spring loaded sensing end of the Garrison valve with a fixed pin. And the power steering box has less turns lock to lock than a manual.So what’s in the adapter thingy that’s providing this change? Too small to be a gear reduction, and that would increase your number of turns lock-to-lock.
welder4956
Well-known member
Nice. 1966?Sprayed some epoxy and urethane primer.
Yes - its a greasable ball in a socket with an heavy spring assembly holding it in place while still letting rotate. Replaces the sloppy and generally leaking big PS valve assembly. This guy goes through his steering and has a bunch of pics of the conversion, he did pretty much exactly what I did. https://67fastbackproject.blogspot.com/2016/05/steering-system-installation.htmlNothing. It replaces the spring loaded sensing end of the Garrison valve with a fixed pin. And the power steering box has less turns lock to lock than a manual.
Beerhippie
Well-known member
Rinnai rebuild, part whatever:
One thing Rinnai has gotten much better with this new kit ids the packaging of the numerous self-tapping sheet metal screws that hold everything together.

On the right are some left-overs from the last rebuild. Each plastic bag contains ONE screw! The ziplock on the left is the new packaging.
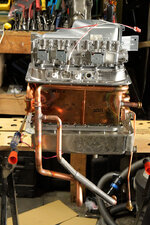
The only part that isn't brand-new is the secondary HX at the bottom of the stack. Since everything is held together with self-tapping screws, I had to peen all the screw locations in the thin SS sheet metal of the old secondary--which worked very well.

Now to transfer all that spaghetti over to the new burner.
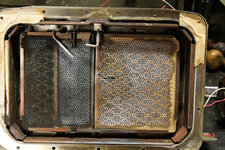
I replaced the burner because both the ceramic burner plates of the old one are cracked--and they only sell the entire burner, not the plates.
I'll get it swapped in after lunch.
One thing Rinnai has gotten much better with this new kit ids the packaging of the numerous self-tapping sheet metal screws that hold everything together.
On the right are some left-overs from the last rebuild. Each plastic bag contains ONE screw! The ziplock on the left is the new packaging.
The only part that isn't brand-new is the secondary HX at the bottom of the stack. Since everything is held together with self-tapping screws, I had to peen all the screw locations in the thin SS sheet metal of the old secondary--which worked very well.
Now to transfer all that spaghetti over to the new burner.
I replaced the burner because both the ceramic burner plates of the old one are cracked--and they only sell the entire burner, not the plates.
I'll get it swapped in after lunch.
Last edited:
JEFFREYWisconsin
Well-known member
- Joined
- Oct 9, 2021
- Messages
- 380
I think I saw them open for Blue Oyster CultThey're all the buzz in the music biz!