To avoid these ads, REGISTER NOW!

Best way to fix a small void in a machined casting bore?

loganb

ALLIANCE MEMBER
Joined
Dec 29, 2011
Messages
5,594
Location
Omaha, NE
Working to fix a "poorly trained" wood planer which has been ******* gear oil down the side of itself for "awhile"....

I narrowed down the leak to it weaping around the pull handle/yoke which actuates the 2 speed low/fast drive gearbox:

Item in question circled....

gearbox3.jpg


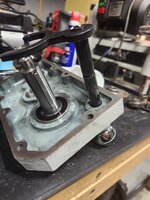
Upon getting it apart, I was assuming I would find an oring on the shaft(correct) and a big tear in said oring...not as correct as I'd have liked....I like "obvious" issues....not as obvious as I'd have liked.

gearbox1.jpg

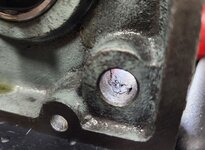
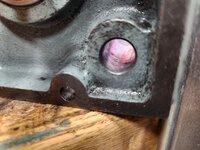
What I did find was in the machined bore there is a void in the casting which I assume isn't doing anything good for the oring/sealing surface. As you can also see from this image with machined bore being backlit...the hole quality ***** too:
gearbox2.jpg

So while I've got this apart, I wouldn't mind fixing this defect.....my initial thought is JBWeld or something similar (after liberally blasting with brakecleen) then file the majority of it back away, followed by a chucking reamer in the drill press. Hole ID is about .472(guessing it's supposed to be 12mm which would be .47244 or something), shaft OD is about .470.

This is a low pressure oil system, just a normal gearlube oil bath, no pumps, no circulation so we're not dealing with pressure here, just trying to stop the seeping and resulting mess all over the side/floor.

Thoughts? Viable? Anything better here than JBWeld? Too deep for me to be able to weld it...also it's pretty small...maybe 1/8" long along the "long axis" and 1/16" deep...so I'm mixing up a pea sized dot for this.
 
Last edited:
To avoid these ads, REGISTER NOW!

nadogail

Well-known member
Joined
Jan 23, 2009
Messages
32,023
Location
Coronado, CA
I have had excellent results with LOCTITE 660 Quick Metal Retaining Compound.

Could you drop a lead pellet into the hole and peen it enough to expand and choke the oil flow?
 
OP
L

loganb

ALLIANCE MEMBER
Joined
Dec 29, 2011
Messages
5,594
Location
Omaha, NE
I have had excellent results with LOCTITE 660 Quick Metal Retaining Compound.

Thanks! Based on their instructions it looks like it might be a bit large of a void for that, but they suggest for larger voids look for their metal filled compounds which leads me to this:

1754966259215.png

From the mfg site "A 2-part, steel-filled epoxy repair putty that is easy-to-use and stops leaks in pipes and tanks, fills oversized bolt holes, smooths welds, and repairs non-structural defects in castings or holes in tanks" which to me sounds like a JBWeld type material with steel filings added in. If I don't get overly aggressive with the amount of material used I can probably 3D print something to hold some sandpaper and use as a basic flap sander to clean up any excess and help polish that bore a bit and avoid spending 30 bucks on a dedicated reamer

Looks like JBWeld has a similar product:


Looks to be probably 1/3rd the price and can be easily picked up locally....though with McMaster I could have it here on Wednesday if I ordered it now so wait time to get isn't a big deal.
 

gorilla

Well-known member
Joined
Dec 13, 2007
Messages
1,654
IMHO the correct answer is to replace the casting anything else is a repair of a defective part. I was suggesting something that might be better than goo.
 

Beerhippie

Well-known member
Joined
Oct 13, 2023
Messages
9,935
Location
Far NE Oregon
IMHO the correct answer is to replace the casting anything else is a repair of a defective part. I was suggesting something that might be better than goo.
Calling a good quality epoxy "goo" is just demonstrating ignorance. JB Weld, used properly, is a structural material.

It's POS casting, sure, but that indicates the entire tool is of the same quality. Silk purses from sow's ears.

JB Weld is still the right answer for this problem, and it'll probably do what the OP wants for a long, long time.
 

Firebrick43

Well-known member
Joined
May 12, 2015
Messages
14,145
Location
West central Indiana
Or just have a new piece machined form a billet of Inconel....

FFS, it's just a seep of non-pressurized oil due to a bad casting. JB Weld (or similar epoxy) is the correct answer.
A sliding shaft with an oring on goes up and down the bore, and the rest of the bore is **** finished, not just the porosity area, the whole thing. The finish is bad enough it will just keep tearing up orings.

The correct solution is to bore it out and press fit or green locktite a brass sleeve in it. I wouldn't even use oillite as it can wick oil out itself. You could either turn one out of 360 brass or use a premade 932 bronze bearing.


duc916

Well-known member
Joined
Apr 18, 2013
Messages
284
Can you post a picture of the shaft with the o-ring, to get a better idea of how the whole mechanism works.
 

dscheidt

Well-known member
Joined
Apr 26, 2017
Messages
2,905
A sliding shaft with an oring on goes up and down the bore, and the rest of the bore is **** finished, not just the porosity area, the whole thing. The finish is bad enough it will just keep tearing up orings.

The correct solution is to bore it out and press fit or green locktite a brass sleeve in it. I wouldn't even use oillite as it can wick oil out itself. You could either turn one out of 360 brass or use a premade 932 bronze bearing.

That might be the correct solution, but consider the rest of the machine is made to the same standard. Also, this is the speed selector for a planner. It doesn’t rotate, so it is a static seal against splash lubrication. As long as the bore is free of sharp bits, an oring will put up with a fair amount of surface roughness.

It might see a cycle or two every time it is used. Depending on how often that is, it might be a long time before the oring wears out. My planer spends its entire life in low speed, because I don’t do a lot of hogging off material, and a little longer on each pass doesn’t matter as much as the better finish from lower speed. For me, the oring would probably last forever.
 
To avoid these ads, REGISTER NOW!

alfadan

Well-known member
Joined
Mar 9, 2007
Messages
2,115
Location
Augusta, ks
That porosity has been soaked in oil for years. I don't think epoxy is going to stick. Might be worth a shot though.
 
OP
L

loganb

ALLIANCE MEMBER
Joined
Dec 29, 2011
Messages
5,594
Location
Omaha, NE
Can you post a picture of the shaft with the o-ring, to get a better idea of how the whole mechanism works.

20250814_203745.jpg

This better shows the sliding shaft in question. The pair of gears go on the keyed shaft, you can see the groove in the shaft.

Some JBWeld steel stick is in the garage... hopefully get a chance to do it and reassemble it this weekend.
 

duc916

Well-known member
Joined
Apr 18, 2013
Messages
284
All depends on how mush you want to mess with it. You can try the JB weld, as it won't ruin anything if it fails. If it doesn't work go back and machine the housing and insert a bushing. If you only want to mess with it once install the bushing.
 

Davefr

Well-known member
Joined
Jan 7, 2010
Messages
11,839
Location
OR
JB Weld in a heartbeat. Get it warm after you mix it so it flows into that void which you need to prepare by cleaning really well. I'd use the regular JB Weld vs the JB Quick.
 

cmandp

Well-known member
Joined
Dec 22, 2011
Messages
1,284
Location
New Jersey
If this was me. I'd fill the void with epoxy putty and then shape close to the bore size. Then try to improve the finish of the bore with some fine sand paper on a piece of steel rod. I bet that would hold up fairly well.

To do in properly get it up on the mill or drill press ream to accept a press in bearing or repair sleeve.
 

txvwnut

Well-known member
Joined
Jan 1, 2015
Messages
7,646
Location
Bedford, Texas
Since I’m late to the party I’ll suggest counter bore and install a seal, providing you can find a seal that fits both dimensions.
 
OP
L

loganb

ALLIANCE MEMBER
Joined
Dec 29, 2011
Messages
5,594
Location
Omaha, NE
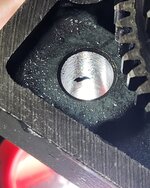
Tough to see but bore is improved...this was after doing some initial polishing. The epoxy fill is on the bottom in the picture about a third of the way down the bore

20250817_094702.jpg

Didn't get a good picture but future steps with additional effort, cutting compound and more spinning of the die grinder improved the surface.

20250817_101638.jpg

Assembled for a couple day leak test...if it doesn't make a mess down the side while sitting I will call it a success and move to put the sprokets and chains back on

Thanks for the assistance and advice!
 
To avoid these ads, REGISTER NOW!
Top Bottom