To avoid these ads, REGISTER NOW!

ice and water shield

billconner

Well-known member
Joined
Jul 20, 2021
Messages
6,971
Location
Thousand Islands NYS
As I progress with my porch addition, I've decided I should replace existing porch roof - just a little over 3 squares.

I'd like to cover entire roof and leave it exposed for a few weeks while I build addition over it. Like adding a false dormer.

Am I safe leaving icexan water shield exposed for a few weeks? O think so, reading 90, or 120, or 180 days in various sources.

Some comments about not letting sheathing dry but this is over an unconditioned open porch. It's not vented but not really "tight". Haven't picked a ceiling but thinking t&g .

Can I put drip edge on after ice and water? I'd like to tear off and add ice and water before installing a Axek or similar fascia.

I assisted my son instally roof on my garage but he had it mastered. I haven't done one since my 40s, 30 years ago, so some trepidation.

Thanks again to all my consultants!
 
To avoid these ads, REGISTER NOW!

mike93lx

ALLIANCE MEMBER
Joined
Dec 9, 2013
Messages
37,858
Location
Richmond, VA
I'd have no problem doing it. For the drip, I'd install it spaced off just a hair, zip tape it on top of the ice and water, then slip the azek under the drip later.
 

PCustoms

Well-known member
Joined
Jul 23, 2011
Messages
23,407
Location
VT
I'd have no problem doing it. For the drip, I'd install it spaced off just a hair, zip tape it on top of the ice and water, then slip the azek under the drip later.
Isn't that backwards?

I screwed scrap azek down in a few spots and put my drip up. A week later I pulled the scraps down and slid my full length azek in.
 

mike93lx

ALLIANCE MEMBER
Joined
Dec 9, 2013
Messages
37,858
Location
Richmond, VA
Isn't that backwards?

I screwed scrap azek down in a few spots and put my drip up. A week later I pulled the scraps down and slid my full length azek in.
I think I'd want the ice and water to wrap all the way to the sub fascia, then have the drip on top with tape covering the nails.

I also used scrap pieces to hold off drip the removed to slide it under. It was a bit of a pain and I wished I had a second set of hands to help, especially with 12ft trim, but I got it done.
 

PCustoms

Well-known member
Joined
Jul 23, 2011
Messages
23,407
Location
VT
I think I'd want the ice and water to wrap all the way to the sub fascia, then have the drip on top with tape covering the nails.

I looked it up, some various opinions (and code) here. Hybrid method looks good to me!


I also used scrap pieces to hold off drip the removed to slide it under. It was a bit of a pain and I wished I had a second set of hands to help, especially with 12ft trim, but I got it done.

My shed was just pine that I wrapped, trying to slip a flimsy piece of aluminum up was a PITA.

The eyebrow I just did, other then fitting the 45's, was cake.
 

PCustoms

Well-known member
Joined
Jul 23, 2011
Messages
23,407
Location
VT
I like hybrid as well... Feels like it should be better, although i think option c, what I suggested, would make the drip edge easier to replace if needed.

Not sure why the drip edge would need to be replaced, but on the off chance it does, a sharp razor and a new roll of tape would be an easy option
 

cgrutt

Well-known member
Joined
Mar 4, 2016
Messages
8,356
I wouldn't worry about leaving I&W exposed for a few days it should be fine. As far as drip edge I've always run drip edge 1st then seal it and nails with I&W at the eves. I&W (or underlayment) 1st than drip edge at the rakes.
 
Last edited:

mike93lx

ALLIANCE MEMBER
Joined
Dec 9, 2013
Messages
37,858
Location
Richmond, VA
Not sure why the drip edge would need to be replaced, but on the off chance it does, a sharp razor and a new roll of tape would be an easy option
I wouldn't say it's likely, and don't disagree that it's not a big deal either way.

Just thinking of a way to defend my position :)
 
OP
B

billconner

Well-known member
Joined
Jul 20, 2021
Messages
6,971
Location
Thousand Islands NYS
So I thought I could put ice and water an wrap over sub-fascia. Then come back with Azek, drip edge, and a strip of tape over drip and nails. Disadvantage is tape edge over ice and water, but doesn't seem bad.

Existing used coil stock over sub fascia and vent to hold vinyl soffit. I want a different soffit look so adding Axek (1x8 over 2x6 sub-fasca) Not quite sure how it stacks but probably 1by furring on bottom of 2x6 and 5/8 t&g. Talk fascia - may rip it and leave out furring.
 

PCustoms

Well-known member
Joined
Jul 23, 2011
Messages
23,407
Location
VT
So I thought I could put ice and water an wrap over sub-fascia. Then come back with Azek, drip edge, and a strip of tape over drip and nails. Disadvantage is tape edge over ice and water, but doesn't seem bad.

Existing used coil stock over sub fascia and vent to hold vinyl soffit. I want a different soffit look so adding Axek (1x8 over 2x6 sub-fasca) Not quite sure how it stacks but probably 1by furring on bottom of 2x6 and 5/8 t&g. Talk fascia - may rip it and leave out furring.

Have you prized azek?
 
OP
B

billconner

Well-known member
Joined
Jul 20, 2021
Messages
6,971
Location
Thousand Islands NYS
I wouldn't worry about leaving I&W exposed for a few days it should be fine. As far as drip edge I've always run drip edge 1st then seal it and nails with I&W at the eves. I&W (or underlayment) 1st than drip edge at the rakes.
Way I have usually done it also but the circumstances are different.
 

cgrutt

Well-known member
Joined
Mar 4, 2016
Messages
8,356
Can you wrap the I&w over sheathing and leave the drip edge off until you're ready to install fascia? Install fascia, drip edge and add another piece of I&w later about 12-18". Not ideal but would probably work and if anything did get underneath it would be protected by 1st layer.
 

PCustoms

Well-known member
Joined
Jul 23, 2011
Messages
23,407
Location
VT
Yeah. Like $6/bf.
Sounds about right.

I didn't even quote materials last week, I just knew I wanted to cut, attach and be done without having to futz with primer and paint. Ever.

Wallet is light but it's over.
 
OP
B

billconner

Well-known member
Joined
Jul 20, 2021
Messages
6,971
Location
Thousand Islands NYS
Can you wrap the I&w over sheathing and leave the drip edge off until you're ready to install fascia? Install fascia, drip edge and add another piece of I&w later about 12-18". Not ideal but would probably work and if anything did get underneath it would be protected by 1st layer.
Sort of what I said but using tape rather than strips of ice and water. Like the Zip tape
 

cgrutt

Well-known member
Joined
Mar 4, 2016
Messages
8,356
Sort of what I said but using tape rather than strips of ice and water. Like the Zip tape
Sorry misunderstood I thought when you said you wanted to tear it off you were planning to install it. Seems like you know what you're going to do Im out good luck with project.
 

PCustoms

Well-known member
Joined
Jul 23, 2011
Messages
23,407
Location
VT
@PCustoms What would you think if I put 1x3 pt at "top" of fascia now - do drip edge normally - and added 1x4 axek later. Gutter would cover seam. Maybe savings not worth it.

My fascia was done similar (1x2? Idk) and I made it a pain to hang the gutter..probably explains why they were under the deck and not hung when I bought the house.

So make sure you think that through
 
To avoid these ads, REGISTER NOW!
OP
B

billconner

Well-known member
Joined
Jul 20, 2021
Messages
6,971
Location
Thousand Islands NYS
Sounds about right.

I didn't even quote materials last week, I just knew I wanted to cut, attach and be done without having to futz with primer and paint. Ever.

Wallet is light but it's over.
What fasteners? I was thinking white trim screws.

80' so $300 or do versus less than half but then painting. Seems worth it.

But there is a parallel header and that would be triple - 2 sides and bottom. Trying to imagine it in a clear finger jointed pine painted.
 

PCustoms

Well-known member
Joined
Jul 23, 2011
Messages
23,407
Location
VT
What fasteners? I was thinking white trim screws.

Last year I used standard trim screws (IIRC they didn't have white that day) and a dab of caulk. This year I used the white screws, they get scuffed anyway so again with the caulk...

The screw/plug system are $$$ and I'm not sold on hanging in a ladder to put them in. 10' back I can't see the caulked holes and I know they are there.

Chuckled to myself this morning, happened to notice the neighbors house, that they spent thousands on, and the seems in the trim were gaping so bad I could see it from the road. SMH.
 
OP
B

billconner

Well-known member
Joined
Jul 20, 2021
Messages
6,971
Location
Thousand Islands NYS
The GRKs are what I had in mind.

Leaning towards the composite over clear finger jointed pine. In the area of $500-600 difference but then materials and time to paint pine.

Need to finalize ceiling material. Keep thinking I'll come back to pine edge and center bead with a spar varnish finish, but a good looking 4x8 would be OK, even painted if grain *****. Just haven't seen it.
 

PCustoms

Well-known member
Joined
Jul 23, 2011
Messages
23,407
Location
VT
The GRKs are what I had in mind.

This is what I used, but again I felt the paint was soft and showed a mark from the torx driver

Leaning towards the composite over clear finger jointed pine. In the area of $500-600 difference but then materials and time to paint pine.

Where it's exposed and we'll get wet I think the PVC material makes a lot more sense than pine.

Need to finalize ceiling material. Keep thinking I'll come back to pine edge and center bead with a spar varnish finish, but a good looking 4x8 would be OK, even painted if grain *****. Just haven't seen it.

Last summer I did my porch, close to 500 square feet, it was a substantial difference between plywood/pine/pvc. I ended up buying half inch sanded pine plywood, then I used a 60° chamfer bit in the router to put a v-groove every 6". Running these perpendicular to the length of the porch and having a v-match at the long edge of the panel it is virtually indistinguishable from pine edge an center.
 
OP
B

billconner

Well-known member
Joined
Jul 20, 2021
Messages
6,971
Location
Thousand Islands NYS
SmartSide trim? I see they had a smooth now. How durable is it?

This is what I used, but again I felt the paint was soft and showed a mark from the torx driver

Which is why I considered both. See sketch. Azek or other composite on fascia for sure, but the boxing of the header, maybe the pine. It's pretty protected.
 

Attachments

  • porch trim.pdf
    15.3 KB · Views: 8

mike93lx

ALLIANCE MEMBER
Joined
Dec 9, 2013
Messages
37,858
Location
Richmond, VA
I've had great luck with smartside.

My sheds both have lap siding for fascia trim. I prepainted it all then just touch up the nails
 

mike93lx

ALLIANCE MEMBER
Joined
Dec 9, 2013
Messages
37,858
Location
Richmond, VA
Good paint adhesion and water resistance? Still love not painting.

Thought about their siding for ceiling - 4" groove design.
Their primer seems very high quality. Yes on both.

I had unpainted azek on my last house and the edges got kind of gross. It certainly doesn't need paint but i think painted trim looks better
 

PCustoms

Well-known member
Joined
Jul 23, 2011
Messages
23,407
Location
VT
SmartSide trim? I see they had a smooth now. How durable is it?

I've never used it, and I would need a lot of convincing to try it.

Which is why I considered both. See sketch. Azek or other composite on fascia for sure, but the boxing of the header, maybe the pine. It's pretty protected.
I like your second sketch better for boxing the header. Having the soffit "float" looks like a pita.
 
OP
B

billconner

Well-known member
Joined
Jul 20, 2021
Messages
6,971
Location
Thousand Islands NYS
I've never used it, and I would need a lot of convincing to try it.


I like your second sketch better for boxing the header. Having the soffit "float" looks like a pita.
I thought the only difference was furring the soffit and ceiling 3/4" so alI could use 1x6 instead of 1x8 for sides of header. Didn't mean for anything to float, but did want edges of ceiling and soffit to be over trim. Playing with idea of a rabbet in fascia for soffit.
 

PCustoms

Well-known member
Joined
Jul 23, 2011
Messages
23,407
Location
VT
Looks nice...but that gap in vents!
You talking the spacing/pattern?

I laid it out a couple of different ways, if I remember correctly I'm way over vented for the roof, but the pattern of three and then skip seem to work out the best. For what they are those stupid things are expensive...
 

mike93lx

ALLIANCE MEMBER
Joined
Dec 9, 2013
Messages
37,858
Location
Richmond, VA
You talking the spacing/pattern?

I laid it out a couple of different ways, if I remember correctly I'm way over vented for the roof, but the pattern of three and then skip seem to work out the best. For what they are those stupid things are expensive...
Yeah

I hear you, just busting balls
 

mike93lx

ALLIANCE MEMBER
Joined
Dec 9, 2013
Messages
37,858
Location
Richmond, VA
You totally **** for that by the way, now I can't unsee it.

I'm sitting out here and counting, 13 more vents to fix the pattern. Every other groove would have a vent...
Had you done two in each bay, it could be even without using more vents.

Just saying
 
OP
B

billconner

Well-known member
Joined
Jul 20, 2021
Messages
6,971
Location
Thousand Islands NYS
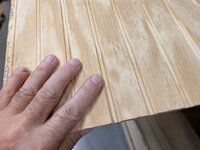
Found this. Basically 1/4 ply with nicely machined bead. Not designed well for butting edges. Might want to batten seams.

The ply is around $1/sq ft. I found vinyl and other products that would be acceptable but all I the $8/sq ft range.

Still like the idea of pine edge and center bead t&g, in the $2.50-3.00/sq ft range, plus spar or poly. It would make it possible to run parallel to house rather than perpendicular, I think better looking.
 

Attachments

  • PXL_20250820_200727459_copy_1020x768.jpg
    PXL_20250820_200727459_copy_1020x768.jpg
    154 KB · Views: 4
To avoid these ads, REGISTER NOW!
Top Bottom