
You are using an out of date browser. It may not display this or other websites correctly.
You should upgrade or use an alternative browser.
You should upgrade or use an alternative browser.
ZMotorsports Shop Projects 2.0
- Thread starter zmotorsports
- Start date
ntsqd
Well-known member
YIKES!!! ^^^^^
Going back to the hoisting of the cut tire or any tire for that matter, when we first got our CTD/pop-top camper I was concerned about what would happen if I were incapacitated and my wife had to change the tire. The wheel & tire likely outweigh her! With a conventional tire carrier there would be no safe way for her to get the replacement down, much less get the old one back up. I came up with this:
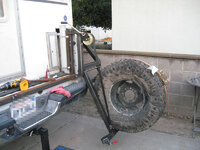
I'm applying the lessons learned to the carrier going on my current project.
Going back to the hoisting of the cut tire or any tire for that matter, when we first got our CTD/pop-top camper I was concerned about what would happen if I were incapacitated and my wife had to change the tire. The wheel & tire likely outweigh her! With a conventional tire carrier there would be no safe way for her to get the replacement down, much less get the old one back up. I came up with this:
I'm applying the lessons learned to the carrier going on my current project.
OP
zmotorsports
ALLIANCE MEMBER
YIKES!!! ^^^^^
Going back to the hoisting of the cut tire or any tire for that matter, when we first got our CTD/pop-top camper I was concerned about what would happen if I were incapacitated and my wife had to change the tire. The wheel & tire likely outweigh her! With a conventional tire carrier there would be no safe way for her to get the replacement down, much less get the old one back up. I came up with this:
I'm applying the lessons learned to the carrier going on my current project.
There are a couple of tire carrier manufactures offering something similar and I contemplated incorporating something similar into my design back when I built my bumpers. However, in wanting to not add more weight to the rear bumper of the Jeep, I opted to keep it simple. If needs be, I could back up nearer to a rock or mound to load, but so far I just heave ho it up there, even in the shop. I can usually get it up onto my thighs and then it's a simple matter of leveraging it onto the studs.
Scuderia-F1
Well-known member
We use that very same AC "picker" here at Officina Ferrari Classiche. It is a GREAT bit of equipment.So last year when we replaced the engine in my son's WJ I had started contemplating engine hoists, again. I have a pretty good one, however, one of the things I love about my engine hoist I have is the squared off/parallel outriggers vs. the angled variety that seems to be the majority of the units out there. I swore I would never have angled outriggers ever again and after having my engine hoist for a couple of decades now, I have found little fault with it nor any times when the paralleled legs are a detriment. That being said, last year someone posted a thread here on Garage Journal inquiring about engine hoists and one caught my eye, so I started doing more research and fell in love with the specs. I have also discovered that over the past couple of years I find myself using my engine hoist much more frequently than in years past, mainly because I am working alone and need the hoist for either moving things around the shop or loading unloading items from client's vehicles. Unfortunately, the brand and design I have been drawn to are quite expensive and therefore have very few reviews, along with the fact that this brand is made in Denmark and not many vendors here in the states.
I have been waffling back and forth over this engine hoist for better than a year now, and then a couple of months ago when my son sold his milling machine we used our engine hoist to disassemble it and place it on the buyer's trailer. My engine hoist did the job, but it struggled a bit due to the required height and the fact that at full extension it reduced the capacity to 1k pounds (1/2 ton). Those two factors again led me to doing more research on the AC Hydraulic engine hoist. I broke down and made a few phone calls and inquiries here a few months back and finally pulled the trigger a couple of months ago. Seeing as how no one in the states had one in stock, at least for the price I was willing to pay, I ended up ordering one and then waiting for it to ship from Denmark and then arrive through customs.
Well, it arrived last week while the wife and I were on vacation, so I picked it up last night and got it setup in the shop. I am very impressed with the design characteristics and overall build quality upon first impressions. I think it will be a nice addition to the shop and be much quicker to be ready to lift and therefore I may find myself using it more than my previous engine hoist. The previous lift is very stable and easy to maneuver around the shop, but it does take some time to extend each outrigger the correct length and pin according to the job at hand. I think this one being easier to lower the outriggers and being ready to use will aid in the usability, plus it folds up to a much smaller footprint when not in use. Knowing I now need tires on the Jeep, maybe I should have waited to purchase.
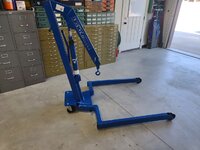
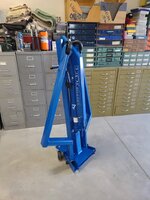
Here is my new AC Hydraulics WJN10-EUR engine hoist/crane. It has a 2400 lb. capacity and even has 1540 pound capacity with the arm fully extended.
The jack is a high quality jack with a dedicated handle and deadman style release knob, not a multi-sectioned sloppy handle found on similar models and use a bottle jack assembled handle.
The outriggers fold up easily and are pinned into the upright position to avoid accidentally falling and damaging something.
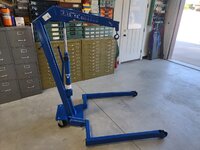
Relatively small footprint when folded. I only wish that it would fit through the doorway between the RV/storage bay and the body of the shop, but it's not a big deal to open the overhead doors to move from one area to the other, just would have been nice to fit through the doorway. If I angle it and maneuver or walk it through it might fit, but not worth damaging a door or doorway.
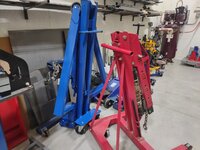
In its new home in the storage bay. Takes up much less space than the previous hoist.
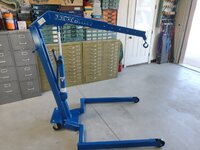
Old engine hoist for comparison. The height alone should be worth it, especially on lifted vehicles.
Time will tell if this was a good investment or not, but I do like the build quality. Now to get the old one sold.
Thanks for looking.


bugnut
ALLIANCE MEMBER
Mike, once again a great trip report. Love the pictures. Parks are being abused, somewhat. I can see the day of quotas everywhere and I have advocated that the Smokies should have electric buses/trams and a multi story parking area so that cars are no longer occupying every inch and taking up space that is currently green. I'll step off my soapbox here.
Restaurants that you choose always look like great choices! And the prime rib
Restaurants that you choose always look like great choices! And the prime rib
ajohno
Well-known member
Looks like a great trip Mike. Thanks for sharing the photos. As I’m on the other side of the world I will never see places like this as I won’t go on a plane.
signcrafter
Well-known member
- Joined
- May 9, 2012
- Messages
- 12,631
That's a beautiful lift Mike. I'm sure after using it a few times the questioning weather you should have waited or not will go away real quick. Congrats.So last year when we replaced the engine in my son's WJ I had started contemplating engine hoists, again. I have a pretty good one, however, one of the things I love about my engine hoist I have is the squared off/parallel outriggers vs. the angled variety that seems to be the majority of the units out there. I swore I would never have angled outriggers ever again and after having my engine hoist for a couple of decades now, I have found little fault with it nor any times when the paralleled legs are a detriment. That being said, last year someone posted a thread here on Garage Journal inquiring about engine hoists and one caught my eye, so I started doing more research and fell in love with the specs. I have also discovered that over the past couple of years I find myself using my engine hoist much more frequently than in years past, mainly because I am working alone and need the hoist for either moving things around the shop or loading unloading items from client's vehicles. Unfortunately, the brand and design I have been drawn to are quite expensive and therefore have very few reviews, along with the fact that this brand is made in Denmark and not many vendors here in the states.
I have been waffling back and forth over this engine hoist for better than a year now, and then a couple of months ago when my son sold his milling machine we used our engine hoist to disassemble it and place it on the buyer's trailer. My engine hoist did the job, but it struggled a bit due to the required height and the fact that at full extension it reduced the capacity to 1k pounds (1/2 ton). Those two factors again led me to doing more research on the AC Hydraulic engine hoist. I broke down and made a few phone calls and inquiries here a few months back and finally pulled the trigger a couple of months ago. Seeing as how no one in the states had one in stock, at least for the price I was willing to pay, I ended up ordering one and then waiting for it to ship from Denmark and then arrive through customs.
Well, it arrived last week while the wife and I were on vacation, so I picked it up last night and got it setup in the shop. I am very impressed with the design characteristics and overall build quality upon first impressions. I think it will be a nice addition to the shop and be much quicker to be ready to lift and therefore I may find myself using it more than my previous engine hoist. The previous lift is very stable and easy to maneuver around the shop, but it does take some time to extend each outrigger the correct length and pin according to the job at hand. I think this one being easier to lower the outriggers and being ready to use will aid in the usability, plus it folds up to a much smaller footprint when not in use. Knowing I now need tires on the Jeep, maybe I should have waited to purchase.
Here is my new AC Hydraulics WJN10-EUR engine hoist/crane. It has a 2400 lb. capacity and even has 1540 pound capacity with the arm fully extended.
The jack is a high quality jack with a dedicated handle and deadman style release knob, not a multi-sectioned sloppy handle found on similar models and use a bottle jack assembled handle.
The outriggers fold up easily and are pinned into the upright position to avoid accidentally falling and damaging something.
Relatively small footprint when folded. I only wish that it would fit through the doorway between the RV/storage bay and the body of the shop, but it's not a big deal to open the overhead doors to move from one area to the other, just would have been nice to fit through the doorway. If I angle it and maneuver or walk it through it might fit, but not worth damaging a door or doorway.
In its new home in the storage bay. Takes up much less space than the previous hoist.
Old engine hoist for comparison. The height alone should be worth it, especially on lifted vehicles.
Time will tell if this was a good investment or not, but I do like the build quality. Now to get the old one sold.
Thanks for looking.
OP
zmotorsports
ALLIANCE MEMBER
One more question, if you don't mind Mike...
Your crossfires on the duals, do you happen to have a picture of how you mounted them? After this trip, I should be prepped to get my Cat Eye's installed, but the provided brackets are at least 1/8" thick and the ears on my center caps seem a little flimsy. Curious how yours are mounted.
Keith, I snapped some pictures last night of how I mounted the Crossfires on my coach so hopefully these will do a better job than my explanation.
Here you can see how I mounted them as close to center as possible directly to the center hat to keep the rotating mass as minimal as possible.

The face of the gauge is even with the center cap seam so when the center cap is removed for installation or removal the gauge is flush.
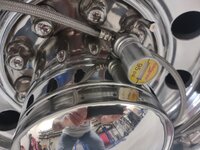
I drilled a 3/8" hole through the side of the center cap and used a supplied bolt but I did install a nylon washer to keep the body of the unit spaced slightly away from the chrome center cap.
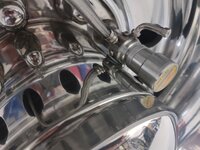
Hope those are helpful Keith. I have used this same mounting configuration on all three of our coaches and have over a quarter of a million miles logged without any of them ever coming loose. I did however have to replace the nylon washer on this coach a couple of years ago when I replaced the Crossfires due to one gauge coming apart internally. The nylon was beginning to get weathered and looked like it was cracking, but by that time the same washers had been in place for approx. 15 years.
OP
zmotorsports
ALLIANCE MEMBER
We use that very same AC "picker" here at Officina Ferrari Classiche. It is a GREAT bit of equipment.
Anders, that is GREAT to hear. I really appreciate your feedback. I was worried as I could not find any reviews online and have found very few vendors for AC Hydraulics products here in the states. It was a hefty chunk of change for an engine hoist but just the little I've played around with it, I've found it has a great feel to it and the quality of materials used seems to be of high quality as well.
If you endorse it that is good enough for me as I know we share a commonality when it comes to fine quality tools. Much appreciated my friend.
OP
zmotorsports
ALLIANCE MEMBER
Mike, once again a great trip report. Love the pictures. Parks are being abused, somewhat. I can see the day of quotas everywhere and I have advocated that the Smokies should have electric buses/trams and a multi story parking area so that cars are no longer occupying every inch and taking up space that is currently green. I'll step off my soapbox here.
Restaurants that you choose always look like great choices! And the prime rib
Thanks Joel. I was furious when Zion NP went to the shuttle system, but after using it a few times I actually quite enjoy it now as allows the visitors to fully envelope the scenery without worrying about oncoming traffic, or finding a pullout to park. I refuse to use the system in Yellowstone NP however, as we have such different expectations when we visit Yellowstone than many of its travelers.
The food was delicious the entire trip, other than the first night which I was very disappointed in. That was one of the meals I was so looking forward to because it was so good a couple years ago when we were in Worland. This time not so much. Service as well as the food was not good at all.
The other Mexican restaurant that was relatively new and which came recommended by the campground owners was delicious however. I'd definitely go back there again, and we almost did the last night we were in Worland, but we returned to camp a bit too late and neither of us felt like going out.
The Slippery Otter Pub in West Yellowstone was a new one for us as we had heard of it, but never tried it. I heard that they had good burgers, and I was craving a burger, but when we sat down and they told me the special for the evening my mouth started to water as prime rib is my kryptonite.

Looks like a great trip Mike. Thanks for sharing the photos. As I’m on the other side of the world I will never see places like this as I won’t go on a plane.
Aaron, thank you for your continued support and the comments.
OP
zmotorsports
ALLIANCE MEMBER
Busy night last night.
I arrived home to find the delivery guy did me a solid by placing the tires just behind the gates and not out in front of the house.
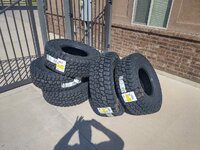
Brought them into the shop and removed the packing tape and shipping labels.
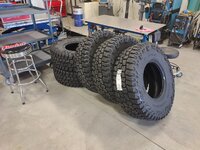
Made sure they matched the advertised depth of tread.

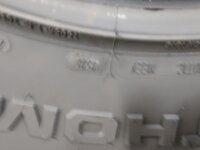
And even got relatively fresh ones with a mid-July build date.
Next I wanted to see what was left on my old tires.

7/32" remaining so they've worn well. I would say they could potentially still have another 10k miles left in them. I think I'll post them up on Facebook MP to see if I can at least get enough to get the new ones mounted/balanced. I sold my last ones, Nitto's, with less tread and still got a couple hundred out of them.

Thanks for looking.
I arrived home to find the delivery guy did me a solid by placing the tires just behind the gates and not out in front of the house.
Brought them into the shop and removed the packing tape and shipping labels.
Made sure they matched the advertised depth of tread.
And even got relatively fresh ones with a mid-July build date.
Next I wanted to see what was left on my old tires.
7/32" remaining so they've worn well. I would say they could potentially still have another 10k miles left in them. I think I'll post them up on Facebook MP to see if I can at least get enough to get the new ones mounted/balanced. I sold my last ones, Nitto's, with less tread and still got a couple hundred out of them.
Thanks for looking.
OP
zmotorsports
ALLIANCE MEMBER
After moving the tires into the shop, I commenced my bi-weekly lawn mowing. Damn it is looking good, but holy **** is it thick and grows like crazy. There is no way I could go to once a week, hell, at this rate I may have to start going to 3x a week.
After completing the lawns and the wife still not home from work I began modifying my new fuel tank cradle/skid for the Jeep. I really wanted to buy the OEM one, but they're running nearly a grand. I am not a fan of Dorman these days, but I did install one on @Just Fishing Jeep earlier this year and it fit well. He had mentioned that the welds were not of the highest quality so he reinforced them before bringing it to me to install.
I concur that the welds were absolute **** on this thing, but at a third the cost of the OEM, I rolled the dice and bought one and figured I would be prepared to throw a couple hours at it making sure it was sound enough to install.

They used small resistance/spot welds to secure the overlapping formed sections and it was evident they didn't use enough current to properly fuse the materials. I thought about drilling and spot welding, but welding along the seams was easy enough and would provide a stronger structure as well as cover more surface area. Especially where this may see some slight impacts over its life.
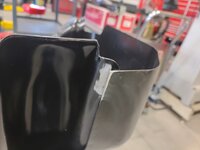
I knocked the paint away in multiple areas.

This section surprised me the most. I just smacked the top inch or so with a hammer to roll the edge for a tighter fitment and it fell apart.

About 8 spot welds failed along this seam alone with only a couple of impacts with the hammer at the top edge.
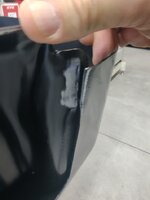
Looks like my decision to weld more surface area than they had was a good decision after all. Clamped back together for welding.
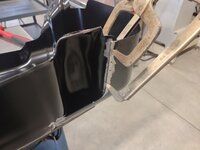
Go easy on me, I haven't used the squirt gun in several months.

I went one step further and figured since I'd be painting the cradle, may as well make sure ALL the seams were properly supported.


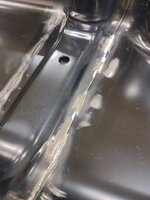
Probably overkill, but I feel much better with all seams stitch welded, both inside and out.

After completing the lawns and the wife still not home from work I began modifying my new fuel tank cradle/skid for the Jeep. I really wanted to buy the OEM one, but they're running nearly a grand. I am not a fan of Dorman these days, but I did install one on @Just Fishing Jeep earlier this year and it fit well. He had mentioned that the welds were not of the highest quality so he reinforced them before bringing it to me to install.
I concur that the welds were absolute **** on this thing, but at a third the cost of the OEM, I rolled the dice and bought one and figured I would be prepared to throw a couple hours at it making sure it was sound enough to install.
They used small resistance/spot welds to secure the overlapping formed sections and it was evident they didn't use enough current to properly fuse the materials. I thought about drilling and spot welding, but welding along the seams was easy enough and would provide a stronger structure as well as cover more surface area. Especially where this may see some slight impacts over its life.
I knocked the paint away in multiple areas.
This section surprised me the most. I just smacked the top inch or so with a hammer to roll the edge for a tighter fitment and it fell apart.
About 8 spot welds failed along this seam alone with only a couple of impacts with the hammer at the top edge.
Looks like my decision to weld more surface area than they had was a good decision after all. Clamped back together for welding.
Go easy on me, I haven't used the squirt gun in several months.
I went one step further and figured since I'd be painting the cradle, may as well make sure ALL the seams were properly supported.
Probably overkill, but I feel much better with all seams stitch welded, both inside and out.
OP
zmotorsports
ALLIANCE MEMBER
On the inside, I knocked the welds flat to they wouldn't rub or wear the actual poly tank when it sits inside the cradle. The welds themselves were quite flat already, but by slightly breathing over them with a Roloc disc ensured they wouldn't create any extra pressure on the tank itself.
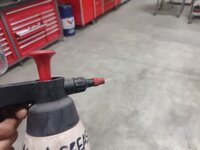
I grabbed the Wax & Grease Remover to give everything a wipe before running the DA over the cradle and my dang pressure sprayer was plugged up. I have had this particular pump sprayer for over 20-years now and it has accompanied me through many paint jobs over the last couple of decades, but the last couple of times I've use it the stream was diminishing until this time it wouldn't spray anything at all.
Not wanting to toss it, as it has sentimental value, I tore into it to see if I could revive it. I found that Wax & Grease Remover over long periods of sitting will actually turn to a gel or paste and it had plugged up most of the workings of the pump, pickup tube and nozzle. After fully disassembling and cleaning it was time to put it back together and see if it is salvageable.

BINGO! Work like new again.
The stuff I got out of the pickup tube and where it attached to the upper body of the pump was nasty and thick.
By this time the wife arrived home and it was getting late so I called it quits. Hopefully will try to finish it up tonight so maybe I can install it over the weekend while waiting for tires to get mounted/balanced.
Thanks for looking.
I grabbed the Wax & Grease Remover to give everything a wipe before running the DA over the cradle and my dang pressure sprayer was plugged up. I have had this particular pump sprayer for over 20-years now and it has accompanied me through many paint jobs over the last couple of decades, but the last couple of times I've use it the stream was diminishing until this time it wouldn't spray anything at all.
Not wanting to toss it, as it has sentimental value
, I tore into it to see if I could revive it. I found that Wax & Grease Remover over long periods of sitting will actually turn to a gel or paste and it had plugged up most of the workings of the pump, pickup tube and nozzle. After fully disassembling and cleaning it was time to put it back together and see if it is salvageable.BINGO! Work like new again.
The stuff I got out of the pickup tube and where it attached to the upper body of the pump was nasty and thick.
By this time the wife arrived home and it was getting late so I called it quits. Hopefully will try to finish it up tonight so maybe I can install it over the weekend while waiting for tires to get mounted/balanced.
Thanks for looking.
ScepterToad
Well-known member
- Joined
- Nov 9, 2023
- Messages
- 357
Thanks Mike! Very helpful!Keith, I snapped some pictures last night of how I mounted the Crossfires on my coach so hopefully these will do a better job than my explanation.
Here you can see how I mounted them as close to center as possible directly to the center hat to keep the rotating mass as minimal as possible.
The face of the gauge is even with the center cap seam so when the center cap is removed for installation or removal the gauge is flush.
I drilled a 3/8" hole through the side of the center cap and used a supplied bolt but I did install a nylon washer to keep the body of the unit spaced slightly away from the chrome center cap.
Hope those are helpful Keith. I have used this same mounting configuration on all three of our coaches and have over a quarter of a million miles logged without any of them ever coming loose. I did however have to replace the nylon washer on this coach a couple of years ago when I replaced the Crossfires due to one gauge coming apart internally. The nylon was beginning to get weathered and looked like it was cracking, but by that time the same washers had been in place for approx. 15 years.
I have tabs on mine, but I think they are the wrong orientation so I won't be able to use them. I suppose drilling holes in the center caps isn't the end of the world. Certainly don't like the supplied brackets that go under a lug nut.
Also, nice job on the skid. Crazy how stuff is made these days.
OP
zmotorsports
ALLIANCE MEMBER
Thanks Mike! Very helpful!
I have tabs on mine, but I think they are the wrong orientation so I won't be able to use them. I suppose drilling holes in the center caps isn't the end of the world. Certainly don't like the supplied brackets that go under a lug nut.
Also, nice job on the skid. Crazy how stuff is made these days.
Glad to be of help Keith.
Yeah, I waffled on the fuel skid/cradle for a few months. I figured the OEM lasted 14 years/170k miles, but just not sure I could justify the $1k cost. They're not terrible to replace so I figure if I can get another 10 years or so out of this aftermarket one I'm money ahead, but time will tell. Hope I didn't shoot my foot off.

Bodj Built
Well-known member
I've been working on dropping some weight over the past year and the wife and joke about eating light throughout the day so we can splurge a bit for a nice dinner. We then have to joke about whether it was "worth the calories" or not.
I picked up mountain biking this year (end of February) and have only missed two weeks since starting (I make up for it by doubling my mileage the following week). It's pretty disappointing to see that an 8.5 mile ride, climbing 1600ft, barellyyyyy works off a BigMac (not even the whole meal!)
OP
zmotorsports
ALLIANCE MEMBER
I picked up mountain biking this year (end of February) and have only missed two weeks since starting (I make up for it by doubling my mileage the following week). It's pretty disappointing to see that an 8.5 mile ride, climbing 1600ft, barellyyyyy works off a BigMac (not even the whole meal!)
Yeeaaah, I'm not "all in" to the point that I need another hobby, nor devoted enough to take up any more time that I already don't have. I'm just focusing on making better choices in my intake.
Bodj Built
Well-known member
Yeeaaah, I'm not "all in" to the point that I need another hobby, nor devoted enough to take up any more time that I already don't have. I'm just focusing on making better choices in my intake.
Oh I wasn't suggesting that. I'm doing it to avoid the Dad-bod haha. It's just sad thinking a BigMac is 500+ calories. Riding has me thinking differently, if the splurge is worth the workout lol
OP
zmotorsports
ALLIANCE MEMBER
Oh I wasn't suggesting that. I'm doing it to avoid the Dad-bod haha. It's just sad thinking a BigMac is 500+ calories. Riding has me thinking differently, if the splurge is worth the workout lol
I gotcha, I ask myself that all the time; is the juice worth the squeeze?
bugnut
ALLIANCE MEMBER
my mouth started to water as prime rib is my kryptonite.
Mike, I hear ya loud and clear! Recently stopped in Rockingham on travels and trying to decide what to eat. Desk person mentions several restaurants and then ad's Friday night at the Holiday restaurant was prime rib special. Decision made!
OP
zmotorsports
ALLIANCE MEMBER
I was able to finish up the work on the fuel cradle/skid last night so it is ready to install as soon as I can get the Jeep back into the shop.
The pressure sprayer works just like new again.
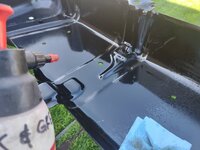
After wiping with Wax & Grease Remover, the areas where welding took place were painted, heavily.
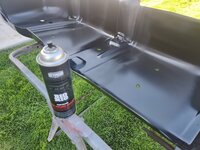
With seeing how easily the paint came off when prepping to weld the other night, I figured I would sand the outside of the cradle and apply a better quality paint. I hit the entire outside with some 120-grit on the DA and it came off way too easily.

Outside blown off, then wiped down with Wax & Grease Remover.

A couple coats of Seymour Big Rig Gloss Black on the outside.

For a rattle can, this high solids paint lays down nicely and has great adhesion and protection qualities, again, for a rattle can.


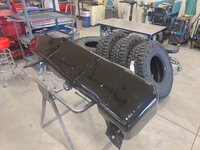
As the paint was drying, my son and his family stopped by so I had my son help me move the painted fuel cradle back into the shop, while my grandson was quite impressed with the "big tires".
Thanks for looking.
The pressure sprayer works just like new again.
After wiping with Wax & Grease Remover, the areas where welding took place were painted, heavily.
With seeing how easily the paint came off when prepping to weld the other night, I figured I would sand the outside of the cradle and apply a better quality paint. I hit the entire outside with some 120-grit on the DA and it came off way too easily.
Outside blown off, then wiped down with Wax & Grease Remover.
A couple coats of Seymour Big Rig Gloss Black on the outside.
For a rattle can, this high solids paint lays down nicely and has great adhesion and protection qualities, again, for a rattle can.
As the paint was drying, my son and his family stopped by so I had my son help me move the painted fuel cradle back into the shop, while my grandson was quite impressed with the "big tires".
Thanks for looking.
signcrafter
Well-known member
- Joined
- May 9, 2012
- Messages
- 12,631
Looks good Mike. ***** that you have to do all that work to a brand new part to make it right. But it's probably better then OEM now and saved a few bucks over OEM. That paint stand looks a lot nicer then the body panel stand I have, what brand or model number is that?
OP
zmotorsports
ALLIANCE MEMBER
Looks good Mike. ***** that you have to do all that work to a brand new part to make it right. But it's probably better then OEM now and saved a few bucks over OEM. That paint stand looks a lot nicer then the body panel stand I have, what brand or model number is that?
Thanks Scott. I would have liked to bought the OEM cradle but with all my other expenses right now, just couldn't justify the 3x cost, so I figured a couple hours labor was a small price to pay for saving $600 or so. I'll give this one a try. If I get 10 or so years out of it, I'd probably do it again as I almost feel this is a sacrificial or routine replacement part based on how I use the Jeep. If I only get a year or two, then I'll probably have learned my lesson and buy the OEM one.
Sorry, I can't remember the brand of the paint stand. I had four of them when I had my paint shop, but when I closed it down I sold two and kept two. They work great as they tilt and have various posts/pegs to hang things on. Looking back, I should have kept the other two as well as I see at least a few more full paint jobs in my future, at least once I retire.
Mike I'd say you've haven't lost much stride with the ole squirt gun, looks good to me. The finished product with the skid looks fantastic, it always ***** to have to improve something you buy, but I'd say that was a nice investment.
Glad to hear you give a to the Seymor brand, they are proud of that stuff, I looked at it for the gate, but I couldn't find a satin, and the cost delta between any of their paint and my trusty VHT Chassis & Rollbar paint was enough to convince me to stick with trusty.
BUT, I've been eyeing the Seymore paints for my project car
Glad to hear you give a
to the Seymor brand, they are proud of that stuff, I looked at it for the gate, but I couldn't find a satin, and the cost delta between any of their paint and my trusty VHT Chassis & Rollbar paint was enough to convince me to stick with trusty.BUT, I've been eyeing the Seymore paints for my project car
OP
zmotorsports
ALLIANCE MEMBER
Mike I'd say you've haven't lost much stride with the ole squirt gun, looks good to me. The finished product with the skid looks fantastic, it always ***** to have to improve something you buy, but I'd say that was a nice investment.
Glad to hear you give a
BUT, I've been eyeing the Seymore paints for my project car
Thanks Mike, welding is a perishable skill and one that if not nursed from time to time, can decay. I've done some TIG welding lately but I think the last thing I MIG welded was my lathe stand almost a year ago. Yeah, buying a product and knowing it will require some attention from time of delivery is not ideal, but knowing the cost difference I was expecting I would need to spend a couple hours so I'm not upset. We'll just have to wait and see how it holds up long term.
As for paints, I have experimented with multiple chassis paints or painting systems over the past 25 or so years now. The absolute best results I had was with my 1971 Chevelle and a 1976 IH Scout II that did frame up restos on. For both of those the frames were media blasted, then covered with epoxy primer followed by dedicated urethane paint, although I used PPG single stage on those. The Scout II got gloss black and my Chevelle got single stage with a flattener in it to give an OEM appearing semi-gloss. Both have lasted amazingly well and still in service, well the Chevelle was the last time I talked to the guy which was a few years ago.
Unfortunately, a full chassis up paint job for a daily driver and/or weekend warrior are hard to accomplish so I have experimented with aerosols quite a bit over the years and for the past 20 or so years now, the Eastwood Extreme Chassis paint in both semi-gloss and gloss has been my paint of choice with excellent results. I have had less than impressive results with the POR-15 so I am pretty much to the point of not recommending that, even though I once did. However, seems like over the past five years or so the price of the Eastwood Extreme has just kept creeping up, not terrible, but it's about $21 for a 14 oz aerosol can and therefore in my opinion coming up short in its economic advantage.
Then about six months ago, I purchased a couple cans of both Summit's Chassis Paint in both gloss black and semi-gloss from Summit Racing as well as Seymour's Big Rig aerosols in both semi-gloss and gloss from my local FleetPride store. These both come in right @ $16 for a 16 oz can so just a slide edge from an economic standpoint than the Eastwood product. However, after using both in pretty harsh areas now, I have been very, very impressed with both the Seymour and the Summit Racing products. They both lay down nice and seem to be holding up well, but the coming winter will be the big test. I sprayed the rear axle and a few smaller chassis components on my 2006 with the Summit Racing chassis paint, then a couple smaller components with the Seymour Big Rig paint and the front suspension crossmember and so far both seem to be holding up well. I've only done a little touch-up on the Jeep with the Summit so nothing enough to really even throw into the comparison, that is until I just painted the fuel cradle with the Seymour Big Rig gloss black.
Here are my impressions or opinions now on these products, keep in mind these are just my opinion, and others may have different experiences. After using both on both my truck as well as a few areas on my Jeep; if you can get the surface extremely clean and free from all remaining paint and remnants of prior coating(s) and the ability to give it a thorough wipe with a Wax & Grease Remover or some chemical wipe, such as what I just did on the new fuel cradle, then the Seymour Big Rig paint lays down amazing. It spray out nice, has excellent coverage and when dry still retails its finish and almost looks wet. Their website states it gives almost a "powder coated" finish and although I feel like it gives a powder coated appearance and initial appearance, I don't think I would go as far as to say it is like powder coating.
If touching up a component or something where it will be "relatively" clean, ie. no grease or oil buildup, yet maybe a small amount of debris or leftovers from previous coatings that couldn't be fully removed with something like a wire brush, but not to the extent of sanding, then the Summit Racing chassis paint sprays out nice and lays down very even with excellent coverage and durability. I just think the Seymour Big Rig may have a slight advantage in solids content but only "IF" it can be properly prepped. If not, I feel the Summit Racing paint has a slight advantage. At least that's what I'm using now and using that criteria to choose between them. I only have a couple cans of Eastwood Extreme left, but don't see myself restocking when it is consumed.
As for things that won't be in quite as extreme conditions as the undercarriage such as engine bracketry or the like, I have also used VHT Chassis & Rollbar paint, several Seymour aerosols from their E-Coat aerosol to their cast aluminum and bronze coatings and even plain old Rustoleum black and they have been acceptable in the durability and appearance categories. I really like the Seymour line and have nothing but good to say about their products. They also seem to go quite a ways in general. I sprayed two very heavy coats on the fuel cradle and finished a can of the gloss black, but it was already opened when used on my truck's rear axle and a couple smaller items. I recently received a sample of Steel-It in black but have not really used it on anything per se to give any opinion on one way or the other. It gets great reviews, but I can't give it my personal endorsement as of yet.
Probably more than you wanted but that's my feelings thus far when it comes to chassis paints.
WoodsTruck
Well-known member
- Joined
- Jan 12, 2013
- Messages
- 1,037
Mike,
We realize the weather where you paint is always perfect, but how much would a change in humidity affect any of the paints you describe?
We realize the weather where you paint is always perfect, but how much would a change in humidity affect any of the paints you describe?
Swanny1953
ALLIANCE MEMBER
Mike, thanks again for sharing your vacation experiences and great photos!
I’m going to pass your restaurant picks in West Yellowstone along to our tour director as he didn’t have much to recommend when we were in town. We found a couple of other great places - wish we would have had your list when we were there!
Again, always enjoy your storytelling and pics!! Thanks for sharing.
I’m going to pass your restaurant picks in West Yellowstone along to our tour director as he didn’t have much to recommend when we were in town. We found a couple of other great places - wish we would have had your list when we were there!
Again, always enjoy your storytelling and pics!! Thanks for sharing.
OP
zmotorsports
ALLIANCE MEMBER
Mike,
We realize the weather where you paint is always perfect, but how much would a change in humidity affect any of the paints you describe?
I would hardly say our weather is always perfect, but I would say at least we don't have much in the form of humidity in the hot summer months.
I'm sorry, I can't give an opinion on how they spray in higher humidity as I don't have any experience using them in anything more than about 8-10% humidity.Mike, thanks again for sharing your vacation experiences and great photos!
I’m going to pass your restaurant picks in West Yellowstone along to our tour director as he didn’t have much to recommend when we were in town. We found a couple of other great places - wish we would have had your list when we were there!
Again, always enjoy your storytelling and pics!! Thanks for sharing.
Thanks Gary. Ditto, I enjoy following along on your adventures and road trips as well.

WoodsTruck
Well-known member
- Joined
- Jan 12, 2013
- Messages
- 1,037
That was more a poke at your distaste for the white stuff.I would hardly say our weather is always perfect,
Thanks for the reply and the continued photo display of your adventures. I need to find time to get out more.
OP
zmotorsports
ALLIANCE MEMBER
Seeing as how I've used my last can of the Seymour Big Rig test paint in gloss black, I stopped by on the way home and grabbed a few more cans as I see myself using this much more in the future, along with the others I mentioned above. I still have a can and a half of semi-gloss remaining, but I am completely out of the gloss black, so I grabbed a few more cans as well as a couple cans of their high solids primer to try.

I then racked the Jeep in order to pull the tires/wheels and get them ready to drop off at the tire shop for mounting and balancing on Saturday.

At that point I decided to spray the bolts for the fuel cradle/skid and start breaking them loose. Unfortunately, I forgot that the BDS mounting brackets that I used for my long arm suspension actually covers one of the fuel tank mounting bolts, so I had to regroup. I grab the Jeep with the lift arms at the rear suspension mount when lifting and seeing as how I need to remove the lower control arm and the mounting bracket, or at least shift it a little, I had to set the Jeep back down on jackstands and move the one arm to grab under the body mount at the frame instead.
Here you can see the frame mounted bracket and the ear of the fuel tank skid/cradle barely.
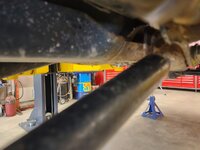
After lowering and repositioning the right rear lift arm I was able to raise the Jeep and continue loosening the mount after dropping the lower control arm.

With the fuel cradle ready to drop, I moved the lift table closer to the job on stand by.
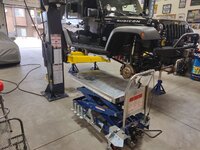
This is where the evening made a hard stop. As I was preparing to drop the fuel tank and cradle, I looked at the material thickness and it didn't seem right. Everything I had read about these aftermarket fuel tank cradles stated that they are direct replacements and are of the same material thickness. I confirmed on the last one I did that they indeed are a direct bolt in and match up perfectly, but one thing I didn't pay as close attention as I should have was material thickness. I knew I would be having to spend a couple hours welding and painting the new one based on what I learned from the owner of the previous Jeep I replaced the cradle on, but for some reason the thickness jumped out at me like a sore thumb as I was standing there removing bolts. I grabbed my dial calipers and sure enough, the original OEM cradle thickness measures .120" (11-gauge) whereas the new aftermarket one measured just over .080", which I am sure is thicker due to the couple coats of paint that I added, so it is more than likely .075" which is 14-gauge. ****!
Nope, I don't feel comfortable with that, especially the way I use my Jeep and the abuse I put her through. If it were a mall crawler or simply a highway queen then I don't think it would matter, however, one good smack on a rock and I don't think this particular cradle is going to provide the protection that I have had for the first 14-years and 170k miles. As I sat there contemplating what to do and trying to keep my wits about me, I began just wandering around the shop thinking.
I looked down at the lift anchors and thought I should probably retorque those anchors as I haven't put a torque wrench on them for about 6 or 7 weeks now. The lift has been installed for exactly 2 months now and after the initial installation I checked the torque about a week later and did get a bit of rotation out of nearly every anchor, so now being about 7 or so weeks since I checked them, I was curious.
Our of 16 anchors, I was able to get just a slight bit of movement out of 5 of them, the other 11 were still torqued right to where I last checked them about 7 weeks ago.

After retorquing the lift anchors I just sat and contemplated, having the wind knocked out of me for the night over the fuel tank skid. I was scrolling through my phone searching for OEM cradles when the wife came home and saw me sitting and thinking. When I explained what I had found she said, "hell no, you're not putting that in our Jeep". This is what I get for trying to save a few bucks and it bites me squarely in the ***.
I did find a Mopar parts warehouse that I have bought parts from before that had them marked down to just over $700, compared to the $1k I was originally quoted, but then there will be freight on top of that so I'm still searching. The Jeep presence around here is quite strong, so I think I can sell the aftermarket one for what I gave for it, especially where I beefed up the welds and repainted it, but I'm going to lose out on those couple of hours of work I put into it.
I just hung up with my local Jeep/Mopar dealership where I've purchased a lot of parts from over the years, although I don't buy quite as many as I used to when I have my business. The guy I usually deal with is great and he is going to match what I can buy it for online, plus he won't charge me freight so I went ahead and ordered the OEM one which should be here in a few days. I feel much better about the situation and will go ahead and try to sell the aftermarket one.
I then racked the Jeep in order to pull the tires/wheels and get them ready to drop off at the tire shop for mounting and balancing on Saturday.
At that point I decided to spray the bolts for the fuel cradle/skid and start breaking them loose. Unfortunately, I forgot that the BDS mounting brackets that I used for my long arm suspension actually covers one of the fuel tank mounting bolts, so I had to regroup. I grab the Jeep with the lift arms at the rear suspension mount when lifting and seeing as how I need to remove the lower control arm and the mounting bracket, or at least shift it a little, I had to set the Jeep back down on jackstands and move the one arm to grab under the body mount at the frame instead.
Here you can see the frame mounted bracket and the ear of the fuel tank skid/cradle barely.
After lowering and repositioning the right rear lift arm I was able to raise the Jeep and continue loosening the mount after dropping the lower control arm.
With the fuel cradle ready to drop, I moved the lift table closer to the job on stand by.
This is where the evening made a hard stop. As I was preparing to drop the fuel tank and cradle, I looked at the material thickness and it didn't seem right. Everything I had read about these aftermarket fuel tank cradles stated that they are direct replacements and are of the same material thickness. I confirmed on the last one I did that they indeed are a direct bolt in and match up perfectly, but one thing I didn't pay as close attention as I should have was material thickness. I knew I would be having to spend a couple hours welding and painting the new one based on what I learned from the owner of the previous Jeep I replaced the cradle on, but for some reason the thickness jumped out at me like a sore thumb as I was standing there removing bolts. I grabbed my dial calipers and sure enough, the original OEM cradle thickness measures .120" (11-gauge) whereas the new aftermarket one measured just over .080", which I am sure is thicker due to the couple coats of paint that I added, so it is more than likely .075" which is 14-gauge. ****!
Nope, I don't feel comfortable with that, especially the way I use my Jeep and the abuse I put her through. If it were a mall crawler or simply a highway queen then I don't think it would matter, however, one good smack on a rock and I don't think this particular cradle is going to provide the protection that I have had for the first 14-years and 170k miles. As I sat there contemplating what to do and trying to keep my wits about me, I began just wandering around the shop thinking.
I looked down at the lift anchors and thought I should probably retorque those anchors as I haven't put a torque wrench on them for about 6 or 7 weeks now. The lift has been installed for exactly 2 months now and after the initial installation I checked the torque about a week later and did get a bit of rotation out of nearly every anchor, so now being about 7 or so weeks since I checked them, I was curious.
Our of 16 anchors, I was able to get just a slight bit of movement out of 5 of them, the other 11 were still torqued right to where I last checked them about 7 weeks ago.
After retorquing the lift anchors I just sat and contemplated, having the wind knocked out of me for the night over the fuel tank skid. I was scrolling through my phone searching for OEM cradles when the wife came home and saw me sitting and thinking. When I explained what I had found she said, "hell no, you're not putting that in our Jeep". This is what I get for trying to save a few bucks and it bites me squarely in the ***.
I did find a Mopar parts warehouse that I have bought parts from before that had them marked down to just over $700, compared to the $1k I was originally quoted, but then there will be freight on top of that so I'm still searching. The Jeep presence around here is quite strong, so I think I can sell the aftermarket one for what I gave for it, especially where I beefed up the welds and repainted it, but I'm going to lose out on those couple of hours of work I put into it.
I just hung up with my local Jeep/Mopar dealership where I've purchased a lot of parts from over the years, although I don't buy quite as many as I used to when I have my business. The guy I usually deal with is great and he is going to match what I can buy it for online, plus he won't charge me freight so I went ahead and ordered the OEM one which should be here in a few days. I feel much better about the situation and will go ahead and try to sell the aftermarket one.
OP
zmotorsports
ALLIANCE MEMBER
That was more a poke at your distaste for the white stuff.
Thanks for the reply and the continued photo display of your adventures. I need to find time to get out more.
I was smellin' what you were sellin', just didn't know how to respond without sounding like a jerk. Yeah, that white stuff I can do without, at least for now. Maybe I'll feel differently once the wife and I retire and she doesn't have to drive 45 miles one way in the **** and I won't have to be outside in the dark clearing it off my drive and more importantly, I won't be responsible for snow removal at work. Maybe, just maybe then I will relax a bit about it.
Plus, maybe by then I can have my grandson help me by letting him drive the Wheel Horse to plow.
ScepterToad
Well-known member
- Joined
- Nov 9, 2023
- Messages
- 357
Mike, given your skills and abilities, I'm curious as to why you'd just replace the skid as opposed to fixing whatever is wrong with it. Did I miss something in the thread?
SilverJimmy
Well-known member
Mike, what about your OEM cradle damage makes you want to replace it instead of repairing it? I was very impressed by your repairs to mower deck on your beloved Snapper walk behind mower. Could you repair the original cradle and actually beef up the damaged areas?
SilverJimmy
Well-known member
Keith beat me to it. Inquiring minds think alike!
signcrafter
Well-known member
- Joined
- May 9, 2012
- Messages
- 12,631
That ***** Mike. Sometimes you wins some and sometimes you loose some. I seem to run into more issues like these then the average I think. Regroup and figure out how to proceed. Did you consider using it as a skin and adding beefier supports at all? I'm not familiar with those so not sure if that's even an option but as I was reading your post about thinking about your options I was waiting for you getting the welder back out. Was waiting to see a bunch of flat or round stock getting cut and welded up to make a cage or something using the skin. Glad you found an OEM one for a reasonable price and hopefully yours will sell since it's an improved aftermarket ZMotorsports design!Seeing as how I've used my last can of the Seymour Big Rig test paint in gloss black, I stopped by on the way home and grabbed a few more cans as I see myself using this much more in the future, along with the others I mentioned above. I still have a can and a half of semi-gloss remaining, but I am completely out of the gloss black, so I grabbed a few more cans as well as a couple cans of their high solids primer to try.
I then racked the Jeep in order to pull the tires/wheels and get them ready to drop off at the tire shop for mounting and balancing on Saturday.
At that point I decided to spray the bolts for the fuel cradle/skid and start breaking them loose. Unfortunately, I forgot that the BDS mounting brackets that I used for my long arm suspension actually covers one of the fuel tank mounting bolts, so I had to regroup. I grab the Jeep with the lift arms at the rear suspension mount when lifting and seeing as how I need to remove the lower control arm and the mounting bracket, or at least shift it a little, I had to set the Jeep back down on jackstands and move the one arm to grab under the body mount at the frame instead.
Here you can see the frame mounted bracket and the ear of the fuel tank skid/cradle barely.
After lowering and repositioning the right rear lift arm I was able to raise the Jeep and continue loosening the mount after dropping the lower control arm.
With the fuel cradle ready to drop, I moved the lift table closer to the job on stand by.
This is where the evening made a hard stop. As I was preparing to drop the fuel tank and cradle, I looked at the material thickness and it didn't seem right. Everything I had read about these aftermarket fuel tank cradles stated that they are direct replacements and are of the same material thickness. I confirmed on the last one I did that they indeed are a direct bolt in and match up perfectly, but one thing I didn't pay as close attention as I should have was material thickness. I knew I would be having to spend a couple hours welding and painting the new one based on what I learned from the owner of the previous Jeep I replaced the cradle on, but for some reason the thickness jumped out at me like a sore thumb as I was standing there removing bolts. I grabbed my dial calipers and sure enough, the original OEM cradle thickness measures .120" (11-gauge) whereas the new aftermarket one measured just over .080", which I am sure is thicker due to the couple coats of paint that I added, so it is more than likely .075" which is 14-gauge. ****!
Nope, I don't feel comfortable with that, especially the way I use my Jeep and the abuse I put her through. If it were a mall crawler or simply a highway queen then I don't think it would matter, however, one good smack on a rock and I don't think this particular cradle is going to provide the protection that I have had for the first 14-years and 170k miles. As I sat there contemplating what to do and trying to keep my wits about me, I began just wandering around the shop thinking.
I looked down at the lift anchors and thought I should probably retorque those anchors as I haven't put a torque wrench on them for about 6 or 7 weeks now. The lift has been installed for exactly 2 months now and after the initial installation I checked the torque about a week later and did get a bit of rotation out of nearly every anchor, so now being about 7 or so weeks since I checked them, I was curious.
Our of 16 anchors, I was able to get just a slight bit of movement out of 5 of them, the other 11 were still torqued right to where I last checked them about 7 weeks ago.
After retorquing the lift anchors I just sat and contemplated, having the wind knocked out of me for the night over the fuel tank skid. I was scrolling through my phone searching for OEM cradles when the wife came home and saw me sitting and thinking. When I explained what I had found she said, "hell no, you're not putting that in our Jeep". This is what I get for trying to save a few bucks and it bites me squarely in the ***.
I did find a Mopar parts warehouse that I have bought parts from before that had them marked down to just over $700, compared to the $1k I was originally quoted, but then there will be freight on top of that so I'm still searching. The Jeep presence around here is quite strong, so I think I can sell the aftermarket one for what I gave for it, especially where I beefed up the welds and repainted it, but I'm going to lose out on those couple of hours of work I put into it.
I just hung up with my local Jeep/Mopar dealership where I've purchased a lot of parts from over the years, although I don't buy quite as many as I used to when I have my business. The guy I usually deal with is great and he is going to match what I can buy it for online, plus he won't charge me freight so I went ahead and ordered the OEM one which should be here in a few days. I feel much better about the situation and will go ahead and try to sell the aftermarket one.
OP
zmotorsports
ALLIANCE MEMBER
Mike, given your skills and abilities, I'm curious as to why you'd just replace the skid as opposed to fixing whatever is wrong with it. Did I miss something in the thread?
Keith, while I appreciate your vote of confidence, this one is nearing the point of being so corroded there's not a lot of structural left to build off of. Unfortunately, the nature of the beast with these things as they trap in moisture and debris which causes their demise over time. Plus the rocks I've allowed it to come into contact with haven't helped much.
Scuderia-F1
Well-known member
AC is a tier 1 manufacturer Mike. It’s a Danish company, utterly highly rated. It a lot of money but it’s great value, so well worth it. Plus they is extremely well stocked with spares comes the time for a re seal or something.Anders, that is GREAT to hear. I really appreciate your feedback. I was worried as I could not find any reviews online and have found very few vendors for AC Hydraulics products here in the states. It was a hefty chunk of change for an engine hoist but just the little I've played around with it, I've found it has a great feel to it and the quality of materials used seems to be of high quality as well.
If you endorse it that is good enough for me as I know we share a commonality when it comes to fine quality tools. Much appreciated my friend.
WoodsTruck
Well-known member
- Joined
- Jan 12, 2013
- Messages
- 1,037
I was going to ask about the material thickness of the cradle. I installed a 23 gallon tank under the back of my Bronco and purchased the skid plate that goes with it. It is just a center protection plate and nothing on the sides which would help minimize side compression if it got smacked on the edge. I need to find some thicker metal and box it in before I install it.
OP
zmotorsports
ALLIANCE MEMBER
That ***** Mike. Sometimes you wins some and sometimes you loose some. I seem to run into more issues like these then the average I think. Regroup and figure out how to proceed. Did you consider using it as a skin and adding beefier supports at all? I'm not familiar with those so not sure if that's even an option but as I was reading your post about thinking about your options I was waiting for you getting the welder back out. Was waiting to see a bunch of flat or round stock getting cut and welded up to make a cage or something using the skin. Glad you found an OEM one for a reasonable price and hopefully yours will sell since it's an improved aftermarket ZMotorsports design!
Thanks Scott. If the original has lasted 14 years and 170k miles, there's no reason to think I can't get the same life out of another OEM one, maybe more as I find myself not doing as many of the more extreme trails these days.