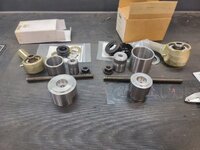
To avoid these ads, REGISTER NOW!

ZMotorsports Shop Projects 2.0

OP
Z

zmotorsports

ALLIANCE MEMBER
Joined
Oct 20, 2009
Messages
21,598
Location
Northern Utah
I love that Mike. It would be really neat if you had something like "ZMotorsports" and a part number engraved into it. Or even a case with foam inserts for all the parts and then a set of instructions. I can picture your son or grandson opening up the case many years down the road to do the repair and getting a big smile knowing the maker of the tool and how well it works.

I don't have the available real estate to start putting things in cases Scott, in fact, I generally have to remove tools from cases in order to find room for them so I don't see that happening. I may engrave it, but I've never really gotten into the whole engraving tools craze, even at work.

To be honest, it will probably get tossed into a drawer with other shop made tools and just hope my son remembers what it's for. :ROFLMAO:
 
To avoid these ads, REGISTER NOW!

madison069

Well-known member
Joined
Nov 5, 2010
Messages
4,388
Location
Monroeville, PA
I don't have the available real estate to start putting things in cases Scott, in fact, I generally have to remove tools from cases in order to find room for them so I don't see that happening. I may engrave it, but I've never really gotten into the whole engraving tools craze, even at work.

To be honest, it will probably get tossed into a drawer with other shop made tools and just hope my son remembers what it's for. :ROFLMAO:
I wonder if you can make a deal for engraving several items at a local trophy shop? Or maybe they can send you to a proper engraving place to get you going?
 
OP
Z

zmotorsports

ALLIANCE MEMBER
Joined
Oct 20, 2009
Messages
21,598
Location
Northern Utah
I wonder if you can make a deal for engraving several items at a local trophy shop? Or maybe they can send you to a proper engraving place to get you going?

While that's a good idea to have them done in bulk Cody, to be honest though, I have so many shop-made tools that I really don't want to start down that rabbit hole of engraving all of the shop-made stuff, that could get really expensive really quick. I'm not Matt, aka @lilscorpion in that I'm that organized. :ROFLMAO:
 

signcrafter

Well-known member
Joined
May 9, 2012
Messages
12,605
I don't have the available real estate to start putting things in cases Scott, in fact, I generally have to remove tools from cases in order to find room for them so I don't see that happening. I may engrave it, but I've never really gotten into the whole engraving tools craze, even at work.

To be honest, it will probably get tossed into a drawer with other shop made tools and just hope my son remembers what it's for. :ROFLMAO:
I get the plastic case thing and I take most of my tools out also because they take up too much space. But when I read you talking about your son and grandson using them after you are gone I thought it might be more special then just another tool thrown in the drawer.
 
OP
Z

zmotorsports

ALLIANCE MEMBER
Joined
Oct 20, 2009
Messages
21,598
Location
Northern Utah
I get the plastic case thing and I take most of my tools out also because they take up too much space. But when I read you talking about your son and grandson using them after you are gone I thought it might be more special then just another tool thrown in the drawer.

True Scott, and I get that, however all of my tools are merely thrown into drawers in some manner or another. I would be pleased if they'd just know how to use them, continue to use them and on occasion reflect back on where they gained those skills. I don't think I could ask for any more than that.
 

customh

Well-known member
Joined
Feb 18, 2013
Messages
563
Location
East Bethel, MN
True Scott, and I get that, however all of my tools are merely thrown into drawers in some manner or another. I would be pleased if they'd just know how to use them, continue to use them and on occasion reflect back on where they gained those skills. I don't think I could ask for any more than that.
A 3D Printer and some CAD software (no cardboard jokes) would make the job of drawer organizing and labeling what the tool is for quite simple. I know @zmotorsports is always on the hunt for new and creative ways to use his time.
 
OP
Z

zmotorsports

ALLIANCE MEMBER
Joined
Oct 20, 2009
Messages
21,598
Location
Northern Utah
A 3D Printer and some CAD software (no cardboard jokes) would make the job of drawer organizing and labeling what the tool is for quite simple. I know @zmotorsports is always on the hunt for new and creative ways to use his time.

Travis, my son and I had this exact conversation the other night. He has a nice 3D printer setup and just recently got it all setup in his home garage. Since having it back up and running, he's been making some tool organizing things for his toolbox but also making little toys and accessories for toys for his son lately. I was impressed with a little 3D printed garbage can he made to scale to go with my grandson's garbage truck. Very cool, but when we started talking about the equipment and process I simply explained that I don't want to spend that kind of time, or money, on it. He said "yeah, it's like having a whole other hobby and a lot of time can be spent going down that rabbit hole". I don't need nor want another hobby at this point in my life. Hell, I don't have enough time to enjoy the hobbies I do have as there's too much work to do maintaining the home and vehicles as it is. :unsure:


My boss at the Vintage racing/touring shop used to use a paint pen to write on special tools what they were for. I bought some of the tools out of that shop and in the steel box of press tooling there is still a chunk labeled "Lola Hub".

Thom, many of my not as often used tools in blow-molded cases merely have the contents written with paint pen. Nothing special, just the contents. As for the one-off tools I've made, some I have used my small engraver to write what the tool does, others I've used the paint pen again. Only downside to the paint pen is it will come off when using brake cleaner such as when cleaning tools before putting away. Other than that it's inexpensive and quick, two things I like.
 

ptt49er

Well-known member
Joined
Jun 28, 2018
Messages
333
Location
Rock Hill, SC
If you did engrave a serial # on each of your home made tools you could associate that to a list in your shop notebook for future reference. Could even use typical punch set to stamp the numbers on there.

Appreciate the time you do spend keeping this thread up to date - provides a lot of inspiration!
 

WoodsTruck

Well-known member
Joined
Jan 12, 2013
Messages
1,037
I know Mike loves the white stuff so I'll add some content.
Buddy I ride with used to own a Snap-On truck. We had reason to have a tool to remove the large headed bolts for the scratchers on the skid rails. I made the closed end crowfoot tool since it takes a huge wrench to get them off and I am not interested in the weight and size penalty to carry such a large wrench. The 3/8" ratchet is already in the home-made tool roll and the 3/8" aluminum plate doesn't add too much weight. I stamped his, jokingly, "Snap-Off" so I didn't get a visit from a lawyer and the SBG designation for "scratcher-be-gone". He got a kick out of it.
 

Attachments

  • IMG_8999.jpg
    IMG_8999.jpg
    59.9 KB · Views: 91
  • Scratcher tool.jpg
    Scratcher tool.jpg
    1.3 MB · Views: 88

PugetDude

ALLIANCE MEMBER
Joined
Mar 13, 2013
Messages
22,626
Location
Superstition Mountains, AZ
Travis, my son and I had this exact conversation the other night. He has a nice 3D printer setup and just recently got it all setup in his home garage. Since having it back up and running, he's been making some tool organizing things for his toolbox but also making little toys and accessories for toys for his son lately. I was impressed with a little 3D printed garbage can he made to scale to go with my grandson's garbage truck. Very cool, but when we started talking about the equipment and process I simply explained that I don't want to spend that kind of time, or money, on it. He said "yeah, it's like having a whole other hobby and a lot of time can be spent going down that rabbit hole". I don't need nor want another hobby at this point in my life. Hell, I don't have enough time to enjoy the hobbies I do have as there's too much work to do maintaining the home and vehicles as it is. :unsure:
Amen, brother.
Wait till retirement becomes your full time job- you never get a day off.
 

joecon

Well-known member
Joined
Oct 4, 2010
Messages
687
I have made a few tools over the years. What I started to do was put labels on them from a label maker. It won't stand up to abuse, but you can print another one easy enuf. I also started putting things in kit boxes. It keeps them together and since I don't use them all the time, I know where they are and they are easy to transport. I also sometimes paint them to match the application, green and yellow for John Deere.
 

lilscorpion

Well-known member
Joined
Mar 15, 2010
Messages
3,619
Location
Colorado
While that's a good idea to have them done in bulk Cody, to be honest though, I have so many shop-made tools that I really don't want to start down that rabbit hole of engraving all of the shop-made stuff, that could get really expensive really quick. I'm not Matt, aka @lilscorpion in that I'm that organized. :ROFLMAO:
I appreciate the…compliment?! 😂😂

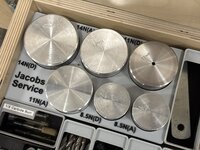
I’m not all high tech. Mike, you could use manual punch letter stamps to stamp in what they’re for. In the pic below I did make a 3D printed organizer but, long before I got a printer, I used some harbor freight stamps to keep things straight. These are similar tools but used for helping assemble and disassemble Jacobs drill chucks.

image.jpg

The stamps work awesome.

image.jpg

I would struggle to remember which is for which otherwise. Bet you $100 I couldn’t pull the right one unmarked on the first guess and get it right.

image.jpg

You probably have these stamp thingies already in one of dem many toolbox drawers…
 
OP
Z

zmotorsports

ALLIANCE MEMBER
Joined
Oct 20, 2009
Messages
21,598
Location
Northern Utah
I appreciate the…compliment?! 😂😂

I’m not all high tech. Mike, you could use manual punch letter stamps to stamp in what they’re for. In the pic below I did make a 3D printed organizer but, long before I got a printer, I used some harbor freight stamps to keep things straight. These are similar tools but used for helping assemble and disassemble Jacobs drill chucks.

image.jpg

The stamps work awesome.

image.jpg

I would struggle to remember which is for which otherwise. Bet you $100 I couldn’t pull the right one unmarked on the first guess and get it right.

image.jpg

You probably have these stamp thingies already in one of dem many toolbox drawers…

Matt, I have a very nice set of number and letter stamps that I purchased many years ago and use them on occasion. Not as much as I thought I would when I spent the money for a nice set, but I do use them. I too have a few tools that I have stamped using them, but I could probably use them more often.
 
OP
Z

zmotorsports

ALLIANCE MEMBER
Joined
Oct 20, 2009
Messages
21,598
Location
Northern Utah
Last night was lawn mowing night so I didn't get much time on the Johnny Joint tools.

The lawns are looking great now that the daytime temps have come back down into the low 80's. The areas I replaced back in June have filled in and become almost undetected now.
lawn1.jpg

lawn2.jpg

After finishing the lawns I was able to start on the pressing component of the tool. I cut off a 2" length of 2" diameter stock and brought it to 1.600" OD on half of it. Then machined a step in which to fit inside of the large washer that goes on the outside of the bushing in the joint.
jj13.jpg

I made the step about .015" smaller so it wasn't too tight, yet not sloppy either. This way it will index nicely on the washer without too much fuss when pressing the bushing into the joint's housing.
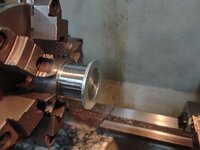
jj14.jpg

What I forgot to take a picture of was the 1" diameter by .500" deep hole machined in the end to allow the spherical ball to nest up inside during the pressing process.
jj15.jpg

This is how it will press together and still allow just enough room to install the snap ring.
jj16.jpg

This is how the tool will stack up when preparing to press the bushing into the joint. By drilling undersize and then reaming the .500" hole for the allthread, it is a nice slip fit and self-aligns everything for pressing. I just need to flip the pressing part around in the lathe and take the OD to the same 1.600" and then a chamfer and this tool for the 2.5" joints will be completed.
jj17.jpg

By making the pressing slug just a little longer than the tapered sleeve it "should" allow me to press the bushing into the joint and as soon as the bushing clears the tapered sleeve I "should" be able to lift it off without releasing the nut from the allthread and install the snap-ring all in one motion without the need to reset the tool another time. Hope that makes sense and time will tell if it works the way I have it planned in my head. :unsure:

I have also used this time to play with some various speeds and feed rates and I have been quite pleased with how the surface finish has come out considering everything is just made from mild steel scraps.

Thanks for looking.
 
OP
Z

zmotorsports

ALLIANCE MEMBER
Joined
Oct 20, 2009
Messages
21,598
Location
Northern Utah
Grass is looking top notch Mike!

Thanks Mike. It's so thick and growing so fast with these temps, I had to raise the deck to the next notch because it clumps and clogs so bad at the height I've been mowing. We definitely have a fall yard at vs. our last home that was more of a spring yard. Sad that just about the time it really starts looking great it's about time to go dormant. :rolleyes:
 

fouckhest

Well-known member
Joined
Jul 24, 2013
Messages
1,945
Location
Greer, SC
Sad that just about the time it really starts looking great it's about time to go dormant. :rolleyes:

I can very much relate, ours just happens to be more early summer, just about the time it starts to look nice, it gets brutal hot so you are constantly watering, cutting twice a week, etc., it looks great, but then becomes a burden, then just to turn back to brown as it goes dormant.
 

LXCam

ALLIANCE MEMBER
Joined
Apr 23, 2013
Messages
19,357
Location
AZ
I don't have the available real estate to start putting things in cases Scott, in fact, I generally have to remove tools from cases in order to find room for them so I don't see that happening. I may engrave it, but I've never really gotten into the whole engraving tools craze, even at work.

To be honest, it will probably get tossed into a drawer with other shop made tools and just hope my son remembers what it's for. :ROFLMAO:
It doesn't happen all the time but when there's real estate I'll stamp my initials and the year.

Here’s an oldie but a goodie all though it might be past time to service it 🤨
IMG_5150.jpeg
IMG_5151.jpeg
 
To avoid these ads, REGISTER NOW!

GRN96WS6

Well-known member
Joined
Dec 23, 2012
Messages
2,300
Location
SOMD
Thank you. If I let the lawn go a week I'd be mowing it a couple times at different heights, more than that I'd need a swather.
Yeah I don't water mine, BUT when we get normal rain out here on the east coast, I have to cut it once a week or my poor push mower would hate me ha!
 

LXCam

ALLIANCE MEMBER
Joined
Apr 23, 2013
Messages
19,357
Location
AZ
Is that for checking the runout on a stanction or tube?
Yes it was for checking small shafts. At the time I was doing quite a bit of work on production machines that used transfer belt systems with inductive pickups for synchronous operations. More or less anything that created an oscillation screwed the pooch on timing trying to run 30k parts an hour.
I’m thinking ”Cam”shaft lift checker?!
It’s done that too before I got a lathe.
 
OP
Z

zmotorsports

ALLIANCE MEMBER
Joined
Oct 20, 2009
Messages
21,598
Location
Northern Utah
Made more progress on the Johnny Joint tools last night.

Completed the driver for the 2.5" joint.
jj21.jpg

Then went to work creating the tapered sleeve for the 2" bushing. With only 1-degree of taper, it won't go in on the one side which matched the ID of the actual joint.
jj22.jpg

But will slide it flush on the opposing side creating a nice smooth transition to compress the bushing just enough to match the joint's housing.
jj23.jpg

Sleeve in place on the 2" tool.
jj24.jpg

Beginning the driver for the 2" tool.
jj25.jpg

Test fitting with the 2" joint.
jj26.jpg

Perfect.
jj27.jpg

Next to ream the hole to size for the allthread.
jj28.jpg

I generally like to drill about 4%-5% undersize for reaming on mild steel and around 2%-3% for higher carbon content steel or SS.
jj29.jpg

Slight chamfer on the hole.
jj30.jpg


Stay tuned for more.
 
OP
Z

zmotorsports

ALLIANCE MEMBER
Joined
Oct 20, 2009
Messages
21,598
Location
Northern Utah
Continuing on.

Just for shits & giggles I threw some knurls on the drivers, than cut a 30-degree chamfer on the end where the nut will ride.
jj31.jpg

Lathe work completed on the tools.
jj32.jpg

Disassembled for the next step.
jj33.jpg


WOW! That's a big mess on the lathe. :oops:
jj34.jpg

Time to move over to the milling machine and cut a couple of opposing steps in the base of the 2.5" tool.
jj35.jpg

After a little deburring with a file.
jj36.jpg

Testing in the vise.
jj37.jpg

That should work nicely to hold the tool.
jj38.jpg

Now the 2" base.
jj39.jpg

That also should work.
jj40.jpg


Stay tuned for a few more pictures.
 
OP
Z

zmotorsports

ALLIANCE MEMBER
Joined
Oct 20, 2009
Messages
21,598
Location
Northern Utah
Continuing on.

The machining completed on both the 2" and 2.5" tools.
jj41.jpg

jj42.jpg

Disassembled and ready for the final steps of stamping the sizes and treating the materials. Just ran out of time for the night.
jj43.jpg

I wanted to get the machining area of the shop cleaned as it was messing with me. Took the next half hour to do a thorough cleaning of the lathe and mill as well as gave the full shop a sweep, with the exception of under the Jeep which is on the lift still torn apart.
jj44.jpg

jj45.jpg

jj46.jpg

jj47.jpg


Thanks for looking.
 

Jgaz

Well-known member
Joined
Dec 16, 2016
Messages
1,748
Location
AZ
Just for shits & giggles I threw some knurls on the drivers
Nice work Mike, I love the knurling.

There were times at work if I was machining something, especially on an off shift, I would knurl the part I was turning.
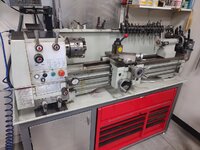
It always made me laugh that I could hold .001 on a bore and most people thought nothing of that.
But add knurling and they would lose their ****!
 

Grant Gunderson

Well-known member
Joined
May 17, 2013
Messages
2,347
Location
Bellingham, WA
Yes it was for checking small shafts. At the time I was doing quite a bit of work on production machines that used transfer belt systems with inductive pickups for synchronous operations. More or less anything that created an oscillation screwed the pooch on timing trying to run 30k parts an hour.

It’s done that too before I got a lathe.
Love it.
 

signcrafter

Well-known member
Joined
May 9, 2012
Messages
12,605
Work of arts Mike! I need to get better at cleaning up when done. Seems like I'm always behind and have to move on to the next project as soon as I finish one, or have too many projects going at the same time and things get out of hand quickly. Will be a goal on the new shop to keep it clean once it's all set up. That's just an excuse and something I need to change. Nothing like working in a clean organized shop and yours is a great example of one.

Are there tools like this out there already specifically for those joints? Or is there a market out there in the 4WD world for you to make some money selling them?
 

PugetDude

ALLIANCE MEMBER
Joined
Mar 13, 2013
Messages
22,626
Location
Superstition Mountains, AZ
And, on the other end of the Johnny Joint spectrum, I sent a couple to powder coating with the bushings still installed.
They didn't do well in the oven....😳
Pounded them mostly back in with a BFH and a socket, then re-installed them.
(Everyone take deep breath...This was for an art project, not a vehicle...🤣)image~2.jpg
 
Last edited:
OP
Z

zmotorsports

ALLIANCE MEMBER
Joined
Oct 20, 2009
Messages
21,598
Location
Northern Utah
Nice work Mike, I love the knurling.

There were times at work if I was machining something, especially on an off shift, I would knurl the part I was turning.
It always made me laugh that I could hold .001 on a bore and most people thought nothing of that.
But add knurling and they would lose their ****!

Thank you. I have some opportunity with my knurling. Although it turned out "ok", I didn't feel like I had the wheels hitting as perpendicular as I should have. I set them square, but I think maybe I didn't lock the toolpost tight enough and with the pressure feeding inward on the X-axis, it came off a degree or two allowing an uneven contact, noticeable at the end nearest the chuck. Something to work on.

That being said, I was very pleased with how close nice the overall finished came out, especially being on mild steel. In the past I have fought with the finish and would shoot to come up shy of my target by about .001"-.002" and then take it the remainder of the way using abrasive measures, ie. file and emery paper, to get the desired finish.

However, with the addition of my DRO, I have been doing more experimenting with depth of cuts and pushing the tooling a bit more than I have in the past and found the sweet spot on some of my tooling that nets me great finish as well as landing spot on the dimensions, a win/win.

Still learning and it's always a good thing to learn on something less critical like a shop tool. ;)


Nice job Mike. Love the custom tooling.

Thank you.
 
OP
Z

zmotorsports

ALLIANCE MEMBER
Joined
Oct 20, 2009
Messages
21,598
Location
Northern Utah
Work of arts Mike! I need to get better at cleaning up when done. Seems like I'm always behind and have to move on to the next project as soon as I finish one, or have too many projects going at the same time and things get out of hand quickly. Will be a goal on the new shop to keep it clean once it's all set up. That's just an excuse and something I need to change. Nothing like working in a clean organized shop and yours is a great example of one.

Are there tools like this out there already specifically for those joints? Or is there a market out there in the 4WD world for you to make some money selling them?

Thanks Scott. I learned something about myself at a very early age, I simply cannot function nor work in a messy environment. I simply cannot focus on what I need to so in my mind the job is not complete until the shop is cleaned up from said job. Even if I have another vehicle waiting immediately behind, I need to clean between them before I can move on. I need to have each tool in its proper place so I can walk right to the toolbox and grab the tool I need for the job at hand.

As for the Johnny Joint tool, yes, Currie offers a tool specifically for rebuilding these joints, they run $150/per size and readily available. However, most people I know don't have the proper tool(s) and just rebuild them the way I have in the past, using various drivers and receivers to press them out and back in. However, I have really wanted to build a set to use but never "made" the time to fabricate them, until now and I really didn't want to spend $300 to have both sizes on hand.
 

signcrafter

Well-known member
Joined
May 9, 2012
Messages
12,605
Thanks Scott. I learned something about myself at a very early age, I simply cannot function nor work in a messy environment. I simply cannot focus on what I need to so in my mind the job is not complete until the shop is cleaned up from said job. Even if I have another vehicle waiting immediately behind, I need to clean between them before I can move on. I need to have each tool in its proper place so I can walk right to the toolbox and grab the tool I need for the job at hand.

As for the Johnny Joint tool, yes, Currie offers a tool specifically for rebuilding these joints, they run $150/per size and readily available. However, most people I know don't have the proper tool(s) and just rebuild them the way I have in the past, using various drivers and receivers to press them out and back in. However, I have really wanted to build a set to use but never "made" the time to fabricate them, until now and I really didn't want to spend $300 to have both sizes on hand.
I actually function pretty good in a mess, but a clean shop is definitely a pleasure to work in. Think it comes from not having toolboxes or other organizing items like shelves. Always spent my money on the tools to get the job done. I'm getting to the point where I have some extra funds to use on that stuff and trying to set up the new garage for success keeping it clean and organized. Now just have to find, or make the time to do it and keep up with it. Once it gets messy it's easy to keep making it worse. Thanks for the inspiration Mike!
 
To avoid these ads, REGISTER NOW!
Top Bottom