To avoid these ads, REGISTER NOW!

What did you do "IN" your garage today?

Mr.zippy

Well-known member
Joined
Apr 27, 2020
Messages
2,221
Location
Wyoming
Still cleaning up and putting away. I was able to dry the oriental carpets and just sweep and vacuum. Lanterns, stoves and the heater were refilled/prefilled for the next trip, and are all put away, clothes duffels, hunt gear put away, Fuel fill station is refilled and that is put away with the Pantry/Stove/lantern/fuel box. got the van empty enough to go refill it. Privy "privacy tent" dried out and put away, canopy stakes, ropes, shock lines, dry and put away...

I still need to clean mud/dirt of the canopy poles and put them away, and most of the canopy traps are tomorrow. I should have time for some of the mods I want to work on for some things.

Were you able to harvest any game on this trip?
 
To avoid these ads, REGISTER NOW!

Outlawmws

Well-known member
Joined
Aug 9, 2011
Messages
39,322
Location
The Badlands
Were you able to harvest any game on this trip?
Only saw 3 deer in 5 days. 2 does and a spike in one group. First time hunting in this area. We did see 3 guys with a buck in the back of a PU on Tuesday afternoon, and someone had got one out of the camp we were in as they left the hide and legs outside of camp, hence I named the camp "Deer hide camp".

I did see plenty of mountain quail coveys, and half a dozen tree squirrels but didn't break out the shotgun. Once the weather started the small game evaporated.
 

KwikFab

Well-known member
Joined
Jul 27, 2024
Messages
1,222
Location
Central Valley, CA
Finally a little bit of time to cut.

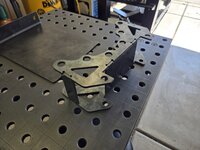
Started off with the pipe roller, but this one was a quick mock-up as I realize I should've measured my own pipe jack before cutting it out.

20251016_124938.jpg

20251016_125454.jpg

It's ok though because the new Rigid pipe jack my friend bought me should arrive today so I'll have that to measure the 'V' on.

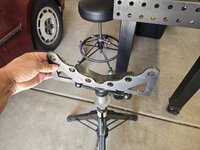
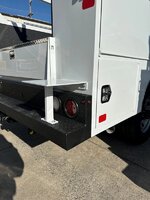
Also, he requested a vise mount for his service truck body. Thing is, they sell for over $345 before shipping and taxes which is ******* wild. The worst part, which makes me sick as a fabricator, is that such a premium product maintains sharp as hell corners.

PassengersideViseBracket.jpg

I won't even mention the ugly *** welds.

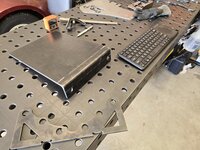
Anyway here's my version cut and bent in the same 3/16" mild steel.

20251016_124953.jpg

With the smallest radius that'll prevent anyone from stabbing their hand or getting their arm sliced up or their clothes.

20251016_125153.jpg

Still have a lot more work to do including finalizing the pipe jack heads as I got an order for 6 of them, 3 dino kits, some motor bike parts, and 4 large custom MOLLE panels for a customer of a customer.

Well, pipe jack arrived super late, and damaged :ROFLMAO:

20251016_194457.jpg

20251016_194650.jpg

It's ok, it's still perfectly fine to use especially for what I use them for. The friend I mentioned sometime back about buying me an expensive flange just for mock up, bought me this pipe jack just to ensure the roller head I make will work on it.

So I end up with a free new pipe jack, along with having my own design for a part I should be able to sell to others.

Screenshot 2025-10-16 224448.png

I expect it to work well but we'll see once it's cut out and welded up.
 

jblnut

ALLIANCE MEMBER
Joined
Jan 17, 2015
Messages
7,135
Location
In the Middle of MN
jblnut - I'd plan to replace that rim and/or expect it to crack again, not necessarily at the location of your repair. Welded up many like that for farmers and it'll get you through the harvest, but it will crack again. Some replace them before they crack again and keep them as a spare for less downtime the next time it happens. Some paint them red or circle the repair so you know you're putting on the spare and don't forget :).
It's painted black on the outside so I know right where it is. It'll last though harvest and likely beyond but I'm searching for a new rim or a whole new set. At $2350 each for a set of four plus new tires as these are nothing special I'm looking at North of $17,000 for rims and tires. Yikes. I found a few decent sets of used takeoffs in that $6k range that I plan to check out in a few weeks.
 

bugnut

ALLIANCE MEMBER
Joined
Jul 14, 2012
Messages
3,998
Location
Central Ohio
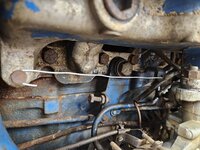
Found a couple of springs, tested both and settled on one, used it to replace the wire on the Ford tractor, it appears that the missing spring is the root cause of the throttle not holding position. Immediately able to hold 2000rpms, needs to reach 2200 for full throttle, 1500 for correct pto speed. Without the spring the governor and linkage would not hold 1400. Waiting on parts manual so i can determine if the spring is available. Failed to take pictures, but it is working at the moment.
 

Attachments

  • 20251013_144124.jpg
    20251013_144124.jpg
    902.8 KB · Views: 16

kaymccampbell

Well-known member
Joined
Feb 27, 2015
Messages
29,616
Location
Upstate New York
Finished "de-insulating" my Ferrari 308GT4 exhaust manifolds so that I can have them ceramic coated. The insulation is the last smog related part on the car most of which had been deleted years ago by PO's. For those not around back in the 70's a "thermal reactor" exhaust system was an attempt to retain as much heat in the exhaust flow as possible to "burn" any un-burnt or partially burnt fuel. The original thermal reactor muffler on this car weighed in at a hefty 85 lbs. The TR system went away with the advent of catalytic converters.

The headers where wrapped with mineral wool insulation bound in a fiberglass wrapping then enclosed in an aluminum sheet metal skin. Surprisingly the headers are in very good condition with only some surface rust where water had gotten inside of the insulation over the years. After some surface clean up I'll send them to Jet Hot or some similar applicator. A fellow 308 owner had his done at Jet Hot which turned out great. It sure beats paying $3k for an aftermarket set of SS headers.
Are you going to have them ceramic lined?
 

kaymccampbell

Well-known member
Joined
Feb 27, 2015
Messages
29,616
Location
Upstate New York
In the past weeks, cleaned, flung, put away, cut and assembled PVC pipe, cut foam, modded my battery soldering station, installed a new fan in the shoptop, cleaned up the heavulating shitmess of wires on it, loaded and tested pronterface on the shoptop. I think ***** might best describe the software. I'm sure there's plenty of other **** that I've forgotten.
IMG_20251015_171146.jpg
 

bmwrd0

Well-known member
Joined
Nov 7, 2010
Messages
5,508
Location
Beaver Fever Oregon
Spent a bit of time the last few days getting prepared for the new to me lathe in the shop, which mostly consists of going threw the old lathe bench looking to get rid of things, and get rid of the bench itself in a couple days as the new lathe is on its original legs. Dang, I had tucked away a lot of stuff! But, I needed something more fun than that, so I took the milling attachment I got in the big box o' lathe stuff apart and started cleaning it.
54861001890_0896f5aaa9_b.jpg
 

Prospecter

Well-known member
Joined
May 16, 2015
Messages
2,443
Location
Maine
In the past weeks, cleaned, flung, put away, cut and assembled PVC pipe, cut foam, modded my battery soldering station, installed a new fan in the shoptop, cleaned up the heavulating shitmess of wires on it, loaded and tested pronterface on the shoptop. I think ***** might best describe the software. I'm sure there's plenty of other **** that I've forgotten.
IMG_20251015_171146.jpg
Nice to see you posting. Missed you there for a while.
 

jblnut

ALLIANCE MEMBER
Joined
Jan 17, 2015
Messages
7,135
Location
In the Middle of MN
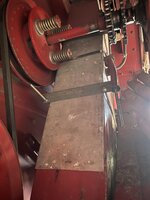
Sneak peak of yet another combine issue. It’s getting comical at this point. Took the better part of a $12 roll of tile tape to seal the leaky spot but we got it done lol. It’s looking more and more like I need to spend more on parts this winter than I paid for the combine lol.

The red box where the tape is houses the clean grain elevator. The harvested corn goes to the grain tank through that red taped up square. They wear out eventually. Apparently eventually is today lol. Tomorrows fix to follow !!
IMG_4883.jpeg
 

Beerhippie

Well-known member
Joined
Oct 13, 2023
Messages
10,011
Location
Far NE Oregon
Sneak peak of yet another combine issue. It’s getting comical at this point. Took the better part of a $12 roll of tile tape to seal the leaky spot but we got it done lol. It’s looking more and more like I need to spend more on parts this winter than I paid for the combine lol.

The red box where the tape is houses the clean grain elevator. The harvested corn goes to the grain tank through that red taped up square. They wear out eventually. Apparently eventually is today lol. Tomorrows fix to follow !!
IMG_4883.jpeg
Oh, yeah: Welding stuff with lots of grain dust present... what can possibly go wrong?
 

strength_and_power

Well-known member
Joined
Apr 26, 2015
Messages
1,422
- Oil change and tire rotation on the wife's car
- Got the traffic light up and spent some time making the wiring neat

1000236735.jpg

Shop all cleaned up for the night
1000236736.jpg
I have the same check engine sign in my shop and a traffics light as well. Amazon has a traffic light sequencer that was affordable and has a crazy amount of patterns and times you can set.
 

Outlawmws

Well-known member
Joined
Aug 9, 2011
Messages
39,322
Location
The Badlands
Big job was getting the big canopy tarp spread out to dry and the smaller side panels hung on a line, then the dried dirt swept or leaf blower-ed off them all., then folded.

Ordered some silver tarp repair tape that will replace the dying duct tape on the one hole, and reinforce the edge for a couple of the grommets. to be replaced with new ones on at least one high stress spot (grommet is half torn out...).

Lots of little clean up and put aways...
 

Blue Chips

Well-known member
Joined
Jan 25, 2012
Messages
199
Location
Maine
I just got back to perusing the GJ forum again. I haven’t had time for the past few weeks…too busy with projects. For example:

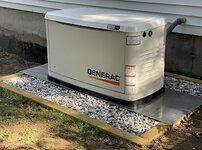
I finally completed the installation of our 24kw standby generator. It worked perfectly in a simulated power outage, and I like the app from Generac for monitoring, etc.
generator-installed-1-smaller-image.jpg

I overhauled the mower deck of the old New Holland GT18 garden tractor that I recently purchased, which involved welding a few cracks, replacing the spindle housings and bearings, replacing the axles for the anti-scalp wheels, installing new blades, replacing most of the fasteners and several other miscellaneous parts, plus lots of cleaning, sanding, priming, and painting. It should be good for many more years (if I remember to clean it on a regular basis to keep it from rusting).

Before:
old-but-solid-mower-deck-smaller-image.jpg

After:
deck-almost-finished-smaller-image.jpg

We decided to replace our old kitchen range with a new Wolf gas range. Wolf recommended at least a 500 cfm range vent hood, so I ordered one with a 680 cfm capacity. I wanted a secure mounting surface for the range hood, so I removed the drywall from the wall above the stove, blocked out the studs with more 2x4s, and installed 1/2" plywood in place of the drywall. I also installed new ducting for the range hood. I removed and repaired one of the existing wall cabinets while I was at it.

drywall-replaced-with-plywood-smaller-image.jpg

Back in the garage/shop again, I built a custom oak cabinet to go above the range hood. Wife wanted an open-front cabinet, but if she changes her mind, I can always add doors to it. I came ‘fairly’ close to matching the stain color of the existing cabinets…not exact, but close enough.

building-new-open-front-cabinet-smaller-image.jpg

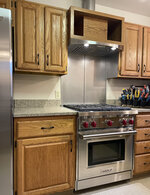
Another garage/shop project: I fabricated a stainless-steel backsplash from scratch. I used an orbital sander to texture the surface to soften reflections from the lights. I did the same thing on another backsplash about 20 years ago, and it worked great. The backsplash is secured by 1/4” x 3/4" stainless bar stock and countersunk stainless flat-head screws. I also added stainless panels to the sides of the cabinets above the range.

Backsplash in progress:
backsplash-and-hood-installation-in-progress-smaller-image.jpg

Softer reflections from textured surface:
backsplash-surface-reflectance-pattern-smaller-image.jpg

Finished backsplash:
new-backsplash-1-smaller-image.jpg

All in place. Just waiting for the new gas line to be connected by the licensed gas tech next week.

new-backsplash-2-smaller-image.jpg

hood-and-backsplashed-installed-1-smaller-image.jpg

I wanted to go with a 36” range instead of 30", but our kitchen isn’t very large, and we need all of the available counter space and storage. It’s just the two of us in the house, and we don’t cook for large groups very often, so we can get by fine with a 30” range. Besides, I have so many other projects going on that I didn’t want to deal with swapping out kitchen cabinets and shortening the quartz countertop. I’m also planning to replace all of the cabinet hinges and pulls with stainless steel to help integrate the cabinets with the stainless appliances.

Now back to other projects...

Edit: Since there were some comments below regarding the need for make-up air for the range hood, I just wanted to add that yes, I was already planning to install a make-up air kit, which should arrive in a few days.
 
Last edited:
To avoid these ads, REGISTER NOW!

strength_and_power

Well-known member
Joined
Apr 26, 2015
Messages
1,422
All in one go? My dentist wanted a bone graft, the gum to heal and then go back in 6 months later for the implant... Way too much un-insured $$ too.
He did the bone graft and installed whatever is under the gums. I’ll go back in two weeks for a check that will determine if they do the torque test in 3 or 6 months. Once clear, it’s on to my regular dentist for the visible part of the implant. And another $3k out of pocket if insurance does their usual and generously pay .37 to the project.
 

PhantomEB

Well-known member
Joined
Feb 6, 2006
Messages
6,817
Location
Medicine Hat, AB, Canuckistan
Shop is full. TIPM is out of the 3500 for a week probably more. Bronco squeezed over to make room for the 3500…. I probably could squeak the bronco out but it’s just a minor headlight to swap out on the Daily. Smoked a deer last week on our way back from Montana. Lucky all I needed was a bumper cover which just got black duct taped up and replace the headlight. Might take the opportunity to swap out to Silverstars as I hate the yellow light and LEDs screw up my wiring.
 

jblnut

ALLIANCE MEMBER
Joined
Jan 17, 2015
Messages
7,135
Location
In the Middle of MN
Oh, yeah: Welding stuff with lots of grain dust present... what can possibly go wrong?
Right !! I always have a few wet blankets, a couple fire extinguishers and a few pails of water along with a pressurized garden hose with a spray nozzle on it when I weld on combines and balers or anything dusty that I can’t get 100% clean. Last time I welded on the feeder house I soaked the inside first so it was all mushy and soggy first as I knew I’d be welding where there was dust/debris behind.

I think there may be an extended wear liner inside already but they don’t usually protect this area. Just the bottom and sides where the most wear usually happens. I may see if I can get a SS plate made that I can sneak in there on the inside to line the whole works. If not we’ll be taking all kinds of things apart this winter to get this thing out.
IMG_4886.jpeg

Yesterdays fix. Well, fixes. I think we added tape or redid it complete three or four times.
IMG_4884.jpeg

There’s a real good chance this will be here next year yet :lol_hitti
IMG_4888.jpeg
 

Beerhippie

Well-known member
Joined
Oct 13, 2023
Messages
10,011
Location
Far NE Oregon
Sneak peak of yet another combine issue. It’s getting comical at this point. Took the better part of a $12 roll of tile tape to seal the leaky spot but we got it done lol. It’s looking more and more like I need to spend more on parts this winter than I paid for the combine lol.

The red box where the tape is houses the clean grain elevator. The harvested corn goes to the grain tank through that red taped up square. They wear out eventually. Apparently eventually is today lol. Tomorrows fix to follow !!
IMG_4883.jpeg
I may be overly cautious, but when I've needed to weld on grain delivery stuff, I'd back-flush the inside of the line/bin with CO2 just to be safe.
 

Beerhippie

Well-known member
Joined
Oct 13, 2023
Messages
10,011
Location
Far NE Oregon
I may be overly cautious, but when I've needed to weld on grain delivery stuff, I'd back-flush the inside of the line/bin with CO2 just to be safe.
Part of my caution is due to what I work on: grain delivery, weighing and grinding systems for malt that are attached to two large silos via open-center Flex-Augers. A very small dust explosion could, in theory, propagate through the augers and into the silos. Not a theory I want to test. CO2 is cheap.
 

69charged

Well-known member
Joined
Sep 20, 2007
Messages
469
Location
carberry, manitoba
Failure of this gasket is a common problem unfortunately. Same thing happened to me.

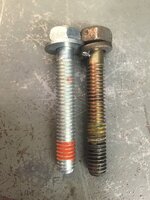
Briggs and Stratton came out with a revised gasket, new bolts with pre-applied Locktite (my picture below), and a revised upwards torque spec. I read somewhere that some folks would even take a center punch to dimple the gasket mating surface to try to stop the gasket from walking (I did not do this).

Some additional reading for you in links below.
1760439107752.jpeg
Well Larry, not good news. Didn’t save it in time.
IMG_5913.jpeg
****. Now I need more parts. And a friggin new gasket again! Ugh….
I think the worst part for me is it had a slow leak, and was nothing too serious. We are trying to sell our house and we have a conditional offer on it right now, and it includes our new hot tub and this ride on mower for the 6 acres. The couple looking at it have 4 young kids, the wife home schools them, and the husband works away for up to a month at a time. Not that that story means anything to anyone. But I couldn’t bring myself to sell them something that was in this condition, knowing that she might be the one mowing while he’s away, accidentally run it out of oil and then what…..
I thought eh, 50 bucks for the gasket and my time I’ll have er fixed up in no time.
Look where that got me 🙄

Sorry for the rant…..
 

larry4406

Well-known member
Joined
Jan 27, 2006
Messages
19,564
Location
Northern Virginia
I just got back to perusing the GJ forum again. I haven’t had time for the past few weeks…too busy with projects. For example:

I finally completed the installation of our 24kw standby generator. It worked perfectly in a simulated power outage, and I like the app from Generac for monitoring, etc.

generator-installed-1-smaller-image.jpg

I overhauled the mower deck of the old New Holland GT18 garden tractor that I recently purchased, which involved welding a few cracks, replacing the spindle housings and bearings, replacing the axles for the anti-scalp wheels, installing new blades, replacing most of the fasteners and several other miscellaneous parts, plus lots of cleaning, sanding, priming, and painting. It should be good for many more years (if I remember to clean it on a regular basis to keep it from rusting).

Before:
old-but-solid-mower-deck-smaller-image.jpg

After:
deck-almost-finished-smaller-image.jpg

We decided to replace our old kitchen range with a new Wolf gas range. Wolf recommended at least a 500 cfm range vent hood, so I ordered one with a 680 cfm capacity. I wanted a secure mounting surface for the range hood, so I removed the drywall from the wall above the stove, blocked out the studs with more 2x4s, and installed 1/2" plywood in place of the drywall. I also installed new ducting for the range hood. I removed and repaired one of the existing wall cabinets while I was at it.

drywall-replaced-with-plywood-smaller-image.jpg

Back in the garage/shop again, I built a custom oak cabinet to go above the range hood. Wife wanted an open-front cabinet, but if she changes her mind, I can always add doors to it. I came ‘fairly’ close to matching the stain color of the existing cabinets…not exact, but close enough.

building-new-open-front-cabinet-smaller-image.jpg

Another garage/shop project: I fabricated a stainless-steel backsplash from scratch. I used an orbital sander to texture the surface to soften reflections from the lights. I did the same thing on another backsplash about 20 years ago, and it worked great. The backsplash is secured by 1/4” x 3/4" stainless bar stock and countersunk stainless flat-head screws. I also added stainless panels to the sides of the cabinets above the range.

Backsplash in progress:
backsplash-and-hood-installation-in-progress-smaller-image.jpg

Softer reflections from textured surface:
backsplash-surface-reflectance-pattern-smaller-image.jpg

Finished backsplash:
new-backsplash-1-smaller-image.jpg

All in place. Just waiting for the new gas line to be connected by the licensed gas tech next week.

new-backsplash-2-smaller-image.jpg

hood-and-backsplashed-installed-1-smaller-image.jpg

I wanted to go with a 36” range instead of 30", but our kitchen isn’t very large, and we need all of the available counter space and storage. It’s just the two of us in the house, and we don’t cook for large groups very often, so we can get by fine with a 30” range. Besides, I have so many other projects going on that I didn’t want to deal with swapping out kitchen cabinets and shortening the quartz countertop. I’m also planning to replace all of the cabinet hinges and pulls with stainless steel to help integrate the cabinets with the stainless appliances.

Now back to other projects...
Our Wolf hood has variable speed. Unfortunately, at its lowest setting per the fan curve, it’s still at 57% of max rated capacity.

Per Code, since your 680 cfm hood surpasses the 400 cfm threshold, you should be providing makeup air. If your fan’s turn down is same as ours, min fan speed would be around 388 cfm.

I hope you don’t have any back draft issues while operating the hood.
 

jblnut

ALLIANCE MEMBER
Joined
Jan 17, 2015
Messages
7,135
Location
In the Middle of MN
Part of my caution is due to what I work on: grain delivery, weighing and grinding systems for malt that are attached to two large silos via open-center Flex-Augers. A very small dust explosion could, in theory, propagate through the augers and into the silos. Not a theory I want to test. CO2 is cheap.
I’ve recently been doing some IT work in the local elevator and I cannot believe the dust load in that place. I almost don’t even want to fart just in case it sets something off. I asked if there was some sort of inspection or dust removal plan and the answer was “no” and “we clean weekly, come back on Monday and see how clean it is”. I plan to be there this coming Monday to work in a few corners they said would be offline finally so we shall see. I drew the date on some dust behind a leg and I bet it’s still there in 20yrs lol
 

Beerhippie

Well-known member
Joined
Oct 13, 2023
Messages
10,011
Location
Far NE Oregon
I’ve recently been doing some IT work in the local elevator and I cannot believe the dust load in that place. I almost don’t even want to fart just in case it sets something off. I asked if there was some sort of inspection or dust removal plan and the answer was “no” and “we clean weekly, come back on Monday and see how clean it is”. I plan to be there this coming Monday to work in a few corners they said would be offline finally so we shall see. I drew the date on some dust behind a leg and I bet it’s still there in 20yrs lol
My original boss at the brewery didn't believe in dust explosions!

When we got our first, very used, silo filled for the first time, dust was issuing from numerous small holes in the top of the silo. My boss suggested I get up there on a lift and weld them while we were filling, so we could easily see the holes by the dust coming out!

Not only did I refuse, but the grain truck driver said he'd just be packing up and going a few miles down valley for lunch--with his truck. When the boss man asked him why, he said he'd just wait 'till the dust settled and see if there was still a brewery to deliver to.

I flooded that bosses inbox with online stories and videos of dust explosions and their aftermaths.

Not long after, I spent a week or two installing a carefully grounded dust collection system in the grain room. I patched the holes in the silo with fiberglass and epoxy--pretty much the entire top.
 
Last edited:

niget2002

Well-known member
Joined
Oct 2, 2012
Messages
11,237
Location
Josephine, TX
Good day in the shop so far.

Oil change on the truck.
Built a shelf for the wife.
Built a small stand she can use to hang products on for her business.

Now relaxing in the recliner watching football.

Last night I hooked up a wled controller to the govee spot lights. I got it working, but it looks like there's a bug in the driver library keeping it from setting the current correctly at start up
I have to reset the settings after a restart to get full brightness. I have a thread on discord discussing it.
 

Beerhippie

Well-known member
Joined
Oct 13, 2023
Messages
10,011
Location
Far NE Oregon
Toyota time again.

The toy started bucking badly as I drove in this AM. It would idle just fine and rev without a load, but as soon as I let the clutch out, it became a wild bronco. The engine light flashed once and I pulled over at the first opportunity--there's no shoulder for much of that road, just ditches.

Opened the hood and checked everything. Nothing obvious. I checked more, shaking hoses and wires--still nothing. I got back in and fired it up--the gal whose house I'd pulled over in front of was glaring out the window at me--and drove the rest of the way to the shop without a hitch.

Fortunately, a coworker who's a certified mechanic with much more experience than I with fuel injected rigs had stopped in to grab something. He suggested the engine coolant temp sensor. I checked it out, and the terminal plug on the end of the sensor turned freely--that didn't seem right. $40 at the local auto parts store, five minutes of wrenching and a new sensor was installed. Only spilled about a cup of coolant.

I drove a few miles after lunch with no problems, so hopefully, that was the problem. The Toy has ODB I, so all I could do that way was check the blinking light codes--there were none.

Old cars sure are fun!

Now I'm fixing up some estate sale tool finds. New cord and plug for a bench grinder, clean and paint an old Ridgid 10" pipe wrench. I think I'll try sharpening the teeth on it back up--wish me luck.
 

Blue Chips

Well-known member
Joined
Jan 25, 2012
Messages
199
Location
Maine
Our Wolf hood has variable speed. Unfortunately, at its lowest setting per the fan curve, it’s still at 57% of max rated capacity.

Per Code, since your 680 cfm hood surpasses the 400 cfm threshold, you should be providing makeup air. If your fan’s turn down is same as ours, min fan speed would be around 388 cfm.

I hope you don’t have any back draft issues while operating the hood.
Thanks, but I already have an appropriate make-up air kit on order. I've installed them before.

This particular hood is rated at 280/450/680 cfm, depending on the speed setting.

On a similar note, we're planning to reduce make-up air requirements in our basement by upgrading our old oil-fired boiler that uses inside air for combustion to a high-efficiency propane-fired model that uses outside air for combustion.
 

kaymccampbell

Well-known member
Joined
Feb 27, 2015
Messages
29,616
Location
Upstate New York
Our Wolf hood has variable speed. Unfortunately, at its lowest setting per the fan curve, it’s still at 57% of max rated capacity.

Per Code, since your 680 cfm hood surpasses the 400 cfm threshold, you should be providing makeup air. If your fan’s turn down is same as ours, min fan speed would be around 388 cfm.

I hope you don’t have any back draft issues while operating the hood.
My range hood made the rollout sensors on the boiler kick. It also would pull the flames right out of the fireplace. I have two 12's and an 8 automatic makeup air ducts that are triggered by pressure switches on the hood's outlet duct. I've also got a makeup air duct on the boiler, that's triggered by the vent damper, and another makeup that feeds the front hall and is triggered by a pressure drop in the house, to catch any other vents n whatnot, like the laser cutter vent or shop vent.
 

Blue Chips

Well-known member
Joined
Jan 25, 2012
Messages
199
Location
Maine
My range hood made the rollout sensors on the boiler kick. It also would pull the flames right out of the fireplace. I have two 12's and an 8 automatic makeup air ducts that are triggered by pressure switches on the hood's outlet duct. I've also got a makeup air duct on the boiler, that's triggered by the vent damper, and another makeup that feeds the front hall and is triggered by a pressure drop in the house, to catch any other vents n whatnot, like the laser cutter vent or shop vent.
I've dealt with make-up air requirements quite a number of times over the past 50 years or so, during which time I've restored/remodeled multiple houses and workshop areas. Each one presented its own set of challenges. I've always provided more than enough make-up air to prevent any vacuum-related issues.

I have a pretty sizeable exhaust fan in my current workshop, as well as a built-in vacuum that exhausts outside (which I just repaired yesterday). The negative pressure that can be generated is quite impressive. I have a 10-inch make-up air duct that is just adequate for that purpose.
 
Last edited:

bmwrd0

Well-known member
Joined
Nov 7, 2010
Messages
5,508
Location
Beaver Fever Oregon
Toyota time again.

The toy started bucking badly as I drove in this AM. It would idle just fine and rev without a load, but as soon as I let the clutch out, it became a wild bronco. The engine light flashed once and I pulled over at the first opportunity--there's no shoulder for much of that road, just ditches.

Opened the hood and checked everything. Nothing obvious. I checked more, shaking hoses and wires--still nothing. I got back in and fired it up--the gal whose house I'd pulled over in front of was glaring out the window at me--and drove the rest of the way to the shop without a hitch.

Fortunately, a coworker who's a certified mechanic with much more experience than I with fuel injected rigs had stopped in to grab something. He suggested the engine coolant temp sensor. I checked it out, and the terminal plug on the end of the sensor turned freely--that didn't seem right. $40 at the local auto parts store, five minutes of wrenching and a new sensor was installed. Only spilled about a cup of coolant.

I drove a few miles after lunch with no problems, so hopefully, that was the problem. The Toy has ODB I, so all I could do that way was check the blinking light codes--there were none.

Old cars sure are fun!

Now I'm fixing up some estate sale tool finds. New cord and plug for a bench grinder, clean and paint an old Ridgid 10" pipe wrench. I think I'll try sharpening the teeth on it back up--wish me luck.
I loath the current policy of cutting a ditch on both sides of a county road with no place to turn out. I understand the reason, but there needs to be a realization that people do pull over for good reasons, reasons that you don't want to force them to do while driving, such as check their phone.
 

Beerhippie

Well-known member
Joined
Oct 13, 2023
Messages
10,011
Location
Far NE Oregon
I loath the current policy of cutting a ditch on both sides of a county road with no place to turn out. I understand the reason, but there needs to be a realization that people do pull over for good reasons, reasons that you don't want to force them to do while driving, such as check their phone.
Uh, that "current policy" would date back to 1928, at the latest. That's the date the bridge in front of my cabin was built, and the raised and ditched road (formerly the highway, now the truck route) is at least that old--there probably was an earlier bridge.

It's very common out here, especially on roads in irrigated areas. It's not only a PITA for breakdowns, but it often turns a simple wreck due to inattention into a fatality.
 

Beerhippie

Well-known member
Joined
Oct 13, 2023
Messages
10,011
Location
Far NE Oregon
They have an app and an adapter cable for you phone to be an OBD reader now.


Triangular file should do fine.
Not for OBD I, that I'm aware of or can find.

Triangular file has worked well on the hook jaw. Waiting for the rest of the wrench to come out of the curing oven. I FUed and painted a pre-WWII wrench red, but it will match my restored #2 cutter.
 
To avoid these ads, REGISTER NOW!
Top Bottom