To avoid these ads, REGISTER NOW!

What did you do "IN" your garage today?

2001ZR2

Well-known member
Joined
Jan 4, 2018
Messages
419
Location
Kansas City
Last night had help wrestle my Craftsman Table saw on to a universal equipment mobile base. Missed the dimensions so had to adjust the frame. Found the base was missing a 1/4-20 nut that held one of wheels...replaced it. Now the saw can be moved easily.

Had a magnifying lamp that was missing a machine screw...found one in my fastener storage. Not on the floor...bet I'm the only GJ member that has done that. 🤔

Today started sorting a bunch of stuff from FB market place score. Decided since there were so many Taiwan and Japan COO sockets that these could be test subjects for my Ultrasonic cleaner and evaporust. Dish soap and water works better before you string the sockets on a zip tie. Tomorrow will see if the evaporust works and doesn't damage chrome sockets. My research shows that heat helps the evaporust work better.
 
To avoid these ads, REGISTER NOW!

Beerhippie

Well-known member
Joined
Oct 13, 2023
Messages
10,008
Location
Far NE Oregon
I didn't wonder; I used a mulching mower for 20-30 years before I gave up on lawns. it's smart!

Just do't try to mulch oak leaves (or other high acidic vegetation), I tried a "oak leaf compost bin" for close to three years. Those leaves NEVER composted.
Oaks don't much grow up here. There are a few, but far between.

I wish we could do away with the lawns--the most useless agriculture ever--but we need customers and customers love lawns.
 

Skyman

Well-known member
Joined
Nov 9, 2021
Messages
1,222
Location
Central Maryland
Today started sorting a bunch of stuff from FB market place score. Decided since there were so many Taiwan and Japan COO sockets that these could be test subjects for my Ultrasonic cleaner and evaporust. Dish soap and water works better before you string the sockets on a zip tie. Tomorrow will see if the evaporust works and doesn't damage chrome sockets. My research shows that heat helps the evaporust work better.


I've never had Evaporust cause any harm to plating, and I've used gallons of it. I learned that knocking off as much of the rust as is reasonably practical to do before soaking in ER does make for the most economical use of ER. After a soak, I pour the ER through a coffee filter in a funnel, into a separate container, and use that ER again until it becomes too dark and ineffective. I try to save the virgin ER for items that I want to have come out as clean as possible. Used ER tends to leave a darker finish on parts that come out of it. A scrubbing with a bristle brush helps to knock that darkness down a bit. I've never tried heating ER. I don't have an ultrasonic cleaner, but am thinking about acquiring one. A final suggestion is to keep ER covered to minimize evaporation. I use capped containers where possible, and where not possible, I cover the container with Saran wrap.
 

Old Man Roger

Well-known member
Joined
Apr 6, 2017
Messages
17,817
Location
Palm Coast Florida
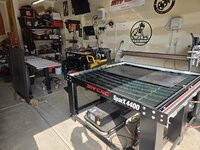
You have no idea how hard it can be giving away hundreds of pounds of steel for free for others to recycle and collect money from

I let 3 months of skeleton cutouts accumulate; do you know how many 4' x 4' sheets and 2' x 4' sheets that is? :ROFLMAO:

It was around 40 or so 4x4s and several 2x4 (around 8 or 10?).

I had gone through some 25 complete sheets of steel.
Too bad you can’t melt it down and make new plate.lol
 

msharley

Well-known member
Joined
Sep 20, 2021
Messages
14,160
Location
Central Pennsylvania
This thread moves pretty fast. If you don't log in, and look around once in a while you might miss it.

Finally got the work bike back together. Ridden to work & back for a few days. Nothing has leaked out or fallen off, and the suspension feels good. Haven't done much else in the garage. Taking a little break from wrenching. Working on household projects.

Decided she deserved a glamour shot since she still looks pretty good for 26:
IMG_2544.jpeg
That! Is RED!! Enough! Great looking road way!
 

kaymccampbell

Well-known member
Joined
Feb 27, 2015
Messages
29,609
Location
Upstate New York
Been doing the same to mine.
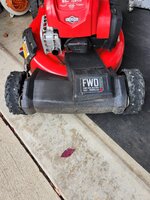
Be thankful you have concrete! 😂IMG_4034.jpeg
I can't count the number of jobs I've done in all weather, out on the gravel, or on top of a landfill, or in an alley full of rats, or half sunk in the swamp. A bit of poly or some broken sheets of ply can make the job a bit more tolerable. Now that I'm old, most everything comes in on the lift. But when it STB on the back 40, well, there we are again.
 

Jgaz

Well-known member
Joined
Dec 16, 2016
Messages
1,705
Location
AZ
Finished up another series of attempts to improve dust collection (or containment) on my old miter saw.

I borrowed an idea from someone here about enclosing the space around the saw with solid panels.
Mine lift straight up to move out of the way to cut miters.
There may be a second version as I ran short of material on hand while making the left hand panel.
IMG_5853.jpeg

Also a third attempt to direct more of the saw dust into the factory dust port.
IMG_5852.jpeg
May add onto the aluminum.

Also no pics but I ran a full 2 1/2“ shopvac hose right to the back of the port.
Previously I had the hose choked down to less than an 1 1/2“

All mods seemed to help (some) but I’m not sure I won’t try again.
 
To avoid these ads, REGISTER NOW!

Motorman55

Well-known member
Joined
Apr 10, 2016
Messages
2,648
Location
South Jersey
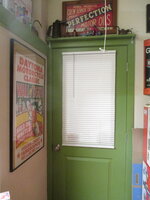
Installed a window mini blind to the office/shop door. The front of the shop faces due West and I needed something to block the setting sun rays shining thru the garage windows and into the office. Also helps stop the glare from the shop ceiling lights.

I used the small clips that comes with the blind that holds the bottom down. Keeps the blind from swinging back and forth when opening and closing the door. I'm going to get one for the small pass thru window too. That gets a lot of sun rays coming thru also.1761274950511.jpeg 1761274712944.jpeg1761274569789.jpeg
 

Outlawmws

Well-known member
Joined
Aug 9, 2011
Messages
39,321
Location
The Badlands
Filled the "green bin" with mostly ivy.

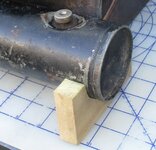
Made a support saddle for my late 20's Gypsy camp stove tank so it has support when I need to pump it up:

7/8" gap under it - see that cap on the end? an external pump lands there and you pump pressure in the tank:

Gypsy tank support for pump before.jpg

It wants to rock so I made a support saddle:

Gypsy tank support for pump with saddle.jpg


Stuck a temporary mirror on the right side of the T-van as I busted the factory mirror up backing up in camp, in the dark while it was snowing and caught a tree with it - the reflection in the window gives a fair representation of the view I get!:

T-van temp mirror.jpg

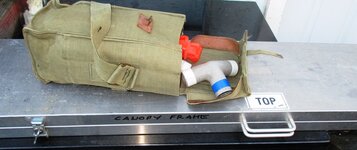
The Blue tape came in so I finished the color coding of the big canopy poles, and the similar "lean-to for the van I made up"

Big canopy pole box, and parts bag for the corner connections - The aluminum box is 48X10X2-1/2 and is pretty much full!
:
Canopy pole storage.jpg

The poles: stored for transport - and color code instructions inside - to the lower right are the 4" leg extensions I made:

Canopy poles color coded.jpg


I should have done the color coding years ago. this makes it super easy to assemble.
 

Beerhippie

Well-known member
Joined
Oct 13, 2023
Messages
10,008
Location
Far NE Oregon
Filled the "green bin" wit Mostly ivy

Made a support saddle for my late 20's Gypsy camp stove tank so it has support when I need to pump it up:

7/8" gap under it - see that cap on the end? an external pump ladds ther adn you pump pressure in the tank:

Gypsy tank support for pump before.jpg

It wants to rock so I made a support saddle:

Gypsy tank support for pump with saddle.jpg


Stuck a temporary mirror on the right side as I busted the factory mirror up backing up in camp, in the dark while it was snowing and caught a tree with it - the reflection in the window gives a fair representation of the view I get!:

T-van temp mirror.jpg

The Blue tape came in so I finished the color coding of the big canopy poles, and the similar "lean-to for the van I made up"

Big canopy pole box, and parts bag for the corner connections - The aluminum box is 48X10X2-1/2 and is pretty much full!
:
Canopy pole storage.jpg

The poles: stored for transport - and color code instructions inside - to the lower right are the 4" leg extensions I made:

Canopy poles color coded.jpg


I should have done the color coding years ago. this makes it super easy to assemble.
For color-code matching fittings and poles for tents, we just set the frame up and hit each joint with spray paint. Marks the fitting and the pole all at once.

Now the new tents come that way from the factory.
 

bornbadbob

Well-known member
Joined
Jan 3, 2025
Messages
216
Removed the slat wall from the garage, going to repurpose the slat wall into the wife’s garden shed and may change the spot for the left overs if I can make it work in the he garage, pretty sure I can find some wall space for at least some of it
Also flung, cleaned and sort some of the bits that have been hanging out too long.
 

Attachments

  • IMG_7372.jpeg
    IMG_7372.jpeg
    796.8 KB · Views: 20
  • IMG_7371.jpeg
    IMG_7371.jpeg
    685.7 KB · Views: 19

Motorman55

Well-known member
Joined
Apr 10, 2016
Messages
2,648
Location
South Jersey
Finished up another series of attempts to improve dust collection (or containment) on my old miter saw.

I borrowed an idea from someone here about enclosing the space around the saw with solid panels.
Mine lift straight up to move out of the way to cut miters.
There may be a second version as I ran short of material on hand while making the left hand panel.
IMG_5853.jpeg

Also a third attempt to direct more of the saw dust into the factory dust port.
IMG_5852.jpeg
May add onto the aluminum.

Also no pics but I ran a full 2 1/2“ shopvac hose right to the back of the port.
Previously I had the hose choked down to less than an 1 1/2“

All mods seemed to help (some) but I’m not sure I won’t try again.
This guy makes custom designed vac attachments for collected saw dust on miter saws. https://shopnationstore.com/
 

Jgaz

Well-known member
Joined
Dec 16, 2016
Messages
1,705
Location
AZ
This guy makes custom designed vac attachments for collected saw dust on miter saws. https://shopnationstore.com/
Thanks. They currently have nothing that works on my 90’s vintage DW705.

Ive been in contact with them twice about future plans to include more saws but my 705 isn’t in the plans.

They seem like a good company to deal with, I wish I could do business with them.
 

LeonardY

Well-known member
Joined
Apr 16, 2011
Messages
5,096
Location
Southern California
Washed and waxed the Volvo. I'll be trying to sell it this weekend.

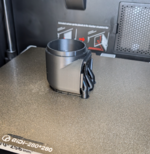
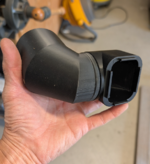
Printed a couple of pieces for my Dewalt chop saw dust collection. I'm really liking this new printer. Still haven't fully figured out the slicing software. The parts seem a little light.
1761282510036.png1761282537949.png
They fit together nicely.
1761282586134.png
Will print the rest tomorrow. Then that should be it.
But like @Jgaz said. I can't guarantee that there won't be another iteration.

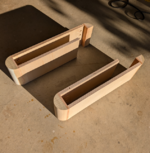
Worked on the desk base. This is far as I got. I'll try to finish that up tomorrow as well.
1761282829249.png

@Beerhippie While I was sitting in the garage, Amazon pulled up and delivered this.
1761283049583.png
Read the instructions. I've got a siphon sprayer but I'm going to have to figure out the right mix to use it. I think that will be the only way to reach the top of the tree.
 
Last edited:

bustedcrawler

Well-known member
Joined
Feb 12, 2015
Messages
88
Location
Denver
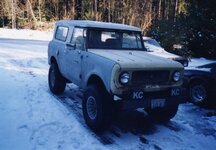
Nice scout!


But getting onto this time of year, wouldn't you want the plow?

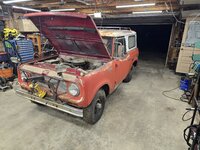
No, don't have enough driveway to justify it. Takes me 30mins or so to shovel walks and what I need to clear of the gravel drive way. Plow itself was missing.


66, was a factory turbo 152 but not sure where/when/why turbo and its hardware went missing. So 152, 3spd, and a twin stick 20.


Got it running so the wipers will work for vin inspection and roadworthiness check for going from bill of sale to title.
Once that is done... 5.3LS goes in with NV4500, ORD magnum/205 combo, 60/14 bolt, some K5 blazer or YJ or Waggy leaf springs and 40s go in.
 

rd65

Well-known member
Joined
Sep 29, 2017
Messages
2,827
Location
Granite Falls, WA
No, don't have enough driveway to justify it. Takes me 30mins or so to shovel walks and what I need to clear of the gravel drive way. Plow itself was missing.


66, was a factory turbo 152 but not sure where/when/why turbo and its hardware went missing. So 152, 3spd, and a twin stick 20.


Got it running so the wipers will work for vin inspection and roadworthiness check for going from bill of sale to title.
Once that is done... 5.3LS goes in with NV4500, ORD magnum/205 combo, 60/14 bolt, some K5 blazer or YJ or Waggy leaf springs and 40s go in.
One I had awhile ago, 93ish. 68 with 266 and 35s. Parts were hard to source back then, can't imagine what they're like now. Could have made some serious coin if I sold today vs back then.
 

Attachments

  • img060.jpg
    img060.jpg
    101.3 KB · Views: 45

Wrench97

Well-known member
Joined
Jun 23, 2018
Messages
12,155
Location
Southeastern Pa
No, don't have enough driveway to justify it. Takes me 30mins or so to shovel walks and what I need to clear of the gravel drive way. Plow itself was missing.


66, was a factory turbo 152 but not sure where/when/why turbo and its hardware went missing. So 152, 3spd, and a twin stick 20.


Got it running so the wipers will work for vin inspection and roadworthiness check for going from bill of sale to title.
Once that is done... 5.3LS goes in with NV4500, ORD magnum/205 combo, 60/14 bolt, some K5 blazer or YJ or Waggy leaf springs and 40s go in.
I worked for a IH dealer in the early 70's having the problematic turbos removed was common I think there were only somewhere around 1000 made, it could also be a engine swap with a non turbo 152 or 198 .
 
Last edited:
To avoid these ads, REGISTER NOW!
Top Bottom