To avoid these ads, REGISTER NOW!

What did you do "IN" your garage today?

Beerhippie

Well-known member
Joined
Oct 13, 2023
Messages
9,946
Location
Far NE Oregon
A couple of weeks ago, I built a You Tube intake air muffler for our ridiculously loud vintage DeVilBliss 5 hp recip compressor.

It did nothing to reduce the noise, as per my OSHA-approved sound pressure meter. Between 85 and 90 dB at my desk, regardless.

So today I tried another approach. Folks replied to my thread about the muffler build with some suggestions to:

1) Relocate the intake outside.

B) Use a long section of hose between the comp and the intake filter.

iii) Build an insulated enclosure for the comp. Now, this just ain't happening due to where the comp is used to living.

So, a long hose leading to an outside intake. That I can do.

I have most of the parts I need around the shop: Some 1" plumbing fittings, a bunch of 1 1/4" tubing (hose) and a 1" wall flange from the muffler build.

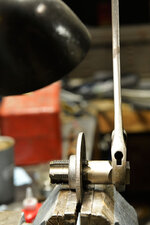
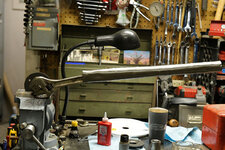
Problem is, I need the wall flange to be a pass-through so I can mount the intake filter to the wall outside. This means re-tapping it all the way through:
54931044840_f42f650e6e_o.jpg

54929867897_108368a7d1_o.jpg

Big tap require big wrench.

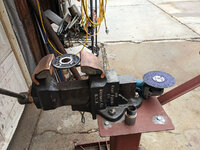
Now the flange is too thick for a close ******, so grind the boss off (yes, tapping it would have been much easier after grinding it down--but that would be thinkin' ahead):
54930943788_f3e716db0e_o.jpg

Gawds, I love those 3M Cubitron II disks!
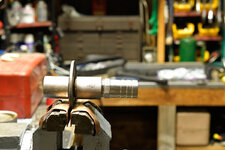
54931044815_dd4a43a19f_o.jpg

That's the ticket!

Shoot a heavy coat of black gloss on, and get it into the curing oven.

While that's happening (and after the weekly office meeting), I bored a 1 1/2" hole through the wall with a hole saw.
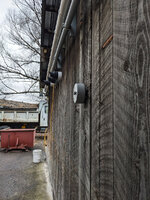
54930738551_090ae61f87_o.jpg

I mounted the intake well away from and lower than the Rinnai water heater exhausts so I don't pick up a bunch of CO. I also moved the outer coupler to the inside of the wall as the filter housing was sticking out too far in a forklift zone and the hose barb on the inside wasn't sticking out far enough.

Now, I'd ordered two 1 1/4 barb X 1" MNPT fittings to attach the hose to my fittings. Of course, what I got from The Jungle were two 1 " barb X 1" MNPT. Fortunately, it's a low-suction applications so this will work:

54931044825_27d32de2a6_o.jpg

Finished:

54931044810_8bf5a072ca_o.jpg

It seems a little quieter to me, but best get out the meter and check. Nope. Still 85-89 dB at my desk. Maybe a dB or so of reduction, but I guess it's just a damned noisy old compressor.

You can see why an insulated enclose ain't practical there. I guess I'll live with it. At least the comp isn't sucking out what warm air I can muster in the shop anymore.
 
Last edited:
To avoid these ads, REGISTER NOW!

Beerhippie

Well-known member
Joined
Oct 13, 2023
Messages
9,946
Location
Far NE Oregon
I woke this AM to a dead heating coil on my coffee maker, and a down internet on the provider end. But I persevered!

I did manage to rebuild this tailstock (you can see the parts doner in the background)
54931055398_57cd01624c_b.jpg
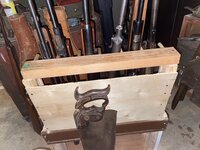
And made the temporary, albeit necessary, repairs to the air gun rack
54930832711_a0e8c4baf3_b.jpg
NOOOOOO!

I always have my camping stove-top drip coffee maker for a back-up.

Well done, considering.
 

SMOKEYBEAR

Well-known member
Joined
Jan 3, 2016
Messages
461
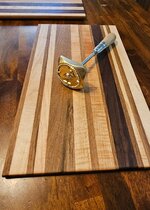
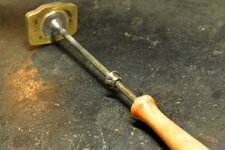
My new brand from Buckeye Engraving arrived. Tested it out on a few pieces I have built recently, and one older piece I have been waiting to do...

I'm gonna cross post it in the new tool arrivals.
 

Attachments

  • BE9.jpg
    BE9.jpg
    139.3 KB · Views: 21
  • BE8.jpg
    BE8.jpg
    245.3 KB · Views: 17
  • BE6.jpg
    BE6.jpg
    127.5 KB · Views: 13
  • BE5.jpg
    BE5.jpg
    95.3 KB · Views: 14
  • BE3.jpg
    BE3.jpg
    299.3 KB · Views: 15
  • BE2.jpg
    BE2.jpg
    144.4 KB · Views: 17
  • BE1.jpg
    BE1.jpg
    289.5 KB · Views: 16

SMOKEYBEAR

Well-known member
Joined
Jan 3, 2016
Messages
461
Now you need the proper heat source for it:

53372206430_a86a8ddf68_o.jpg
I certainly do. After a run with it tonight, I need to hit it with a temp gun and see the results to get an idea that is more accurate than heat radiating up into the handle :ROFLMAO:to get the desired result. I like the heavy burn, gives it a texture, lower heat and the details are unbelievable.
 

Beerhippie

Well-known member
Joined
Oct 13, 2023
Messages
9,946
Location
Far NE Oregon
I certainly do. After a run with it tonight, I need to hit it with a temp gun and see the results to get an idea that is more accurate than heat radiating up into the handle :ROFLMAO:to get the desired result. I like the heavy burn, gives it a texture, lower heat and the details are unbelievable.
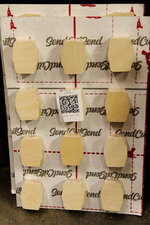
Getting the temperature just right is tough.

I don't know how the handle shaft attaches to the head of yours, but our just had the shaft threaded into a blind-tapped hole in the brand. That didn't last long.

I found a nut that fit the threads of the shaft, a fender washer and welded them all together, then cleaned up my Booger Welds (Pat pend)
with and angle grinder. I then brazed those to the back of the brand:

54931139508_a0e678847a_o.jpg

I found that the distance of the brand from the head of the ol' Clayton-Lambert torch made a difference in keeping the heat consistent (as does heating time), so I added a stop to the shaft:

54930063197_934bbb6988_o.jpg

The stop collar I used wasn't big enough for the "hook" of the blowtorch, so another washer and more Booger welds.

Of course, when I'm using ours, I'm often making a hundred or more brands in a day:

54371844643_c5dac86506_o.jpg

54371844638_1c2bf24b0a_o.jpg

YMMV.
 

M.Brane

ALLIANCE MEMBER
Joined
Feb 11, 2024
Messages
1,775
Location
1 hr N/W of LA LA Land
A couple of weeks ago, I built a You Tube intake air muffler for our ridiculously loud vintage DeVilBliss 5 hp recip compressor.

It did nothing to reduce the noise, as per my OSHA-approved sound pressure meter. Between 85 and 90 dB at my desk, regardless.

So today I tried another approach. Folks replied to my thread about the muffler build with some suggestions to:

1) Relocate the intake outside.

B) Use a long section of hose between the comp and the intake filter.

iii) Build an insulated enclosure for the comp. Now, this just ain't happening due to where the comp is used to living.

So, a long hose leading to an outside intake. That I can do.

I have most of the parts I need around the shop: Some 1" plumbing fittings, a bunch of 1 1/4" tubing (hose) and a 1" wall flange from the muffler build.

Problem is, I need the wall flange to be a pass-through so I can mount the intake filter to the wall outside. This means re-tapping it all the way through:

54931044840_f42f650e6e_o.jpg

54929867897_108368a7d1_o.jpg

Big tap require big wrench.

Now the flange is too thick for a close ******, so grind the boss off (yes, tapping it would have been much easier after grinding it down--but that would be thinkin' ahead):

54930943788_f3e716db0e_o.jpg

Gawds, I love those 3M Cubitron II disks!

54931044815_dd4a43a19f_o.jpg

That's the ticket!

Shoot a heavy coat of black gloss on, and get it into the curing oven.

While that's happening (and after the weekly office meeting), I bored a 1 1/2" hole through the wall with a hole saw.

54930738551_090ae61f87_o.jpg

I mounted the intake well away from and lower than the Rinnai water heater exhausts so I don't pick up a bunch of CO. I also moved the outer coupler to the inside of the wall as the filter housing was sticking out too far in a forklift zone and the hose barb on the inside wasn't sticking out far enough.

Now, I'd ordered two 1 1/4 barb X 1" MNPT fittings to attach the hose to my fittings. Of course, what I got from The Jungle were two 1 " barb X 1" MNPT. Fortunately, it's a low-suction applications so this will work:

54931044825_27d32de2a6_o.jpg

Finished:

54931044810_8bf5a072ca_o.jpg

It seems a little quieter to me, but best get out the meter and check. Nope. Still 85-89 dB at my desk. Maybe a dB or so of reduction, but I guess it's just a damned noisy old compressor.

You can see why an insulated enclose ain't practical there. I guess I'll live with it. At least the comp isn't sucking out what warm air I can muster in the shop anymore.
I would try a gobos that you could easily move. Cheap, and easy enough. You might be surprised. Pay no attention to the ones they try to sell you. Pretty stupid what they want for some plywood covered with rockwool, and fabric.
 

Jgaz

Well-known member
Joined
Dec 16, 2016
Messages
1,690
Location
AZ
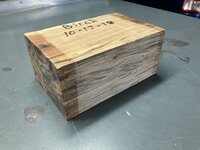
I’m getting ready for round #2 of my “use up what I’ve been hoarding” projects.

This chunk of Spalted Birch was sent to me by a friend in Tenn. that can no longer turn on his lathe.
IMG_5936.jpeg
Im going to use this stock for the lids on 4 or 5 small boxes (Approx. 4 x 6.5 x 3” deep)
I‘d like to get a little fancier on this run of boxes and miter the corners and add so splines to the joint.

I absolutely HATE cutting a 45* angle on the ShopSmith!
The tilting table instead of the tilting blade ***** for angle cutting.
Cutting the 45 on the miter saw is doable but I find it kind of finicky to make the opposite sides exactly the same length. I also seem to get errors caused by turning the saw left to right.

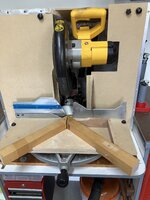
Because I’d like to do a production run of at least 4 boxes, I decided to make a jig for the miter saw to help out.
I modeled the jig after the picture framing jig that I use to make picture frames on the table saw.
IMG_5935.jpeg
The test piece to the right of the blade came out great.
In use there will be a stop block on the RH fence (B) to keep the opposite sides exactly the same lengths.
I’m thinking this will make the boxes easier and much quicker to build.

I might pretty this jig up a bit but probably won’t.
 

kaymccampbell

Well-known member
Joined
Feb 27, 2015
Messages
29,595
Location
Upstate New York
A couple of weeks ago, I built a You Tube intake air muffler for our ridiculously loud vintage DeVilBliss 5 hp recip compressor.

It did nothing to reduce the noise, as per my OSHA-approved sound pressure meter. Between 85 and 90 dB at my desk, regardless.

So today I tried another approach. Folks replied to my thread about the muffler build with some suggestions to:

1) Relocate the intake outside.

B) Use a long section of hose between the comp and the intake filter.

iii) Build an insulated enclosure for the comp. Now, this just ain't happening due to where the comp is used to living.

So, a long hose leading to an outside intake. That I can do.

I have most of the parts I need around the shop: Some 1" plumbing fittings, a bunch of 1 1/4" tubing (hose) and a 1" wall flange from the muffler build.

Problem is, I need the wall flange to be a pass-through so I can mount the intake filter to the wall outside. This means re-tapping it all the way through:

54931044840_f42f650e6e_o.jpg

54929867897_108368a7d1_o.jpg

Big tap require big wrench.

Now the flange is too thick for a close ******, so grind the boss off (yes, tapping it would have been much easier after grinding it down--but that would be thinkin' ahead):

54930943788_f3e716db0e_o.jpg

Gawds, I love those 3M Cubitron II disks!

54931044815_dd4a43a19f_o.jpg

That's the ticket!

Shoot a heavy coat of black gloss on, and get it into the curing oven.

While that's happening (and after the weekly office meeting), I bored a 1 1/2" hole through the wall with a hole saw.

54930738551_090ae61f87_o.jpg

I mounted the intake well away from and lower than the Rinnai water heater exhausts so I don't pick up a bunch of CO. I also moved the outer coupler to the inside of the wall as the filter housing was sticking out too far in a forklift zone and the hose barb on the inside wasn't sticking out far enough.

Now, I'd ordered two 1 1/4 barb X 1" MNPT fittings to attach the hose to my fittings. Of course, what I got from The Jungle were two 1 " barb X 1" MNPT. Fortunately, it's a low-suction applications so this will work:

54931044825_27d32de2a6_o.jpg

Finished:

54931044810_8bf5a072ca_o.jpg

It seems a little quieter to me, but best get out the meter and check. Nope. Still 85-89 dB at my desk. Maybe a dB or so of reduction, but I guess it's just a damned noisy old compressor.

You can see why an insulated enclose ain't practical there. I guess I'll live with it. At least the comp isn't sucking out what warm air I can muster in the shop anymore.
Now that you've got the whooping sound outside, it's time to play with other bits. I'd look at the belt cover next. The one on mine is a ****** birdcage that rattles no end. Yours doesn't look overly well supported. Try disconnecting it and see if it makes a difference.

Does your compressor have the exposed spring clatter valves?
 

jblnut

ALLIANCE MEMBER
Joined
Jan 17, 2015
Messages
7,114
Location
In the Middle of MN
THAT'S CHEATING!
“Work smarter, not harder”. I work dumb and hard more than I don’t but wow. I cut back brush today for 3hrs that would have taken me a day or more with a handheld saw.

No, that's fun!
Oh my gosh it really was !! No action shots but I have one of Pops moving brush.
IMG_5116.jpeg
 

Beerhippie

Well-known member
Joined
Oct 13, 2023
Messages
9,946
Location
Far NE Oregon
“Work smarter, not harder”. I work dumb and hard more than I don’t but wow. I cut back brush today for 3hrs that would have taken me a day or more with a handheld saw.


Oh my gosh it really was !! No action shots but I have one of Pops moving brush.
IMG_5116.jpeg
Hey! I'm jealous, not stupid!

I would try a gobos that you could easily move. Cheap, and easy enough. You might be surprised. Pay no attention to the ones they try to sell you. Pretty stupid what they want for some plywood covered with rockwool, and fabric.
Gobos? A removable housing? Do you see how much room I have between the hot water tank and the comp? How would I ventilate it for heat?
Now that you've got the whooping sound outside, it's time to play with other bits. I'd look at the belt cover next. The one on mine is a ****** birdcage that rattles no end. Yours doesn't look overly well supported. Try disconnecting it and see if it makes a difference.

Does your compressor have the exposed spring clatter valves?
See the all-thread rod bolted to the belt cover and the wall? That stabilizes the janky AF cover pretty well. There are some other braces not visible in the pic. When we got the already well-used comp (thirty years ago), that cover shook like a dog shittin' peach pits.

No exposed springs, thank DVB. Probably could do with a complete rebuild. Probably ain't happenin' anytime soon, times being hard.
 

rharman

Well-known member
Joined
Apr 22, 2012
Messages
8,888
Location
SoCal
Where would I find such dampeners?

After eliminating the intake as the main source of noise, the remaining racket does seem to be coming from that area.
The trick will be getting the right size. Every motorcycle shop with air cooled engines would (possibly) have them.

Take the link with the humor it's meant to be.... :bounce:
 

rharman

Well-known member
Joined
Apr 22, 2012
Messages
8,888
Location
SoCal
< snip >

I absolutely HATE cutting a 45* angle on the ShopSmith!
The tilting table instead of the tilting blade ***** for angle cutting.

< /snip >

Truer words were never spoken....

I can probably count on one hand (well, maybe a few fingers on the other as well) the number of bevel cuts I've done on my shopsmith in 40 years.
 
To avoid these ads, REGISTER NOW!

jblnut

ALLIANCE MEMBER
Joined
Jan 17, 2015
Messages
7,114
Location
In the Middle of MN
Hey! I'm jealous, not stupid!
“Buy a Limbsaw”
“Just buy a Limbsaw you dummy”
Said everyone I know that doesn’t own one. Yeah okay. Holy ****. What a game changer. Pops and I are gonna go out again tomorrow while it’s still nice out and slay more brush. I have a 16” bar on it now but think I’m gonna toss a 24” bar on it tomorrow. I’ll cut a few branches that didn’t get all the way through on the first cut. I can’t believe how much fun a chainsaw is when it’s powered by hydraulics fed by a 85hp Kubota motor 😂
 

Beerhippie

Well-known member
Joined
Oct 13, 2023
Messages
9,946
Location
Far NE Oregon
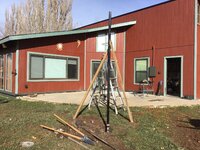
Set a steel corner post outside the garage. Going to set up a 25x25 shade cloth over the area. I do all my welding, grinding etc out here to minimize chance of smoldering fire in the garage. Sun here has the highest solar incidence of anywhere in the US & I get cooked. Slab will be cut out, replaced & squared off w/ some sort of pavers. Scored 3 basement jack posts ( I’ve always called them lolly columns) from Habitat for $15.00. Sectioned, plug welded the bolt holes where not needed & flared the ends to exclude rain & snow. Post drops into 30” of one of the larger diameter tubes encased in reinforced concrete. I tried to hire a professional shade company, but they quit responding to communications, I’m particular when I have to pay for something I can do myself. They wanted 4 grand just to set the post😳.
IMG_6138.jpeg
So what do you obsess over while lying awake at three in the morning?

I've found a great way to avoid having to worry about "slow smoulders" in the shop: I keep lots of flammables--oily rags, wood shavings, steel wool, etc--in the welding zone. No chance of no "slow"--it's all or nothing.
 
Last edited:

Beerhippie

Well-known member
Joined
Oct 13, 2023
Messages
9,946
Location
Far NE Oregon
“Buy a Limbsaw”
“Just buy a Limbsaw you dummy”
Said everyone I know that doesn’t own one. Yeah okay. Holy ****. What a game changer. Pops and I are gonna go out again tomorrow while it’s still nice out and slay more brush. I have a 16” bar on it now but think I’m gonna toss a 24” bar on it tomorrow. I’ll cut a few branches that didn’t get all the way through on the first cut. I can’t believe how much fun a chainsaw is when it’s powered by hydraulics fed by a 85hp Kubota motor 😂

Yeah, but first, I gotta get that fancy power supply for it.

Y'know, Minnesota ain't all that far from NE Oregon. Bring that thing by this spring and I'll gladly comp you and yours a fine meal and beers!
 

BlakeTheCarGuy

ALLIANCE MEMBER
Joined
Oct 10, 2018
Messages
9,384
Location
Roanoke Virginia
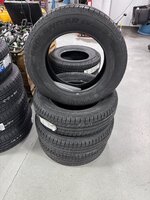
I installed my new set of tires today. I bought the vehicle last month and it had two cheap off brand Firestone tires on it called SureDrive that’s like their house brand and they were awful especially in the rain and very loud, then the original Firestone Destination LE2 tires on the back which were pretty worn out. Got these Yokohama Geolander CV G058 to try out and so far after 30 miles of driving they are spectacular. Quietest tires I’ve had in a long while. Ride like pillows. My dad’s been criticizing me over my tire choice since I got home telling me I needed to return these and get Michelin. Michelin are great and all but I’m trying to stay around the $600 range which these were $614 with my employee discount and the Michelin would of been between $800-$850 with the discount. I am bummed no white letter tires were available but that’s ok these do really well. Yokohama has a tire plant in a neighboring town to my hometown and work town and I know a few workers there. First time trying Yokohama and they haven’t disappointed so far. I also purchased a set of Goodyear Reliant tires for it from Walmart Black Friday deals and they will be here tomorrow I’m going to save them as an extra set and use them next time I need tires or sell them to a friend or coworker maybe. If they weren’t a good deal I’d not have bought them but for $96 a piece wasn’t bad. Normally I’d never consider Goodyear because of a few reasons but they were cheap. I’ll be doing an alignment tomorrow I was just too tired today.IMG_3416.jpegIMG_3417.jpegIMG_3418.jpegIMG_3419.jpegIMG_3420.jpeg
 

GrayFlattop

Well-known member
Joined
Jan 18, 2018
Messages
1,051
Location
Chicago
A couple of weeks ago, I built a You Tube intake air muffler for our ridiculously loud vintage DeVilBliss 5 hp recip compressor.

It did nothing to reduce the noise, as per my OSHA-approved sound pressure meter. Between 85 and 90 dB at my desk, regardless.

So today I tried another approach. Folks replied to my thread about the muffler build with some suggestions to:

1) Relocate the intake outside.

B) Use a long section of hose between the comp and the intake filter.

iii) Build an insulated enclosure for the comp. Now, this just ain't happening due to where the comp is used to living.

So, a long hose leading to an outside intake. That I can do.

I have most of the parts I need around the shop: Some 1" plumbing fittings, a bunch of 1 1/4" tubing (hose) and a 1" wall flange from the muffler build.

Problem is, I need the wall flange to be a pass-through so I can mount the intake filter to the wall outside. This means re-tapping it all the way through:

54931044840_f42f650e6e_o.jpg

54929867897_108368a7d1_o.jpg

Big tap require big wrench.


Now the flange is too thick for a close ******, so grind the boss off (yes, tapping it would have been much easier after grinding it down--but that would be thinkin' ahead):

54930943788_f3e716db0e_o.jpg

Gawds, I love those 3M Cubitron II disks!

54931044815_dd4a43a19f_o.jpg

That's the ticket!

Shoot a heavy coat of black gloss on, and get it into the curing oven.

While that's happening (and after the weekly office meeting), I bored a 1 1/2" hole through the wall with a hole saw.

54930738551_090ae61f87_o.jpg

I mounted the intake well away from and lower than the Rinnai water heater exhausts so I don't pick up a bunch of CO. I also moved the outer coupler to the inside of the wall as the filter housing was sticking out too far in a forklift zone and the hose barb on the inside wasn't sticking out far enough.

Now, I'd ordered two 1 1/4 barb X 1" MNPT fittings to attach the hose to my fittings. Of course, what I got from The Jungle were two 1 " barb X 1" MNPT. Fortunately, it's a low-suction applications so this will work:

54931044825_27d32de2a6_o.jpg

Finished:

54931044810_8bf5a072ca_o.jpg

It seems a little quieter to me, but best get out the meter and check. Nope. Still 85-89 dB at my desk. Maybe a dB or so of reduction, but I guess it's just a damned noisy old compressor.

You can see why an insulated enclose ain't practical there. I guess I'll live with it. At least the comp isn't sucking out what warm air I can muster in the shop anymore.
Hey! I'm jealous, not stupid!


Gobos? A removable housing? Do you see how much room I have between the hot water tank and the comp? How would I ventilate it for heat?

See the all-thread rod bolted to the belt cover and the wall? That stabilizes the janky AF cover pretty well. There are some other braces not visible in the pic. When we got the already well-used comp (thirty years ago), that cover shook like a dog shittin' peach pits.

No exposed springs, thank DVB. Probably could do with a complete rebuild. Probably ain't happenin' anytime soon, times being hard.

Hard to tell from the photo, but it would appear that the compressor is sitting directly on the floor. I’d try putting some isolation pads under the feet of the tank to decouple the compressor from the floor.

If you can’t move the compressor outside into a lean-to shed as suggested, try absorbing the noise with some baffles near (above, behind, in front) the unit. Some boxes made from 2 x 6 stuffed with mineral wool with the open side facing the pump should help. I would think that even partial coverage would help.

Elastomeric machine mounts between the pump and tank can’t hurt. Maybe wrap the tank with dynamat as well.
 

rharman

Well-known member
Joined
Apr 22, 2012
Messages
8,888
Location
SoCal
@Beerhippie - Have you considered dampeners between the cylinder fins (and, head, if applicable)? Might help and cheap & easy to do.

1763425498069.png
@Beerhippie...

You've already dealt with the intake and, somewhat, the exhaust. Hopefully, this could be a noticeable improvement.

Years ago, I saw a video of Harley-Davidson doing acoustic emissions testing on a new model. Amazing how much noise the vibrating fins caused. Wish I could find it again. Pretty spacey with a soundproof room and an articulated arm with I don't know how many sensors/microphones on it just circling around the bike in all directions. Like watching the robot welders on an assembly line.
 

Beerhippie

Well-known member
Joined
Oct 13, 2023
Messages
9,946
Location
Far NE Oregon
How about a lean-to dog house outside the shop wall? Air pipe and power is easy to run.
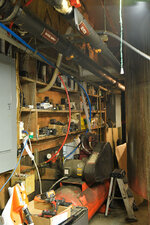
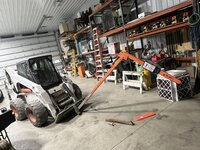
The space outside is where the forklift lives and works moving and emptying those dump bins in the outside picture into a dump truck. There's barely room to fit a Lego brick in there if you don't want it crushed.

The space where the compressor lives inside the shop is incredibly limited, and a lot of the structure has been built around it in a tiny shop. When we installed the 1,200 gallon hot liquor tank--what you civilians call a "water heater"--we removed the roof and dropped it in, with the compressor where it still is.

This is the shoe-horn brewery. But we're still brewing....
 

cannuck

Well-known member
Joined
Nov 30, 2021
Messages
4,656
Location
Rural SK
A few months ago I had one tool bag packed to work on my press brake in town and another to work on C7 (that's a dump truck, not a plastic pig). My 18v fuel drill was swapped in and out of these bags as I went from shop to shop to shop. At the end of those jobs, my drill and battery were nowhere to be found. I last remembered using it at shop in town working on break, where I thought I might have left it on a work bench. The employees know my tools and they are marked, and none would do anything bad to them but I had this horrible, sick feeling that a customer might have picked it up. Lost a lot of faith in humanity and used other tools until I could bring myself to replace a perfectly good drill and battery. While re-packing my tool bag to work on an X-ray table at little kid's clinic for some strange reason I climbed onto a step stool to reach back row of top tray of my tool box and out of the corner of my eye I saw something red on the roof of the tractor cab. Damned if it wasn't my drill and battery. Then I remembered taking them up to drill a hole to bolt a strain relief on heater motor cable! Faith in mankind restored a bit.
 

kaymccampbell

Well-known member
Joined
Feb 27, 2015
Messages
29,595
Location
Upstate New York
A few months ago I had one tool bag packed to work on my press brake in town and another to work on C7 (that's a dump truck, not a plastic pig). My 18v fuel drill was swapped in and out of these bags as I went from shop to shop to shop. At the end of those jobs, my drill and battery were nowhere to be found. I last remembered using it at shop in town working on break, where I thought I might have left it on a work bench. The employees know my tools and they are marked, and none would do anything bad to them but I had this horrible, sick feeling that a customer might have picked it up. Lost a lot of faith in humanity and used other tools until I could bring myself to replace a perfectly good drill and battery. While re-packing my tool bag to work on an X-ray table at little kid's clinic for some strange reason I climbed onto a step stool to reach back row of top tray of my tool box and out of the corner of my eye I saw something red on the roof of the tractor cab. Damned if it wasn't my drill and battery. Then I remembered taking them up to drill a hole to bolt a strain relief on heater motor cable! Faith in mankind restored a bit.
I think we've all been there. Though my faith in humanity has been gone for decades.
 

Beerhippie

Well-known member
Joined
Oct 13, 2023
Messages
9,946
Location
Far NE Oregon
A few months ago I had one tool bag packed to work on my press brake in town and another to work on C7 (that's a dump truck, not a plastic pig). My 18v fuel drill was swapped in and out of these bags as I went from shop to shop to shop. At the end of those jobs, my drill and battery were nowhere to be found. I last remembered using it at shop in town working on break, where I thought I might have left it on a work bench. The employees know my tools and they are marked, and none would do anything bad to them but I had this horrible, sick feeling that a customer might have picked it up. Lost a lot of faith in humanity and used other tools until I could bring myself to replace a perfectly good drill and battery. While re-packing my tool bag to work on an X-ray table at little kid's clinic for some strange reason I climbed onto a step stool to reach back row of top tray of my tool box and out of the corner of my eye I saw something red on the roof of the tractor cab. Damned if it wasn't my drill and battery. Then I remembered taking them up to drill a hole to bolt a strain relief on heater motor cable! Faith in mankind restored a bit.
Is it odd that I hear this in my mind as I read it in a Billy Bob Thornten accent?
 
Last edited:

Duster346

Well-known member
Joined
Mar 11, 2013
Messages
316
Location
Castle Rock, CO
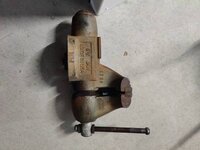
Fella at work has been bugging me to sell him one of my vises (yeah, they are crappy Wilton tradesman's according to folks here).

So, got the idea to buy a vise off Craigslist and restore it to give to him for Christmas.

Found a very nice 1765 that mainly just had surface rust. Seems like it had very little use but was maybe bolted onto the back of a welding truck.

Reused everything but the pipe jaws (one was missing) and vise jaws. Got some vise jaws from Logan @ antiquevises.com.

The hammertone green paint is NLA so decided to do it as a snap on. (Red overspray all over my shop now 😅)
3964.jpg

3986.jpg

3987.jpg

4055.jpg
 

Brazen Bull

Well-known member
Joined
Apr 3, 2024
Messages
114
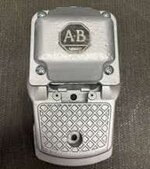
Well today I cleaned the gunk off a scrapyard dumped Alan Bradley foot switch, probably from the late 50s.
Under the lid with its cork gadget it is factory fresh inside.
I'm pairing it up to my humble vintage how gamer grade drill press, I never had a peddle control before.
This is the model.
Got a little 5" piece of train track to use for a mini anvil. Somebody already drilled four countersunk holes in the base. I need it for little stuff, I like it.
Fixed the switch in a 50s or early 60s jigsaw left for dead. Works perfect.
 

Attachments

  • Z.jpg
    Z.jpg
    6.7 KB · Views: 12

coldh2o

Well-known member
Joined
May 21, 2013
Messages
1,437
Location
Ontario, Canada
@Beerhippie...

You've already dealt with the intake and, somewhat, the exhaust. Hopefully, this could be a noticeable improvement.

Years ago, I saw a video of Harley-Davidson doing acoustic emissions testing on a new model. Amazing how much noise the vibrating fins caused. Wish I could find it again. Pretty spacey with a soundproof room and an articulated arm with I don't know how many sensors/microphones on it just circling around the bike in all directions. Like watching the robot welders on an assembly line.

Hmmm, doesn't HD making a bike quieter go against their demographic?
 

M.Brane

ALLIANCE MEMBER
Joined
Feb 11, 2024
Messages
1,775
Location
1 hr N/W of LA LA Land
Hard to tell from the photo, but it would appear that the compressor is sitting directly on the floor. I’d try putting some isolation pads under the feet of the tank to decouple the compressor from the floor.

If you can’t move the compressor outside into a lean-to shed as suggested, try absorbing the noise with some baffles near (above, behind, in front) the unit. Some boxes made from 2 x 6 stuffed with mineral wool with the open side facing the pump should help. I would think that even partial coverage would help.

Elastomeric machine mounts between the pump and tank can’t hurt. Maybe wrap the tank with dynamat as well.
My overkill IR is mounted on hockey pucks, and still vibrates the floor. It's really not that loud, but I don't run it very often. It's going to be relocated to the S patio once I have an actual patio cover more for space reasons than noise.
 

rd65

Well-known member
Joined
Sep 29, 2017
Messages
2,813
Location
Granite Falls, WA
That's good to know.

Where did you get it? My Home Depot is supposed to have one, but it is never available.
Make sure the person that is feeding the machine keeps the guy at the other end of the tube up to date on product left. I tasked my brother with that and he failed miserably. He was supposed to let me know when we were half way done with bags, then I would start shooting the other half of attic space. My wife wasnt too excited about feeding the hopper the next day after I got more material.
 

micromind

Well-known member
Joined
Sep 24, 2023
Messages
3,084
Location
Fernley, Nevada, about 30 miles east of Reno.
Well today I cleaned the gunk off a scrapyard dumped Alan Bradley foot switch, probably from the late 50s.
Under the lid with its cork gadget it is factory fresh inside.
I'm pairing it up to my humble vintage how gamer grade drill press, I never had a peddle control before.
This is the model.
Got a little 5" piece of train track to use for a mini anvil. Somebody already drilled four countersunk holes in the base. I need it for little stuff, I like it.
Fixed the switch in a 50s or early 60s jigsaw left for dead. Works perfect.

Allen Bradley stuff from the 50s that still works is no surprise at all.
 
To avoid these ads, REGISTER NOW!
Top Bottom