To avoid these ads, REGISTER NOW!

New powder coating oven build

Jehannum

Well-known member
Joined
May 3, 2012
Messages
1,368
Location
Albuquerque, NM
I've been in the market for a long time, ever since I tossed an old kitchen oven about a year ago (and I've had ambitions for a while before that).

I was planning to go based on the plans here, along the lines of the one @lilscorpion built, but then I saw a pizza oven for sale at a local auction house.

Knowing I didn't need the pretty one, I went and bid on the ugly one, and won it for $8 ($9.69 after the house's premium).

The "garden" size trailer might have been a bit on the sketchy side, but it does fit in with my MO.
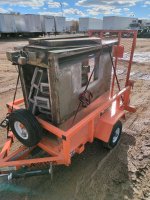
messages_0(22).jpeg

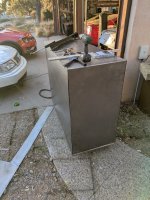
Got it home, pulled it out of the trailer with my 50 year old engine hoist, cleared out what I _think_ were the burners from the inside, and measured.

messages_0(15).jpeg

She big.
messages_0(16).jpeg

messages_0(17).jpeg

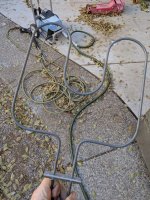
I filled it full of purple power and let it chooch for a while, then hosed out all the encrustalized pizza. I also excavated the stuff I'd bought years ago for doing the job, two electric oven elements, and a "brain" that I built from a PID temperature controller, solid state relay, timer, switches, and tell-tale lights, all fit up into an outdoor box.

Brain:
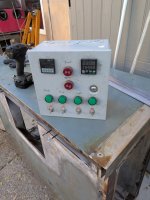
messages_0(23).jpeg

Oven heater:
messages_0(21).jpeg

Upside down, but the two heater elements fit well inside where the old gas burners used to be:
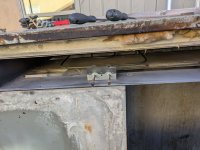
messages_0(20).jpeg

So my plan (such as it is) is to re-clad the outside, cover up the holes (I have one of the two "doors" that used to allow the conveyor chain through them, but each end has a wide opening, the former top has a vent hole and the cavity where the gas burners used to be, and the former front has a spot where a window and side door used to be.

It's currently upside down from how I'll orient it from here on out. The burner cavity will be on the bottom, I'll add a convection fan between the burner cavity and the old vent, the old window/side door will be the top, and it'll hold the oven lights, and I'll seal one of the open ends, and turn the other into a door.

I think I'll sacrifice an inch of overall height (so it'll accommodate 32" high things) so that I can make a sliding rack for holding parts.

Oh, and the best part is that I have a deadline - one of my friends needs to put some glossy black powder on an itty bitty cart he's building for one of those itty bitty US General 2 drawer tool boxes from Hazard Fraught before Christmas.

I'll order sheet and square tube tomorrow and hopefully have it delivered so that I can get most of the job done next weekend.
 
Last edited:
To avoid these ads, REGISTER NOW!

CapriMikeC

Well-known member
Joined
May 31, 2019
Messages
421
Location
AZ
How much juice will it pull from the wall?

A buddy used to do powder coating with an old kitchen oven and the biggest challenge was not disturbing the powder when placing them in the oven. The sliding rack is brilliant. Maybe also add a way of hanging parts from the top?

AI will never be able to deep fake your feet.
 
OP
J

Jehannum

Well-known member
Joined
May 3, 2012
Messages
1,368
Location
Albuquerque, NM
How much juice will it pull from the wall?

A buddy used to do powder coating with an old kitchen oven and the biggest challenge was not disturbing the powder when placing them in the oven. The sliding rack is brilliant. Maybe also add a way of hanging parts from the top?

AI will never be able to deep fake your feet.
The SSR is rated to 40A, which happens to coincide with the breaker.

The sliding rack is going to go on the top, so I think I've got that well in-hand.
 
OP
J

Jehannum

Well-known member
Joined
May 3, 2012
Messages
1,368
Location
Albuquerque, NM
Does that apply to smell?

Anyway, the oven bake elements I got are WB44K5013's, so they're 2000 watts apiece, and at 240V, 4000W works out to 17A, so I should be well within the factor of safety for the SSR and the breaker.
 

mikedodge

Well-known member
Joined
Jun 27, 2017
Messages
2,837
That 16" inside seems pretty thin. Most of the stuff that I want to do if it won't fit in a normal oven it won't fit in there. But I'll be watching to see how this turns out, I'll probably be building something some day.
 
OP
J

Jehannum

Well-known member
Joined
May 3, 2012
Messages
1,368
Location
Albuquerque, NM
That 16" inside seems pretty thin. Most of the stuff that I want to do if it won't fit in a normal oven it won't fit in there. But I'll be watching to see how this turns out, I'll probably be building something some day.
That's fair.

Most of my use case will be smaller parts that would normally fit inside a regular oven, but I did run across an issue there when I was doing the lips and barrels of my BBS wheels, they're 17", and wouldn't fit. I did find a workaround by disassembling them into their 3 component parts (and then tilting them, so that I could do only one lip per cycle).

But this should let me do a full set of wheels in one go, which will be a significant upgrade to my capabilities.
 

RoninB4

Well-known member
Joined
Jul 22, 2020
Messages
3,609
Location
Under My House
Does that apply to smell?
-I was thinking taste but perhaps I'm limiting myself with patina.

-Have been using a counter-top pizza oven for powder coating but a donated oven has been waiting as a donor for a home brewed build. Hope yours works out as you want it to, looks like it should.
 
To avoid these ads, REGISTER NOW!
OP
J

Jehannum

Well-known member
Joined
May 3, 2012
Messages
1,368
Location
Albuquerque, NM
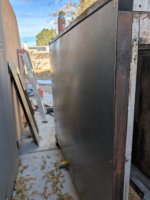
Got the front reinsulated and covered:
messages_0(28).jpeg

Then got the vent hole inside plugged off (this was the worst job):
messages_0(29).jpeg

Insulated that hole too:
messages_0(30).jpeg

Then covered up the outside:
messages_0(31).jpeg

I also chiseled out a piece of angle bracket in that cavity near the top, so that my electric burners will sit flat inside of it. I'll have to do the same thing to the other side where there are a bunch of pieces of angle welded in (presumably guides for the conveyor).
 

no704

Well-known member
Joined
Apr 27, 2016
Messages
5,229
Looks great! A little deburr, a coat of high temp paint and off to the races!
 
OP
J

Jehannum

Well-known member
Joined
May 3, 2012
Messages
1,368
Location
Albuquerque, NM
First test went well. I have some things to do - tadpole gasket on the door, bump-out on the bottom for insulation around the burner terminals, and an insulated bumpout on the top around the light sockets, but the door fits, the controller works, the switches do switchy things, and I'm pretty happy overall. Gonna do my coworker's mini tool cart between now and Tuesday.

messages_0(37).jpeg

messages_0(38).jpeg

It needs a convection fan, bad. The thermocouple isn't in the best place, and the right way to fix it would be to put a fan in to move air. On the to-do list for sure.
 

mikedodge

Well-known member
Joined
Jun 27, 2017
Messages
2,837
Usually ovens have those heating elements fully exposed top and bottom for more equal heat so you might need to get creative with a blower and ducting or double thr number of them since it's double the size and figure out a control that cycles them equally to avoid needing a large circuit.
 
OP
J

Jehannum

Well-known member
Joined
May 3, 2012
Messages
1,368
Location
Albuquerque, NM
Usually ovens have those heating elements fully exposed top and bottom for more equal heat so you might need to get creative with a blower and ducting or double thr number of them since it's double the size and figure out a control that cycles them equally to avoid needing a large circuit.
I may cut that tongue out of there, since it's not doing anything anymore. I'm also only at around 17A power consumption, on an appliance that is wired with 6 ga. power leads on a 40A SSR, so I have ample overhead if I decide I should go ahead and run a third heat element (math says 6000W@240V is 25A, probably somewhere around 30A with overhead for 40W lamps, fans, losses, etc).

It turns out the timer I have outside (which was originally there for a jacuzzi courtesy of the previous owner, I've since had it hauled away to the dump where it belongs) has a 40A breaker on 12/3 romex, so I'll be running the oven in the garage for now, glad I put casters on it.

I'll fix the wiring situation, since I had assumed (because the house was owned by a GC) that it was done correctly, and I currently have my air compressor wired to it.
 

slodat

ALLIANCE MEMBER
Joined
Feb 6, 2010
Messages
3,682
Location
Central-ish, WA
Wanted to note the enclosure you’re using for your controls is not an “outdoor” (NEMA 3R or better) enclosure. Those knockouts can and do allow water infiltration.

Oven transformation looks good! I have two different commercially made powder ovens. The smaller one uses the same style elements you used. They last me about 9-12 months. It works well. Even a simple fan will really help with moving the air around and equalizing temperature. Nice work!

How are you handling the rack with heavier items?
 
OP
J

Jehannum

Well-known member
Joined
May 3, 2012
Messages
1,368
Location
Albuquerque, NM
Wanted to note the enclosure you’re using for your controls is not an “outdoor” (NEMA 3R or better) enclosure. Those knockouts can and do allow water infiltration.

Oven transformation looks good! I have two different commercially made powder ovens. The smaller one uses the same style elements you used. They last me about 9-12 months. It works well. Even a simple fan will really help with moving the air around and equalizing temperature. Nice work!

How are you handling the rack with heavier items?
The rack won't work well with heavier stuff. I'll figure something better out when I need to do something heavier.
 
To avoid these ads, REGISTER NOW!
Top Bottom