To avoid these ads, REGISTER NOW!

ZMotorsports Shop Projects 2.0

Bob Heine

ALLIANCE MEMBER
Joined
Oct 24, 2009
Messages
10,707
Location
Boca Raton, Florida
And back in the car.
tl30.jpg
Mike, my problem is more age than mileage. In November 1991 I bought my '87 Corvette with 52,884 miles on it. Today, a little over 34 years later, it has 87,942 miles on it. So 35,058 miles or a bit over a thousand miles a year. The seams in the leather seats were opening up and the leather was cracking when I bought the car but I lived with it because I was working crazy hours at IBM.

Many people avoid upholstery work because it looks so difficult. I bought my 1974 Fiat X1/9 in 1982 and the vinyl buckets were cracked and looked terrible. It was a California car that had spent quite a bit of time in the LA sun. A couple of additional years in the Florida sun before I bought it and the seats were cooked. Took the car to an upholstery shop and they wanted $1,400 to replace the vinyl. I paid $1,800 for the car so it wasn't gonna happen. At the time, Bayless Fiat/Lancia in Georgia sold replacement covers for $350 so I figured it was worth a try. They came out fantastic and still looked new when I got rid of the car :)cry:) in 1989 (IBM would only allow me to store two cars in our garage while we were in Australia).

A few months after I retired in 1994 I decided to spend a few of my "every day is Saturday" time to reupholster the seats in the Corvette. The leather was never cared for in the four years before I bought it in 1991 and try as I might, nothing would bring it back. With a lot less income, I didn't even ask the pros for an estimate. Although the leather was quite a bit more expensive, it was easier to install than the vinyl. A little Florida heat helps with any kind of upholstery work.
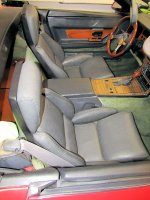
2025-12-29 Upholstery.jpg
It goes on much nicer and easier to be consistent as it is a "creamier" consistency.
tl36.jpg
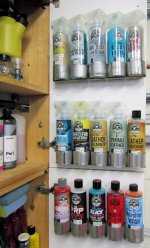
I'm a big fan of Chemical Guys products. In addition to the Leather Conditioner, they offer Leather Cleaner and Sprayable Leather Cheaner & Conditioner. The cleaner does a great job getting rid of dirt embedded in the leather and following up with the conditioner keeps the leather supple. For the quick wipe-down I use the sprayable combo stuff.
Bottle Holder 15.jpg
With the car just over 200k miles I would like to keep it as nice as possible for the next few years and then upgrade it for her as we retire and she will no longer need a commuter car.
I assume Chrystal gets the Crystal Red Camaro and you'll go find your own toy. I may be wrong but I thought I recalled you mentioning her saying it was "her car" when it first came home.
 
To avoid these ads, REGISTER NOW!

Bob Heine

ALLIANCE MEMBER
Joined
Oct 24, 2009
Messages
10,707
Location
Boca Raton, Florida
Upholstery is something I despise and would rather leave to the experts. However, my son and I replaced the material on his 2002 Duramax last year and it was surprisingly not as bad as I initially thought it would be, so I opted to tackle another one rather than pay someone else. This one also turned out not to be bad at all.
Mike, the thing I despise more than upholstery work is paying someone a fortune to do it for me. Liane had me on a pretty long leash so when I gambled $350 on the upholstery for the Fiat, she didn't tell me I couldn't do it. Actually she couldn't say much because I re-covered a couple of couches and sewed the cushions for them years before. Sometimes I feel like I'm crazy to try stuff but then I would feel terrible for not even trying. I have my shares of epic fails because someone tells me I can't do it. I'm OK with failing but I really love succeeding.
 
OP
Z

zmotorsports

ALLIANCE MEMBER
Joined
Oct 20, 2009
Messages
21,439
Location
Northern Utah
Mike, my problem is more age than mileage. In November 1991 I bought my '87 Corvette with 52,884 miles on it. Today, a little over 34 years later, it has 87,942 miles on it. So 35,058 miles or a bit over a thousand miles a year. The seams in the leather seats were opening up and the leather was cracking when I bought the car but I lived with it because I was working crazy hours at IBM.

Many people avoid upholstery work because it looks so difficult. I bought my 1974 Fiat X1/9 in 1982 and the vinyl buckets were cracked and looked terrible. It was a California car that had spent quite a bit of time in the LA sun. A couple of additional years in the Florida sun before I bought it and the seats were cooked. Took the car to an upholstery shop and they wanted $1,400 to replace the vinyl. I paid $1,800 for the car so it wasn't gonna happen. At the time, Bayless Fiat/Lancia in Georgia sold replacement covers for $350 so I figured it was worth a try. They came out fantastic and still looked new when I got rid of the car :)cry:) in 1989 (IBM would only allow me to store two cars in our garage while we were in Australia).

A few months after I retired in 1994 I decided to spend a few of my "every day is Saturday" time to reupholster the seats in the Corvette. The leather was never cared for in the four years before I bought it in 1991 and try as I might, nothing would bring it back. With a lot less income, I didn't even ask the pros for an estimate. Although the leather was quite a bit more expensive, it was easier to install than the vinyl. A little Florida heat helps with any kind of upholstery work.
2025-12-29 Upholstery.jpg

I'm a big fan of Chemical Guys products. In addition to the Leather Conditioner, they offer Leather Cleaner and Sprayable Leather Cheaner & Conditioner. The cleaner does a great job getting rid of dirt embedded in the leather and following up with the conditioner keeps the leather supple. For the quick wipe-down I use the sprayable combo stuff.
Bottle Holder 15.jpg

I assume Chrystal gets the Crystal Red Camaro and you'll go find your own toy. I may be wrong but I thought I recalled you mentioning her saying it was "her car" when it first came home.

Bob, I would say age vs. mileage can work either way. Mileage will show more wear, especially around the side bolsters from entering/exiting the vehicle whereas age will generally show up in material degradation so I can see your point about the seams opening up. Next month will be 10 years that we've been caretakers of her 2013 Acura TL. We purchased it with 34k miles on the odometer and it now has just over 204k so around 17k/year which I believe is now just slightly over what is considered average. The car has held up well and aged well, but from my reading, this is very common in the Acura line to have the seat leather get hard and brittle. I guess I didn't realize that when we bought it, but over the past couple of months that is what I have discovered.

The car should last a few more years until we retire, but I would like to get something maybe a year before we retire and then just after retiring we'll sell the Acura as she will no longer need a commuter car. Not sure what we'll get, but I'd like to get her something a little more upscale, but slightly used of course.

The "Crystal Red Camaro" will continue to be "our" toy to enjoy, but I do want to build something else as a toy. I have a lot of ideas bouncing around in my head, but not sure what it will be that floats to the top when the time comes. :headscrat

Thanks for the feedback on the Chemical Guys products. I have not used them in the past, but have read very good reviews and the leather "kit" that I purchased has the leather treatment/cleaner as well as the conditioner so time will tell, but I already like the way it applies much more than the Leather Honey.


Mike, the thing I despise more than upholstery work is paying someone a fortune to do it for me. Liane had me on a pretty long leash so when I gambled $350 on the upholstery for the Fiat, she didn't tell me I couldn't do it. Actually she couldn't say much because I re-covered a couple of couches and sewed the cushions for them years before. Sometimes I feel like I'm crazy to try stuff but then I would feel terrible for not even trying. I have my shares of epic fails because someone tells me I can't do it. I'm OK with failing but I really love succeeding.

I agree Bob, although I hate failing, I would rather fail at something and learn from it than never try. Hell, most of my knowledge and skills have come to fruition from my failed attempts. :ROFLMAO: Like Liane, Chrystal doesn't really have me on a very short leash as far as spending money, she let's me spend what I need or want without too much pushback, but I don't like wasting money nor taking her trust for granted so I try to be frugal and mindful as well as involve her in most discussions. I took a chance on the car's material because I was unsure of the quality as well as I kind of wanted to surprise her. I'm happy to report both were a success. ;)
 
OP
Z

zmotorsports

ALLIANCE MEMBER
Joined
Oct 20, 2009
Messages
21,439
Location
Northern Utah
Last night I jumped back on the coach's supplemental braking system and figured I would try to wrap that up this week.


I couldn't wait to try out the new Atro Rivnut tool that arrived on Saturday. I did one test before crawling under the coach to add the 7 Rivnuts into the bulkhead supports. With a standard bit driver attached it is actually quite compact, and much more conducive to tight quarters than the large handled version. Plus, once above about 1/4" Rivnuts, they can be tough to compress evenly, emphasis on evenly.
supbrake1.jpg

The Rivnuts went in very smooth and all very consistent with one another using this tool. That being said, I watched about 3 or 4 YouTube reviews of this tool last week before ordering it and after Cam, aka @LXCam showed it and I was shocked when I actually used it last night. All of the videos that I watched the people doing the review had one common complaint, that the tool had to be manually released from the Rivnut once it was installed and compressed.

I'm not sure what they were thinking because all a person has to do is hit reverse on the driver/gun and as it backs the anvil out it eventually hits the end and then just release your grip on the installation tool with your other hand and it spins right out of the installed Rivnut, easy peazy. Not sure what is so hard to understand about that and why all of the reviews complain about having to disconnect the drill or driver and manually unthreading the installation tool from the Rivnut. :dunno: I ran them in, compressed the threaded insert, hit reverse to slightly release the anvil from the threaded inserts top hat or collar and then simply released the tool and it spun right out and on to the next one. I had all seven of the threaded inserts installed in not much more than a minute, and that involved lying on my back and reaching around the suspension for each one. This tool is a time saver and a sanity saver, thanks Cam.

supbrake3.jpg

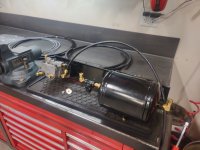
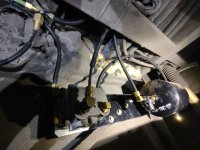
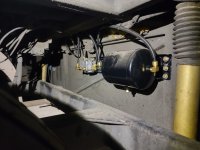
I bolted the air reservoir to the mounting bracket and then mocked up the brake relay to orientate the fittings in both and determine routing of the air lines.
supbrake2.jpg

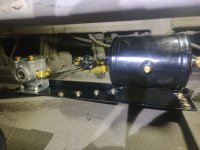
Then with the Rivnuts installed, it was time to crawl underneath the coach and install the bracket and components, then begin running air lines.
supbrake4.jpg

Bracket bolted to the bulkhead and one air line ran from the reservoir to the brake relay.
supbrake5.jpg

Looking up from the bottom.
supbrake6.jpg

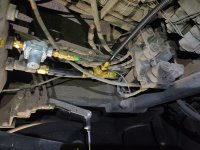
Another air line ran and looking in through the wheel opening. It looks so easy to get to in this picture.....what an illusion. :ROFLMAO:
supbrake7.jpg


Thanks for looking.
 

Bob Heine

ALLIANCE MEMBER
Joined
Oct 24, 2009
Messages
10,707
Location
Boca Raton, Florida
OP
Z

zmotorsports

ALLIANCE MEMBER
Joined
Oct 20, 2009
Messages
21,439
Location
Northern Utah
Mike, one of my random Milwaukee pimps talked me into a right angle bit driver that might make even tighter spots easy:
https://www.homedepot.com/pep/Milwa...8B1N2pFJqBn3D8tu7YytXsOne-SyHZFhoCgOIQAvD_BwE

I saw one of those Bob. But not sure I have room in my drawer for any more power tools. ;) Yeah, that's what I'm telling myself these days to avoid going down that path, besides, I could always just use a ratchet if needs be and I need it shorter. This installation was quite unique in the lack of available space however.
 
OP
Z

zmotorsports

ALLIANCE MEMBER
Joined
Oct 20, 2009
Messages
21,439
Location
Northern Utah
Mike, I’d forgotten about those complaints. It was an easy one to figure out after my tester as well. It’s amazing how some folks can’t see the obvious at times. I’m glad this worked out well for you my friend.

Yeah, I couldn't understand it Cam, once the tool retracts and hits the stop, just let go and the whole tool just spins right out. Nothing to it and nothing really to think about, but I was amazed that multiple people couldn't figure that out. :headscrat

I also splurged and bought the one that does the smaller sizes as well. The handheld crimper does a decent job on the smaller sizes, but this is so much easier to get consistent crimps every time and is so quick, it seemed like a no-brainer to have both sizes available. Thanks again for the suggestion Cam.
 

CGohring

ALLIANCE MEMBER
Joined
Apr 22, 2011
Messages
57
Location
Las Vegas
Yeah, I couldn't understand it Cam, once the tool retracts and hits the stop, just let go and the whole tool just spins right out. Nothing to it and nothing really to think about, but I was amazed that multiple people couldn't figure that out. :headscrat

I also splurged and bought the one that does the smaller sizes as well. The handheld crimper does a decent job on the smaller sizes, but this is so much easier to get consistent crimps every time and is so quick, it seemed like a no-brainer to have both sizes available. Thanks again for the suggestion Cam.
I love mine as well, my only caution to folks is to make sure you set the torque setting correct on whatever driver you use. - I didn't realize that rivnuts were strong enough to strip the threads off the tool. - lesson learned (the hard way).
 
OP
Z

zmotorsports

ALLIANCE MEMBER
Joined
Oct 20, 2009
Messages
21,439
Location
Northern Utah
I was able to "nearly" wrap up the supplemental braking system on our coach last night. I just crawled under it, cut the control air line from the brake treadle and realized a different style of T was needed and would eliminate one full connection, so out from under the coach, removed coveralls and ran to my local Fleetpride to see if such a T existed. Then back under the coach to make the connection and start running the last two remaining air lines.

Here I tapped into the signal air line from the brake treadle and ran it to the control side of the supplemental brake relay. I added a loop and some poly loom while I was at it. The loop to keep the line at a more favorable angle into the fittings and the poly loom to aid with abrasion resistance as things vibrate around going down the road.
supbrake11.jpg

With the control side of the brake relay complete, I moved to the supply. I tapped into the supply line that feeds the drive axle brake relay and ran that air line over to the inlet of the remote reservoir's PPV valve, also adding some poly loom where it passes over any crossmember or anything it can rub on. Probably overkill as the chassis manufacturer didn't do this and the lines have been fine for 24-years and 150k miles now. Probably just me being overly cautious.
supbrake12.jpg

All of the air lines completed for the controls and supply of the supplemental braking system. Only one left is the discharge line that I need to run along the frame rails, through the engine bay and to the hitch for the coupler.
supbrake13.jpg

And here is the one coming from the brake relay that I need to connect to the hitch with a coupler for the toad to connect to.
supbrake14.jpg

One more view looking in through the wheel well opening.
supbrake15.jpg

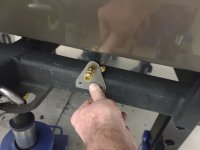
Before closing up shop for the evening, I grabbed a piece of flat plate scrap and drew up a template for the coupler bracket and transferred it to the .125" plate. Most people I see install these just drill into the fiberglass rear cap near the hitch, but I can't bring myself to dill through my fiberglass so I think this will look nicer.
supbrake16.jpg


Thanks for looking.
 

Xti04

Well-known member
Joined
Nov 11, 2016
Messages
2,341
Nice work on upholstery Mike. I have a new seat bottom to install in the wifes Mercedes at some point. I need to get it done soon before the split in the seam gets any worse. The Acura leather always felt hard to me. Im not sure any amount of leather conditioner could keep them from cracking.
 
OP
Z

zmotorsports

ALLIANCE MEMBER
Joined
Oct 20, 2009
Messages
21,439
Location
Northern Utah
Nice work on upholstery Mike. I have a new seat bottom to install in the wifes Mercedes at some point. I need to get it done soon before the split in the seam gets any worse. The Acura leather always felt hard to me. Im not sure any amount of leather conditioner could keep them from cracking.

Thanks Mark. I too thought the Acura seat material felt a bit on the hard side from the beginning, but didn't realize they were so fragile until I started looking for good replacements. Then through much reading on the Acura forums I learned just how common this type of cracking was. Also, there are a lot more options for upholstery in the Third Gen than the Fourth Gen TL's, which also made me nervous as to what I was going to end up with once the job was complete.
 
OP
Z

zmotorsports

ALLIANCE MEMBER
Joined
Oct 20, 2009
Messages
21,439
Location
Northern Utah
Mike I probably missed it but who did you buy the replacement covers from?

Cam, I purchased them through eBay, Professional Seat Covers was the vendor. I wanted to use The Seat Shop where I purchased the interior for my son's Duramax last year, but they only offered the Third Gen replacements, not the Fourth Gen. Their products and fitment were excellent. As far as the ones I used on my wife's Acura, I was pleasantly surprised on both the color match as well as the fitment, especially at that price point.
 
OP
Z

zmotorsports

ALLIANCE MEMBER
Joined
Oct 20, 2009
Messages
21,439
Location
Northern Utah
Very nice job on the seat covers.

I need to do that on my 2003 F350 drivers seat. The Seat Shop has an excellent looking reproduction for my truck. When the time for that project comes, I would like to add heated seats.

Thank you. We used The Seat Shop on my son's and the quality and fitment were excellent. I highly recommend their product.
 

WoodsTruck

Well-known member
Joined
Jan 12, 2013
Messages
1,025
Very nice job on the seat covers.

I need to do that on my 2003 F350 drivers seat. The Seat Shop has an excellent looking reproduction for my truck. When the time for that project comes, I would like to add heated seats.
You can either get aftermarket seat heaters online, or source ones for a 2003 F350 Lariat or above trim from Ford. They aren't that much difference in price but the element should match the seat foam pattern better. You'll need to do the wiring that way though.
I did this in the back seats of my '12 SuperCrew so the kids had heat.
 
To avoid these ads, REGISTER NOW!

TerryH

Well-known member
Joined
Dec 8, 2012
Messages
2,248
Location
Springdale, AR
New upholstery looks great! Both our drivers, 2012 Charger and 2011 Ram Laramie Sport, are nearing 200k. Both have leather. Had to have the boltster replaced on the driver's seat on my Ram a few years back. Seats still fine in the Charger. Both have the old Chrysler MaxCare lifetime warranty. Unlimited time and mileage with $100 deductible per warranty visit. Doesn't cover upholstery and such though. Chrysler has done many thousands of dollars in repairs over what the warranty cost. Most recently front struts, oil pan gasket and you have to pull the rack and lower the cradle to change it :oops:, door hinges and hood shocks on the Charger. My buddy who is the service manager at my preferred Dodge dealer says we single handedly killed the true lifetime MaxCare warranty by keeping these 2. lol... The way they sell it now is unlimited mileage but only good for 7 years. We plan to drive these 2 forever.
 

LXCam

ALLIANCE MEMBER
Joined
Apr 23, 2013
Messages
19,175
Location
AZ
I love mine as well, my only caution to folks is to make sure you set the torque setting correct on whatever driver you use. - I didn't realize that rivnuts were strong enough to strip the threads off the tool. - lesson learned (the hard way).
Heed CG’s advice. Half asleep today I forgot to set my torque setting and busted the internal anvil. Btw, I didn’t get that greedy with it but i definitely wasn’t on my game. There goes today’s plans.
 
OP
Z

zmotorsports

ALLIANCE MEMBER
Joined
Oct 20, 2009
Messages
21,439
Location
Northern Utah
New upholstery looks great! Both our drivers, 2012 Charger and 2011 Ram Laramie Sport, are nearing 200k. Both have leather. Had to have the boltster replaced on the driver's seat on my Ram a few years back. Seats still fine in the Charger. Both have the old Chrysler MaxCare lifetime warranty. Unlimited time and mileage with $100 deductible per warranty visit. Doesn't cover upholstery and such though. Chrysler has done many thousands of dollars in repairs over what the warranty cost. Most recently front struts, oil pan gasket and you have to pull the rack and lower the cradle to change it :oops:, door hinges and hood shocks on the Charger. My buddy who is the service manager at my preferred Dodge dealer says we single handedly killed the true lifetime MaxCare warranty by keeping these 2. lol... The way they sell it now is unlimited mileage but only good for 7 years. We plan to drive these 2 forever.


Thanks Terry. I've personally never purchased a new vehicle with a warranty. Our Jeep is the closest I've come as it was only a year old with 3208 miles on it but never had any issues needing me to use the remaining warranty.

I know many people HAVE to drive a new vehicle with those warranties as they're like a warm blanket. I think Chrysler had planned on people not keeping their vehicles very long when they implemented that warranty. People like yourself are the exception that probably did kill it. 😂

I have a friend who bought his Jeep JKUR Wrangler new in 2009 thinking that with the lifetime warranty he'd be set for life. He bought that year with that warranty specifically with the initial intentions of never selling it. I did a little work on it over the years such as gearing, small lift and bumpers/winch but nothing to void the warranty. He never required use of the warranty before trading it in several years later on a newer JKUR, a 2016 model year. He's since traded it again on a new 2023 JLUR and has had nothing but problems with this one. Told me recently he wishes he'd kept the 2009 as it was much less problematic and trusted it's reliability where he doesn't trust his new one to make it out of the driveway or across town. I tried telling him the new ones had all the "fluff" and electronics that would fail long before anything structurally when he told me he was trading it in, but what do I know. :dunno:
 
OP
Z

zmotorsports

ALLIANCE MEMBER
Joined
Oct 20, 2009
Messages
21,439
Location
Northern Utah
Heed CG’s advice. Half asleep today I forgot to set my torque setting and busted the internal anvil. Btw, I didn’t get that greedy with it but i definitely wasn’t on my game. There goes today’s plans.

Agreed. I played with torque settings and trashed a couple Rivnuts doing some testing before actually installing any in the coach for this very reason.
 

SilverJimmy

Well-known member
Joined
Apr 14, 2012
Messages
1,643
Location
Prescott/Flagstaff, AZ
My old Snap-On manager bought one of those Ram Laramie trucks with the lifetime warranty. He says he gets a kick out of all the attempts he gets from Ram salesmen trying to trade him out of his truck. There must be some kind of super bonus offered to them if they can get one of those vehicles off that program! He just laughs and hands them a nice crisp Benjamin when he takes it in for what ever it needs. I think they missed the day at sales school the lesson about never trying to sell a salesman!
 
OP
Z

zmotorsports

ALLIANCE MEMBER
Joined
Oct 20, 2009
Messages
21,439
Location
Northern Utah
I don't have much experience with automotive sales people as all of my vehicles have been purchased either wrecked or second hand. Maybe that's a blessing.

One thing I have noticed through my experience with RV's however, is that whenever I've been looking at various coaches I did all my research long before beginning my actual search, then when the time came to actually look at specific coaches, I quickly discovered I knew more about the coaches than the sales people did. So much so in fact that I was very disappointed in the erroneous information and flat out lies that the tried to tell me, and they did NOT like to be corrected.

It still baffles me that with all of the information that is so easily accessible and readily available today vs. 10 or 20 years ago how many people don't do any research and simply the sales people's word when making such a large purchase, then ask the dumbest questions after the fact that should have been addressed before making the purchase. :rolleyes:
 

ntsqd

Well-known member
Joined
Jan 22, 2005
Messages
988
Location
Lower left coast
I despise the stereotypical salesman. Enough so that when I was working in retail I decided to just be an advocate and not a "Salesman". I wanted our customers to buy from us, but it was more important to me that they get the product that best fit their needs.

We have one such salesman at my current employer. Its like he looked up the 1970's salesman stereotype on wikipedia or somewhere, and then set out to be that person. Mid-40's to mid-50's, pot-bellied in Sansabelts, loafers, and a polyester shirt partially unbuttoned to display his gold necklaces & chest hair. If he were any more the cliche' he'd drive a 1977 Corvette.
 
Last edited:

Xti04

Well-known member
Joined
Nov 11, 2016
Messages
2,341
I had a buddy who purchased a Jeep grand Cherokee with the lifetime warranty. Had thousands of dollars worth of work done over the years. Engine seized, they gave him a check for 5k to not put an engine in it. We had plans to bring it over here and do a swap but it never materialized, think he sold it to someone cheap.
 

TerryH

Well-known member
Joined
Dec 8, 2012
Messages
2,248
Location
Springdale, AR
My old Snap-On manager bought one of those Ram Laramie trucks with the lifetime warranty. He says he gets a kick out of all the attempts he gets from Ram salesmen trying to trade him out of his truck. There must be some kind of super bonus offered to them if they can get one of those vehicles off that program! He just laughs and hands them a nice crisp Benjamin when he takes it in for what ever it needs. I think they missed the day at sales school the lesson about never trying to sell a salesman!
We are not frequent new car buyers and I've never been an extended warranty buyer. My wife talked me into buying it on these 2. We had previously agreed before purchasing them that we were going to drive them until the wheels fell off. Turns out that's covered so we're apparently driving them forever.
 
Last edited:
OP
Z

zmotorsports

ALLIANCE MEMBER
Joined
Oct 20, 2009
Messages
21,439
Location
Northern Utah
We are not frequest new car buyers and I've never been an extended warranty buyer. My wife talked me into buying it on these 2. We had previously agreed before purchasing them that we were going to drive them until the wheels fell off. Turns out that's covered so we're apparently driving them forever.

Again Terry, I think you are the exception and one of the killers of their warranty plan. ;) Me sharing the story of my friend who bought the 2009 Jeep Wrangler was to merely to imply that many people may start out with the intention of keeping a vehicle forever, or at least long term, but very few follow though with that plan. I think my friend used that as a way of rationalizing the new purchase, as may be true with many others.
 
OP
Z

zmotorsports

ALLIANCE MEMBER
Joined
Oct 20, 2009
Messages
21,439
Location
Northern Utah
I hope everyone brought in a safe and Happy New Year and is looking forward to 2026.


The wife and I just had a nice simple New Year's Eve dinner at home. Threw some meatage on the grill along with some grilled mushrooms and onions and enjoyed a nice quiet meal, but didn't quite make it to midnight.
nye.jpg


The wife made a smaller version of Thanksgiving dinner for Christmas Eve when we had our kids over, including a spiral cut ham. Not wanting to be wasteful, she kept the ham hock and made a pot of ham & beans for us on New Year's Day. Mmmmm. I love her ham & bean soup, but she doesn't make it often enough.
ny.jpg


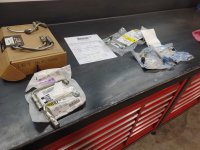
On Friday we were able to knock another item off our list of vehicle repairs for my son. He has had a couple of high pressure fuel lines fail over the past couple of years and all were purchased from Merchant Automotive several years ago when we did injectors. Having issues with some of Merchant's parts over the years and having two high pressure fuel lines fail leaving my son stranded, we opted to purchase new OEM lines for his truck several months ago when his second one failed. We had replaced three on the driver's bank, but still had the hardest ones to do as we were short on time. Friday morning with the wife having to work, we opted to tackle the four on the passenger's bank, cylinders 1, 3, 5 and 7 along with cylinder # 2 on the driver's bank and get them over with.
lb71.jpg

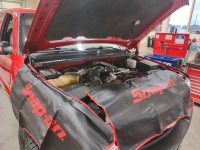
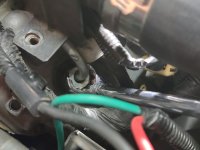
With the FICM removed and all fuel lines disconnected from it, then the bracket loosened and moved out of the way, we were able to snake a crow's foot socket down into the recess and disconnect the line from cylinder #1.
lb72.jpg

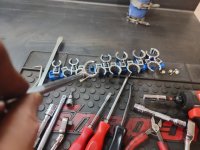
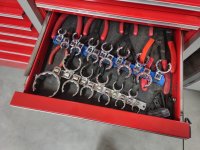
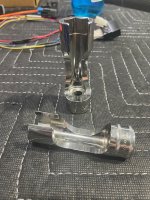
If anyone is looking for some awesome crow's feet sockets, these are the cat's meow. I've had the SAE version from Snap-on for several years now, but I couldn't justify the cost of their metric ones so I purchased a set from Martin that I read good reviews about.
lb73.jpg

These really work well, especially on fasteners or lines where you can't get a full 60-degree range of motion to go to the next flat.
lb74.jpg

Cylinder #1 removed, matched up and ready to continue on installing the remainder of the new OEM lines.
lb75.jpg

Right bank completed, FICM reinstalled and buttoning the passenger's side up.
lb76.jpg

Then moved on to the front high-pressure line, cylinder #2, on the driver's bank to repeat the process.
lb77.jpg

Completed, ready for a road test and check for leaks. All good, but with it raining hard on Friday, we opted to leave it in the shop until Saturday as his truck was shined up and clean.
lb78.jpg


Thanks for looking.
 

signcrafter

Well-known member
Joined
May 9, 2012
Messages
12,448
Food looks good Mike and happy New Year. We also just relaxed at home and was asleep before midnight, part of getting old I guess. LOL.

Those crows foot wrenches look nice, I will have to look into them. Think all mine are 6 point and sunex if I remember right, don't use them that often but when they are needed there isn't a substitute.
 

OutlawDrifter

Well-known member
Joined
Jan 20, 2015
Messages
3,886
Location
KS
Mike, I'm also a big fan of ham & bean soup. My favorite part of harvest back home was dipping an ice cream bucket of Great Northern beans out of the combine to take to my grandma. Dinner that night was always ham & bean soup and fresh cornbread :thumbup:

I'm going to have to check out those Martin crow's feet.
 
OP
Z

zmotorsports

ALLIANCE MEMBER
Joined
Oct 20, 2009
Messages
21,439
Location
Northern Utah
Food looks good Mike and happy New Year. We also just relaxed at home and was asleep before midnight, part of getting old I guess. LOL.

Those crows foot wrenches look nice, I will have to look into them. Think all mine are 6 point and sunex if I remember right, don't use them that often but when they are needed there isn't a substitute.

Thanks Scott. Yeah, I purchased the standard crow's feet in the Matco flavor about 30 years ago and have used them quite a lot over the past several decades. However, I ran across some fittings and fasteners where I couldn't quite get to the next flat so about 15-20 years ago I purchased the Snap-on SAE set. However, over the past few years, especially on these ligth duty diesel trucks, I have found several locations where the same scenario plays out in which I can't quite get to the next flat, mainly when having to reach down into the valley of these GM and Ford trucks and trying to remove fasteners or fuel lines. I simply couldn't justify the expense of the new Snap-on's at this time however. Upon doing some research I found some good reviews of the Martin brand, which was still not cheap, but much less than the Snap-on's.
 
OP
Z

zmotorsports

ALLIANCE MEMBER
Joined
Oct 20, 2009
Messages
21,439
Location
Northern Utah
Saturday morning we awoke to a breathtaking sunrise. The temperatures along the Wasatch Front here have been unseasonably warm for the entire month of December so rather than snow, we've had quite a lot of rain. The clouds opened just enough on Saturday morning to allow a beautiful show by Mother Nature.
satmorn.jpg

I met up with my son and grandson for boy's breakfast again. My grandson loves fixing his dad's coffee for him by dumping in the creamer and stirring the coffee.
satmorn1.jpg

My son mentioned that he had a drip hanging off the lower fastener on the thermostat housing on his Jeep the other day, but while sitting there eating breakfast, we noticed quite a lot of coolant piss out onto the ground. He drove it back to the shop and we crawled under it to discover his thermostat housing was leaking coolant from around the gasket.
leak1.jpg

Parts ordered and should be here in a day or two.
leak2.jpg

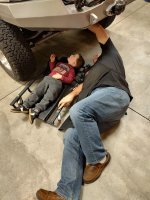
My grandson wanted to see what we were looking at so he laid down on the creeper and I slid him under the Jeep to point out the leak. I didn't realize my son took a picture of us.
leak3.jpg

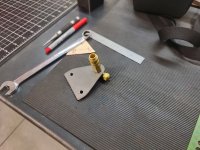
Afterwards, I hurried and knocked out the bracket for the rear air coupler on the coach so I could bead blast and paint it.
supbrake21.jpg

Marked the location so I can drill and tap the holes for mounting. Most of what I see people doing is to simply drill into the fiberglass of their coaches and mount the coupler, but I don't like drilling into the fiberglass to mount anything if I don't absolutely have to. This will be much more rigid and not create stress cracks in the fiberglass from connecting/disconnecting the coupler repeatedly. Also need to slap a coat of paint on the hitch again while I'm at it as it looks a bit faded.
supbrake22.jpg


Thanks for looking.
 
OP
Z

zmotorsports

ALLIANCE MEMBER
Joined
Oct 20, 2009
Messages
21,439
Location
Northern Utah
Happy new year Mike. Those martin crow feet look a lot beefier than the snap on an style.

Thanks. Yeah, the wall thickness can work either with or against a person so not quite sure if the thicker Martin's is a good thing yet. So far I've been able to get them into anywhere I've needed to. But I have also not had an issue with the Snap-on's spreading at any point, so not sure if it's a pro or a con at this point. :unsure:
 
Last edited:
To avoid these ads, REGISTER NOW!
Top Bottom