Assembled my new WEN 2.8 Amp 9" Bench Top Bandsaw, the last of the WEN woodworking tools for 2025 that I ordered from HD that came in today.
With the exception of a few plastic knobs, the power switch and belts, the whole machine is built from metal. The main frame and the body panels are all steel and the pulleys and table top are aluminum.
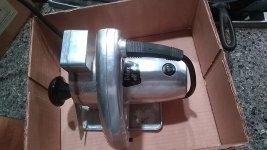
Assembly just required the installation of the aluminum table top. Once that was on I checked it for level and set the little red arrow tilt indicator to the angle support/gear. The table is now set square to the blade itself both side to side and front to back. (See Pics)
After a quick check to make sure none of the saw blade guide bearing were touching the blade, I turned it on then made a slight adjustment to center the blade on the pulleys thru the small clear plexi widow. (See Pic)
The fence is dead straight in-line and 90 degrees to the table after clamping it. The little plastic miter gauges' scale label and pointer aligns correctly and sits at 90 degrees to the blade when in the table track. I did a few free hand test cuts on some 1x5 and as you can see from the pics it was a nice 90 degree all the way across the cuts. The 1/4" blade that comes with it cuts ok. I think there's two or three other sizes available and I'll pick them up too.
One thing I do not like is the guide cover. It can be a real pain in the fingers to get it to open. That little 'push' label is deceiving. Doesn't release the guide from its locked position. Instead you have to squeeze it, jiggle it, lift it, cuss at it and hope it pops open before you break it. Once open, just lift the cover and it comes right off. I'll have to work on that part. Also, I think I'll modify the cover itself by cutting off the tab just below the 'push' decal and replace it with a piece of clear plexi. (See the pic) As it is now, the tab blocks the view of any pencil outline your trying to cut along like very thin ply, plexi etc when looking down on it.
Other modifications/improvements I'll make: 1. Mount the saw to a wider 3/4" plywood platform. Its a little tipsy as it stands now due to its narrow base. 2. Add a flexible working light. 3. Vac shut off gate and vac hose adapter for use when its tied into a multi tool vac line. 4. A dedicated bench on wheels with a drawer to hold its accessories and extra band saw blades. 5. Sand the table top to create a smoother surface then apply a past wax.
Finally, I paid $149.00 from HD with 90 Day Return, Free Delivery with my HD CC 18 Mo No Interest Coupon same as the other WEN tools I bought together.) Also has the WEN 2 Year Warranty.
I think its probably safe to say its on par & cost with other brands in its size. Is it perfect? No, but its good enough for government work and what I need it for. Now if it'll just last to the end of my 2026 wood projects. Here's a few pics.


I’ve had my WEN drill press - not sure what size, probably the biggest bench top offering?- for probably a decade and I’ve had litterally zero problems with it. I put a cheap drill press vice on the table and use it for dang near everything. Very happy with it. Noticed just the other day that it had a depth stop on the feed handle. I generally just wrap some tape around the bit to show when I’m deep enough but having a measured stop is even better! Looking forward to putting that to use


")