To avoid these ads, REGISTER NOW!

First time building a storage shed, squaring the frame questions

Codyboy

Well-known member
Joined
Jan 31, 2019
Messages
1,722
Location
S.E. TEXAS
The guy was an old school journeyman carpenter, and a stickler for accuracy. First couple of days were interesting, to say the least. I figured out a trick that calmed him down somewhat. He would bark out a measurement for a 2x, I would cut it and then lightly rub a carpenters pencil on the cut line. He thought I had been sufficiently chastised and had learned to split a pencil line with a Skilsaw... :ROFLMAO: (or maybe he just gave up and quit bitching. :dunno: )
Hmm. Split the line?
My dad taught me two ways depending on how it was marked.
If marked with a tape measure or a wood rule then you LEAVE the line. The whole line.

If you are using a pattern as is useful for multiple repetitive cuts, then you CUT the line.
 
To avoid these ads, REGISTER NOW!

PugetDude

ALLIANCE MEMBER
Joined
Mar 13, 2013
Messages
22,481
Location
Superstition Mountains, AZ
Back in the ‘80s when we were getting established my father in law helped me with home fix up and small construction projects. He was a machinist and of course accustomed to measuring parts to the thousandth of an inch. When he and I were building stuff and cutting lumber and checking measurements, one of the things I heard him say many times was this…

”Close enough for a carpenter”
Our favorites when building stuff or doing projects with friends
1. " Close enough for who it's for"
2. How does it look on your end-
" Can't see it from my house"
3. When loading firewood
" Duck or bleed!"
 

OccupantRJ

Well-known member
Joined
May 15, 2009
Messages
11,276
Location
Eastern North Carolina
I was installing vinyl siding on my already built concrete block shop when my son was about 12 years old. A pool deck with pressure treated railings and posts was attached onto the side of the shop. I needed clearance for the vinyl to pass between a closely located vertical handrail corner post and the wall, so decided to cut 3/4” off the post vertically. With my son watching I measured and marked a dark pencil line the 42” or so vertically down the post to mark the cut. I disappeared into the shop and came back with the chainsaw and his eyes opened wide and he got a puzzled look on his face. I fired up the saw, positioned myself steadily, and proceeded to cut the post. I was apparently having an exceptional day because when I finished the pencil line was pretty well split all the way down. Even I was impressed. My son had an amazed look on his face.
i think I solidified my handyman standing with him that day.
 

Upstater57

ALLIANCE MEMBER
Joined
Jun 22, 2025
Messages
87
Location
Utica, New York
I was installing vinyl siding on my already built concrete block shop when my son was about 12 years old. A pool deck with pressure treated railings and posts was attached onto the side of the shop. I needed clearance for the vinyl to pass between a closely located vertical handrail corner post and the wall, so decided to cut 3/4” off the post vertically. With my son watching I measured and marked a dark pencil line the 42” or so vertically down the post to mark the cut. I disappeared into the shop and came back with the chainsaw and his eyes opened wide and he got a puzzled look on his face. I fired up the saw, positioned myself steadily, and proceeded to cut the post. I was apparently having an exceptional day because when I finished the pencil line was pretty well split all the way down. Even I was impressed. My son had an amazed look on his face.
i think I solidified my handyman standing with him that day.
Old age and treachery will always impress and outperform youth and inexperience. Hopefully your son has learned the fine art of chainsaw operations. LOL
 

OccupantRJ

Well-known member
Joined
May 15, 2009
Messages
11,276
Location
Eastern North Carolina
Old age and treachery will always impress and outperform youth and inexperience. Hopefully your son has learned the fine art of chainsaw operations. LOL
He has well surpassed that. He has engineering degrees as well as an MBA and became the North American head Engineer for a company with 21 locations in the US and Canada at 32 years old. He is 41 now. If it moves, clicks, ticks, or electrically hums he can handle it. He also has a ship captain license and is a joint dive master/captain on a weekend dive boat for fun, and is ordained to marry people on board. He is a true renaissance man who helped give us a granddaughter. We are very proud of him.
 
Last edited:

Upstater57

ALLIANCE MEMBER
Joined
Jun 22, 2025
Messages
87
Location
Utica, New York
He has well surpassed that. He has engineering degrees as well as an MBA and became the North American head Engineer for a company with 21 locations in the US and Canada at 32 years old. He is 38 now. If it moves, clicks, ticks, or electrically hums he can handle it. He also has a ship captain license and is a joint dive master/captain on a weekend dive boat for fun, and is ordained to marry people on board. He is a true renaissance man who helped give us a granddaughter. We are very proud of him.
Congratulations RJ!
Your son had a good teacher and role model to build his life upon. Well done.
 
OP
P

peejay75

Well-known member
Joined
Sep 4, 2017
Messages
312
Okay all, another question...

The tutorial I'm following for this build said to place the boards that the joists attach to (don't know the proper terminology!) together, and mark the joist locations on both boards at the same time, to keep things consistent and potentially avoid any errors, versus marking the boards separately.
Well, I'm at the stage of checking the frame diagonals for square, and laying out the joists to see which ones are warped, duds, checking crown, etc.
So that got me thinking, if the joist marks are the same on both 12' boards, then wouldn't that "automatically" make the frame square, when I attach the joists? On the flip side, if the frame needs to be corrected for square, and you've already made your joist marks on both, then is there now a good chance the marks will no longer line up, when you go to fasten the joists?

(Attaching a pic of my "progress" so far!)
 

Attachments

  • IMG_20251122_125213.jpg
    IMG_20251122_125213.jpg
    743.3 KB · Views: 54
Last edited:
OP
P

peejay75

Well-known member
Joined
Sep 4, 2017
Messages
312
Yes use shims on the narrower board to bring g the top edges flush.
It's not too late to do this unless the floor boards are already screwed and glued.
(I still never figured out why the top of the board is not flush with the top of the rim joist, because the bottom on both ends is...i'm gonna blame wonky hardware...but i like the idea of adding a shim between the top of the outer joist and the bottom of the floor board.)
 

PCustoms

Well-known member
Joined
Jul 23, 2011
Messages
23,529
Location
VT
Okay all, another question...

The tutorial I'm following for this build said to place the rim joists together, and mark the joist locations on both boards at the same time, to keep things consistent and potentially avoid any errors, versus marking the boards separately.
Well, I'm at the stage of checking the frame diagonals for square, and laying out the joists to see which ones are warped, duds, checking crown, etc.
So that got me thinking, if the joist marks are the same on both rim joists, then wouldn't that "automatically" make the frame square, when I attach the joists? On the flip side, if the frame needs to be corrected for square, and you've already made your joist marks on both, then is there now a good chance the marks will no longer line up, when you go to fasten the joists?

(Attaching a pic of my "progress" so far!)

You need the joists (or studs if a wall) to be correctly spaced at each end

But each rim joists can float relative to the other, which makes a parallelogram. You need to square these.
 

MovingAlong

Well-known member
Joined
Aug 17, 2013
Messages
1,261
(I still never figured out why the top of the board is not flush with the top of the rim joist, because the bottom on both ends is...i'm gonna blame wonky hardware...but i like the idea of adding a shim between the top of the outer joist and the bottom of the floor board.)

Lumber moves, breathes, shifts and isn't perfect even on the day it's "made".

When having the top match up correctly is important, line up the top edges. When the bottom is important, line that up. You won't typically get both.

Quite a few tutorials on framing to be found on YouTube: https://www.youtube.com/@MattBangsWood, https://www.youtube.com/@LevelUpFraming

And this guy builds some pretty good sheds too: https://www.youtube.com/@EverydayShed

And of course, the G.O.A.T. of efficient framing, Larry Haun:
 

mikedodge

Well-known member
Joined
Jun 27, 2017
Messages
2,855
Okay all, another question...

The tutorial I'm following for this build said to place the boards that the joists attach to (don't know the proper terminology!) together, and mark the joist locations on both boards at the same time, to keep things consistent and potentially avoid any errors, versus marking the boards separately.
Well, I'm at the stage of checking the frame diagonals for square, and laying out the joists to see which ones are warped, duds, checking crown, etc.
So that got me thinking, if the joist marks are the same on both 12' boards, then wouldn't that "automatically" make the frame square, when I attach the joists? On the flip side, if the frame needs to be corrected for square, and you've already made your joist marks on both, then is there now a good chance the marks will no longer line up, when you go to fasten the joists?

(Attaching a pic of my "progress" so far!)

With the joists in theres still nothing to hold it square until you put the floor on.

I'm surprised you're still at this point.. in 2 weeks you've pretty much only marked out that spacing?

Don't buy too much 2x4 type lumber in advance, it can warp and twist pretty quickly.
 

OccupantRJ

Well-known member
Joined
May 15, 2009
Messages
11,276
Location
Eastern North Carolina
Outer perimeter frame is called the rim joist.
Hook tape measure on outside of rim joist.
CENTER of each floor joist after starting from hooking tape measure on rim joist should normally line up every 16 or 24” except maybe the last one, depending on joist spacing chosen and on floor size.
Cut other joists to proper length.
Drop into place on your lines and nail. Check spacing.
I like two lines with an X in the middle for first timers. Check spacing.
Rack (adjust) frame until cross measurements are equal.
Lay first floor sheet lined up on rim joist and tack nail into place along long edge. 3 nails.
If frame is square, sheet should line up at other edges.
Tack nail sheet until more sheets are on to verify things line up.
Last exposed joist may be bowed a bit. Align it to edge of sheet and tack nail into place. Do this for each sheet.
Tack nailing is drive nails partially in as pins to allow easier removal if adjustments are needed.
Good luck.
 
Last edited:

joe_pinehill1

Well-known member
Joined
Feb 23, 2013
Messages
537
Location
Northern Virginia
Square the perimeter with 3-4-5 ratio and nail the flooring. Then start framing the walls. Remember you're framing a shed not building furniture.

I ordered material by phases, a floor package, framing package, exterior sheeting, roof. If you working alone, remember bar clamps are your third hand.

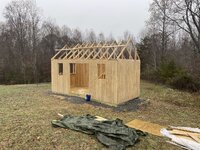
I built this shed 2 years ago using plans from icreatables.com. The plans were good, I made some modifications for extra windows. The project was half the price of what I could buy a premade shed locally in Northern VA, and better construction. Its framed like a house. The only regret I have is not pouring concrete for the foundation vs. gravel. Between the cost of timbers for the gravel perimeter, gravel delivery, floor joists, Concrete would not have been that much more expensive.
 

Attachments

  • IMG_4779.jpg
    IMG_4779.jpg
    606.8 KB · Views: 42
  • IMG_4929.jpg
    IMG_4929.jpg
    727.9 KB · Views: 45
Last edited:
OP
P

peejay75

Well-known member
Joined
Sep 4, 2017
Messages
312
Okay, had some time to relax, I'd like to thank you all for the hand-holding!

When having the top match up correctly is important, line up the top edges. When the bottom is important, line that up. You won't typically get both
That's probably the keystone statement right there! I take it as "the wood is not perfect, and neither are you!"

And this guy builds some pretty good sheds too: https://www.youtube.com/@EverydayShed
His build is the main one I'm using, with other resources sprinkled in.

I'm surprised you're still at this point.. in 2 weeks you've pretty much only marked out that spacing?
Lol...i never told you about my 2-years (and counting) fuel injection replacement???

Outer perimeter frame is called the rim joist.
+1 for terminology!

Rack (adjust) frame until cross measurements are equal.
+2 for terminology, again!

Square the perimeter with 3-4-5 ratio and nail the flooring.
I checked this earlier today, it's pretty close to 5, gonna get a helper or a better holding apparatus (bar clamp?) for the tape measure and verify when less football games are on!

I built this shed 2 years ago using plans from icreatables.com.
FANTASTIC build! For reasons that don't involve shed envy, will not be showing that to the ol' wife!

Again, thank you ALL! Enjoy your Thanksgivings Days!
 
To avoid these ads, REGISTER NOW!

Codyboy

Well-known member
Joined
Jan 31, 2019
Messages
1,722
Location
S.E. TEXAS
Square the perimeter with 3-4-5 ratio and nail the flooring. Then start framing the walls. Remember you're framing a shed not building furniture.

I ordered material by phases, a floor package, framing package, exterior sheeting, roof. If you working alone, remember bar clamps are your third hand.

I built this shed 2 years ago using plans from icreatables.com. The plans were good, I made some modifications for extra windows. The project was half the price of what I could buy a premade shed locally in Northern VA, and better construction. Its framed like a house. The only regret I have is not pouring concrete for the foundation vs. gravel. Between the cost of timbers for the gravel perimeter, gravel delivery, floor joists, Concrete would not have been that much more expensive.

I too wish I would have done concrete for my shed. I did figure the cost and yes it was minimally more.
Hindsight is 20/20 though.
By the time I placed the blocks got them level, built the framing and then added 3/4 plywood, bought concrete steps...
Definitely would have been better with concrete.
 

mikedodge

Well-known member
Joined
Jun 27, 2017
Messages
2,855
I too wish I would have done concrete for my shed. I did figure the cost and yes it was minimally more.
Hindsight is 20/20 though.
By the time I placed the blocks got them level, built the framing and then added 3/4 plywood, bought concrete steps...
Definitely would have been better with concrete.

On the otherhand with slabs that small it can be big deal if the concrete cracks overtime, when it gets wet from rain or humidity it's humid inside, if it settles or animals try to burrow under it it's harder to level...
 

Codyboy

Well-known member
Joined
Jan 31, 2019
Messages
1,722
Location
S.E. TEXAS
On the otherhand with slabs that small it can be big deal if the concrete cracks overtime, when it gets wet from rain or humidity it's humid inside, if it settles or animals try to burrow under it it's harder to level...
Not understanding that at all. Maybe I'm not reading correctly.
Why would concrete getting wet matter? Why would it settle and animals burrowing under it?
 

mikedodge

Well-known member
Joined
Jun 27, 2017
Messages
2,855
Not understanding that at all. Maybe I'm not reading correctly.
Why would concrete getting wet matter? Why would it settle and animals burrowing under it?

I said If.
It's a small slab for a small shed. When the concrete gets wet it tends to wick the dampness further in. Most people aren't going to pour it very thick, have any sort of footings for it or have much underlay. You complain about placing blocks and framing a floor and plywood but that's nothing compared to the work involved making a proper slab.
 

joe_pinehill1

Well-known member
Joined
Feb 23, 2013
Messages
537
Location
Northern Virginia
Okay, had some time to relax, I'd like to thank you all for the hand-holding!


That's probably the keystone statement right there! I take it as "the wood is not perfect, and neither are you!"


His build is the main one I'm using, with other resources sprinkled in.


Lol...i never told you about my 2-years (and counting) fuel injection replacement???


+1 for terminology!


+2 for terminology, again!


I checked this earlier today, it's pretty close to 5, gonna get a helper or a better holding apparatus (bar clamp?) for the tape measure and verify when less football games are on!


FANTASTIC build! For reasons that don't involve shed envy, will not be showing that to the ol' wife!

Again, thank you ALL! Enjoy your Thanksgivings Days!

I found bar clamps like these I used all the time. Good for holding siding, while you position for nailing. Like a third hand.
PITTSBURGH 12 in. Ratcheting Bar Clamp/Spreader - Item 62123 / 46807 / 68975 / 69221 / 69222 / 63017
https://hftools.com/app62123
 

joe_pinehill1

Well-known member
Joined
Feb 23, 2013
Messages
537
Location
Northern Virginia
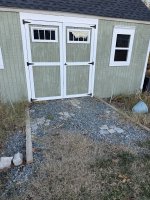
Another suggestion, instead of building a wood ramp, I laid gravel at the door way. I found someone offering free belgium block on FB Market Place, and randomly laid them in the gravel to give the look of an old abandoned road. (The front of the shed looks better in when the plants are green)
 

Attachments

  • IMG_8385.jpg
    IMG_8385.jpg
    295.4 KB · Views: 34

captain14

Well-known member
Joined
Dec 19, 2012
Messages
7,070
Location
Near College Park Maryland 20740
I may have missed it, but what siding product are you using? My father and I each built a 84 Lumber shed built on deck piers 30+ years ago. Keeping the T1-11 siding off the ground and stored materials against the siding makes it last a long time. My father’s other shed that came with the house was built on a poured concrete slab and between the moisture wicking up and planting shrubs on one side has caused the T1-11 to just rot away. We’ve replaced sections of the siding 15+ years ago and it needs to be replaced again.

My shed’s siding still looks great and I add new stain every 5-6 years.
 

Milton Shaw

Well-known member
Joined
Feb 11, 2011
Messages
4,856
Okay, had some time to relax, I'd like to thank you all for the hand-holding!


That's probably the keystone statement right there! I take it as "the wood is not perfect, and neither are you!"


His build is the main one I'm using, with other resources sprinkled in.


Lol...i never told you about my 2-years (and counting) fuel injection replacement???


+1 for terminology!


+2 for terminology, again!


I checked this earlier today, it's pretty close to 5, gonna get a helper or a better holding apparatus (bar clamp?) for the tape measure and verify when less football games are on!


FANTASTIC build! For reasons that don't involve shed envy, will not be showing that to the ol' wife!

Again, thank you ALL! Enjoy your Thanksgivings Days!
I worked with a carpenter that's favorite saying was. "We ain't building a piano." That saying summed up his thoughts on accuracy.
 
OP
P

peejay75

Well-known member
Joined
Sep 4, 2017
Messages
312
Happy New Year's (Eve), to you fine people!

Not 'tis a great time to update you on the shed foundation progress, as well as ask one FINAL question for 2025!

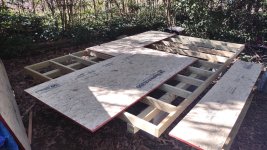
So I've learned that the 4x8 sheets are actually less than 4x8...(plus, my frame comes in closer to 7'11.5", oops!)...anyhoo, i'm shy of the frame...my thought would be to cut off the groove side of that back 4x8 sheet ("A") to maybe 2x8, push it to the edge, then scoot a full 4x8 sheet ("B") next to it, and use a whateverx8 piece ("C") on the end to make up the gap. Yay?IMG_20251231_140915.jpgIMG_20251231_140942.jpg
 
Last edited:

mike93lx

ALLIANCE MEMBER
Joined
Dec 9, 2013
Messages
37,944
Location
Richmond, VA
Happy New Year's (Eve), to you fine people!

Not 'tis a great time to update you on the shed foundation progress, as well as ask one FINAL question for 2025!

So I've learned that the 4x8 sheets are actually less than 4x8...(plus, my frame comes in closer to 7'11.5", oops!)...anyhoo, i'm shy of the frame...my thought would be to cut off the groove side of that back 4x8 sheet ("A") to maybe 2x8, push it to the edge, then **** a full 4x8 sheet ("B") next to it, and use a whateverx8 piece ("C") on the end to make up the gap. Yay?IMG_20251231_140915.jpgIMG_20251231_140942.jpg
The groove and sizing is for a reason. You don't want the sheets tightly butted as they will swell and get uneven.

Don't pound the tongue into the groove and keep the shot edges apart by 1/8".

A small difference like that is fine and will be covered by the wall and siding
 
OP
P

peejay75

Well-known member
Joined
Sep 4, 2017
Messages
312
Happy New Year! (officially)

Ok, yes, I will be wasting money and plywood on this, but I'm ok with that...right now...

When screwing down the subfloor, is predrilling not necessary? (All of the videos I've seen, they don't.) Is there an advantage or disadvantage to it at this stage? (Only asking because I typically always predrill, but 1 out of 10 screws usually will just spin and never fully tighten, and I'm wondering if that could be why or if I just drilled in an unlucky spot).IMG_20260101_131503.jpg
 
OP
P

peejay75

Well-known member
Joined
Sep 4, 2017
Messages
312
Depends on the type of screw you’re using.

Traditional wood screws, pre-drill the hole. Modern “deck” screws, just drive them home.
So these Deckm8te ones, just drive 'em home?

Don't bother pre drilling. If they aren't tightening you probably didn't hit the stud.
So far I've only done dimensional lumber joining, this will be my first sheeting-to-dimensional lumber fastening, I use a 9/64" brad bit to start the holes, maybe it's not staying true on the ones that aren't tightening.

Based on his post, I think he drilled pilot holes, probably too big for whatever screw is being used in soft wood. Regardless, I agree no pilot holes needed.
No risk of splitting the plywood, then?

IMG_20260101_154142.jpg
 

whateg01

Well-known member
Joined
Mar 13, 2006
Messages
11,538
Location
doo dah, kansas, usa
So these Deckm8te ones, just drive 'em home?


So far I've only done dimensional lumber joining, this will be my first sheeting-to-dimensional lumber fastening, I use a 9/64" brad bit to start the holes, maybe it's not staying true on the ones that aren't tightening.
This isn't furniture. Think about drywall crews. You think they drill pilot holes for each screw driven into a 2x4? Or are you just drilling through the plywood? Either way, unless you are putting a screw 1/4" from the edge of plywood, it's not going to split. It's plywood, not dimensional. The only issue I've ever had was if the screw grabbed the plywood and pulled it up before starting in the 2x. If it won't pull through just back the screw out until it's just clear of the 2x and run it home again.

No risk of splitting the plywood, then?

IMG_20260101_154142.jpg
3/4" plywood? You need longer screws!
 
To avoid these ads, REGISTER NOW!
Top Bottom