To avoid these ads, REGISTER NOW!

ZMotorsports Shop Projects 2.0

OP
Z

zmotorsports

ALLIANCE MEMBER
Joined
Oct 20, 2009
Messages
21,439
Location
Northern Utah
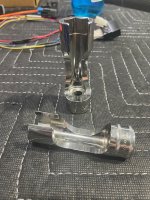
i really like this style for injector lines
IMG_8789.jpg

I agree and I have several individual ones for specific injector lines, such as on some of the older CAT engines and a few Cummins heavy truck engines.

If using solely for injector lines, then yes, I too think those are the best to use, but the 12-point crow's feet are more "universal" and fit a wider variety of fasteners as well as can be used on lines.
 
To avoid these ads, REGISTER NOW!
OP
Z

zmotorsports

ALLIANCE MEMBER
Joined
Oct 20, 2009
Messages
21,439
Location
Northern Utah
I like the 12 pt crows feet. I don't think I have seen those before.

Thanks. I haven't seen anyone show them on GJ in the past, which is why I thought I'd show them in case anyone else was interested. They aren't something I use everyday, but they certainly have their usefullness in some scenarios when nothing else will reach or be able to get to the next flat by being able to turn 60-degrees.
 

signcrafter

Well-known member
Joined
May 9, 2012
Messages
12,429
Thanks. I haven't seen anyone show them on GJ in the past, which is why I thought I'd show them in case anyone else was interested. They aren't something I use everyday, but they certainly have their usefullness in some scenarios when nothing else will reach or be able to get to the next flat by being able to turn 60-degrees.
And that's why we appreciate your posts Mike. Although I'm not sure my wife appreciates GJ posts as much as I do when the new tools arrive. 😂
 

larry4406

Well-known member
Joined
Jan 27, 2006
Messages
19,461
Location
Northern Virginia
I like the 12 pt crows feet. I don't think I have seen those before.

Thanks. I haven't seen anyone show them on GJ in the past, which is why I thought I'd show them in case anyone else was interested. They aren't something I use everyday, but they certainly have their usefullness in some scenarios when nothing else will reach or be able to get to the next flat by being able to turn 60-degrees.
Most definitely!

Having to use a crows feet is already bad enough and the 12 pt option adds another ray of hope.

Those Martin's are not cheap! Says they are made in the USA!
 
OP
Z

zmotorsports

ALLIANCE MEMBER
Joined
Oct 20, 2009
Messages
21,439
Location
Northern Utah
Most definitely!

Having to use a crows feet is already bad enough and the 12 pt option adds another ray of hope.

Those Martin's are not cheap! Says they are made in the USA!

Yeah, they're not cheap, but less than the Snap-on version. I'm sure there are other manufacturers of them as well, but cannot vouch for their quality. I'm sure the Wright's are good though. I haven't used the Proto version, but other Proto tools I have are excellent quality.
 

fouckhest

Well-known member
Joined
Jul 24, 2013
Messages
1,866
Location
Greer, SC
Merry Christmas, Happy Birthday and Happy New Year, Mike!

It looks like you had quite a busy and productive holiday break'ish!

The seats in the wives car look good, I'll be curious to see what a little heat will do over time, should shrink up/tighten up nicely!
 
OP
Z

zmotorsports

ALLIANCE MEMBER
Joined
Oct 20, 2009
Messages
21,439
Location
Northern Utah
Merry Christmas, Happy Birthday and Happy New Year, Mike!

It looks like you had quite a busy and productive holiday break'ish!

The seats in the wives car look good, I'll be curious to see what a little heat will do over time, should shrink up/tighten up nicely!

Thanks Mike. I wish you and your family a great 2026 as well.

Yeah, it's been a busy week and while I was able to knock a few things off my "to do" list, I felt like I did a fair amount of relaxing with the wife as well. It was a very relaxing and recharging holiday week. That being said, I wasn't planning on the thermostat housing on the son's WJ, but I'm thankful it had issues so close to home and not while he was on a trip somewhere, so I count that as a win and blessing as I wasn't ready to test out the new trailer quite yet. ;)
 

InDaRed2

Well-known member
Joined
Sep 21, 2015
Messages
319
Location
MO
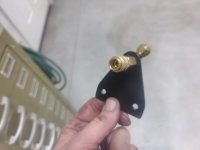
Afterwards, I hurried and knocked out the bracket for the rear air coupler on the coach so I could bead blast and paint it.
supbrake21.jpg

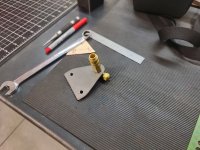
Marked the location so I can drill and tap the holes for mounting. Most of what I see people doing is to simply drill into the fiberglass of their coaches and mount the coupler, but I don't like drilling into the fiberglass to mount anything if I don't absolutely have to. This will be much more rigid and not create stress cracks in the fiberglass from connecting/disconnecting the coupler repeatedly. Also need to slap a coat of paint on the hitch again while I'm at it as it looks a bit faded.
supbrake22.jpg


Thanks for looking.
Mike, what kind of fitting is that, that allows you to sandwich the sheet metal between? I need to mount an external air line from my compressor on my truck and bought some bulkhead fittings but you mount appears to have less connections than I would have with the bulkhead fitting.

51z55SGEvBL._AC_SL1000_.jpg
 

patlun

Well-known member
Joined
Apr 12, 2015
Messages
242
Location
Värmland, Sweden
leak3.jpg

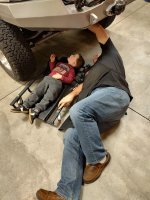
I smiled and wiped a tear at the same time looking at that picture. I photographed my father showing my nephew how to use an hammer 20 years ago or so, my father died 2008 and my nephew don't have that much memories of him. That picture means a lot for him. and me

Such pictures of daily life can be very good memories in the future, Personally I think they are much more valuable than the ones that are directed in any way,
 
OP
Z

zmotorsports

ALLIANCE MEMBER
Joined
Oct 20, 2009
Messages
21,439
Location
Northern Utah
Mike, what kind of fitting is that, that allows you to sandwich the sheet metal between? I need to mount an external air line from my compressor on my truck and bought some bulkhead fittings but you mount appears to have less connections than I would have with the bulkhead fitting.

51z55SGEvBL._AC_SL1000_.jpg

I've used bulkhead fittings such as those in the past with excellent results.

However, in this application I was able to measure the gap between the street elbow and the fitting body, then select the proper thickness of material as well as a correct thickness of washer for the backside to where it should tighten fully at about the right spot to be tight on the bracket, thus eliminating one more connection point or potential leak point.
 
OP
Z

zmotorsports

ALLIANCE MEMBER
Joined
Oct 20, 2009
Messages
21,439
Location
Northern Utah
leak3.jpg

I smiled and wiped a tear at the same time looking at that picture. I photographed my father showing my nephew how to use an hammer 20 years ago or so, my father died 2008 and my nephew don't have that much memories of him. That picture means a lot for him. and me

Such pictures of daily life can be very good memories in the future, Personally I think they are much more valuable than the ones that are directed in any way,

Thank you. I too much prefer the non-staged pictures of everyday life over the staged pictures of various activities. I wish I could convince my wife of that as she hates her picture being taken and always forgets to snap pictures of me working in the shop. I get pictures of her either cooking in the kitchen or when we are on various trips or playing with our grandson and she gets mad at me, but these types of pictures to me have much more meaning.

I have very, very few pictures of my parents other than anniversary pictures. I do have one of my dad standing at a workbench while my son is playing with a Rochester four-barrel carburetor that I absolutely love. My son is probably only about 4 or 5 at the time and my dad passed away a couple years later.
 

Mr.zippy

Well-known member
Joined
Apr 27, 2020
Messages
2,221
Location
Wyoming
Thank you. I too much prefer the non-staged pictures of everyday life over the staged pictures of various activities. I wish I could convince my wife of that as she hates her picture being taken and always forgets to snap pictures of me working in the shop. I get pictures of her either cooking in the kitchen or when we are on various trips or playing with our grandson and she gets mad at me, but these types of pictures to me have much more meaning.

I have very, very few pictures of my parents other than anniversary pictures. I do have one of my dad standing at a workbench while my son is playing with a Rochester four-barrel carburetor that I absolutely love. My son is probably only about 4 or 5 at the time and my dad passed away a couple years later.

I had two thoughts when I saw that photo.
One, it's a fantastic documentation of Gramps and me, that the little guy will grow to cherish!
Two, that's gonna hurt like hell getting up off the floor.......
 
OP
Z

zmotorsports

ALLIANCE MEMBER
Joined
Oct 20, 2009
Messages
21,439
Location
Northern Utah
I had two thoughts when I saw that photo.
One, it's a fantastic documentation of Gramps and me, that the little guy will grow to cherish!
Two, that's gonna hurt like hell getting up off the floor.......

Agreed about the getting up part. Not as easy as it was a couple of decades ago that's for sure. 🙄
 
OP
Z

zmotorsports

ALLIANCE MEMBER
Joined
Oct 20, 2009
Messages
21,439
Location
Northern Utah
I was able to find my air leak on the coach last night. Once I aired it back up and crawled under it the leak was quite evident and an easy fix. I worried about creating leaks as many PTC fittings don't like to be disturbed once they have been in service for many years and miles. While replacing the PPV valves on the primary tank I had disturbed a line adjoining the air leveling manifold and that was the source of the leak. I was going to remove it, cut about a half inch off the end and reinstall it when I noticed the entire line was less than 2' long, so I just removed and replaced it. Plus I added some poly loom as it ran across another fitting which should air in abrasion protection.

Fired the coach back up and crawled back under and no leak. All is good and time to move on to the hydraulic oil and filter replacement. With the hydraulic filter loosened and hydraulic oil draining I figured I would determine the final mounting location for the supplemental braking air coupler at the hitch and get those holes drilled and tapped.

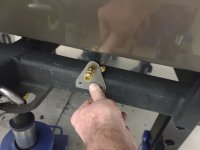
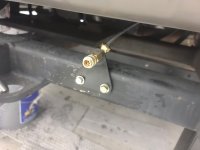
With the orientation of the air line determined, I added some sealant and tightened the fitting to the bracket for the final time.
supbrake31.jpg

I also dug through my rubber caps/plugs and found a cap to place over the coupler when not in use to keep it safe from the elements, although when traveling the coupler will more than likely have an air line connected for the Jeep, unless we take the new car trailer once in a while. Otherwise the coach doesn't go anywhere without something in tow.
supbrake32.jpg

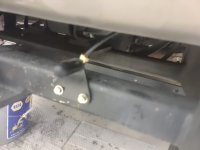
Holes drilled and tapped. Hose cut to length and connected and bracket loosely held in place. I say loosely because I want to sand the hitch down and repaint it once the hydraulic filter and system is serviced.
supbrake33.jpg

Cap installed.
supbrake34.jpg


The last few months I noticed a drip coming from the hydraulic filter or the housing and I knew I would be servicing the hydraulic system so I didn't address it at the time. I highly expected that maybe the filter had come loose a little creating the leak, however, after crawling under the rear and taking a closer look, it appears as though the flow meter on the side of the housing is the source of the leak, so the entire filter housing will be coming out to see if it is something I can repair without having to replace the entire filter housing.

While I was under the coach my friend contacted me to see if I could take another look at his Polaris that I did the pre-season carb cleaning on. He took it to his cabin over New Year's and he said it only run a short time before bogging and being way down on power. I told him to bring it over right away and I'd see if I could squeeze it in this week.

sled1.jpg

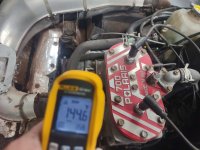
He was a bit later than I expected dropping it off, but with him there I fired it up and it definitely didn't sound right. It did fire right up, but it really didn't like having throttle added and it had to be feathered in order to gain RPM's. I grabbed my IR gun and quickly noticed that the PTO side wasn't contributing. The MAG side was nearing 150 degrees.
sled2.jpg

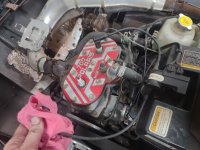
Whereas the PTO side was barely at 90 degrees.
sled3.jpg

I reached down and grabbed the plug wire and pulled it and no change. Yep, that cylinder isn't contributing.
sled4.jpg


To rule out the coil and wire I swapped the wires side for side and no change, still the PTO side was not contributing. I'll have to dig deeper and do a compression test and see how far he wants me to go. I really don't want to get into rebuilding powersports engines again and only work on these because he's a friend.


To be continued as I dig deeper as time allows. Thanks for looking.
 

customh

Well-known member
Joined
Feb 18, 2013
Messages
562
Location
East Bethel, MN
I forget if the non-VES engines were known for being as reliable as the Liberty VES.

I'll be interested to see what you find. Father in law had an '03 800 that wasn't great (dropped a piston once, then broke a crank the next year), an '04 700 that was rock solid and a '04 600 Classic he still has with 11k miles on it, also rock solid.
 
OP
Z

zmotorsports

ALLIANCE MEMBER
Joined
Oct 20, 2009
Messages
21,439
Location
Northern Utah
I forget if the non-VES engines were known for being as reliable as the Liberty VES.

I'll be interested to see what you find. Father in law had an '03 800 that wasn't great (dropped a piston once, then broke a crank the next year), an '04 700 that was rock solid and a '04 600 Classic he still has with 11k miles on it, also rock solid.

Travis, I found reliability hit and miss with any brand when the Variable Exhaust System or Valve engine came out. Some used mechanically (cable) operated and others used pressure and both had their pros and cons. I rebuilt so many of both Arctic Cat and Polaris engines back in the early 2000's because people would do their own "porting" and then forget about the exhaust valve that also had to be modified to coincide with the altered port height.

My clients that had me to pre-season inspections and tune-ups seemed to have less issues overall than someone who just rode them until there was a problem. A simple carbon cleaning will go a long way to ensure proper operation on any of them though.

I didn't perform a compression test on it yet, but my gut tells me it will be something simple as just pulling it over it didn't feel line only one cylinder had compression. That's not a very scientific assessment, but just my gut, but I do know the PTO side cylinder is not contributing for certain.
 
To avoid these ads, REGISTER NOW!

ntsqd

Well-known member
Joined
Jan 22, 2005
Messages
986
Location
Lower left coast
On the air coupler, in my various OBA systems I've found that even when I could keep a cover on them the QDs would gather junk inside them and then the sleeves wouldn't slide. One day I used a QD plug with female NPT threads and an NPT plug to create a QD plug that I could just leave in the QD socket. I tried that over the next several trips and I've not had a problem since.

Now my go-to for building a new OBA system is to order SS QD plugs & NPT plugs from mcmaster. I chuck up the QD plug and use a parting tool to cut a shallow groove in the hex of the plug. Some 1/8" SS cable with a couple Nicopresses later and I have a lanyard on the plug.
Your use is different and may not require going that far, but I thought it worth mentioning.
 
OP
Z

zmotorsports

ALLIANCE MEMBER
Joined
Oct 20, 2009
Messages
21,439
Location
Northern Utah
The parts arrived for my son's WJ yesterday so he came by after work so we could get his Jeep back on the road.


I am sure proud of how he keeps his vehicles maintained. He also had to show me his new center caps that he installed as the factory ones were looking bad and the plastic retainers were failing. Although these are aftermarket center caps, with the red bowtie center logo, they match his truck quite well and look great.
lb7.jpg

We replaced the failed thermostat housing with an OEM one as well as a new thermostat. Torqued it to spec, pulled a vacuum on the system to ensure a tight system and then refilled with fresh coolant. Still not sure why the new thermostat housing started leaking after only about 5k miles, but there were no cracks visible and it was still flat on the sealing surface. :headscrat
wj.jpg


I then turned my attention back to the coach. I developed a leak at the hydraulic filter earlier in last year's travels, but it was a slight drip every once in a while, and I knew I would be draining the hydraulic fluid and replacing the filter at the end of the season, so I just kept an eye on it throughout the remainder of our 2025 travels. The filter is buried up under the rear cap and doesn't have the best access but after removing the hydraulic filter and allowing the fluid to drain, I realized that the filter itself didn't appear to be the source of the leak. There was buildup above the sealing surface of the filter so I opted to remove the housing thinking it must be cracked or has failed in some manner. I figured I would have to remove it and take it to my local FleetPride to match it up anyways and maybe I could see the origin of the leak.
hyd1.jpg

Buried under the buildup I saw a restriction gauge, which I didn't realize this housing was equipped with. The gauge is right up against the frame rail so not sure why they would put a filter housing with a restriction gauge when it cannot be seen. :unsure:
hyd2.jpg

I thought that must be the source of the leak and there must be a gasket or something under the restriction gauge so I grabbed a pick to clean out the screw heads and that's when I saw it. Just cleaning the screw heads out of the first screw, it turned, very easily.
hyd3.jpg

I moved to the next screw head and sure enough, it was also very loose. Well BINGO, there's the leak's origin.
hyd4.jpg

The screws came out far too easily and I was pleasantly surprised to see just a couple of small O-rings for the seal. This should be an easy fix.
hyd5.jpg


The wife arrived home from work and I called it a night, but after a thorough cleaning it should be ready to reassemble, install and finish up the hydraulic system service.

Thanks for looking.
 

ScepterToad

Well-known member
Joined
Nov 9, 2023
Messages
340
Fascinating how the manufacturers of these coaches changed things over the years. My coach has one of the giant hydraulic reservoirs and 3 filters inside.

Speaking of that, given your experience in industrial settings, do you view the filter system you have to be adequate? I suppose that more often filter changes will accomplish the same thing as having a large reservoir and filter setup provided routine maintenance (which is clearly NOT a problem for you).
 
OP
Z

zmotorsports

ALLIANCE MEMBER
Joined
Oct 20, 2009
Messages
21,439
Location
Northern Utah
Fascinating how the manufacturers of these coaches changed things over the years. My coach has one of the giant hydraulic reservoirs and 3 filters inside.

Speaking of that, given your experience in industrial settings, do you view the filter system you have to be adequate? I suppose that more often filter changes will accomplish the same thing as having a large reservoir and filter setup provided routine maintenance (which is clearly NOT a problem for you).

Keith, yeah, I have seen Monaco use both filtration systems over the years. The one like I have will have the spin-on style of filter to a housing and will have the rectangular reservoir. Yours will have the round reservoir with the band clamp and have a series of filters stacked internal to the reservoir. Not sure which is better to be honest, as long as they allow the fluid to circulate through the filters and have enough surface area to keep the fluid temperature under control, both styles perform as designed.

We have both similar designs in the industrial world and as you eluded, maintenance is the key no matter the design. To be honest, the hydraulic system is sealed so unless there is foreign material introduced into the system during a fluid check or some form or maintenance, the only other reason for contamination getting into the system is a failing component. But that's a tricky one, because under normal use it is highly unlikely to have a component failure as those are generally linked or related to neglected or poor maintenance practices.

I do like having the restriction gauge in the industrial field however, as it is a nice tool to relay the health of the filtration system. However, in an RV under normal usage and good maintenance practices, it is highly unlikely a person would see much in terms of restrictions in the filters. The manner in which Monaco/Roadmaster mounted the filter head so close to the frame rail, it is impossible to actually view the restriction gauge anyways. I suppose if it was perfectly clean and with the use of a mirror and all of the wiring looms were moved out of the way a person could see the gauge, but otherwise the gauge is pretty useless in this situation.

When I was originally thinking I must have had a cracked housing and looking online I was finding many more choices without the restriction gauge than with. I also wanted to make sure to select one to keep the same filter so I figured I would remove it, clean it and take proper measurements to ensure a perfect match. That is when I discovered the source of the leak being the restriction gauge and figured it would be an easy enough fix. I do think I will add a bit of thread locker to the small screws to hopefully prevent a future leak. Although with the coach taking 24 years and 150k miles to start to leak, I doubt I'd have another issue. :unsure:
 

SilverJimmy

Well-known member
Joined
Apr 14, 2012
Messages
1,643
Location
Prescott/Flagstaff, AZ
I was going to ask who’s coach that filter housing came off of cuz there’s no way it at came off of @zmotorsports coach with all that dirt and grime on it, but then after the explanation of how it’s buried in an area of the coach that you can’t really see…..
So, Mike is a Mortal after all!
Happy New Year, really looking forward to everything that you teach me during our great American 250th Anniversary!
 
OP
Z

zmotorsports

ALLIANCE MEMBER
Joined
Oct 20, 2009
Messages
21,439
Location
Northern Utah
I was going to ask who’s coach that filter housing came off of cuz there’s no way it at came off of @zmotorsports coach with all that dirt and grime on it, but then after the explanation of how it’s buried in an area of the coach that you can’t really see…..
So, Mike is a Mortal after all!
Happy New Year, really looking forward to everything that you teach me during our great American 250th Anniversary!

Yes, I'm mortal Sterling and I think you give me too much credit. It's not a show coach, it's used, although not as heavily as I would prefer ;), and even with a small "weep" somewhere a very small amount of residual oil will collect a ton of dirt, road debris and tire dust which will gather and buildup rather quickly.

Besides, that is also corrosion protection. :bounce:
 
OP
Z

zmotorsports

ALLIANCE MEMBER
Joined
Oct 20, 2009
Messages
21,439
Location
Northern Utah
Last night I was able to diagnose and repair the Polaris snowmobile and have the owner come and collect it.

I threw a compression gauge on it even though my gut was telling me I could feel the two cylinders having compression and sure enough, both cylinders had relatively close compression.

After now confirming it had both spark and compression, the only other element to verify is fuel. I disconnected the fuel inlet line and threw my pressure gauge on it. It showed it was holding pressure which told me that the fuel level must be correct to close off the inlet needle.
sled3.jpg


sled4.jpg

From there I thought I would remove the PTO side carburetor and check to see if I had a broken reed or something in the intake. As I removed the carburetor it "felt" a bit light so I held it upright so as to not lose any fuel and brough it to the bench and removed the float bowl. Shockingly, when I removed the float bowl I discovered the bowl was empty. :headscrat If there was no fuel, why would the inlet needle be holding pressure with no fuel level to hold the float up? Also, I noticed that when I removed the fuel line from the carb to hook up the pressure pump, very, very little fuel came out, which that SHOULD have been the first red flag looking back.

I reconnected my pressure gauge and even with no float bowl on the carb, it held pressure. OK, that's not right. I removed the float pivot, float and needle from the seat and that's when I noticed the needle was stuck in the brass seat. I hit it with a little air and a piece of debris popped out. Hmmmm. So I went back to the sled and pulled the engine over a few times and a little trickle of fuel came out of the fuel line. I quickly removed the fuel line from the MAG side and it had fuel there bubbling up out of the line and when I pulled the engine over it spurted fuel out of the hose. Well, well, well, looks like we have a fuel delivery issue. :unsure: Could be a failing fuel pump, but I have not seen one fail before on only one chamber.

I went and removed the constant tension clamp from the fuel pump side of the PTO fuel line, then pulled the hose off the barb.
sled5.jpg

I used a little compressed air to blow backwards through the line from the carb side to the fuel pump side and blew into a paper towel. This was the result.
sled6.jpg


Not wanting to have a repeat issue, I removed the line from the other carb and did the same procedure as well as from the tank and ensured good clean fuel was flowing. Evidently letting a sled sit in a barn for a few years with no fuel in it is not a good practice. :dunno:

With fuel supply now verified, I reinstalled the PTO side carb, reconnected everything and with the air box still removed I choked and gave her a couple of pulls. As soon as it fired off the tone was evident that she's now firing on both cylinders with excellent throttle response. Problem solved and the owner can come and get it.
sled7.jpg


Funny story time. I had opened the gate for the owner to back up to the shop to hook up to his trailer. My son, DIL and grandson were planning on stopping by for a visit and evidently when they pulled into the neighborhood, my grandson saw the lights on in the shop and said "Papas in the shop". So they pulled around back to the shop and when my son and grandson came into the shop my grandson wanted to sit on the snowmobile. My son was going over the various components with him and he knew the key and fuel tank and what to pull on to start it, so my son asked him if he wanted to see it run. Now I have to keep reminding myself that my grandson is not even 3-years old yet because he talks so clearly and surprises me every time I see him with his vocabulary as well as his imagination and the way his little mind works. My son pulled the handle and it fired right up, my grandson didn't even hesitate as he reached for and grabbed full throttle. :bounce: WOW! That happened fast. :oops: The thing revved and track spun on the trailer and he didn't even flinch. My son grabbed his son's hand off the throttle and as we were laughing he explained to my grandson *********** the engine with the kill switch so he reached over and smacked the red killswitch then just sat there looking at the two of us. My hell, that kid has no fear and I'm not sure how I feel about that. :headscrat


As they headed in the house the owner arrived and we had to let the shop air out a bit while he was hooking up the trailer. Sounds like he and his wife are going back up to their cabin this weekend, so he was pleased I was able to get it running so quickly for him. Nice to have that job out of the shop.
sled8.jpg


Thanks for looking.
 
OP
Z

zmotorsports

ALLIANCE MEMBER
Joined
Oct 20, 2009
Messages
21,439
Location
Northern Utah
Yup, my Ford F-350 has a 6.Ut-Oh that leaks oil from the bed plate for self applied anti-corrosion protection. Ford really does know how to make their trucks last!

Oh, I have one of those too! Really slick feature!


I have two clients currently with leaking bed plates on their 6.0's and after providing them with a rough estimate to repair, they've both decided to live with the leaks. Resealing those is not a small task.
 
OP
Z

zmotorsports

ALLIANCE MEMBER
Joined
Oct 20, 2009
Messages
21,439
Location
Northern Utah
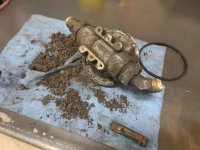
While I was waiting for the owner of the sled to arrive, I figured I would knock out the hydraulic filter housing cleaning and repair.

For starters I needed to get as much gunk off the housing as possible before it hits my solvent tank.


hyd6.jpg

After a quick dip in the solvent tank and everything blown off with compressed air, it was time to inspect parts.
hyd7.jpg

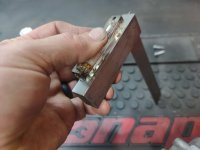
Checking the mating surface of the restriction gauge to ensure it isn't damaged or warped. It was doubtful, but wanted to verify before going through the hassle of putting everything back together. I am still under the belief that the leak was solely due to the screws being loose and the hyd. fluid weeping out from underneath the restriction gauge.
hyd8.jpg

Lastly checking the gauge itself. Everything looked fine and no issues noted.
hyd9.jpg

Still thinking the leak was solely due to screws coming loose, I thought I'd just check to see if I had replacement O-rings that would fit. While the original O-rings didn't look to be flattened out or misshaped, there's no sense in doing all this and not replacing them.
hyd12.jpg

Original O-rings measured approx. .067" cross section.
hyd10.jpg

I found one in my selection that is just about .010" thicker.
hyd11.jpg

Restriction gauge reinstalled with a small amount of 262 Loctite on the threads and then some Revlock Sure Lock applied after the fact.
hyd13.jpg


Now to begin cleaning the mess off the frame rail and hitch area from the same residue so I can prep and paint it. I'd hate to disappoint ya'll and put it back together without cleaning and paint. ;) I don't want to get called back out by Sterling, aka @SilverJimmy. :bounce:
 

Jgaz

Well-known member
Joined
Dec 16, 2016
Messages
1,688
Location
AZ
Oil leaks can be beneficial.

I had a triumph motor cycle in the 70’s that had the “self lubricating chain” option,
It was courtesy of the leaking countershaft seal that never seemed to stay fixed
 
OP
Z

zmotorsports

ALLIANCE MEMBER
Joined
Oct 20, 2009
Messages
21,439
Location
Northern Utah
What does that restriction gauge do? I am not familiar with one.

In hydraulic systems, most of the time the filtration is on the return side. In the filter housing there is a small port on each of the inlet and outlet ports with the gauge between the ports. The gauge has a calibrated spring inside with an indicator type of "shuttle" valve. When the filter begins to become restricted the shuttle valve will begin to shift and show in a different range to represent the filter becoming restricted. It merely an indicator for maintenance purposes so you replace the filter before it becomes completely plugged.
 

Boosted1

Well-known member
Joined
Nov 25, 2007
Messages
1,680
Location
Georgetown, KY
Hey Mike,
That hydraulic filter housing looks like the perfect candidate part to put into my new Ultrasonic parts cleaner :).
I picked one up on sale from HF over the holidays. 6L capacity and have tried it on some small rusty parts with Evapo rust. Works great. You can also use cleaner / degreaser solution in it to just clean stuff.
Have you ever considered getting an ultrasonic cleaner? I hear they work great on Carbs too.
 
OP
Z

zmotorsports

ALLIANCE MEMBER
Joined
Oct 20, 2009
Messages
21,439
Location
Northern Utah
Hey Mike,
That hydraulic filter housing looks like the perfect candidate part to put into my new Ultrasonic parts cleaner :).
I picked one up on sale from HF over the holidays. 6L capacity and have tried it on some small rusty parts with Evapo rust. Works great. You can also use cleaner / degreaser solution in it to just clean stuff.
Have you ever considered getting an ultrasonic cleaner? I hear they work great on Carbs too.

Yes, I have often considered an ultrasonic cleaner. However, I think it would have been more valuable about 20-years ago when I had my speed shop and working on a lot powersports equipment which involved doing a LOT of carburetor work. Back then I just used a 5-gallon bucket of carburetor cleaner with the metal basket that submerged into the pail. It worked well, but nothing like the new ultrasonic cleaners.

Every time I consider one, I discount it solely because I don't do much in terms of carburetor work these days and it would be hard to rationalize the purchase as well as the bench space given up for it. I know they work on things other than carburetors, but who knows, maybe one day. :unsure:
 

fouckhest

Well-known member
Joined
Jul 24, 2013
Messages
1,866
Location
Greer, SC
Every time I consider one, I discount it solely because I don't do much in terms of carburetor work these days and it would be hard to rationalize the purchase as well as the bench space given up for it. I know they work on things other than carburetors, but who knows, maybe one day. :unsure:

Ultrasonics pop on to my FBMP search routine occasionally, I've been told by different folks that the cheat code is to keep your eye out for a dentist office closing/going out of business, if you can find that, then you get bigger, better, for around the same cost as the cheap little ones...YMMV
 
To avoid these ads, REGISTER NOW!
Top Bottom