To avoid these ads, REGISTER NOW!

Above 1200 Sq/FT Swiss Garage / Workshop / House Build

Wokspaces above 1200 squarefeet.
To avoid these ads, REGISTER NOW!

Bob Heine

ALLIANCE MEMBER
Joined
Oct 24, 2009
Messages
10,706
Location
Boca Raton, Florida
The good thing, though, is that it came with a lot of accessories, like plenty of high-quality sanding belts
Nils, I would be a little careful with those belts. Even the best ones come apart when the glue and tape holding them together gets to a certain age. Not sure when that is but I let the belt get up to speed and then give it twenty or thirty seconds before bringing anything in contact with the belt. It's not like an exploding grinding wheel but it's a big surprise and a slap on the hand when a belt seam lets go.
 
OP
J

JDMjunkies.ch

Well-known member
Joined
Dec 27, 2016
Messages
447
Location
Switzerland
Recently, I was able to obtain something rare, which I've been searching for five years, or so now. But let's start in the beginning. In 1937, Nissan registered a daughter-company called "Nissan Auto Sales Co. Ltd." as a sales division spin-off. In 1957, the same company registered the "NISSALCO" trademark, with the aim to develop and produce service tools for Nissan factories and workshops. They produced all kind of mechanical and electronic testers but also accessory parts for Nissan Car owners. Here is a picture from the Nissan Cherry assembly line, with a NISSALCO sign above every test bench:
20250730_194013-Kopie.jpg

Today, the company is still existing, but under the "ALTIA" Name. In the early 70ies, they developed a Special service tool box for the Datsun 240Z sports. ST0929-0000. And yesterday, I finally got one, after many years of searching for it.20251002_161721-Kopie.jpg

The toolbox comes with a selection of Special tools for the 240Z. And this box came with a lot of extra tools inside.
20251002_161754-Kopie.jpg

You can lift out the upper case, and then you have access to the lower level. Mine included also the Booklet that comes with it.
20251002_161819-Kopie-rotated.jpg

So first, I had to get all the parts out and go through them.
20251002_162359-Kopie.jpg

Luckily, i collected some of the Datsun / Nissan / Kent-Moore Special tools books over the years.
20250926_140439-Kopie.jpg

And the box (even though without any part number or information) and some of the tools are also listed in the US-service manual:
tool9.JPG.84ba66fdee3da21f882a8fde50d5bd4e.jpg

Sadly, I quickly realized that my purchase came with a lot of additional tools which do not exactly belong to the S30, but random Datsun's, and some original tools from the box are missing. It seems that the previous owner also recreated some missing tools.

_04-Tool-Box-Additional-tools-Tool-List.xlsx-Excel.png

Overall, it's still a good starting point. After cleaning the box out, hammering the metal straight and fixing the locks. it started to look good.
20251002_163903-Kopie-rotated.jpg

I wanted to keep the patina, but still clean up all the parts. so i gave them a quick wash in the parts cleaner:
20251002_182243-Kopie.jpg

And then put the original parts back in:
20251005_131931-Kopie-rotated.jpg

Assembled (some tools are not correct):
20251005_131956-Kopie.jpg

And closed:
20251005_132612-Kopie.jpg

The set also included this nice Nissan wooden tool box, with the lovely lock:
20251002_171039-Kopie.jpg

I still have to figure out yet what this is used for, but i just love the looks of it:
20251002_171114-Kopie.jpg

I'm also working on to restore the original manual that came with it:
20251005_132814-Kopie.jpg

But it appears that the last few pages are missing and the back cover. But still better than nothing. It also has a very strange format, where each page is only printed on one side and then folded to have a print on both sides, which is a bit weird.
20251005_132827-Kopie-rotated-e1759667860544.jpg

That's it for now. I will try to keep finding the missing tools and pages. If you know something, I'm happy to hear from you. Expect some more tools related stuff in the coming days, but I also hope to work on the car itself again, in the next days. Stay tuned!
 
OP
J

JDMjunkies.ch

Well-known member
Joined
Dec 27, 2016
Messages
447
Location
Switzerland
You might remember that recently, I picked up another vintage Datsun tool Board, to the one I already had.
Soon after that, a friend wrote me that he found some more. So naturally, I negotiated and was able to pick them up last week. This time, luckily, including some tools:
20251009_185015-Kopie.jpg

First, I had to clean everything and sort through the boxes of tools:
20251010_141654-Kopie.jpg

It included quite a funky set of homegrown tools. I wonder what purpose they were made for:
20251010_141659-Kopie.jpg

Then I also spent a bit of time to remove rust and put some protective clear coat primer on the walls, to ensure they don't corrode any longer. Thanks to @Mymechanics for your support and inputs!
20251006_200806-Kopie.jpg

So totally i have now 5 tool walls. That one from Germany, which is already completed and hanging in my garage, plus these four. Two Datsun ones:
20251011_165450-Kopie.jpg

And two more modern ones with a Nissan branding:
20251011_171127-Kopie.jpg

As you can see in the photos, many tools are there, but also many are missing. So the next step is to make an inventory of what I have and what is missing. And what the tools are for, which do not belong to these specific tool boards. Luckily, I have a lot of original Datsun / Nissan / Kent-Moore / SPX documentation about those tools, and what cars / Engines / transmissions they are intended for.
20250926_140439-Kopie-1.jpg

And my latest acquisition also included a more modern Nissan / SPX / Kent-Moore booklet, which is nice for the Nissan branded boards:
20251011_165435-Kopie.jpg

I was lucky to already find some of the missing tools. But that's only a fraction. Some of the tools will be tricky to find and might take me a few months / years to come accross.20250929_142921-Kopie.jpg

Overall, I'm quite happy. I have to find a nice place for the Datsun branded walls, and with the Nissan ones I yet have to decide if I keep them as decoration or if I sell them, if the right person comes along. Either way, it was a great find, but still some homework ahead to figure out what all these tools are used for, which car models they fit and what is missing.
20251011_171148-Kopie.jpg
 
OP
J

JDMjunkies.ch

Well-known member
Joined
Dec 27, 2016
Messages
447
Location
Switzerland
A little update from the outside, too, for those who followed the whole build.
Before we even started building our house, our nice neighbor asked if it's OK if he plants a Thuja hedge on the border so he doesn't have to look at the construction site all day. Of course we agreed - a free hedge to the neighbor - great for us too :cool:
Until now, a few years later, when we figured out that Thujas actually don't like the climate change with increasing warm summers over here, so they all started to dry, no matter the actions we took:20250515_165247.jpg

Also, we were never a big fan of that particular garden area, some other plants died too, and it was mainly a big triangle overgrown with wield strawberries in the end. (Not that I don't like to munch a few wild strawberries in summer). While at it anyway, we decided to replace the whole area with a kind of "forest", which gives it a more natural look and more shadow on our terrace in hot summer.
But yeah, the plants and cherry tree still have to grow a bit until the neighbor's house is hidden. The photo is from mid-summer, so now it's already grown quite a bit.20250608_145025.jpg

While spending time in the garden anyway, I decided to install an irrigation system along the southern wall. Due to the heat reflection from the sun, that area of the lawn was always burnt / dried out, despite our watering system.20250513_161059.jpg

What can I say? It works. A few hours of work and bucks well spent:20250515_165206.jpg

While reworking the other part of the garden, we realized that that little wood-fence we had installed as a barrier between the lawn and the other area has rotten away. And that the lawn-mower can not cut the grass until the edge, because it would hit the little fence. Means we had to manually trim the edges of the lawn every now and then. And since every man needs endless projects, it was about time to get that done. Holes dug, rebar laid down (We luckily still had a bit of leftover from the house)20250711_164452.jpg

Concrete mixed and poured and stones laid:
20250719_130925.jpg

And finally, after a few days of work - Done. Not perfect, but I'm happy for my first attempt. Now the lawn mover can drive over the edge and cut the grass completely, which was well worth the hours and money spent.20250723_182902.jpg

We spent a lot of time in the garden this year, and I hope this will further reduce our manual labor required to keep it tidy. But I'm pretty sure it won't take long until my wife or me comes up with new ideas for "improvements".
 
OP
J

JDMjunkies.ch

Well-known member
Joined
Dec 27, 2016
Messages
447
Location
Switzerland
After getting my new tool boards, I was wondering what to do with them. I decided to keep them, because I liked them so much. But where to hang them? After years of collecting various stuff and hanging it in random free spaces, it got me thinking how I could improve the whole thing.
20251017_124222.jpg

I was never really happy with the layout, particularly that green drawer on the left in the previous photo. The idea was originally to have the soldering table underneath that light shaft, but since my wife decided to put a big bucket with tomato plants on top of it, the only thing that comes through that windows are spiders when I open it to vent. Also, the parts washer in the middle of the room can get the whole area quite smelly.
In the bay-area, there was a lot of stuff standing around. Including my very first crappy cheap tool trolley which I never used, but kept for sentimental reasons :)
20251017_123159.jpg

I started to think and measure how I can improve the whole situation with minimal work. And that quickly spiralled into a load of small tasks.
Main goal: Move the green drawer to the rear --> requires the white shelves to me moved to the right.
Move the white shelves completely to the wall --> requires the power outlets and tubing to be moved about 10cm.
Move the soldering table to the left side --> Requires the grinding machine to be moved.

On the positive side, the drawer just fit between the window-frame and shelves by the millimeter and the whole moving also allowed me to:
- Move the parts cleaner to the window (better air ventilation when working with it)
- Move the blue drawer and the big workbench about 10-20cm to the right, giving better space between shelves and workbench.
- Move the trash bin into the former area of the parts cleaner (more central)
- Move the silver shelves (not visible) further to the right, giving some better access to the steps.
20251017_195822.jpg

After this was done, I also removed some things on the Wall of the Bay area and moved some things further up on the wall, so I could hang all the Nice vintage Datsun tool walls. Those nice framed prints never really made sense to be in a working area anyway.
20251024_084842.jpg

Overall, I'm very satisfied with the new layout. The change is minimal, even though it was more work than expected. But the space is much more accessible now.
20251024_112053.jpg

20251024_112107.jpg

The soldering area has more light and isn't hidden behind the green drawer (Yes, I'm aware that the textile banner behind the grinder is probably not the best idea.)
20251024_112116.jpg

And on the opposite side I moved some **** to another area, so I finally had some space to hang the removed prints from the Garage and even make a display shelve with my "best-off" parts:
20251024_112128.jpg

Over the years I've hoarded loads of stickers from friends and nice brands and suppliers, so I decided to give them a bit of credit by putting them on the blue drawer:
20251014_154255-rotated.jpg

After a proper cleanup of the whole garage and workshop and scrapping some things. I think the area is much cleaner now. As you can see the body of my 240Z is also nearing completion, so soon it's time for paint and then the fun part (assembly) starts.
20251024_112209.jpg

And a wide-angle view of my garage area:
20251024_112233.jpg

Thanks to Chris (26th-Z) I was able to get some of the missing tools for my Datsun 240Z factory toolbox too. Strangely, some of my parts are pretty similar, but had completely different part numbers. And all of them have a slightly different shape, material, or coating.20251024_085313.jpg

Well, the good thing is I have now one complete set with the mentioned part numbers in the manual and box to complete it: Excellent, and thank you, Chris!
20251024_085404.jpg

That's it for now. Now it's about time to get some work on the Project car done during winter-time. I'll keep you updated.

Sorry for so many posts in a row. A lot of things happened in the recent weeks and I just realized I never posted about it. And you maybe need a little read on a rainy fall / winter day - so here you go! :)
 
OP
J

JDMjunkies.ch

Well-known member
Joined
Dec 27, 2016
Messages
447
Location
Switzerland
I had this Genuine Datsun Parts sticker for a long while and always wondered how I can present it. When I found this piece of Aluminum sheet, I got the idea to make a sign out of it. 20251029_201739-Kopie.jpg

So I cut the Aluminum.
20251029_203837-Kopie.jpg

and then put the Sticker on it.
20251029_204106-Kopie.jpg

So I ended up with this cool sign.
20251029_205340-Kopie.jpg

And found a good little Spot for it:
20251211_144447-Kopie.jpg

I also recently also found this nice NISMO (Nissan Motorsports) sign with the vintage lettering in Japan,
20251210_152345-Kopie.jpg

So I had to find a nice place for it as well, but it looks a bit small on this big wall, next to the huge Datsun sign.
20251213_133102-Kopie.jpg

I've also been trying to find an original Nissan "Elephant oil" Oil can. The problem is that most Japanese shipping companies now refuse to ship anything with oil residues on it. so it was a bit tricky to find one and get it to my place. Nevertheless. here you go:
20251124_182430-Kopie.jpg

I just like the Color scheme of it and the fact that it has the same Nissan Elephant Oil logo on the can, which is also on my 240Z Oil filler cap. And it also looks good next to the "Datsun Saves" ad campaign oil can.
20251124_182413-Kopie.jpg

I've also been hunting Tools. 20251210_152655-Kopie.jpg

Luckily, I was able to find a few of the missing ones, and the tool boards are slowly filling with all the missing stuff. Still plenty of items to find, but there are still some on the way to my place, and I prepared myself to find the missing ones. At least 2/5 tool boards are completed now - which is already very good progress.
20251210_153220-Kopie.jpg

Let's see what I find next to put in my Workshop / Garage. There is still plenty of space on the walls, *lol*.
I'll keep you updated. Have a nice holiday season, and thanks for reading.
 
To avoid these ads, REGISTER NOW!
OP
J

JDMjunkies.ch

Well-known member
Joined
Dec 27, 2016
Messages
447
Location
Switzerland
What, may I ask, is Elephant Oil?
Elephant oil was the Nissan factory / House brand of fluids. Grease, Engine oil, transmission oil, etc in the 70ies
It's what is mentioned in most factory documentation of that time, and the Logo is found on the Oil cap of most Datsun (= NIssan) cars of that era.
Here is an other example of nissan automatic transmission fluid from the "Elephant" brand. mentioned in the japanese operation manual:
Scan_13-12-2025_1609-Kopie.jpg
 

smschriefer

Well-known member
Joined
May 28, 2009
Messages
842
Location
Yorktown, VA
I've been meaning to ask you a question for awhile. There is a YouTube channel, "my mechanics insights" that has been restoring a Datsun 240Z to beyond factory specs with his attention to detail. He is out of Switzerland and I was curious if you know him, or run in his circles? All I can say is that he has set the bar very high for me for future restorations. If I fall short of what he does I know I still did quite well.
 
OP
J

JDMjunkies.ch

Well-known member
Joined
Dec 27, 2016
Messages
447
Location
Switzerland
I've been meaning to ask you a question for awhile. There is a YouTube channel, "my mechanics insights" that has been restoring a Datsun 240Z to beyond factory specs with his attention to detail. He is out of Switzerland and I was curious if you know him, or run in his circles? All I can say is that he has set the bar very high for me for future restorations. If I fall short of what he does I know I still did quite well.
Haha yes, I know him very well, even though he tries to keep his persona secret.
I even donated one of my original R180 differentials to him, for his latest episode. That dirty / greasy Differental in the Video was actually from one of my cars. And I have also helped him with other stuff like tools and measurements.
He does indeed a very nice job and I'm addicted to his videos.
 
Last edited:

RoninB4

Well-known member
Joined
Jul 22, 2020
Messages
3,562
Location
Under My House
Nice. Before I got it, I didn't even know these existed :p
-This is an FYI concerning your grinder. The "wheel dresser" you have works but it creates a wheel that will give a fairly rough surface to what you grind on. This is ok too if a rough surface is acceptable. For a finer/smoother surface there are at least two more options. The first is a very open pore stick that's shown in the photo below, it will dress a wheel for a smoother surface.

Stone.jpg

-For an even better surface a diamond dresser is used as shown below.

diamond2.jpg

There are diamond dressers on a long handle but I'm not a fan of these. Any dresser that's not supported by the grinder tool rest will be erratic and not create a consistent surface, the hand is erratic. If a better surface is not needed then disregard this.

-My last suggestion is for the belt sander. The belts often become clogged with material being sanded, reducing how well the belt abrades and producing an excess of heat. Many times the belt life can be extended by using one of these sticks to clean/dislodge the clogged material.

belt cleaner.jpg

-These are made from the same material (coagulated latex) as a crepe soled shoe. Old, worn out shoes like this were always saved for the sole when possible.

Crepe.png

-Last suggestion if you're new to using a grinder. The grinder wheel should ONLY be used for ferrous steel, never aluminum (clogs the wheel and can be dangerous). For all non-ferrous materials the belt sander is best to use.

-House and garage look really nice. A friend of mine bought a 240Z brand new in 1974 and I thought it was the best looking car I had ever seen and look forward to seeing your progress on car or home. Hope this post helps somebody.
 
OP
J

JDMjunkies.ch

Well-known member
Joined
Dec 27, 2016
Messages
447
Location
Switzerland
-This is an FYI concerning your grinder. The "wheel dresser" you have works but it creates a wheel that will give a fairly rough surface to what you grind on. This is ok too if a rough surface is acceptable. For a finer/smoother surface there are at least two more options. The first is a very open pore stick that's shown in the photo below, it will dress a wheel for a smoother surface.

Stone.jpg

-For an even better surface a diamond dresser is used as shown below.

diamond2.jpg

There are diamond dressers on a long handle but I'm not a fan of these. Any dresser that's not supported by the grinder tool rest will be erratic and not create a consistent surface, the hand is erratic. If a better surface is not needed then disregard this.

-My last suggestion is for the belt sander. The belts often become clogged with material being sanded, reducing how well the belt abrades and producing an excess of heat. Many times the belt life can be extended by using one of these sticks to clean/dislodge the clogged material.

belt cleaner.jpg

-These are made from the same material (coagulated latex) as a crepe soled shoe. Old, worn out shoes like this were always saved for the sole when possible.

Crepe.png

-Last suggestion if you're new to using a grinder. The grinder wheel should ONLY be used for ferrous steel, never aluminum (clogs the wheel and can be dangerous). For all non-ferrous materials the belt sander is best to use.

-House and garage look really nice. A friend of mine bought a 240Z brand new in 1974 and I thought it was the best looking car I had ever seen and look forward to seeing your progress on car or home. Hope this post helps somebody.
Wow, thanks a lot for the great amount of good information. Many things I didn't know before.
I have meanwhile exchanged the grinding disk for a textile polishing wheel / disk, but will change back whenever needed. Honestly I don't use it very often, but it has been very handy on one or another occasion (like making that Datsun spare parts sign).
I will try to remember all the information you gave me. definitely very useful. I Appreciate!
 
OP
J

JDMjunkies.ch

Well-known member
Joined
Dec 27, 2016
Messages
447
Location
Switzerland
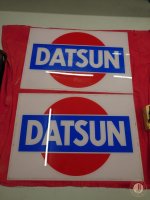
Recently, I acquired this beautiful Datsun Dealer sign with NEON tube lighting in Germany:
20260208_170236-Kopie.jpg

First thing was to take it apart and give it a proper cleanup:
20260209_111530-Kopie.jpg

This sign has been in storage with the previous owners in a dry place for 15 years (It was already there when they bought the house). So the condition is quite good. But as it happens, it has collected a bit of dirt over the years:
20260209_111242-Kopie.jpg

One side of the plexiglass sign had some scratches, but the other one is still in remarkable condition.
20260209_164913-Kopie-rotated.jpg

Next was to remove all old electronics. We don't need those filters and brittle old sockets / starters anymore, and the wiring doesn't seem very safe and also not correct to the current electric installation standards / codes.20260209_163610-Kopie.jpg

Once I had everything removed, I also gave the frame a proper cleanup with some warm soap-water. I like to have things clean, but without destroying the patina, that show's it's age.20260214_091643-Kopie.jpg

While at it, I noticed that some bolt-holes were tightened a bit too much in the past, so they got bent outwards. So I hammered them straight again.
20260214_091841-Kopie.jpg

After a few days, the new inverterless LED Tubes arrived (Neutral white, 15W). While I love the buzzing sound and slight flickering of old Neon-signs, I'm not a fan of replacing starters every now-and-then.
Also, they're just not that safe, energy-efficient or environmental-friendly like new LED tubes. So while at it anyway, I always ensure to bring them to the latest technology inside. Also because it's cheap and easy.
Left are the old components, right side shows the new ones:
20260219_193853-Kopie.jpg

I removed all old rusty mounting brackets, which held the sockets, which were all cracked. It's not really safe to have cracked 230V AC sockets in a metal frame.
20260219_195038-Kopie.jpg

Here we have the new ones:
20260219_201300-Kopie.jpg

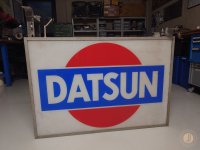
And finally, everything installed. 3x new tubes, all new wiring (up to latest EU-standards), and everything cleaned.
20260220_203608-Kopie.jpg

I also made sure to install this "insulation" tape, as it was on the original ones. Probably to avoid noise or vibrations?
20260220_204219-Kopie.jpg

And everything back and assembled again. I really like the look of this one. the LED light distributes evenly and the brightness fits.
20260220_204928-Kopie.jpg

I also removed that one extension bracket on the top and replaced all bolts with stainless-steel ones, as the originals all had heavy corrosion.
20260220_205001-Kopie.jpg

This is the backside. Now i only need to find a good spot in the garage / workshop to hang it. Overall it was a nice / quick job and Im absolutely satisfied with the results.
20260220_205543-Kopie.jpg

I've recently become a bit obsessed with Kobe Steel. I've known them for long as the company who made the Magnesium wheels for the Nissan Works Rally cars, but recently I dug a bit deeper in their history (More about that, soon).
When suddenly this set of Kobe Magnesium wheels popped up for a fair price, I couldn't resist.
Note: These wheels have nothing to do with any of my cars, but I still had to have them :)
According to a previous owner, they actually made them in both colors, or changed the color during the production period. That's why they're mismatched:20260206_163021-Kopie.jpg

Those are proper magnesium wheels. Super light and cool design.
20260206_162941-Kopie-rotated.jpg

And the best part is that they're all complete with the beautiful center caps, valves, etc.
20260206_163011-Kopie.jpg

And last but not least, an S20 Valve cover. Sort of. This is actually a Japanese-made FRP replica. I always wanted to have an S20 valve cover (from the 70ies Skyline GT-R's and the Fairlady Z432/-R) for wall decoration, but they're quite expensive and somehow too rare to "steal" them from the S20 owners community. I prefer to see them in real cars. But when this one was for sale for a nice price, I had to get it.
It looks quite good, if you ask me. The seller said it's the last one he made, so I was very lucky. I think the white areas can use a little touch-up, as the paint was not sanded down very nicely or the masking tape not applied properly, but this is an easy fix.
20260213_143052-Kopie.jpg

This is the back side:
20260213_143103-Kopie.jpg

I remember seeing some very similar ones on the Wall during our Visit at Protec Japan, But it might be something else.
20251107_150900.jpg

Anyway, I couldn't wait and immediately had to put it on my "wall of fame" - and I think it looks lovely!
I also bought a few wheel-stands to display the Mag wheel on the bottom:
20260213_150335-Kopie-rotated.jpg

That's not it, yet. I stepped into a gold-mine of cool documents recently, which I hope will arrive here in the coming 1-2 weeks, and I've also expanded my Documents archive. I'll keep you updated.
 

Attachments

  • 20260209_111242-Kopie.jpg
    20260209_111242-Kopie.jpg
    532.3 KB · Views: 9
  • 20260209_111530-Kopie.jpg
    20260209_111530-Kopie.jpg
    430.1 KB · Views: 8
  • 20260209_164913-Kopie-rotated.jpg
    20260209_164913-Kopie-rotated.jpg
    483.3 KB · Views: 9
  • 20260209_163610-Kopie.jpg
    20260209_163610-Kopie.jpg
    658.1 KB · Views: 9
  • 20260208_170236-Kopie.jpg
    20260208_170236-Kopie.jpg
    484.6 KB · Views: 9
Last edited:
OP
J

JDMjunkies.ch

Well-known member
Joined
Dec 27, 2016
Messages
447
Location
Switzerland
Love the sign! Good to hear from you.
Thank you all for the kind words! I have yesterday added some shelves, moved some parts, and recently won some auctions with cool decorative stuff. Also, I have expanded my Archives with loads of documentation. Once everything is completed, I have planned for another bigger update :)
 
OP
J

JDMjunkies.ch

Well-known member
Joined
Dec 27, 2016
Messages
447
Location
Switzerland
Time for another update. I've been experimenting a bit with different locations for the Sign:
20260317_134400-Kopie.jpg

I couldn't really decide where to hang it and drill holes, connect the wiring, etc. So I decided to put it in the easiest location. Although the effect of the double-sided sign can not be seen at the moment.
20260325_151406-Kopie.jpg

But it was easy to hook it up to the existing wiring and smart-home system, and i don't think it looks too bad in this place.
Please also note my fancy mobile spray booth :p
20260326_094231-Kopie.jpg

I got an original ticket from the 1969 Tokyo Motor show, where the S30 chassis was shown to the public the first time. the other one is a replica from the 2024 S30.world museum opening. I had them framed
20260313_093726-Kopie-scaled.jpg

And found a nice place to hang it:
20260317_140242-Kopie.jpg

I also had this old poster from a works-team framed, which was lying around since a while:
20260307_165708-Kopie.jpg

Mainly because I found an unused original Works group 4 overfender and wanted to have a picture next to it, to show what it is:
20260309_142429-Kopie.jpg

The Gentleman who sold it, also had this cool clay model. It's unclear yet if it's an original wind tunnel scale model used by the Nissan designers, or not. but it's cool and vintage nonetheless. so I had to get it:
20260309_142643-Kopie.jpg

got some cool "Datsun saves" calculator gauges / dials:
20260216_143130-Kopie.jpg

Which I set up next to the can and framed ******* ad:
20260216_143717-Kopie-1.jpg

I have also collected some nice vintage steering wheels over the years and wanted to display them. After a bit of searching i found the company Streethunter USA that makes these cool stands:
20260310_155434-Kopie.jpg

From left to right: RS-Mach, NISMO 10th anniversary, Watanabe Falcon
20260310_190437-Kopie.jpg

In the end I got so much new stuff recently, that I had to get myself a new shelf (black) to make some space in my "Wall of Fame". But at least i can admire my cool stuff now while working in the garage :)
20260326_094257-Kopie.jpg

I also collected a ton of new (more or less rare) documents for my archives20260304_163720-Kopie-1-rotated.jpg

Which required a larger shelf as well:
20260210_144442-Kopie-rotated.jpg

And here we go. Much better to actually find what I'm looking for, while i do my research :cool:
20260317_130539-Kopie-scaled.jpg

Oh and last, but not least, I got myself a cheap (but so far good) ultrasonic cleaner: It already proved to be quite useful to clean random stuff.
20260322_134526-Kopie.jpg

That's it for the time being. I'll try to work on the cars a bit more instead of decorating and rearranging stuff in the garage all the time. But that's only until i find the next thing that needs to be installed somewhere, *lol*
 

Mr onetwo

Well-known member
Joined
Apr 6, 2011
Messages
2,009
Location
Coastal Maine
Your stuff is the height of coolness :bowdown: . I had a 1972 240Z for a year(1978) when I was in high school.Super fun car, but unfortunately it was in rather poor condition and I had zero skills,money and no auto shop at school at that point in my life :sad:. I sold it and bought a Dodge Challenger convertible. I wish I still had both of them. The photos of your space make it look rather dark. Is that the case or is it just a function of the photos?
 
OP
J

JDMjunkies.ch

Well-known member
Joined
Dec 27, 2016
Messages
447
Location
Switzerland
Thank you all for your kind words and feedback :)
The photos of your space make it look rather dark. Is that the case or is it just a function of the photos?
There are no windows, so there is no direct sunlight or anything, but I put a lot of LED Tubes in there so it's actually quite bright to work.
The camera most probably toned down the brightness because the Tubes in the photo gave it an oversaturation in brightness.
 
To avoid these ads, REGISTER NOW!
Top Bottom