To avoid these ads, REGISTER NOW!

What did you do "IN" your garage today?

micromind

Well-known member
Joined
Sep 24, 2023
Messages
3,057
Location
Fernley, Nevada, about 30 miles east of Reno.
Here's the comp we're moving:

55127535486_9fec976361_o.jpg

That'll be fun. A couple of floor jacks should get it out to where I can get to it with the forklift.

Here's where it's going:

55127724278_11b7f0d129_o.jpg

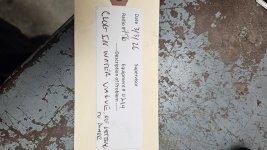
The comp is about 6' long, just over 2' deep, plumbing included, and 4' tall. The bay is 8' long, 4' deep and 5 1/2' high. The comp is driven by a 7 1/2 hp motor. Here's the data plate from the comp:

55127755573_5d8cf22cec_o.jpg

What would you use for sound dampening? How much ventilation will I need? The bay is on an outside wall, where noise matters less than the other walls. I can cut in a couple of louvered vents on that wall.

Outside of the opposite side of the warehouse is outdoor seating for the warmer seasons. We'd like customers seated there to be able to carry on a conversation with the comp running.

I bet if you were to glue some R-max to the tin it'd cut back on the noise outside a lot. Even carpet or a rug would work.
 
To avoid these ads, REGISTER NOW!

Beerhippie

Well-known member
Joined
Oct 13, 2023
Messages
9,816
Location
Far NE Oregon
I’d use unfaced mineral wool batts. Flameproof and quite sound absorbent.
Very high on the list for a couple of spots--the back wall, in between vents, and the top, under the shelf above. I'd have to build a plywood or similar wall for the other sides to secure the rockwool to.
Just remember to put a chunk of ply or 2 by on top of it. I-beams kinda ruin carbide saw blades.
Screw that. No one will ever cut into your nice wood cauls on your sawhorses twice!

Few things piss me off like having someone else use my horses and cut the hell out of my cauls....
 

2drx4

Well-known member
Joined
Oct 13, 2008
Messages
398
Location
Northern BC, Canada
Unloaded the top of this box, pulled it off, then added some Husky mid boxes in the middle:

20260303_192525 - Copy.jpg

I don't know what they cost in the USA, but they're $138 CAD each but online/delivery only from the HomoDepot. They were by far the best deal for a mid box I could find, and they fit perfectly with that Cambodian Tire special box. Quality is comparable. Too bad the drawer fronts aren't black, but I don't care enough to do anything about it. I did make 1/4" ply shims for the top of them so the upper box would sit nicely. Now I just need to add some fasteners to ensure they stay put and then rearrange the whole toolbox. The hutch is also now the "right" height as it was fairly low before.

I ordered two more in black for my other 53" box. It might wind up with the hutch a little too high, I will see, if it does I can use them elsewhere.
 

gearhead1960

ALLIANCE MEMBER
Joined
Mar 21, 2019
Messages
1,839
Location
Manassas, VA, a small blot in history
Unloaded the top of this box, pulled it off, then added some Husky mid boxes in the middle:

20260303_192525 - Copy.jpg

I don't know what they cost in the USA, but they're $138 CAD each but online/delivery only from the HomoDepot. They were by far the best deal for a mid box I could find, and they fit perfectly with that Cambodian Tire special box. Quality is comparable. Too bad the drawer fronts aren't black, but I don't care enough to do anything about it. I did make 1/4" ply shims for the top of them so the upper box would sit nicely. Now I just need to add some fasteners to ensure they stay put and then rearrange the whole toolbox. The hutch is also now the "right" height as it was fairly low before.

I ordered two more in black for my other 53" box. It might wind up with the hutch a little too high, I will see, if it does I can use them elsewhere.
More importantly, it has a place for your RockAuto magnets.... :ROFLMAO:
 

Beerhippie

Well-known member
Joined
Oct 13, 2023
Messages
9,816
Location
Far NE Oregon
One of those little projects today. It's one of those things I like to put off for a rainy day--and today is that day--39F and pouring out.

I made two of these a while back to support some big "barn doors" a coworker made. The doors are 1 1/2" rigid foam board sandwiched between plywood and reinforced with 1 X 4"s.

55128411037_93879282dd_o.jpg

They were beginning to sag--not unexpected, but one of those things I figured future me could deal with when the time came (if you're not going to procrastinate now, when are you?). I clamped it in a vise and bent it back to more-or-less 90 degrees.

I figured it had been a while since I pulled Mr. Sparky out, so let's go!

First cut some 4" 90s out of some scrap:

55128411042_74d3e90e56_o.jpg

All stainless, because that's what you mostly find in a brewery boneyard.

A few hard tacks and

55129687320_ef5bae7814_o.jpg

I'll bet that works. If not, another future me can weld in a strip to make it a box.

One down,

55129487913_b6b46011f2_o.jpg

one to go.

I just hope future me negotiates a better salary....
 

bmwrd0

Well-known member
Joined
Nov 7, 2010
Messages
5,475
Location
Beaver Fever Oregon
Spent the morning diagnosing a non-igniting gas stove. Not hard, but tracking down the wiring harness necessary for it (I can't just replace the single offending unit) at a decent price is a several hours long trip down appliance part irritation. Found it, it should be here in a couple days, and that will be buttoned up.

Also, more cleaning and sorting in the shop.
 

rharman

Well-known member
Joined
Apr 22, 2012
Messages
8,831
Location
SoCal
One of those little projects today. It's one of those things I like to put off for a rainy day--and today is that day--39F and pouring out.

I made two of these a while back to support some big "barn doors" a coworker made. The doors are 1 1/2" rigid foam board sandwiched between plywood and reinforced with 1 X 4"s.
< snip >

I'll bet that works. If not, another future me can weld in a strip to make it a box.

One down,

55129487913_b6b46011f2_o.jpg

< /snip >

Your co-workers sense of alignment and hinge mounting is killing me...... :dunno:
 

Prospecter

Well-known member
Joined
May 16, 2015
Messages
2,421
Location
Maine
Had the neighbor over, after a beer I invited him to help himself to some tools and lawn stuff that is headed to ebay/habitat out of my shop. Tired of all the stuff, lotsa leftovers from previous projects!
Moving stuff out goes a long way to making a shop more efficient. I'm working on that, too. It's hard to do!
 
To avoid these ads, REGISTER NOW!

slomaro3.4

Well-known member
Joined
Mar 3, 2016
Messages
144
How did that work? Did you send drawings? Just the specs?
I measured a bunch and found bronze gears that matched up. To be honest I didn't love how they felt for tolerances so it all went back together and seems to work, but I'm not promising him any longevity. $29 for the parts was a lot cheaper than a NOS gearbox for $500 though.
 

Beerhippie

Well-known member
Joined
Oct 13, 2023
Messages
9,816
Location
Far NE Oregon
I finally got enough of a break in the weather--not raining or snowing, just a bitter breeze blowing--to finish my throttle wheel modification and install it in the Brick.

Compared to the actual stock(ish--it took some minor modding to reverse it) wheel:

55131602415_06b8a724aa_o.jpg

Almost there--I had to drill out the hole for the cable end barrel while I was at it:

55130324512_ce5ee99b11_o.jpg

I eventually had to cut back the web of the wheel, upper left, to the flat at the center of the hub and then bend the Subaru throttle arm a bit, but I got it in.

Aaaaand... IT WORKS!!!!

I took the Brick for a spin around the back forty of the pub. I was able to maintain a crawl at under 2,000 rpm that didn't even cause the speedo needle to twitch. No more bucking at small throttle openings! Not sure if I'll get full throttle as I didn't have anyone to help with the pedal while I was in the engine comp. If I don't quite get full throttle, maybe that will improve my gas mileage.

Now it's :beer2: !
 

CoogarXR

Well-known member
Joined
Jan 11, 2016
Messages
6,856
Location
Ohio
Brought my road box into the garage, took all the tools out of it, and dried them off.

I had to go rescue my wife. Her vw's starter went out. It was pouring rain and all my tools (and myself) got soaked. The box had a ton of water in it too.

But I got the starter to fire one last time! Got the car home, so it was worth it.

Something is arcing between the solenoid and the housing. I couldn't really see. But taking the wires off and cleaning them must have given it a couple more amps, because it still arced, but it actually turned over. Good enough to get home!
 

DGersic

Well-known member
Joined
Mar 12, 2017
Messages
6,326
Location
DeKalb, IL
Cleaning, oiling, and tinkering with mom’s old sewing machine.

IMG_8743.jpeg

Got the old crusty “grease” out of the gears, lubed with a bit of SuperLube gel. Oiled all of the specified points.

Had problems getting it to feed thread correctly. Pulled a big dust ball out from behind the bobbin case, which helped.

Ran some scraps through to get an idea of how it works.
 

Mike65

Well-known member
Joined
Mar 7, 2007
Messages
3,078
Location
Horse Pasture, Va.
When I was topping off the air in the tires of my F150 the other day, I wanted to check the spare tire & noticed it had dry rot cracks all along the sidewall of the tire. I removed it & installed one of the tires I took off it when I got different rims three years ago until I can get a new tire for the spare rim. The spare tire looks as though it was the original tire from when the truck was built back in 2005.
 

Hooked

Well-known member
Joined
Sep 24, 2010
Messages
432
Location
League City, Texas
When I was topping off the air in the tires of my F150 the other day, I wanted to check the spare tire & noticed it had dry rot cracks all along the sidewall of the tire. I removed it & installed one of the tires I took off it when I got different rims three years ago until I can get a new tire for the spare rim. The spare tire looks as though it was the original tire from when the truck was built back in 2005.
I still have the original spare hanging under my 1994 F350. I haven't checked it in years and since I haven't been stuck on the side of the road since I drove it off the lot I may never touch it. ;)
 

rd65

Well-known member
Joined
Sep 29, 2017
Messages
2,773
Location
Granite Falls, WA
I finally got enough of a break in the weather--not raining or snowing, just a bitter breeze blowing--to finish my throttle wheel modification and install it in the Brick.

Compared to the actual stock(ish--it took some minor modding to reverse it) wheel:

55131602415_06b8a724aa_o.jpg

Almost there--I had to drill out the hole for the cable end barrel while I was at it:

55130324512_ce5ee99b11_o.jpg

I eventually had to cut back the web of the wheel, upper left, to the flat at the center of the hub and then bend the Subaru throttle arm a bit, but I got it in.

Aaaaand... IT WORKS!!!!

I took the Brick for a spin around the back forty of the pub. I was able to maintain a crawl at under 2,000 rpm that didn't even cause the speedo needle to twitch. No more bucking at small throttle openings! Not sure if I'll get full throttle as I didn't have anyone to help with the pedal while I was in the engine comp. If I don't quite get full throttle, maybe that will improve my gas mileage.

Now it's :beer2: !
Not sure if our weather next week will reach you, but it looks like winter will be putting up a fight.
 

rd65

Well-known member
Joined
Sep 29, 2017
Messages
2,773
Location
Granite Falls, WA
I still have the original spare hanging under my 1994 F350. I haven't checked it in years and since I haven't been stuck on the side of the road since I drove it off the lot I may never touch it. ;)
Had the original spare under my 80 F350 when I put tires and wheels on it awhile back. Kept one of the best takeoffs for a new spare. I'm kicking myself for not saving the original for garage art.
 

Attachments

  • IMG_20191027_150952416.jpg
    IMG_20191027_150952416.jpg
    516.6 KB · Views: 41

rd65

Well-known member
Joined
Sep 29, 2017
Messages
2,773
Location
Granite Falls, WA
Not in my shop/garage but at my 13x13 work shop. Complaint was no water flow for the blade, user had tried replacing the hose, pressure gauge valve, and male plastic fitting at the ball valve. None of that worked so the dropped it off for repair. So many things wrong. They somehow got tank turned in the foot (required a dead blow hammer to get things back in line), the ball valve is broken, the male fitting was cross threaded, and the nozzle on the blade guard was loose. And it looks like they dropped it out of the truck and bent the tank mounting plate. It is a Stihl TS800 saw on Stihl cart with their pressure tank for blade water. We build a mount for the tank off the back of the cart.
 

Attachments

  • 20260305_135231.jpg
    20260305_135231.jpg
    508.7 KB · Views: 41
  • 20260305_134844.jpg
    20260305_134844.jpg
    566.7 KB · Views: 33
  • 20260305_134839.jpg
    20260305_134839.jpg
    483.8 KB · Views: 34
  • 20260305_134826.jpg
    20260305_134826.jpg
    605.2 KB · Views: 34
  • 20260305_135806.jpg
    20260305_135806.jpg
    735.5 KB · Views: 34

Beerhippie

Well-known member
Joined
Oct 13, 2023
Messages
9,816
Location
Far NE Oregon
Not sure if our weather next week will reach you, but it looks like winter will be putting up a fight.
Having spent over thirty years living in the Intermountain West, I'm aware that winter is never far off. Still haven't put on my summer tires, even 'though we haven't had significant snow in a month or so.

Hell, I've barely used the snowblower this season. I think I used it once.

Gonna be a dry one. I just hope I can gets some dispersed camping in before the forests close.
 
Last edited:

NUTTSGT

Super Moderator
Staff member
Joined
Sep 14, 2009
Messages
50,975
Location
Northern Central Ohio
One of those little projects today. It's one of those things I like to put off for a rainy day--and today is that day--39F and pouring out.

I made two of these a while back to support some big "barn doors" a coworker made. The doors are 1 1/2" rigid foam board sandwiched between plywood and reinforced with 1 X 4"s.

55128411037_93879282dd_o.jpg

They were beginning to sag--not unexpected, but one of those things I figured future me could deal with when the time came (if you're not going to procrastinate now, when are you?). I clamped it in a vise and bent it back to more-or-less 90 degrees.

I figured it had been a while since I pulled Mr. Sparky out, so let's go!

First cut some 4" 90s out of some scrap:

55128411042_74d3e90e56_o.jpg

All stainless, because that's what you mostly find in a brewery boneyard.

A few hard tacks and

55129687320_ef5bae7814_o.jpg

I'll bet that works. If not, another future me can weld in a strip to make it a box.

One down,

55129487913_b6b46011f2_o.jpg

one to go.

I just hope future me negotiates a better salary....
What ?!?! no beer holder on the doors ? There goes your raise.
 

NUTTSGT

Super Moderator
Staff member
Joined
Sep 14, 2009
Messages
50,975
Location
Northern Central Ohio
Spent about an hour online searching for a pair of 3" ball valves. The ones I ordered from HD and were supposed to be there yesterday are delayed by Fedex. One call to HD 800 number yielded automated menu, finally a person who put me on hold, then transferred back to the automated menu, then "thank you calling for the Ontario HD" and then a survey. . . finally GOODBYE with being disconnected.

The second call to cancel the order got me a guy that did a search and said the order was delivered at HD yesterday morning about 9am. I told him nope, didn't happen as per the online tracker and female employee I talked to at the store this morning. . . . . it's on a fedex truck somewhere......funny because the FEDEX hub is like a mile as a crow flies from HD.

So apparently, Ontario HD has a set of 3" PVC ball valves they can send back, put on clearance or put in someone else's pick up order. The Jungle truck will be dropping mine off tomorrow. . . hopefully, they are correct unlike the pipe straps I ordered last week.


So what I did was waste my time.
 
To avoid these ads, REGISTER NOW!
Top Bottom