

Hi Richard S. here in Kansas City. Long time lurker, but this is my first post.
I bought a brand new two post, 9000 lb rated lift from American Automotive Equipment
http://www.americanautomotiveequipment.com/2-Post-Lifts-p/tp9a-d.htm
The below is my experience installing it in my home garage. No Agendas, I don’t want to start a flame war about which lift is best , because mine is certainly not the highest quality. But conversely, I can’t speak for the quality of the more expensive lifts, as I haven’t installed one of those ever, and haven’t used one professionally for more than 15 years now.
What I do want you to know is just what you get for your $1500 shipped to your door.
I read and read and read everything I could on two posts lifts, but never found any definitive information about the good or bad of the $1500 lifts. Yes lots of Armchair quarterbacking and lots of “Bend Pak is awesome” threads. But nothing that said “the $1500 lift killed my brother when it folded like a toothpick with only 3000# on it.” So I took my chances at half the price of a known good lift, and ordered it one fine Monday three weeks ago.
Yes, Yes, we all saw the lift loaded to fail point on youtube. And By the way, that lift looks similar but not exactly like mine. Though I don’t ever intend to lift anything more than my 4500 lb truck, so I think I'm safe.
I bought the TP9A lift. It is marketed by United Products, so says the Install and operation manual that American Automotive Emailed me. A paper copy of an Install manual shipped with the lift. It has the same pictures, but the text is very poorly translated into English.
No big deal, the Emailed manual if completely legible. Obviously American Automotive spent the time to re-write it. Without the American Automotive version the install would have been much tougher.
I just got my lift installed an operational this weekend. It probably took me 20 hours of total time to get it all done. This was my first lift install. Yesterday I used my Full size pickup as the guinea pig vehicle to be lifted up. I figured if I did something wrong I wouldn’t feel too bad about dropping the $500 pickup compared to the Porsche or BMW. I’m much happier now that I’ve successfully lifted a car and nothing broke, and nothing leaked. But it wasn’t without drama.
During the install there were at least three times where I just about gave up and decided to call up American Automotive, complain and return the thing. In retrospect, I would happily pay $500 more for a BendPak lift. Unfortunately the cheapest BendPak I found anywhere was still more than $1000 more expensive than the one I bought, and once I figured that extra $1000, plus eating the shipping both ways, it would have been more than twice the cost of the TP9A that I bought. So I soldiered on.
All of my issues were build quality issues. The install was pretty straight forward, hampered again and again by shoddy assembly and nonexistent quality control.
Here's my list of gripes in order that found them:
1) Paint up and down the edges of the long blue rails was sawn off, I suspect from a steel band that wrapped around the whole assembly at one time. no big deal, but easily avoided with just a little care
2) Of the 6 pulleys that guide the equalizer cables in the lift system, 3 of them would not rotate as installed. In all 3 instances the blue paint applied to the whole assembly was also applied to the pulley shafts, increasing the diameter enough that the pulley became an interference fit between the pulley bushing and shaft. One was so bad that in order to even get it to slide on, the manufacturer ground away at the pulley bushing just to be able to force the pulley on the shaft. I used emery cloth to sand away the paint to get the pulleys to turn.
3) Two of the main balance pulleys (One of them is the one with the ground down bushing) do not rotate straight. The bore of the bushing is not perpendicular to the center line of the pulley. so they wobble 1/8 to 3/16 an inch. One of them ALMOST touches the plate metal that it runs parallel to.
4) NOTHING was greased. every pulley, every bore, was dry dry dry. I used up half a tube of grease lubing up the slide rails where the main carriage bushings slide up and down.
5) When I stood the columns up the power unit side base plate was not flat. I laid it back down and measured versus a straightedge. Lengthwise it was curved 1/4 inch up from center on both the left and right side. I had to shim more than expected to get the column to stand level.
6) Once standing up, I couldn't get the power side carriage to move at all. It was stuck at the bottom. The other side I could lift by doing a dead lift squat. The power side, would not budge. I finally used my 2 ton engine hoist to raise the carriage, and then lower it again, where it promptly got stuck again. I checked for beam straightness, and beam damage, or twisting. and finally found the cause. Inside the beam, where the carriage bushings slide, there was a glob of the blue paint they used that was sticking out more than 1/8 of an inch. This glob would wedge the carriage bushings so that the whole carriage wouldn't move. I filed the glob of paint level with the rest of the paint, and the carriage slid easier.
I then lubed up the slide areas of the rail where the carriage bushings will ride, and the carriages moved much more smoothly.
7) The Hydraulic hose that connects the power side beam to the other beam was 2 inches longer than needed. This extra length meant that the hose would likely rub on the tension balancing cables. My solution was to move the power side beam back two inches, keeping the hose straight. Doing this ALMOST made the equalizer tension cables too short. Additionally moving the colums apart that two inches made the floor cover of the hose and cables shorter than ideal. In retrospect I should have had the hose modified. But REALLY? 2 inches? Where is the quality control?
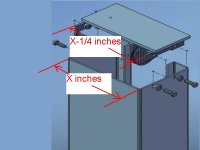
8) The top cover plates / pulley assemblies are made to sit on top of the beam, and bolts from the side secure it to the beam. The top main plate is horizontal, and has two vertical plates welded perpendicular with threaded holes for the bolts to secure it to the beam. The problem? The vertical plates are too close together, and are 1/4 inch from the side walls of the beam. When tightening the bolts down they pull the top of the beam inward by 1/4 if an inch, visibly deforming the beam, and preventing the carriage from achieving full height by pinching the carriage. My solution was to make some 1/4 inch thick shim plates between the beam and the top plate vertical part. (see picture)
9) The bolts provided to attach the motor /power unit to the beam were horrible quality. I used them anyway, and stripped the threads from the bolt with nothing but a 14mm box wrench and mediocre force. I replaced all four bots and nuts with quality hardware.
10) The grease zerk for the chain pulley on top of one of the hydraulic ram fell out while I was routing the equalizing tension cables. I then noticed that that whole pulley assembly was on backwards. The zerk would have been pointing at the closed back of the rail, and completely inaccessible. I disassembled the chain system, and flipped the pulley head around, and screwed the Zerk back in place.
11) Finally it moves under power.!! Oh, but it won't come down. Check the safeties are disengaged, push harder on the hydraulic release lever, nothing. No release of hydraulic pressure. Read the manual for the 14th time. Study the Hydraulic diagram in the manual, and start playing. It turns out there is an adjustment to how fast the hydraulic fluid can release, so that you don't have a 9000lb truck fall 79 inches in 1 second. This Throttling adjuster was screwed in 100%. it was bottomed out, preventing any flow. I backed it out almost all the way in order to get the carriages to come down on their own. Adding the aprox 200 lbs of lift arms helped the carriages to come down quicker than snails pace. I fine tuned this adjustment with my truck to get the proper rate of decent when loaded. Good thing for this picture. As there is no mention anywhere else on the functions of the Hydraulics.
12) I go to bleed the air out of the system as the manual suggests. "slowly loosen the bleed screws located at the top of each cylinder to bleed trapped air" Uh... I don't have any bleed screws. There is a pre-drilled half depth hole where I suspect the bleed screws are SUPPOSED to be installed. But they were never finished drilled, nor tapped. (hands in the air with disgust for the twelfth time). I called American Automotive about this yesterday, but have gotten no response to my voice mail in the last 48 hours. I really don't want to be drilling into hydraulic cylinders. I don’t know what the trapped air will do bad, other than promote rust from within. But it seems to be able to lift my truck with no issues, and no jerkiness.
13) Is it unlucky that I had 13 different issues? The floor plate does not have any margin of height to account for not perfectly level floors. In order to maintain level lifting, I raised one beam up 3/8 of an inch overall to account for the slope of my floor. This 3/8 inch higher beam meant that the floor plate(supposed to be sitting on the floor) now instead rests squarely on the hose and the Tension cables. GRRRR…. Solution will be to build a spacer and bolt the floor plate to the spacer raising the one side up 3/8 of an inch.
I bought a brand new two post, 9000 lb rated lift from American Automotive Equipment
http://www.americanautomotiveequipment.com/2-Post-Lifts-p/tp9a-d.htm
The below is my experience installing it in my home garage. No Agendas, I don’t want to start a flame war about which lift is best , because mine is certainly not the highest quality. But conversely, I can’t speak for the quality of the more expensive lifts, as I haven’t installed one of those ever, and haven’t used one professionally for more than 15 years now.
What I do want you to know is just what you get for your $1500 shipped to your door.
I read and read and read everything I could on two posts lifts, but never found any definitive information about the good or bad of the $1500 lifts. Yes lots of Armchair quarterbacking and lots of “Bend Pak is awesome” threads. But nothing that said “the $1500 lift killed my brother when it folded like a toothpick with only 3000# on it.” So I took my chances at half the price of a known good lift, and ordered it one fine Monday three weeks ago.
Yes, Yes, we all saw the lift loaded to fail point on youtube. And By the way, that lift looks similar but not exactly like mine. Though I don’t ever intend to lift anything more than my 4500 lb truck, so I think I'm safe.
I bought the TP9A lift. It is marketed by United Products, so says the Install and operation manual that American Automotive Emailed me. A paper copy of an Install manual shipped with the lift. It has the same pictures, but the text is very poorly translated into English.
No big deal, the Emailed manual if completely legible. Obviously American Automotive spent the time to re-write it. Without the American Automotive version the install would have been much tougher.
I just got my lift installed an operational this weekend. It probably took me 20 hours of total time to get it all done. This was my first lift install. Yesterday I used my Full size pickup as the guinea pig vehicle to be lifted up. I figured if I did something wrong I wouldn’t feel too bad about dropping the $500 pickup compared to the Porsche or BMW. I’m much happier now that I’ve successfully lifted a car and nothing broke, and nothing leaked. But it wasn’t without drama.
During the install there were at least three times where I just about gave up and decided to call up American Automotive, complain and return the thing. In retrospect, I would happily pay $500 more for a BendPak lift. Unfortunately the cheapest BendPak I found anywhere was still more than $1000 more expensive than the one I bought, and once I figured that extra $1000, plus eating the shipping both ways, it would have been more than twice the cost of the TP9A that I bought. So I soldiered on.
All of my issues were build quality issues. The install was pretty straight forward, hampered again and again by shoddy assembly and nonexistent quality control.
Here's my list of gripes in order that found them:
1) Paint up and down the edges of the long blue rails was sawn off, I suspect from a steel band that wrapped around the whole assembly at one time. no big deal, but easily avoided with just a little care
2) Of the 6 pulleys that guide the equalizer cables in the lift system, 3 of them would not rotate as installed. In all 3 instances the blue paint applied to the whole assembly was also applied to the pulley shafts, increasing the diameter enough that the pulley became an interference fit between the pulley bushing and shaft. One was so bad that in order to even get it to slide on, the manufacturer ground away at the pulley bushing just to be able to force the pulley on the shaft. I used emery cloth to sand away the paint to get the pulleys to turn.
3) Two of the main balance pulleys (One of them is the one with the ground down bushing) do not rotate straight. The bore of the bushing is not perpendicular to the center line of the pulley. so they wobble 1/8 to 3/16 an inch. One of them ALMOST touches the plate metal that it runs parallel to.
4) NOTHING was greased. every pulley, every bore, was dry dry dry. I used up half a tube of grease lubing up the slide rails where the main carriage bushings slide up and down.
5) When I stood the columns up the power unit side base plate was not flat. I laid it back down and measured versus a straightedge. Lengthwise it was curved 1/4 inch up from center on both the left and right side. I had to shim more than expected to get the column to stand level.
6) Once standing up, I couldn't get the power side carriage to move at all. It was stuck at the bottom. The other side I could lift by doing a dead lift squat. The power side, would not budge. I finally used my 2 ton engine hoist to raise the carriage, and then lower it again, where it promptly got stuck again. I checked for beam straightness, and beam damage, or twisting. and finally found the cause. Inside the beam, where the carriage bushings slide, there was a glob of the blue paint they used that was sticking out more than 1/8 of an inch. This glob would wedge the carriage bushings so that the whole carriage wouldn't move. I filed the glob of paint level with the rest of the paint, and the carriage slid easier.
I then lubed up the slide areas of the rail where the carriage bushings will ride, and the carriages moved much more smoothly.
7) The Hydraulic hose that connects the power side beam to the other beam was 2 inches longer than needed. This extra length meant that the hose would likely rub on the tension balancing cables. My solution was to move the power side beam back two inches, keeping the hose straight. Doing this ALMOST made the equalizer tension cables too short. Additionally moving the colums apart that two inches made the floor cover of the hose and cables shorter than ideal. In retrospect I should have had the hose modified. But REALLY? 2 inches? Where is the quality control?
8) The top cover plates / pulley assemblies are made to sit on top of the beam, and bolts from the side secure it to the beam. The top main plate is horizontal, and has two vertical plates welded perpendicular with threaded holes for the bolts to secure it to the beam. The problem? The vertical plates are too close together, and are 1/4 inch from the side walls of the beam. When tightening the bolts down they pull the top of the beam inward by 1/4 if an inch, visibly deforming the beam, and preventing the carriage from achieving full height by pinching the carriage. My solution was to make some 1/4 inch thick shim plates between the beam and the top plate vertical part. (see picture)
9) The bolts provided to attach the motor /power unit to the beam were horrible quality. I used them anyway, and stripped the threads from the bolt with nothing but a 14mm box wrench and mediocre force. I replaced all four bots and nuts with quality hardware.
10) The grease zerk for the chain pulley on top of one of the hydraulic ram fell out while I was routing the equalizing tension cables. I then noticed that that whole pulley assembly was on backwards. The zerk would have been pointing at the closed back of the rail, and completely inaccessible. I disassembled the chain system, and flipped the pulley head around, and screwed the Zerk back in place.
11) Finally it moves under power.!! Oh, but it won't come down. Check the safeties are disengaged, push harder on the hydraulic release lever, nothing. No release of hydraulic pressure. Read the manual for the 14th time. Study the Hydraulic diagram in the manual, and start playing. It turns out there is an adjustment to how fast the hydraulic fluid can release, so that you don't have a 9000lb truck fall 79 inches in 1 second. This Throttling adjuster was screwed in 100%. it was bottomed out, preventing any flow. I backed it out almost all the way in order to get the carriages to come down on their own. Adding the aprox 200 lbs of lift arms helped the carriages to come down quicker than snails pace. I fine tuned this adjustment with my truck to get the proper rate of decent when loaded. Good thing for this picture. As there is no mention anywhere else on the functions of the Hydraulics.
12) I go to bleed the air out of the system as the manual suggests. "slowly loosen the bleed screws located at the top of each cylinder to bleed trapped air" Uh... I don't have any bleed screws. There is a pre-drilled half depth hole where I suspect the bleed screws are SUPPOSED to be installed. But they were never finished drilled, nor tapped. (hands in the air with disgust for the twelfth time). I called American Automotive about this yesterday, but have gotten no response to my voice mail in the last 48 hours. I really don't want to be drilling into hydraulic cylinders. I don’t know what the trapped air will do bad, other than promote rust from within. But it seems to be able to lift my truck with no issues, and no jerkiness.
13) Is it unlucky that I had 13 different issues? The floor plate does not have any margin of height to account for not perfectly level floors. In order to maintain level lifting, I raised one beam up 3/8 of an inch overall to account for the slope of my floor. This 3/8 inch higher beam meant that the floor plate(supposed to be sitting on the floor) now instead rests squarely on the hose and the Tension cables. GRRRR…. Solution will be to build a spacer and bolt the floor plate to the spacer raising the one side up 3/8 of an inch.
Attachments


Last edited:


 You really do get what you pay for when it comes to lifts.