To avoid these ads, REGISTER NOW!

What did you do "IN" your garage today?

rd65

Well-known member
Joined
Sep 29, 2017
Messages
2,764
Location
Granite Falls, WA
Pulled the ram out of my old Alltrade engine hoist. Shaft chrome is worn through and it bleeds down. Off to HF to pick up a 8ton unit. The old is 5 ton with a larger, flat base than the HF unit. I will need to fab something up to make this new one work. Stock unit had 2 bolts in opposite corners, HF unit might be able to get one or two smaller bolts along one side, maybe I can weld a curb on the bolt on base.
 
To avoid these ads, REGISTER NOW!

2001ZR2

Well-known member
Joined
Jan 4, 2018
Messages
405
Location
Kansas City
Yesterday I dug around in the garage to find the fittings, scrap piece of 1" PVC to fix my sprinkler system pipe. The previous installer decided digging was too hard and ran the pipe above ground at an angle. So also grabbed the drain spade or sharp shooter shovel. After playing in mud a suitable trench was created. Hacked/slash and way too much primer/glue and water connection was made. Will try to fill in trench before the rain this afternoon.
 

Old Man Roger

Well-known member
Joined
Apr 6, 2017
Messages
17,535
Location
Palm Coast Florida
Oh boy. What a day. Some days you choose the projects, some days the projects choose you.

This is a bit long winded, but it was a busy day.

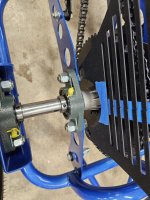
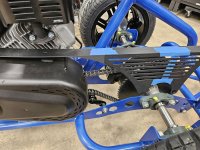
Let's just say I wasn't planning on putting the sporty on the lift today.

2694.jpg

Day started off with me washing the truck in the driveway. After that, I grabbed the son and we jumped on the sporty to go grab lunch. It's been a while since this bike was ridden and it was low on gas, so the plan was to stop at a station and fill up.

We didn't make it. The fuel was older than I thought and it gummed up the carb halfway there. I called the neighbor and he brought me some fresh fuel. Bike made it back home, but I want to drain the fuel. This is also a good time to do the carb rebuild I've had the parts for since last summer.

At least it looked good sitting on the side of the road.

2690.jpg

I asked the son if he wanted to take the other bike to lunch and the look on his face told me "no", so we ended up taking the truck.

When we got home, I replaced the air filter on the shop AC and the server rack. While I did that, I had my son find bolts to bolt two brake rotors together that I use as a door stop. It's something I've been meaning to do and was a great little project for him. I pointed him to the bolt bins and to the toolbox and said, "figure it out". I did catch him trying to use a torque wrench as a ratchet, so I corrected that.

The shop AC was due.

2695.jpg

Next on the agenda was 2 coats of wood sealer on the bottom of the cedar chair.

2696.jpg

Then I emptied the dust collector bins. I discovered the cyclone was clogged, which is why the bag was filling up.

Lastly I 3d printed a little housing for a 2.1" display I programmed to show data from the home automation sensors.

2697.jpg
One question, why were you driving your wife’s bike? :sneaky:

I kid I kid, it just always made me laugh when the Harley guy would pic on their buddies for buying a sportster.
One of the kiddos got a glass calendar thing she wanted hung up and it didn’t have screws so I fashioned some to fit. The heads were to large so I stuck them in a drill and ran them over the grinder. It worked quite well !!
IMG_6271.jpeg

Four done and ready to go.
IMG_6272.jpeg

Also hauled more pipes into the shop to build four more irrigator bridges tomorrow and Tuesday when it’s supposed to be too soggy outside to do farmer things in the fields.
IMG_6275.jpeg
So many finger tips burned because I was too impatient to grab the drill. I have used a peice of fuel line because it happened to be the right size and was at arms reach.
 

Beerhippie

Well-known member
Joined
Oct 13, 2023
Messages
9,792
Location
Far NE Oregon
I decided that the roof rack system on the Brick should be electrically bonded to the body if I'm going to be filling gas cans up there.

55232496619_a62f69348a_o.jpg

55231339322_143968c19b_o.jpg

That should do it. I could see the rack acting like a giant capacitor or Leyden jar when charged by static from air flow. Probably unnecessary, but it sure don't hurt none.

I spent several summers working in Central Oregon between Madras and Prineville. There was a monster of a DC powerline that went through there--I don't remember the voltage, but it was WAY up there. https://www.nwcouncil.org/reports/columbia-river-history/intertie/

If you parked under those lines and didn't ground the vehicle well, the tires would offer enough insulation to turn the rig into a capacitor, which would knock you on yer *** if you reached for the door while standing on the ground. One strategy if you forgot to ground the rig was to take a running jump for the door so you were isolated from the ground. A piece of chain over the bumper or hitch was all the ground needed to make it safe. Locals drug ground straps from under the rig. If I ever again have to park under the Intertie, having the rack grounded would be nice--not that that's likely, as the area has become too crowded for my tastes.
 
Last edited:

dwasifar

Well-known member
Joined
May 28, 2017
Messages
2,093
Beautiful!

I have that project to do as well!

What did you make your slats from and how did you finish them? Rattle can for the metal frame?
Thanks!

The slats are made from cedar decking planks, ripped to width, planed down to about 13/16" to fit into the grooves in the iron, and finished with a light natural water-repellent stain, rolled on and wiped smooth. The cast iron was power washed to remove overgrowth, primed with rust-stop red primer, and finished with rattle-can Rustoleum black. The new hardware is all stainless steel.
 

pancholasvegas

Well-known member
Joined
Nov 6, 2017
Messages
251
Had some decent weather so I’ve been hard at work on the trailer!

IMG_4163.jpeg

Got this truck bed floor from the salvage yard cleaned up, rough trimmed and laid out on the master pattern.

IMG_4415.jpeg

More trimming required, but gave me the rough dims in combination with the wheel wells for what else I need.

Trip down to my buddies shop and I ran a few pieces through the bedroller after rough cutting to size on the plasma. I’ll use these as filler pieces in a few sections.

IMG_4438.jpeg

These filler pieces require a flange to be turned for spot welding to the bed panels. I took a piece of bar stock and cut a slot to depth and used it as a tipping tool.

IMG_4441.jpeg

After running multiple passes, you can sneak up on the flange. Cleaned up with a hammer and dolly, along with some carefully placed sitting on top of it to take out some waves.

IMG_4443.jpeg

Burning the candle at both ends - mixed up some epoxy and sprayed the pieces to save some time on the backend. They’ll get touched up before seam sealer / bedliner anyhow.

IMG_4447.jpeg

The same treatment was applied to the inner bedside to prepare for mounting the wheel wells.

IMG_4453.jpeg


Wheel wells were fitted and began being welded in place to start fitting the floor. A little backwards, but it helps using factory points for measurements when we can, such as these spot weld points and some witness marks.

Before plug welding, I dress the holes with a blunted drill bit.

IMG_4454.jpeg

In preparation for welding these in, I did remove quite a bit of bondo from the outside of the panel. I kept removing as I went. Looks like good penetration on the plug welds. All the remaining bondo is removed as we go, and will be gone before we’re through. It’s largely unnecessary - the dents aren’t that bad.

IMG_4458.jpeg


Before wrapping up for the day - we’re clamping up to take some more measurements on the additional pieces necessary. Please note - this is not the final floor arrangement, the lapping and folding will be much cleaner (and it will all be there!)

I’ll be pulling all of the floor pieces out again, building some bracing for the box, and the finalizing the floor as well as the roll pan section in tandem. I’d rather put the time into making it square before tying together as a unit for the first / final time.

IMG_4457.jpeg
 

2001ZR2

Well-known member
Joined
Jan 4, 2018
Messages
405
Location
Kansas City
Hmm found gas for the mower and followed it around. Loaded the fertilizer spreader and followed it around. Seems to be a theme today. Pulled the shovel out and filled in the trench for repaired sprinkler line.

Then as Bill Murray in Caddy Shack planted Marigolds to stop Varmit Cong from attacking my tomatoes and peppers later this season.
 

scotthesniper

New member
Joined
Apr 26, 2026
Messages
4
i searched before posting, and didn't find a thread like this soooo.......


today, i cleaned up some junk that was in my way. i replaced a bad light fixture, fixed up a tiller, and cleaned up a few things.

how bout you?
I changed 6 tyres gave up on my new mk 100 autel then tinker about with my Trans am getting it ready for summer time
 

rd65

Well-known member
Joined
Sep 29, 2017
Messages
2,764
Location
Granite Falls, WA
Took a water break while edge mowing/trimming back yard. Stella stopped in to say hi, then promptly left. We are watching the youngest boys two hounds while his family are in AZ visiting his dad and grandparents.
 

Attachments

  • 20260426_144547.jpg
    20260426_144547.jpg
    544.5 KB · Views: 49
  • 20260426_144550.jpg
    20260426_144550.jpg
    765.6 KB · Views: 46

bugnut

ALLIANCE MEMBER
Joined
Jul 14, 2012
Messages
3,891
Location
Central Ohio
shoutout to @larry4406 & @harley jim On the grandsons trike I started sketching and fabricating a chain guard. Trying to incorporate the existing bolt holes/fasteners so I need not drill and tap anything. First iteration better than expected. Will fabricate in 2 pcs one a flat panel the second a trimmed up angle. Need to make changes and reprint.

While that was printing I put together this cart. I got it for a sibling as a Christmas gift. I think it might need outriggers and a couple handle bars to help get up from sitting.
 

Attachments

  • 20260426_155734.jpg
    20260426_155734.jpg
    901.5 KB · Views: 21
  • 20260426_155717.jpg
    20260426_155717.jpg
    869 KB · Views: 23
  • 20260426_155710.jpg
    20260426_155710.jpg
    1.1 MB · Views: 22
  • 20260426_155352.jpg
    20260426_155352.jpg
    836.8 KB · Views: 23
  • 20260426_155336.jpg
    20260426_155336.jpg
    943 KB · Views: 24
  • 20260426_155319.jpg
    20260426_155319.jpg
    897.8 KB · Views: 24
  • 20260426_155749.jpg
    20260426_155749.jpg
    1 MB · Views: 22
  • 20260426_155828.jpg
    20260426_155828.jpg
    869.8 KB · Views: 18

Snip's

Well-known member
Joined
Apr 29, 2017
Messages
1,852
Location
Ohio
I decided that the roof rack system on the Brick should be electrically bonded to the body if I'm going to be filling gas cans up there.

55232496619_a62f69348a_o.jpg

55231339322_143968c19b_o.jpg

That should do it. I could see the rack acting like a giant capacitor or Leyden jar when charged by static from air flow. Probably unnecessary, but it sure don't hurt none.

I spent several summers working in Central Oregon between Madras and Prineville. There was a monster of a DC powerline that went through there--I don't remember the voltage, but it was WAY up there. https://www.nwcouncil.org/reports/columbia-river-history/intertie/

If you parked under those lines and didn't ground the vehicle well, the tires would offer enough insulation to turn the rig into a capacitor, which would knock you on yer *** if you reached for the door while standing on the ground. One strategy if you forgot to ground the rig was to take a running jump for the door so you were isolated from the ground. A piece of chain over the bumper or hitch was all the ground needed to make it safe. Locals drug ground straps from under the rig. If I ever again have to park under the Intertie, having the rack grounded would be nice--not that that's likely, as the area has become too crowded for my tastes.
There's gotta be a way to charge up your cell phone for free, while parked under the Interie...
 

Snip's

Well-known member
Joined
Apr 29, 2017
Messages
1,852
Location
Ohio
My MINI Cooper has these plastic aerodynamic panels on the underside of the body...
They cover the open areas around the suspension and get rid of air turbulence and give the underbody smooth airflow...
The plastic panels are held on with small head metric screws... I wanted to spread out the stresses around the plastic screw holes...
Got some 11 gauge T304 SS sheet and punched out some 1-1/2" discs and countersunk the screw hole...
Spun them on the lathe and replaced all the fasteners with my upgraded washers...
IMG_3393 2.jpg

IMG_3401 2.jpg


IMG_3400 2.jpg
 
To avoid these ads, REGISTER NOW!

Jakeweldsalittle

Well-known member
Joined
Feb 20, 2024
Messages
82
Got my mower straightened out. Carb was full of gunk as I suspected. Took if off cleaned it inside and out and now it runs like a top. New air filter, new drive belt, and new spark plug. The old plug actually looked decent, but I had a new one so I threw it in. After that, I pulled my bobber in to get it freshened up for spring. Original battery made it 9 years, but now its dead. I'll go to the local shop and pick one up today. Since I can never leave anything alone, I started fabbing a new mount for my jockey shifter. I didn't like the way the old one looked or felt being behind my hip, so I shortened and mounted it under my clutch leg. Feels comfortable now and easy to get to. Just need some paint and fab a linkage between the shifter and trans. Then I made a quick mount for a battery tender plug so hopefully the next battery last just as long. I've always rode it without a rear fender, but the more I look at it, I can't help but feel it looks a little incomplete. I'm floating the idea of fabbing just a small fastback looking rear fender that follows the countour of the seat, but I don't know. Included is a picture of the powder coating / welding oven I put on my cut down cart last weekend that I forgot to get a picture of.
1777297024787.png
Shifter mounted originally.
1777297085584.png

Revised edition.

1777297116204.png1777297138099.png
Needs clean up and a nema plug, but should work well.
 

Jay__Dub

Well-known member
Joined
Nov 19, 2024
Messages
1,250
Location
Cold Country, Canada
Did a 5K oil and filter change on my wife's 2017 Ford Explorer today...
I went with the 5W30 Valvoline Restore and Protect... Supposed to slowly remove carbon buildup...
Want to keep the Ford "Valvetronic or whatever it's called" clean and free of buildup...
It's supposed to keep carbon out of the ring lands and other places...
By all accounts, a remarkable lubricant.

I'm using it on my Wife's 2.4 GDI, that is famous for gummed piston rings, among other things.

I've watched video from independent sources, and the results look amazing. I'm thinking of starting it in my 08 F2POS, with the infamous 5.4 3V.
 

larry4406

Well-known member
Joined
Jan 27, 2006
Messages
19,247
Location
Northern Virginia
Yesterday I gave the second garage door the same treatment...
All new panel trim with a gazillion miter cuts... S/W Bonding Primer dried...
Today I'll start painting both doors with a final top coat of S/W paint...
IMG_5516.jpg
Doors are looking great.

Hopefully that’s a once in a lifetime job! Looks like it’s been a real PIA.
 

niget2002

Well-known member
Joined
Oct 2, 2012
Messages
11,123
Location
Josephine, TX
Used the attic access in the garage to replace the HVAC filter...

The fancy electronic filter that came with the house crapped out and no longer works. AC guy quoted $675 to replace it with a 20x25x4 normal filter box.

So, I did the right thing, removed all the guts from the electronic filter, unplugged it, and slid in a 20x23x2" filter. The electronic filter looks like it had 3 stages, the pre-filter, an ionizer looking thing, and then the electrostatic cleanable filters. The new paper filter fits where the ionizer looking thing was, so I'm still using the cleanable pre-filter.
 

Hooked

Well-known member
Joined
Sep 24, 2010
Messages
432
Location
League City, Texas
Any one who would steal your fuel, IMHO, deserves the consequences of putting Gasoline in their Diesel tank.

I have personal experience of putting Diesel into my gas tank, the engine would run if both the carburetor and the Diesel fuel were hot, but a cold carburetor did not like cold diesel fuel.

I learned this when i tried to run my 1948 Chevrolet on Diesel
Buddy of mine did that in his '57 Chevy when we were in high school. I never knew the long term results.
 

Beerhippie

Well-known member
Joined
Oct 13, 2023
Messages
9,792
Location
Far NE Oregon
Got one of the two pub/kitchen propane water heaters drained and disconnected so the gas guys can bring in the new one tomorrow.

If you're shopping for water heaters, DO NOT even consider gas. It was cheaper back when we first got them, and the lines were already run, but I doubt gas is cheaper than electric these days--especially when the gas is propane. Gas water heaters draw intake air from the floor. Bad idea. No filter. I tried some aftermarket filters, but there's nothing to support the wrap-around filter, so it does little or nothing. The burner ***** in dust and filth from the floor and clogs up over a few years. The burner can't be replaced by itself--just buy a new heater at $1,000. No parts for the burner are replaceable.

I think all the gas water heaters sold in the US are made by one company and rebadged for whoever sells them--that's what the gas guys tell me.

Oh, well. At least none have lasted long enough to require an anode replacement....
 

larry4406

Well-known member
Joined
Jan 27, 2006
Messages
19,247
Location
Northern Virginia
Got one of the two pub/kitchen propane water heaters drained and disconnected so the gas guys can bring in the new one tomorrow.

If you're shopping for water heaters, DO NOT even consider gas. It was cheaper back when we first got them, and the lines were already run, but I doubt gas is cheaper than electric these days--especially when the gas is propane. Gas water heaters draw intake air from the floor. Bad idea. No filter. I tried some aftermarket filters, but there's nothing to support the wrap-around filter, so it does little or nothing. The burner ***** in dust and filth from the floor and clogs up over a few years. The burner can't be replaced by itself--just buy a new heater at $1,000. No parts for the burner are replaceable.

I think all the gas water heaters sold in the US are made by one company and rebadged for whoever sells them--that's what the gas guys tell me.

Oh, well. At least none have lasted long enough to require an anode replacement....
Interesting.

The Rinnai’s we use at the day job have outside combustion air piped in and exhaust piped out as well.

Sounds like this is a different WH then the Rinnai’s you are using for mash water.

Yeah propane is spendy.
 

Snapped-off

Well-known member
Joined
Feb 22, 2012
Messages
4,783
Location
Indiana
Got one of the two pub/kitchen propane water heaters drained and disconnected so the gas guys can bring in the new one tomorrow.

If you're shopping for water heaters, DO NOT even consider gas. It was cheaper back when we first got them, and the lines were already run, but I doubt gas is cheaper than electric these days--especially when the gas is propane. Gas water heaters draw intake air from the floor. Bad idea. No filter. I tried some aftermarket filters, but there's nothing to support the wrap-around filter, so it does little or nothing. The burner ***** in dust and filth from the floor and clogs up over a few years. The burner can't be replaced by itself--just buy a new heater at $1,000. No parts for the burner are replaceable.

I think all the gas water heaters sold in the US are made by one company and rebadged for whoever sells them--that's what the gas guys tell me.

Oh, well. At least none have lasted long enough to require an anode replacement....
My (NG) gas water heater is going on 12 years I believe. Much cheaper than electric where I'm at.
 

Beerhippie

Well-known member
Joined
Oct 13, 2023
Messages
9,792
Location
Far NE Oregon
Interesting.

The Rinnai’s we use at the day job have outside combustion air piped in and exhaust piped out as well.

Sounds like this is a different WH then the Rinnai’s you are using for mash water.

Yeah propane is spendy.
Our Rinnais draw outside air, too--with no filter. I put screens over the intakes for cottonwood season. The newer models I've seen do have intake filters.

These are storage tank heaters. With the experience I've had with tankless, I'm not going to add more of them.

Since we live in a climate where heating season is more than 8 months of the year, there's absolutely no waste from having big storage tank heaters within the heated envelope--'though people love to argue with me when I tell 'em that. What? I think I know more than the advertisers? Audacious!
 

Beerhippie

Well-known member
Joined
Oct 13, 2023
Messages
9,792
Location
Far NE Oregon
What’s with the extra holes in the floor?
Not the floor's first rodeo.

Got the heater installed and running. This one has air intakes about a foot above the floor--much better--and they're screened at least. It's compatible with the wrap-around style filters, so I need to order another one.
 

Jgaz

Well-known member
Joined
Dec 16, 2016
Messages
1,660
Location
AZ
No garage work for a while. I’ve been up at the Grand Canyon for the last seven days doing my volunteer gig.
Cleaned my boots, clothes, and gear today but still had time to install the chisel rack I made for my newly refurbished eBay chisels.
IMG_6300.jpeg
Also repaired (again) a 9 year old key fob.
IMG_6302.jpeg
What was wrong with a good old fashion key?
Now, get off my lawn!
 
Last edited:

Dan in Pasadena

Well-known member
Joined
Feb 18, 2009
Messages
13,133
Location
Pasadena, CA
No garage work for a while. I’ve been up at the Grand Canyon for the last seven days doing my volunteer gig.
Cleaned my boots, clothes, and gear today but still had time to install the chisel rack I made with my newly refurbished eBay chisels.
IMG_6300.jpeg
Also repaired (again) a 9 year old key fob.
IMG_6302.jpeg
What was wrong with a good old fashion key?
Now, get off my lawn!
1777330980670.jpeg
 

Dan in Pasadena

Well-known member
Joined
Feb 18, 2009
Messages
13,133
Location
Pasadena, CA
I found a bad scrape on the lowest possible place on the front of the new-to-us Audi TT. I had to literally get on hands & knees to see it. I hand sanded it (should have been a machine to be smoother), shot Rustoleum automotive primer then some Rustoleum silver I already had on the shelf. It's too bright a silver but I'm not sure it's even noticeable.

If it bugs me when I wash the car I'll look for a closer match but I suspect this MIGHT happen again since it's so low and since it's a 2015 car it has only rear sensors, no front ones.
 

Attachments

  • IMG_7471.jpeg
    IMG_7471.jpeg
    830.2 KB · Views: 22
  • IMG_7473.jpeg
    IMG_7473.jpeg
    705.7 KB · Views: 21
  • IMG_7476.jpeg
    IMG_7476.jpeg
    881.7 KB · Views: 21

rharman

Well-known member
Joined
Apr 22, 2012
Messages
8,815
Location
SoCal
Used the attic access in the garage to replace the HVAC filter...

The fancy electronic filter that came with the house crapped out and no longer works. AC guy quoted $675 to replace it with a 20x25x4 normal filter box.

So, I did the right thing, removed all the guts from the electronic filter, unplugged it, and slid in a 20x23x2" filter. The electronic filter looks like it had 3 stages, the pre-filter, an ionizer looking thing, and then the electrostatic cleanable filters. The new paper filter fits where the ionizer looking thing was, so I'm still using the cleanable pre-filter.
We had Honeywell electronic filters installed when we remodeled in 1993. Upstairs & downstairs. Rebuilt the elements (new contacts) a couple of times but, eventually, gave up on them. Upstairs entire system was replaced a few years back and now has a normal 1" filter in the return grill. For the downstairs, the electronic filter is unplugged and I just buy 20x25x5 filter elements that are a direct replacement for the two electronic cartridges. Slips right in.
 
To avoid these ads, REGISTER NOW!
Top Bottom