To avoid these ads, REGISTER NOW!

ZMotorsports Shop Projects 2.0

ntsqd

Well-known member
Joined
Jan 22, 2005
Messages
989
Location
Lower left coast
I'm thinking that the rust may not have been caused only by moisture in the compressed air. It may have partially come from outside. Recall historically how intolerant ARB solenoids have been to dust. I put a sintered bronze pneumatic muffler/filter in their exhaust ports.

On my old 4rnnr I used one of the ARB solenoids as an unloader for the Puma OBA compressor. Since I used pneumatic toggle valves to operate the ARBs I had two spare solenoid valves. I used one of those muffler/filters in that ARB solenoid's exhaust port. In the 2+ years that I drove that truck (it was my DD and the only horn was air, so the compressor got cycled at least once a day) I never had a problem. I'm in contact with the father of its current owner and I've heard of no problems in the ~2 years that she's been driving it.

I'm pressure that Mike knows what these muffler/filters are, but for those wondering they look like your old Q-Jet's fuel filter, only with threads on one end.
https://www.mcmaster.com/products/pneumatic-mufflers/mufflers-2~~/
I've found them to be very effective at keeping stuff out of things while still allowing air flow.
 
To avoid these ads, REGISTER NOW!
OP
Z

zmotorsports

ALLIANCE MEMBER
Joined
Oct 20, 2009
Messages
21,441
Location
Northern Utah
Nice information on the HWH Mike! Seems like a lot of folks (myself included) are at a loss when it comes to these systems. One day I'll dig into mine and figure it all out, but this is a great start. Thanks!

I hope I explained it well enough Keith. If I can be of any further assistance in describing the operation feel free to ask.
 
OP
Z

zmotorsports

ALLIANCE MEMBER
Joined
Oct 20, 2009
Messages
21,441
Location
Northern Utah
I'm thinking that the rust may not have been caused only by moisture in the compressed air. It may have partially come from outside. Recall historically how intolerant ARB solenoids have been to dust. I put a sintered bronze pneumatic muffler/filter in their exhaust ports.

On my old 4rnnr I used one of the ARB solenoids as an unloader for the Puma OBA compressor. Since I used pneumatic toggle valves to operate the ARBs I had two spare solenoid valves. I used one of those muffler/filters in that ARB solenoid's exhaust port. In the 2+ years that I drove that truck (it was my DD and the only horn was air, so the compressor got cycled at least once a day) I never had a problem. I'm in contact with the father of its current owner and I've heard of no problems in the ~2 years that she's been driving it.

I'm pressure that Mike knows what these muffler/filters are, but for those wondering they look like your old Q-Jet's fuel filter, only with threads on one end.
https://www.mcmaster.com/products/pneumatic-mufflers/mufflers-2~~/
I've found them to be very effective at keeping stuff out of things while still allowing air flow.

Thom, I probably should have threaded the exhaust port when I had it apart to accept a screened filter/muffler. I've used those in the industrial arena a LOT and they do have their place. However, I really didn't think about it at the time. Also, I am pretty pleased overall with the fact that the system worked for 18 years before having any issues whereas the first system design from Monaco failed in only 5 years, so whatever is possibly getting in back through the solenoid valve's exhaust port, it is pretty minor.
 

ntsqd

Well-known member
Joined
Jan 22, 2005
Messages
989
Location
Lower left coast
I figured at the very least that you would be familiar with them and probably were overly familiar.

After I posted that I was thinking about how long it lasted, and wondered if they were necessary. My OCD wouldn't allow me to not use them on a system that I built. Not because they're needed, but simply because.
 
OP
Z

zmotorsports

ALLIANCE MEMBER
Joined
Oct 20, 2009
Messages
21,441
Location
Northern Utah
You have a curious mind as in you want understand why something failed rather than just firing the parts cannon. Tossing something that can be saved with a bit of work is just wrong to me, but then I don't have lots of "disposable" income. It was also ingrained since my parents were depression kids.

Thank you, yes, I don't like to just throw parts at things, whether I can afford them or not.

I may have a little more disposable income these days than earlier in our marriage, I try not to be wasteful of the blessings I've been presented with. We are supposed to be good stewards over what we have been given charge and in my mind I interpret that as taking care of things but not being wasteful.

My parents were farmers and children of the depression also nor did they have much money when I was a child, so I grew up watching my dad spend hours trying to keep things running and operating vs. spending money so I guess maybe it was ingrained into me as well.

I think more than anything is that I just don't like to spend money on things that I can fix or repair. My wife is still going on and on about saving our coffee maker last week and to me it was just common sense to fix it vs. replace. Yeah, we were prepared to buy another if needs be, but I just wanted to test it and see what failed. The thermistor was much cheaper and we saved another item from the scrap. I'm just doing my part to be green.. :bounce:


Thank you for continuing to follow along and for commenting.
 
OP
Z

zmotorsports

ALLIANCE MEMBER
Joined
Oct 20, 2009
Messages
21,441
Location
Northern Utah
Last night I reinstalled the aux. air compressor under the coach, tested it and then reinstalled the cover that I fabricated back in 2007.
coach41.jpg

coach42.jpg

Then pulled the jackstands and let it sit back down to ride height.
coach43.jpg


I checked this morning and it was still sitting @ 110 PSI, it has only lost 10 PSI in 12 hours. I'm calling this a win as that's a fairly tight air system by anyone's standards. :unsure:

Thanks for looking.
 

BigMike782

Well-known member
Joined
Dec 19, 2008
Messages
1,877
Location
49120
I'm a little late to the keeping the shop clean party but......
Like most I use a combination of cheap paper towels, decent blue boxed shop rags, cotton shop rags when I find a deal on them and bath towels from Goodwill.
One other thing I do for "those" times is I keep a coffee can full of sawdust from my table saw and one full of clay from the yard.
If I have a spill of oil or hydraulic fluid I throw saw dust on it and it absorbs quickly. If it has set a little longer I use the clay and grind it into the concrete. Both of those and proved to help me keep my floor pretty clean and spot free.
 

ntsqd

Well-known member
Joined
Jan 22, 2005
Messages
989
Location
Lower left coast
The best that I've ever seen for pulling oil out of concrete has been Rice Hull Ash. Not easy to find, and usually more expensive than other, lessor options. I've never seen clay used though, that's new to me.
Most paint stores sell a box of rags that for the semi-occasional need have worked well for me. Those are usually made from old cotton t-shirts and similar.
 

madison069

Well-known member
Joined
Nov 5, 2010
Messages
4,204
Location
Monroeville, PA
The best that I've ever seen for pulling oil out of concrete has been Rice Hull Ash. Not easy to find, and usually more expensive than other, lessor options. I've never seen clay used though, that's new to me.
Most paint stores sell a box of rags that for the semi-occasional need have worked well for me. Those are usually made from old cotton t-shirts and similar.
He’s just using nature’s kitty litter. 😁
 

madison069

Well-known member
Joined
Nov 5, 2010
Messages
4,204
Location
Monroeville, PA
Bentonite clay then?

I’m sure the dried clay from his yard will absorb some oil up. I’ve seen too many heavy equipment leaking on construction sites and the clay/dirt ***** it up willingly. Is it as effective as the store bought kitty litter, I don’t know. I’ve used caliche dirt and sand to clean up oil spill in the past and it worked well enough, just had to dispose of the dirt in the dumpster for the land fill. I don’t know if I would use the red clay in my yard to clean my concrete floor, cause I am trying to keep it clean and nice looking these days. I would think the red clay would stain the concrete.
 

madison069

Well-known member
Joined
Nov 5, 2010
Messages
4,204
Location
Monroeville, PA
The best that I've ever seen for pulling oil out of concrete has been Rice Hull Ash. Not easy to find, and usually more expensive than other, lessor options.

I’ve never heard of rice hull ash, had to read up on it. Where was this used for oil cleanup? I tought maybe ocean oil spill but it seems like peat moss or other material was commonly used if they used an organic material.
 
OP
Z

zmotorsports

ALLIANCE MEMBER
Joined
Oct 20, 2009
Messages
21,441
Location
Northern Utah
Not sure if I've mentioned this in the past but both at work and at home, I just use non-clumping kitty litter for oil absorption. It works as effectively as floor dry and is much more economical.

Granted this is for those "gushers" or larger spills, but for most "normal" cleanups I just use a pig mat and toss it as cleanup is much easier. Thankfully I don't have those "gushers" all too often, matter of fact I can't remember the last one. I had a mess on the cooling system of the Buick a couple of months ago and it was borderline grabbing the kitty litter, but used about 4 pig mats instead.

Which brings up another comment, I have two difference versions of pig mats, based on amount of liquid they will hold. I have them labeled as heavy and medium duty on the boxes which are cut away for easy access. The medium ones are by far my most used as they are the least expensive and they help me to keep my messes within reason. ;)
 

GRN96WS6

Well-known member
Joined
Dec 23, 2012
Messages
2,250
Location
SOMD
Not sure if I've mentioned this in the past but both at work and at home, I just use non-clumping kitty litter for oil absorption. It works as effectively as floor dry and is much more economical.

Granted this is for those "gushers" or larger spills, but for most "normal" cleanups I just use a pig mat and toss it as cleanup is much easier. Thankfully I don't have those "gushers" all too often, matter of fact I can't remember the last one. I had a mess on the cooling system of the Buick a couple of months ago and it was borderline grabbing the kitty litter, but used about 4 pig mats instead.
I've used that as well and works pretty good.
 

rharman

Well-known member
Joined
Apr 22, 2012
Messages
8,897
Location
SoCal
< snip >

I don't mean to get down on the industry, but I want to scream at the top of my lungs "if you want to be paid as a professional, then start acting like one and putting out high quality and professional work!" I see it all too much, especially lately and it saddens me to see so many people down on the industry as a whole, yet unwilling to look in the mirror and make changes to the ONE thing they can control, themselves. I see too much entitlement in the industry, but that seems to be everywhere these days.

< /snip >

No one wants to put the work in these days. By that I mean working on themselves to make themselves better, effort to learn, to put in personal time and effort to learn and be good at your trade. I am so glad I am no longer working in the motorcycle/powersports industry any longer. It was hard enough to find decent employees back in the early 2000's, now I bet it is all but impossible. I am north of Seattle so bike shops are very seasonal with layoffs for off season.

I'm just going to add that the attitude problem is not limited to the trades. At my last employer (2014-2021), doing software development, I worked with a couple of folks who had zero interest in improving themselves.

It was the old "I've got 30+ years experience." No, you have 1 year of experience that you've been milking for the last 29 years. Never read a trade journal, never took a class, never went to a conference, never signed up for a webinar, never bothered to stay current with improved techniques, tooling, whatever. So inefficient plodding along like it was 1985.

I tried "Lunch & Learn" presentations and a few other things. Nope, no improvement. At one point, I told my boss that these guys are stealing from you. Taking a paycheck without putting out any effort to excel in their craft but expecting regular raises.

OK, that's the end of my rant. I'm glad I'm retired!
 
OP
Z

zmotorsports

ALLIANCE MEMBER
Joined
Oct 20, 2009
Messages
21,441
Location
Northern Utah
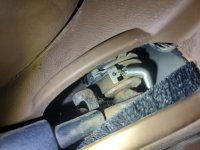
One of the issues plaguing the Jeep JK's has to do with their clutch style mechanism on the E-brakes. The design has a torsional spring inside and allows for the clutch to take up slack in the system when applying the hand brake. However, as the torsion spring wears over time and loses its ability to keep tension on the clutch, the hand brake runs out of room to tighten the cables by the time it reaches the end of its stroke in the center console. As far as I know they don't sell the torsion spring alone and I am told it is only available by purchasing the entire emergency brake as a unit. I have seen some pretty crude, yet effective, means of correcting the issue online so I decided to fabricate my own means of retaining tension and therefore position on the clutch.


Here I am pointing to the tab on the clutch's outer circumference in which I will attach an extension style of spring.
jeep1.jpg

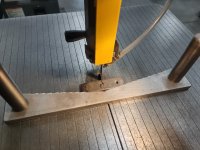
Next I raised the rear of the center console up to gain access to the floor where I measured for a mounting bracket and then cut a piece of .250" steel for the base.
jeep2.jpg

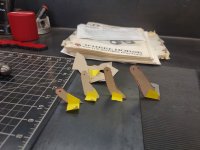
The center console has a relatively deep storage box so I have to design a vertical tab that will be just short enough to clear the bottom of the storage box, yet tall enough to allow the spring to connect and also clear a wire loom running around the back of the shifter mechanism. I used some thin cardboard to mockup a test piece.
jeep3.jpg

I then taped the cardboard cutout to the base of the bracket for a trial fit.
jeep4.jpg

Four test pieces later I finally had the one that would work. It ended up being much taller than I thought so I have to create a small curved notch in the front of the vertical to allow clearance for the wire loom.
jeep5.jpg

Tack welding the two pieces for a final test fit before final welding.
jeep6.jpg

Ready for a test fit.
jeep7.jpg

That should work, maybe a small bend at the top, but we'll try this first.
jeep8.jpg

Next to dig through my assortment of springs to locate one the correct length that seems to have enough spring tension to hold the clutch, but not too much that it doesn't allow the clutch to release fully.
jeep9.jpg

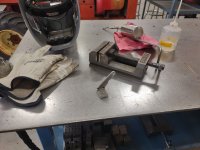
Bead blasted the bracket after final welding.
jeep10.jpg

Painted and ready to install.
jeep11.jpg

Just had to add a slight bend at the top.
jeep12.jpg

jeep13.jpg

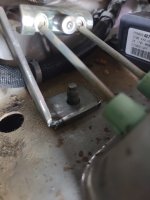
Hole drilled in the tab, then final installation and test drive.
jeep14.jpg


Works like a charm to keep the clutch in the correct position for a full engagement of the hand brake.


Thanks for looking and hope this helps someone else experiencing similar issues.
 
OP
Z

zmotorsports

ALLIANCE MEMBER
Joined
Oct 20, 2009
Messages
21,441
Location
Northern Utah
Also, last week after getting the air system on the coach finished up and needing to pull it out of the shop to clean up the RV bay, I thought I would finally do a walkaround of our 2003 Monaco Dynasty Baroness. Over the past several years I have had a handful of people reach out to me through the couple of RV forums that I participate in as well as my YouTube channel asking for a walkaround of our coach and to explain the history of our ownership, earlier mods and upgrades as well as more current repairs or modifications that I have performed on it over the past 19 years of ownership.

I'm not sure what the change is, but over the past several years it has seemed to spark quite a bit more interest in campgrounds and on the forums than over the previous years. Not sure why? :dunno: In my mind all that I have done is keep it properly maintained and when something needs attention I try to think through any possible ways to improve rather than just do quick repairs. To me it is just a nice and well-maintained coach, but for some reason I have had a lot of questions about it lately. Questions like the condition when we purchased it, what we did to in early on and what we have done to it more recently so while I had the coach out of the shop last week I did a walkaround video of it. It's long, but I hope I covered everything that people were asking about.

Here is a link if anyone is interested in taking the time to watch it.


Thanks for looking.
 

ntsqd

Well-known member
Joined
Jan 22, 2005
Messages
989
Location
Lower left coast
I’ve never heard of rice hull ash, had to read up on it. Where was this used for oil cleanup? I tought maybe ocean oil spill but it seems like peat moss or other material was commonly used if they used an organic material.
Didn't see this until just now. We used it exclusively in the Vintage Race & Touring Car shop. Mostly for spills on the floor or the adjacent unsealed outdoor concrete slabs. When you do have to lay on the floor for some reason, or even lay on a creeper, it is a LOT nicer than kitty litter to lay on or try to roll through. I've never seen something that could pull the oil of an old stain in concrete up like the rice hull ash did. Using a 2x4 to grind kitty litter into the slab is close, but just sifting the ash out over the stain and giving it time to work was pretty amazing.
 

BSWS

Well-known member
Joined
Jun 2, 2019
Messages
360
Location
Tucson AZ
I can tell you what's unique about it Mike. It's probably the cleanest 2003 Monaco on the planet, and definitely the most mechanically-sound. I've mentioned before that I had a 2005 Monaco Dynasty 40' with tag, really similar to yours. It didn't take me long to realize I was in over my head thinking I was going to handle all the mechanical issues. And I don't trust many people to work on my vehicles either. Even if I did, I'd never be comfortable paying what a decent mechanic would have to charge. Imagine what you'd have to charge someone to do the Aquahot lines that you and your son did. I can't even imagine you pulling out that AH the way they bury it in the center.

After all my research I don't think I could ever own anything other than the pre 2009 Monaco/Beaver/ HR, or a Country Coach. Unless I had Mark Martin money.

PS I was looking closely and don't see a hint of any signs of checking since your repaint.
 
To avoid these ads, REGISTER NOW!
OP
Z

zmotorsports

ALLIANCE MEMBER
Joined
Oct 20, 2009
Messages
21,441
Location
Northern Utah
I can tell you what's unique about it Mike. It's probably the cleanest 2003 Monaco on the planet, and definitely the most mechanically-sound. I've mentioned before that I had a 2005 Monaco Dynasty 40' with tag, really similar to yours. It didn't take me long to realize I was in over my head thinking I was going to handle all the mechanical issues. And I don't trust many people to work on my vehicles either. Even if I did, I'd never be comfortable paying what a decent mechanic would have to charge. Imagine what you'd have to charge someone to do the Aquahot lines that you and your son did. I can't even imagine you pulling out that AH the way they bury it in the center.

After all my research I don't think I could ever own anything other than the pre 2009 Monaco/Beaver/ HR, or a Country Coach. Unless I had Mark Martin money.

PS I was looking closely and don't see a hint of any signs of checking since your repaint.

Thank you very much. I appreciate the comments. I have to admit however, when I follow the guys over at Premier RV in Oregon who used to all be original Country Coach employees and I see the coaches that they take into their inventory to sell I don't know if ours would make the cut. They go on and on about how picky and meticulous they are when it comes to people wanting to trade in their coaches and if they aren't exceptionally clean they turn them away and I often wonder if ours would make their cut or not.

As for the checking I would say in the 9-years since the repaint it has not come back anywhere near the original. A few years ago I began spotting a few very, very faint hints that it was trying to come back, but you have to catch it in the right light.

I would agree that I couldn't bring myself to own anything post 2008/2009 era.

Thank you again for continuing to follow along and for the kind words.
 

BSWS

Well-known member
Joined
Jun 2, 2019
Messages
360
Location
Tucson AZ
Thank you very much. I appreciate the comments. I have to admit however, when I follow the guys over at Premier RV in Oregon who used to all be original Country Coach employees and I see the coaches that they take into their inventory to sell I don't know if ours would make the cut. They go on and on about how picky and meticulous they are when it comes to people wanting to trade in their coaches and if they aren't exceptionally clean they turn them away and I often wonder if ours would make their cut or not.

As for the checking I would say in the 9-years since the repaint it has not come back anywhere near the original. A few years ago I began spotting a few very, very faint hints that it was trying to come back, but you have to catch it in the right light.

I would agree that I couldn't bring myself to own anything post 2008/2009 era.

Thank you again for continuing to follow along and for the kind words.
I forgot about Premiere and Kenai. they do have some clean ones and I'm sure yours would meet their standards. For a year or so I was laser focused on finding a Country Coach. I checked Terry's site (Kenai) every day hoping to find the right one. Then I learned about Monacos and was able to expand my search until I bought mine from the original owners. It was a great experience, but too much work for me to handle.

Having your coach stored in the garage, I don't think you'll get enough sun on it to cause any more checking. It looks great.
 
OP
Z

zmotorsports

ALLIANCE MEMBER
Joined
Oct 20, 2009
Messages
21,441
Location
Northern Utah
I forgot about Premiere and Kenai. they do have some clean ones and I'm sure yours would meet their standards. For a year or so I was laser focused on finding a Country Coach. I checked Terry's site (Kenai) every day hoping to find the right one. Then I learned about Monacos and was able to expand my search until I bought mine from the original owners. It was a great experience, but too much work for me to handle.

Having your coach stored in the garage, I don't think you'll get enough sun on it to cause any more checking. It looks great.

Even the guys at Premier RV who are slightly biased to the Country Coach line, often compare them to the mid-2000 Monaco products. When the wife and I were looking back in 2006, we were laser focused on a 1998-1999 Country Coach Magna or Affinity or Monaco Executive or Signature based on my research and wanting a semi-monocoque chassis as well as a tag axle. I learned there were a lot of similarities between the Country Coach and Monaco line and that they were only separated by a block or two in Oregon where their manufacturing plants were located. Both were great products back then and continue to be today.
 

BSWS

Well-known member
Joined
Jun 2, 2019
Messages
360
Location
Tucson AZ
Even the guys at Premier RV who are slightly biased to the Country Coach line, often compare them to the mid-2000 Monaco products. When the wife and I were looking back in 2006, we were laser focused on a 1998-1999 Country Coach Magna or Affinity or Monaco Executive or Signature based on my research and wanting a semi-monocoque chassis as well as a tag axle. I learned there were a lot of similarities between the Country Coach and Monaco line and that they were only separated by a block or two in Oregon where their manufacturing plants were located. Both were great products back then and continue to be today.
After looking at quite a few CC and Monacos they are very much alike. I was dead set on a 2005 or 2006 CC Allure at 40' or 42'. Then I looked at a Holiday Rambler and Monaco that matched up with the Allure and found out I was much more impressed with the bay doors on Monaco products. I could have gone either way, I just found the 2005 Dynasty and went for it. Many people couldn't believe I found a 40' with a tag axle. I was happy to trade that for a little more bay storage. So you were looking at the big models, being my first Class A I felt I should restrict myself to 42'.
 
OP
Z

zmotorsports

ALLIANCE MEMBER
Joined
Oct 20, 2009
Messages
21,441
Location
Northern Utah
After looking at quite a few CC and Monacos they are very much alike. I was dead set on a 2005 or 2006 CC Allure at 40' or 42'. Then I looked at a Holiday Rambler and Monaco that matched up with the Allure and found out I was much more impressed with the bay doors on Monaco products. I could have gone either way, I just found the 2005 Dynasty and went for it. Many people couldn't believe I found a 40' with a tag axle. I was happy to trade that for a little more bay storage. So you were looking at the big models, being my first Class A I felt I should restrict myself to 42'.

I was also limiting myself to a 40', which made finding two things on my "must have" list even more difficult, which is why it took me 9+ months of searching. I needed a tag axle coach and I wanted triple roof airs with the 10kw or 12.5kw generator. Those two items alone had to be special ordered in a 40' package, yet were pretty standard on a 42 plus foot coach. The dealer I was working with found me a nice 2005 42' HR Imperial, but I couldn't do a 42' and it didn't have Aqua-Hot so it was a solid "no" for me. Also was right at the top of our budget which didn't leave much room for any unexpected expenses and I didn't want to leave that door open.
 

OldCarGuy

Well-known member
Joined
Nov 29, 2005
Messages
2,005
Location
Ohio
Also, last week after getting the air system on the coach finished up and needing to pull it out of the shop to clean up the RV bay, I thought I would finally do a walkaround of our 2003 Monaco Dynasty Baroness. Over the past several years I have had a handful of people reach out to me through the couple of RV forums that I participate in as well as my YouTube channel asking for a walkaround of our coach and to explain the history of our ownership, earlier mods and upgrades as well as more current repairs or modifications that I have performed on it over the past 19 years of ownership.

I'm not sure what the change is, but over the past several years it has seemed to spark quite a bit more interest in campgrounds and on the forums than over the previous years. Not sure why? :dunno: In my mind all that I have done is keep it properly maintained and when something needs attention I try to think through any possible ways to improve rather than just do quick repairs. To me it is just a nice and well-maintained coach, but for some reason I have had a lot of questions about it lately. Questions like the condition when we purchased it, what we did to in early on and what we have done to it more recently so while I had the coach out of the shop last week I did a walkaround video of it. It's long, but I hope I covered everything that people were asking about.

Here is a link if anyone is interested in taking the time to watch it.


Thanks for looking.

A very spacious and impressive home work shop! Thanks for sharing..

After listening to your video, we have similar experiences with our motorhomes. I've owned motorhomes for the past 55 years. First one being a 1974 22' Winnebago Indian. On a Dodge RM-300 with a 413 engine. That was one sweet ride!
dcee08e7-6211-45e8-b3a3-d0dfe5cfb6d8.jpg

After four different RV's. I purchased a new 40' 1999 Gulf Stream Tourmaster. It was on a Spartan chassis with a Cummins ISC coupled with the Allison 3000MH. It has an overheating problem at the get go. Gulfsteam put a bigger fan and hydraulic motor. That helped the issue. Once I replaced the OEM turbo charger with a Bank's unit. Along with replacing the 4“ exhaust to a 5” with one less elbow. It was a whole new game. Never overheated. And it would travel the entire Pennsylvania Turnpike without shifting down. That's with pulling my 24' loaded car hauler. Great coach with many happy trouble free trips trips across the states and Canada. Had a 10KW Onan diesel generator.
800e761e-af11-4abc-a7d3-f1ab7c6e78e3.jpg
734bf16f-7b88-47e4-b7a7-17ad2c102dc4.jpg

Twelve years ago the Tourmaster was replaced with a newer tag axle American Eagle coach. Also on a Spartan chassis with a Cummins ISX-15 coupled with the Allision 4000MH transmission. Talk about power... One bulletproof power-train! Over 500 HP with a massive torque of 1,600. With modifications it can be cranked up.. Has a 12KW Onan diesel generator,
6143ad0d-d4c2-494f-ac3e-528871ec5701.jpg

Lot tighter fit with my new 26' Winnebago
fe377059-1c01-450f-a7aa-5d7deaa306f2.jpg

I perform all the service my coaches. And travel with essential Tools & Spare parts. Including starter motor, alternator. Luckily I've been able to service the Aqua-hot without removing it from the coach. I prefer a gas abortion RV refrigerator over an all electric. With a 40 gallon LP tank the 12 cubic feet refer will run for months! The updated coils including interior and could fans make a big improvement.
1b58a636-21f0-4487-bb3b-e1c7b22aed96.jpg

Freezer
19f78526-f71f-4642-beb7-252aec9c1379.jpg

Bottom section.
daa0258c-f5d2-48c2-bc81-b63808812141.jpg

New absorption coil
9310d440-c90b-4e2c-bede-4f906010b80c.jpg
 
Last edited:

ntsqd

Well-known member
Joined
Jan 22, 2005
Messages
989
Location
Lower left coast
I've never been able to understand the difference, but the Dometic adsorption fridges in our pop-top campers were good for a best of 40°F below ambient. Didn't seem to matter what I did, they never worked better than that. I know of a couple remote cafes who use propane fridge/freezers with great success, so that these little fridges were so bad was seriously disappointing.

OTOH the compressor fridges that I replaced them with could keep my ice cream sammiches frozen in 100°F outside temps. A single 100W solar panel more than kept up with it, and here on the Coastal Desert and interior deserts that's good enough.
 
OP
Z

zmotorsports

ALLIANCE MEMBER
Joined
Oct 20, 2009
Messages
21,441
Location
Northern Utah
A very spacious and impressive home work shop! Thanks for sharing..

After listening to your video, we have similar experiences with our motorhomes. I've owned motorhomes for the past 55 years. First one being a 1974 22' Winnebago Indian. On a Dodge RM-300 with a 413 engine. That was one sweet ride!
dcee08e7-6211-45e8-b3a3-d0dfe5cfb6d8.jpg

After four different RV's. I purchased a new 40' 1999 Gulf Stream Tourmaster. It was on a Spartan chassis with a Cummins ISC coupled with the Allison 3000MH. It has an overheating problem at the get go. Gulfsteam put a bigger fan and hydraulic motor. That helped the issue. Once I replaced the OEM turbo charger with a Bank's unit. Along with replacing the 4“ exhaust to a 5” with one less elbow. It was a whole new game. Never overheated. And it would travel the entire Pennsylvania Turnpike without shifting down. That's with pulling my 24' loaded car hauler. Great coach with many happy trouble free trips trips across the states and Canada. Had a 10KW Onan diesel generator.
800e761e-af11-4abc-a7d3-f1ab7c6e78e3.jpg
734bf16f-7b88-47e4-b7a7-17ad2c102dc4.jpg

Twelve years ago the Tourmaster was replaced with a newer tag axle American Eagle coach. Also on a Spartan chassis with a Cummins ISX coupled with the Allsion 4000MH transmission. Talk about power... One bulletproof power-train! Over 500 HP with a massive torque of 1,600. With modifications it can be cranked up.. Has a 12KX Onan diesel generator,
6143ad0d-d4c2-494f-ac3e-528871ec5701.jpg

Lot tighter fit with my new 26' Winnebago
fe377059-1c01-450f-a7aa-5d7deaa306f2.jpg

I perform all the service my coaches. And travel with essential Tools & Spare parts. Including starter motor, alternator. Luckily I've been able to service the Aqua-hot without removing it from the coach. I prefer a gas abortion RV refrigerator over an all electric. With a 40 gallon LP tank the 12 cubic feet refer will run for months! The updated coils including interior and could fans make a big improvement.
1b58a636-21f0-4487-bb3b-e1c7b22aed96.jpg

Freezer
19f78526-f71f-4642-beb7-252aec9c1379.jpg

Bottom section.
daa0258c-f5d2-48c2-bc81-b63808812141.jpg

New absorption coil
9310d440-c90b-4e2c-bede-4f906010b80c.jpg


Thank you very much for taking the time to watch my video and comment on my thread.

I have been a member here and followed your posts and remember your Tourmaster coach. I also saw pictures of your American Coach here recently and thinking how nice it was, nice upgrade.

I waffled on replacing the cooling unit with an Amish unit because prior to 2015 our absorption refrigerator did a fair job. However, when it let loose, I didn't want to mess with absorption any longer and have absolutely no regrets switching over to a residential. In fact, personally, I will never own another coach without a residential refrigerator. Even with the little amount of boondocking we do the inverter has no issues running the unit.

Yes, our experiences with RV ownership are quite similar. Thank you for taking the time to follow along and comment.
 
OP
Z

zmotorsports

ALLIANCE MEMBER
Joined
Oct 20, 2009
Messages
21,441
Location
Northern Utah
On the drive to work yesterday the truck's windshield took a rock hit. 🤬

Before it decided to run on me I thought I would pull it into the shop last night and do a quick fill and repair.
truck1.jpg

truck2.jpg


On the way home from work I stopped by the local paint supply store to pick up a pint of paint for the wife's Acura and a quart of paint for my truck. HOLY ****!!!! I don't paint nearly as often as I used to but I was sticker shocked when the bill came to $575 for a pint and a quart of PPG paint.
paint.jpg


I guess I could have used the lesser line such as Omni, but seeing as how we plan on keeping these for a while I wanted to use the best products I could get my hands on. Been using PPG products for nearly 40 years now and it seems the prices go up each and every time I buy something of theirs.
 

fouckhest

Well-known member
Joined
Jul 24, 2013
Messages
1,866
Location
Greer, SC
On the way home from work I stopped by the local paint supply store to pick up a pint of paint for the wife's Acura and a quart of paint for my truck. HOLY ****!!!! I don't paint nearly as often as I used to but I was sticker shocked when the bill came to $575 for a pint and a quart of PPG paint.


I was talking with my buddy that is fixing my rear bumper last weekend and talking about painting my project car and the cost of paint is silly....to the point I joked with him about just buying one of those amazon inflatable paint booths and shooting the car myself, just to save every penny possible

Also, love that windshield repair kit, that is slick!
 
OP
Z

zmotorsports

ALLIANCE MEMBER
Joined
Oct 20, 2009
Messages
21,441
Location
Northern Utah
I was talking with my buddy that is fixing my rear bumper last weekend and talking about painting my project car and the cost of paint is silly....to the point I joked with him about just buying one of those amazon inflatable paint booths and shooting the car myself, just to save every penny possible

Also, love that windshield repair kit, that is slick!

Thanks Mike.

Back in the late 80's and into the 90's I could buy the primer, sealer, base color and clear for a full-size vehicle paint job for around $1200~ish. That was high quality PPG products throughout and with minimal sheet metal work I was charging in the $4k-$6k for a complete "street" paint job and about another $1500-$2k for a "show job". I don't even dare put pencil to paper to calculate what a full job would run today just in materials alone.

I still have some SPI Universal Clear so I don't need to purchase any of that, but last time I purchased from SPI, it was a fraction of the cost of PPG clears and in my opinion, better than PPG's current clears on the market. The SPI Universal Clear is much like the PPG clears of 15+ years ago as far as high solids go.

While the materials add up quickly, the labor is where it will really get you so if you are willing to tackle the job yourself, it would be worth it to give it a try. Just remember, it's like a house, the foundation is the most important so don't rush the substrate work. The painting is the easy part; all of the prep work is where the labor is really at and where the time needs to be spent getting it right.
 

fouckhest

Well-known member
Joined
Jul 24, 2013
Messages
1,866
Location
Greer, SC
While the materials add up quickly, the labor is where it will really get you so if you are willing to tackle the job yourself, it would be worth it to give it a try. Just remember, it's like a house, the foundation is the most important so don't rush the substrate work. The painting is the easy part; all of the prep work is where the labor is really at and where the time needs to be spent getting it right.

I've heard that for a "decent" paint job these days, just plan on $10k o_O

One thing I am hopeful for on my car is that the body work was done in late 2008, sat all winter (indoors) in high build primer, summer of 2009, it was blocked again and sprayed with a satin black epoxy primer, stayed like that, (always stored indoors) until 2012 when it was wrapped and been like that since, other than what I've peeled off...SO, all that to say, I am hopeful that the body work is still solid under the wrap and epoxy primer, so short of some touch up spots, with a little luck the prep/base should be solid (crosses fingers).

With a little luck, I will find out how it all looks sooner than later!

...end thread jack!
 
OP
Z

zmotorsports

ALLIANCE MEMBER
Joined
Oct 20, 2009
Messages
21,441
Location
Northern Utah
I've heard that for a "decent" paint job these days, just plan on $10k o_O

One thing I am hopeful for on my car is that the body work was done in late 2008, sat all winter (indoors) in high build primer, summer of 2009, it was blocked again and sprayed with a satin black epoxy primer, stayed like that, (always stored indoors) until 2012 when it was wrapped and been like that since, other than what I've peeled off...SO, all that to say, I am hopeful that the body work is still solid under the wrap and epoxy primer, so short of some touch up spots, with a little luck the prep/base should be solid (crosses fingers).

With a little luck, I will find out how it all looks sooner than later!

...end thread jack!

Mike, if it was blocked and then shot with a layer of epoxy primer then you are probably going to be well off. I have seen where people shoot them in primer surfacer thinking the work is sealed, but primer surfacer is actually like a sponge to moisture whereas the epoxy is a true barrier against it. Granted the epoxy will need to be sanded to obtain a mechanical bond going forward, but the epoxy itself will be a good and proper barrier sealing off the substrate beneath it.
 

Xti04

Well-known member
Joined
Nov 11, 2016
Messages
2,347
Which windshield repair kit are you using Mike? I am in the market for a setup.
 
OP
Z

zmotorsports

ALLIANCE MEMBER
Joined
Oct 20, 2009
Messages
21,441
Location
Northern Utah
Which windshield repair kit are you using Mike? I am in the market for a setup.

It's not really a "kit" per se. I started with some Delta products and then added and upgraded over time. I highly recommend getting a nice quality aluminum bridge vs. the plastic or composite ones as they flex a little too much for my liking and the aluminum one is pretty rigid. I also use Delta resin which I have found works well. Also, don't waste your money on the small battery powered UV lights for curing, they don't work nearly as well or as consistent as the 120VAC ones.
 

madison069

Well-known member
Joined
Nov 5, 2010
Messages
4,204
Location
Monroeville, PA
Yea, when I purchased the gallon of red for the camaro it was high and i was purchasing it under my buddy's account for a discount. That reminds me, I need to stir the paint.
 
OP
Z

zmotorsports

ALLIANCE MEMBER
Joined
Oct 20, 2009
Messages
21,441
Location
Northern Utah
Yea, when I purchased the gallon of red for the camaro it was high and i was purchasing it under my buddy's account for a discount.

Side trip here, the company I have been purchasing my PPG paint from is the same company I worked for back in the mid-80's when it was locally owned and also did auto glass. I was offered the job as a counterman from when I was working at a competitor's auto parts store and once they learned that I also "dabbled" in painting, they moved me from the counter selling hard parts to the paint department where I sold paint and auto body supplies as well as mixed paint for local shops. It paid ****, but I actually enjoyed it and was able to meet some great local auto body paint shop owners during that time.

Even back then it seemed like paint was taking anywhere from a 4-7 percent price increase per year, but I remember when I transitioned from shooting enamel and lacquers to urethanes around 1986-1987, for a pint of paint with a "R" or "K" code, which were the highest cost, was around $50-$65 per pint. Now the pint of metallic I just purchased for the wife's Acura TL was $201.03 and that was with my discount. My hell, that comes out to around $1600 per gallon and I used to be able to buy the supplies for an entire paint job for that 4-decades ago.
 

OldCarGuy

Well-known member
Joined
Nov 29, 2005
Messages
2,005
Location
Ohio
I've never been able to understand the difference, but the Dometic adsorption fridges in our pop-top campers were good for a best of 40°F below ambient. Didn't seem to matter what I did, they never worked better than that. I know of a couple remote cafes who use propane fridge/freezers with great success, so that these little fridges were so bad was seriously disappointing.

OTOH the compressor fridges that I replaced them with could keep my ice cream sammiches frozen in 100°F outside temps. A single 100W solar panel more than kept up with it, and here on the Coastal Desert and interior deserts that's good enough.

I have been pleased with absorption refers for over 50 years. All with some minor improvements. Up to replacing the cooling units. The Amish replacement absorption cooling units are far better in design that will out preform and last longer. The photos showing my handheld thermometers readings show the freezer section at zero, while the main box at 28 degrees. The ice cream is hard, plenty of ice cubes, and never any spoiled produce... Even in extreme heat conditions.

Contrary,, my new Winnebago View came with a 10 cu. ft. Norcold refrigerator that is 12 volt compressor-driven. The cooling performance is outstanding even in all conditions. That's saying the coach engine is running, the generator is running, or you're plugged into shore power. The refrigerator kills the battery in no time if not. I have increased the one 100 WATT solar panels to four with no better results. Installing bigger batteries didn't solve the problem. If you turn the unit to sleep mode for the night. The freezer craps out and you wake having warm milk for your cereal. When boon-docking, the only solution is having the auto start setting for the generator. Once again the Winnebago designing wizards put the diesel generator directly under the bed.. Need I say more. This refer makes my appreciate the American Eagles propane refer...
 
Last edited:

ntsqd

Well-known member
Joined
Jan 22, 2005
Messages
989
Location
Lower left coast
This is the fridge that I've put in two of our pop-top campers:
https://www.suremarineservice.com/Galley/Cruise-Classic/ISO-1100BA7IA0000.html It is FAR too small for a motorhome! But it's perfect for a pop-top camper. The spec says 400W/24hrs, which I roughly calculate to be 1.4 amps when running, and that's about what my limited observation has been. Given the low duty cycle, even in the desert, the 100W of solar had little trouble keeping up with it. I made a point when installing both of them to add insulation anywhere I could fit some except for where it would block the cooling coils.

I've read some not so great things about the Norcolds on the pop-top forum, but I've no memory of any details. I wouldn't condemn the type based on one encounter, but I can sure see where it could put a person off of them.
Could yours actually be running off of an internal inverter? The fridge above does the reverse with the 120 VAC input, converts it to 12/24 VDC to run the compressor with.
 
To avoid these ads, REGISTER NOW!
Top Bottom