To avoid these ads, REGISTER NOW!

Can I damage this bearing with heat?

OP
B

Burt Shaver

Well-known member
Joined
Dec 7, 2023
Messages
1,278
Location
Iroquois, Ontario Canada
Yes, I edited my last post to hopefully further help.
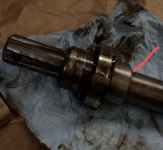
Thank you, I think I got it, I should be looking for roughly .003” then . As I mentioned, I’ve never really payed much attention to the ID of the bearing/collars before. It’s always been automotive, ATV, Snowmobile stuff and I’ve always ordered the correct part’s luckily but this time that collar isn’t right. Bearing was correct but not the collar. Thanks for all the help. Back to the drawing board to try and order this stuff again. Hopefully I can get that thing off of there and I haven’t damaged the axel shaft to much
 
To avoid these ads, REGISTER NOW!

PCustoms

Well-known member
Joined
Jul 23, 2011
Messages
23,432
Location
VT
Yes, there is a shoulder there

IMHO, everything should be a very light press almost slip fit, to that shoulder. The retaining ring then holds it.

Hopefully you didn't damage (gall) the shaft...

Where are you finding these parts, are they generic and you're trying to size things?
 
Last edited:

OccupantRJ

Well-known member
Joined
May 15, 2009
Messages
11,236
Location
Eastern North Carolina
Put it in the press and load it, then start heating the outer sleeve. If you are planning to remove it anyway you can learn from it. If it pops and jumps into place, cool it with air and or a damp rag. Check the bearing rotation.
 
OP
B

Burt Shaver

Well-known member
Joined
Dec 7, 2023
Messages
1,278
Location
Iroquois, Ontario Canada
IMHO, everything should be a very light press almost slip fit, to that shoulder. The retaining ring then holds it.

Hopefully you didn't damage (gall) the shaft...

Where are you finding these parts, are the generic and you're trying to size things?
I ordered the kit off EBay, can’t remember the manufacturer off hand. Oddly the bearing fit perfectly as did the oil seal. I wanted to order from Sparex because watched a video of a fellow who looked like he knew what he was doing and he used Sparex parts but the dealer I spoke to couldn’t seem to find the parts I needed and only kept talking of the 1 3/8” parts for conversion when I just wanted to rebuild this 1 1/8” shaft.
The fellow on the video made his own collar though and yes, he barely had to force it on. He just used a pipe and a hammer
 

RoninB4

Well-known member
Joined
Jul 22, 2020
Messages
3,617
Location
Under My House
Using a cheap electronic caliper from Canadian tire. I’m measuring the ID of collar.
-It's already been mentioned so I'm not going to pile on but a caliper is NOT suitable when it comes to a bearing fitment. For bearing fitment you need a reliable reading in the range of .*** decimal places (metric) and .xxxx decimal places for inch. A caliper, especially an inexpensive one from China, can only read to +/- .001 (inch) and that can exceed the range for fitment itself. The only acceptable measuring instrument for bearing fitment is a micrometer. Too much interference fitment can easily lead to deformation of the race, creating an egg shaped object. You can't just shove it in/on and expect it to work properly. There are procedures to use in the absence of good measuring instruments but are a poor substitute for obtaining accurate numbers in a proper fitment.

-Even using an expensive caliper for ID measurement is useless unless the ID jaws are ground to a sharp edge. Any flat on the knife edges produces an error on a round surface as a geometric chord. If there are knife edges a reading for verification should be done, they're not always accurate. The ID jaws often get banged up through rough handling and the deformation throws the reading off anyway.

-Bearings are more fragile than most people seem to think they are when installed incorrectly. Pounding in with a hammer or excessive force with a press may have installed it but the longevity of that bearing life may have been severely shortened and you won't know it. Pressure on the wrong race can/will produce micro-dimples in the race (Brinelling effect). For some bearings there's a limit to how much grease should be put in, grease in excess of the percentage called for can lead to overheating the bearing. There's more to it than most people consider.
I pressed the 2 collars and bearing at one time,
-Bad assembly procedure for 2 press fits.
which I find it odd that there is a space between the bearing and the last collar to go on the axel,
-Your first clue that something has gone wrong. Perhaps displaced metal is now acting as a washer/spacer.
I think next time I will put them in one at a time
-The beginning of a press fit has to be square to the axis or it can/will displace metal as it goes on crooked. Some assembly lube is also advised for most installations.

-My apologies for the long winded lecture but most people, even "trained" machinists, sometimes fail to understand the fundamentals. Anybody that disagrees with what I've posted is cordially invited to research the subject and further my meager education.
 
OP
B

Burt Shaver

Well-known member
Joined
Dec 7, 2023
Messages
1,278
Location
Iroquois, Ontario Canada
-It's already been mentioned so I'm not going to pile on but a caliper is NOT suitable when it comes to a bearing fitment. For bearing fitment you need a reliable reading in the range of .*** decimal places (metric) and .xxxx decimal places for inch. A caliper, especially an inexpensive one from China, can only read to +/- .001 (inch) and that can exceed the range for fitment itself. The only acceptable measuring instrument for bearing fitment is a micrometer. Too much interference fitment can easily lead to deformation of the race, creating an egg shaped object. You can't just shove it in/on and expect it to work properly. There are procedures to use in the absence of good measuring instruments but are a poor substitute for obtaining accurate numbers in a proper fitment.

-Even using an expensive caliper for ID measurement is useless unless the ID jaws are ground to a sharp edge. Any flat on the knife edges produces an error on a round surface as a geometric chord. If there are knife edges a reading for verification should be done, they're not always accurate. The ID jaws often get banged up through rough handling and the deformation throws the reading off anyway.

-Bearings are more fragile than most people seem to think they are when installed incorrectly. Pounding in with a hammer or excessive force with a press may have installed it but the longevity of that bearing life may have been severely shortened and you won't know it. Pressure on the wrong race can/will produce micro-dimples in the race (Brinelling effect). For some bearings there's a limit to how much grease should be put in, grease in excess of the percentage called for can lead to overheating the bearing. There's more to it than most people consider.

-Bad assembly procedure for 2 press fits.

-Your first clue that something has gone wrong. Perhaps displaced metal is now acting as a washer/spacer.

-The beginning of a press fit has to be square to the axis or it can/will displace metal as it goes on crooked. Some assembly lube is also advised for most installations.

-My apologies for the long winded lecture but most people, even "trained" machinists, sometimes fail to understand the fundamentals. Anybody that disagrees with what I've posted is cordially invited to research the subject and further my meager education.
Thanks for weighing in. As I’ve mentioned above I’m guilty of buying wheel bearings and pressing them into the steering knuckle and pressing the hub into the new bearing without measuring. My procedure had been as simple as cross checking part numbers with OEM numbers and sometimes maybe taking a measurement with this cheap caliper,
I knew something wasn’t right with this new shrink fit collar. The name of this collar threw me off. In my mind I thought maybe it was a super tight interference fit or something because of the name. Not saying my thoughts made sense, but that’s what was running through my mind, maybe it was the heat here getting to me.
What tool would be proper for measuring the ID of a bearing or in this case the collar?
 
OP
B

Burt Shaver

Well-known member
Joined
Dec 7, 2023
Messages
1,278
Location
Iroquois, Ontario Canada
IMG_8283.png
This is what I was using to measure.
IMG_8284.pngI have a set of Mitutoyo and Starrett outside micrometers that I’ve used a few times for engine rebuilding but I hate using them since I need to re learn every time how to use them, but they are not proper in this instance either correct? I don’t have a dial bore gauche small enough for the bore of the collar anyways.
 

NHtoolguy

Well-known member
Joined
Mar 4, 2018
Messages
331
Location
Gilford, NH
I would suggest an outside micrometer to measure the shaft, and ideally a bore gauge or gauge pin to measure the inside diameter of the sleeve. But, most of us don't have access to a bore gauge or a gauge pin set due to cost. So, a telescoping gauge to transfer the inside measurement to an outside micrometer would probably be most practical. However, telescoping gauges are highly susceptible to errors in technique (you have to keep the telescoping gauge somewhat square to the bore and centered, and judge the "drag" before locking and removing it). Inside micrometers are available too, but I think your bore is too small to use one. Thus, the recommendation for the telescoping gauge. Digital calipers are too coarse a tool for determining accurate shrink fits on small parts.
 

RoninB4

Well-known member
Joined
Jul 22, 2020
Messages
3,617
Location
Under My House
Thanks for weighing in.
-I hope my reply wasn't taken as a criticism, was just trying to inform. It's rather crass to hammer on someone for what they didn't really know.
As I’ve mentioned above I’m guilty of buying wheel bearings and pressing them into the steering knuckle and pressing the hub into the new bearing without measuring.
-We've all done this too, I sometimes don't measure either unless something seems wrong.
My procedure had been as simple as cross checking part numbers with OEM numbers
-A decent methodology for ordering.
and sometimes maybe taking a measurement with this cheap caliper,
-Your cheap caliper is ok for checking fastener sizes most of the time (some metric/inch are too close for a caliper) or just getting rough measurements. Bearing fitment is, or should be, too exact to trust to an instrument not capable of discerning close tolerances.
I knew something wasn’t right with this new shrink fit collar. The name of this collar threw me off.
-That when things should be measured for level of precision required. Things purchased off the internet that are made in the 3rd world aren't always what they should be. Even things from a "factory OEM" website aren't always what they should be either, especially when the OEM chooses to outsource what they once made. Can anything be trusted? NO. Trust but verify. Sorry state of affairs we're all in now.
In my mind I thought maybe it was a super tight interference fit or something because of the name. Not saying my thoughts made sense, but that’s what was running through my mind, maybe it was the heat here getting to me.
-You really should research what a running, slip, press, and interference fits are supposed to be. It's a quick read and will inform you when something doesn't seem right so you'll have a set of numbers for what IS right. Measuring, when in doubt, will also tell you if a component like a shaft or housing has worn and a problem exists. Shafts and housings can get wear from bearings being installed incorrectly, metal gets displaced like that.
What tool would be proper for measuring the ID of a bearing or in this case the collar?
-I can type up a guide but perhaps it's better if I direct you to what will work for you. No point in spending an exorbitant amount of cash for something you'll not use very often. What size, approximately, is the ID you want to measure?
 

PCustoms

Well-known member
Joined
Jul 23, 2011
Messages
23,432
Location
VT
If this is a common tractor part, with service kits available, why are all the measurements required?
 

RoninB4

Well-known member
Joined
Jul 22, 2020
Messages
3,617
Location
Under My House
This is what I was using to measure.
-This is ok for checking most fastener sizes, I do with one of my calipers too. It's about HOW precise you need to be.
I have a set of Mitutoyo and Starrett outside micrometers that I’ve used a few times for engine rebuilding but I hate using them since I need to re learn every time how to use them,
-I have to re-zero mine every time to determine if they've changed and just where the vernier line is. It's inconvenient but it's the nature of the beast when working to close tolerances. You do have a set of standards for that set don't you? For any micrometer larger than 0-1 inch the standards are critical for accuracy.
but they are not proper in this instance either correct? I don’t have a dial bore gauche small enough for the bore of the collar anyways.
-A dial bore gauge isn't required here. What size is the ID you need to measure.
 
To avoid these ads, REGISTER NOW!

WillyBoy

Well-known member
Joined
Nov 10, 2021
Messages
648
Location
Genesee valley area of New York state
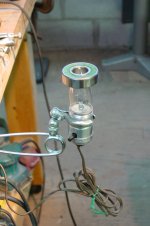
For what it's worth, this is an example of a low budget bearing heater. 10 minutes is usually enough to expand the inner race to either slide in place or to need only a few taps to seat properly. I've used this for fractional horse power motors and other smaller items. Yeah, I know the light isn't on. The picture is easier to see this way.

Bearing heater 1.JPG
 

PCustoms

Well-known member
Joined
Jul 23, 2011
Messages
23,432
Location
VT
For what it's worth, this is an example of a low budget bearing heater. 10 minutes is usually enough to expand the inner race to either slide in place or to need only a few taps to seat properly. I've used this for fractional horse power motors and other smaller items. Yeah, I know the light isn't on. The picture is easier to see this way.

Bearing heater 1.JPG

Does that work with a 0.5mm+ press fit?
 
OP
B

Burt Shaver

Well-known member
Joined
Dec 7, 2023
Messages
1,278
Location
Iroquois, Ontario Canada
For what it's worth, this is an example of a low budget bearing heater. 10 minutes is usually enough to expand the inner race to either slide in place or to need only a few taps to seat properly. I've used this for fractional horse power motors and other smaller items. Yeah, I know the light isn't on. The picture is easier to see this way.

Bearing heater 1.JPG
Nice, I usually turn on a little space heater I have in my shop, set the bearing in front of the space heater for half an hour or so, put whatever part I’m pressing it into into the freezer overnight and yea, near no pressure at all to put them in. This is great though, now I won’t need to heat up my shop when it’s already warm in there
 

RoninB4

Well-known member
Joined
Jul 22, 2020
Messages
3,617
Location
Under My House
In this case, 28 to 31mm
-Do you want metric or inch reading? Would you prefer a bore gauge with a dial indicator or an inside micrometer? Both are available at Am-a-zon. Pick something for an opinion, it doesn't have to be Starrett or Mitutoyo. Do you have the standards for the outside mic set?
 
OP
B

Burt Shaver

Well-known member
Joined
Dec 7, 2023
Messages
1,278
Location
Iroquois, Ontario Canada
Do you want metric or inch reading

Would you prefer a bore gauge with a dial indicator or an inside micrometer
I think I could be more accurate with a dial bore guage and then use the outside micrometers to measure that reading. I think the inside micrometers are a little tricky to use, or so I’ve read.
Do you have the standards for the outside mic set
Not sure what you mean here?
 

RoninB4

Well-known member
Joined
Jul 22, 2020
Messages
3,617
Location
Under My House
I think I could be more accurate with a dial bore guage and then use the outside micrometers to measure that reading. I think the inside micrometers are a little tricky to use, or so I’ve read.
-All measuring instruments require a technique, inside mics and bore gauges too. It's about what technique per instrument you feel confident with and know the procedure. Some like telescoping gauges, I've never really liked them or relied on them when I have a choice. It's all personal preference and accuracy.
Not sure what you mean here?
-Any outside mic larger than 0-1 has to have a set of rods (usually included in a set) that are made to exacting lengths, one for each mic range. They're marked with the exact size for each one. They often come in a small separate box in with the mic set. Each mic has to be "zeroed" to that standard/rod for accuracy as some mics are not set correctly from the factory. It's critical for accurate measuring. They often look like this:

1783786757961.png
 

WillyBoy

Well-known member
Joined
Nov 10, 2021
Messages
648
Location
Genesee valley area of New York state
For nearly as long as ball bearings have been around, the "usual" standard even in the US is metric for OD, ID (bore), and width.
Converting the measurements to inches will give you inches to 4 decimal places.

There are special bore bearings with the ID or bore in inches.
6202 s are available in 1/2 inch, 5/8 inch, and 16 mm.

6203 s are available in 1/2 inch, 5/8 inch, and 16 mm.

6204 s are available in 3/4 inch and 7/8 inch.

Hoping this adds to the confusion. :rolleyes:
 
OP
B

Burt Shaver

Well-known member
Joined
Dec 7, 2023
Messages
1,278
Location
Iroquois, Ontario Canada
Any outside mic larger than 0-1 has to have a set of rods (usually included in a set) that are made to exacting lengths, one for each mic
My 2 Mitutoyo calipers that I purchased new came with a rod each, but the Starret outiside micrmetere u bought at the flea market did not. I ois very little for them so no biggie.
All measuring instruments require a technique, inside mics and bore gauges too. It's about what technique per instrument you feel confident with and know the procedure
I feel confident with a dial bore gauge, rock it till I get the longest measurement. Then zero it out, then use my outside caliper to take it back to zero again. I may have gotten that backwards as I usually need to Che k how to use them again every time I do go to use them but I am confident in those measurements.
Some like telescoping gauges, I've never really liked them or relied on them when I have a choice
Never used telescoping gauges but I’ve heard you need to really know the technique
 
OP
B

Burt Shaver

Well-known member
Joined
Dec 7, 2023
Messages
1,278
Location
Iroquois, Ontario Canada
So I just got an email back from the EBay seller. It looks like he’s going to refund my money for the kit I ordered. I’m pretty happy with that, I asked if they have had other complaints about that sleeve but haven’t received a response back about that yet.
I believe I have found the correct sleeve, I will update with the information I’ve found
Hopefully you guys don’t mind if I turn this into “rebuilding the pto axel shaft on a 1951 Ferguson tractor” thread
 

RoninB4

Well-known member
Joined
Jul 22, 2020
Messages
3,617
Location
Under My House
My 2 Mitutoyo calipers that I purchased new came with a rod each,
-The "rods" might be marked for exact length, inspect them. If purchased new there should even be some paperwork documenting how exact-to-size the rods are.
but the Starret outiside micrmetere u bought at the flea market did not.
-Bought at a flea market? They should not be trusted for accuracy until verified with a standard (rod). Lots of mics come from the factory "close" to the size they measure but can be off a thou or more. It's not about being OCD, it's about setting setting them to the exact reading so they can be used throughout the range reliably. Instruments at the flea markets can, and often are, off because somebody dropped them and now wants to just unload them on somebody else. It's common.
I ois very little for them so no biggie.
-No biggie if you don't need them to be accurate to .0005, you do now.
I feel confident with a dial bore gauge, rock it till I get the longest measurement. Then zero it out, then use my outside caliper to take it back to zero again.
-You're still trying to use a caliper when it's been stated multiple times that a caliper is NOT to be trusted. The procedure you described is rather backwards. A dial bore gauge is to be "zeroed" to a known dimension and then inserted into the bore for a comparative evaluation. A bore gauge, and indicators in general, do NOT provide a quantitative value, they are used for a comparative value. Furthermore, using a caliper or mic to find the dimension is a rather clumsy, 2-1/2 handed procedure requiring you to balance both instruments in your hands while seeking the shortest distance between the measuring faces. Easy to get a bad reading that way. A bore gauge reading should also be taken in at least 2 places 90° from each other in addition to further down the bore. This is to evaluate whether there's a taper in the bore and whether it's egg-shaped (distorted). If you insist on using your caliper then I can't help you much.
I may have gotten that backwards as I usually need to Che k how to use them again every time I do go to use them but I am confident in those measurements.
-It's not only backwards but I'm feeling like your perception/methodology of taking accurate measurements is a bit lacking, no insult intended here. Maybe you need to do some reading about how these instruments are to be used.
Never used telescoping gauges but I’ve heard you need to really know the technique
-Some folks like the telescoping gauges, I don't but that's just my personal preference. I prefer to use instruments to take a direct reading. Every time an intermediary object is used to for indirect measurement it's like hearing a story third hand IMO.
 
To avoid these ads, REGISTER NOW!
Top Bottom