To avoid these ads, REGISTER NOW!

bathroom sink - ****** threads in bad shape - options?

stickshift

Well-known member
Joined
Nov 16, 2011
Messages
1,245
Location
northeastern US
Badly clogged bathroom sink, I removed the old brass P-trap, and here's the ****** after I cleaned off the thread seal tape - leading edge is badly deteriorated. Not confident I can hold the female fitting securely while I loosen the ******. I guess I can remove the cabinet, which will give me a better shot at gripping the female fitting. Or I could cut out the tile, but this simple clog is turning into a whole project.

Other options? Can I simply apply fresh thread seal, and some pipe dope and send it? Or use a hacksaw or oscillating multitool and cut off the leading edge of the ******? Seems there are plenty of good threads remaining, and this is tapered, so it seems removal of the entire ****** may not be necessary.IMG_2109.jpg
 
To avoid these ads, REGISTER NOW!

PCustoms

Well-known member
Joined
Jul 23, 2011
Messages
23,568
Location
VT
Badly clogged bathroom sink, I removed the old brass P-trap, and here's the ****** after I cleaned off the thread seal tape - leading edge is badly deteriorated. Not confident I can hold the female fitting securely while I loosen the ******. I guess I can remove the cabinet, which will give me a better shot at gripping the female fitting. Or I could cut out the tile, but this simple clog is turning into a whole project.

Other options? Can I simply apply fresh thread seal, and some pipe dope and send it? Or use a hacksaw or oscillating multitool and cut off the leading edge of the ******? Seems there are plenty of good threads remaining, and this is tapered, so it seems removal of the entire ****** may not be necessary.IMG_2109.jpg

Is that tile or wainscoting inside the cabinet?

I'd try to hold the female fitting to remove the ******. Depending on your comfort level and surroundings maybe throw some heat at it.

If wood, remove some material to get a better grip, then put a trim ring.

From there I'd get angry and more destructive, but that ****** needs to be swapped IMHO
 
Last edited:

mires

Well-known member
Joined
Jan 12, 2014
Messages
602
Location
Columbia, MO
I could be wrong but that ****** doesn't appear to be threaded into a fitting. That looks like a compression nut at the wall and they used the ****** as an extension of sorts. I would chip out the grout or whatever that is and get a better look at what you're dealing with exactly.
 

PCustoms

Well-known member
Joined
Jul 23, 2011
Messages
23,568
Location
VT
I could be wrong but that ****** doesn't appear to be threaded into a fitting. That looks like a compression nut at the wall and they used the ****** as an extension of sorts. I would chip out the grout or whatever that is and get a better look at what you're dealing with exactly.

Huh?

I see Teflon tape on a ****** threaded into fitting.

Maybe I've never seen it, but what kind of compression nut are you talking about? Keep in mind this should be something like 1.5" pipe
 

rmanrman

Well-known member
Joined
Nov 2, 2012
Messages
388
Cut the ****** about 1.5 inches from the wall as straight as possible. Get a new sawzall blade that should be 4 to 6 inches by 18 TPI.
If your sawzall can put blade up side down.
Start slowly cutting upwards the thickness of the ******. Then grab a slotted (regular) screwdriver that you can beat to death in the slot you created hitting the ****** to the right then from the left. Once that’s done grab a medium pipe wrench and go counterclockwise tapping a hammer on the wrench handle and it should start to unscrew. If still difficult spray a penetrant pb blaster leave for an hour and try again.
 

mires

Well-known member
Joined
Jan 12, 2014
Messages
602
Location
Columbia, MO
Huh?

I see Teflon tape on a ****** threaded into fitting.

Maybe I've never seen it, but what kind of compression nut are you talking about? Keep in mind this should be something like 1.5" pipe
Sorry. Should have said slip joint nut. It looks like there is a gap between the threads and the face of the fitting which is one reason I thought that may be the case. Also, if you look at about 10:00 next to the tile, it looks like knurling which is common on metal slip joint nuts. If that's the case, I can't believe it wasn't leaking at that connection.
 

kbuhagiar

Well-known member
Joined
Dec 27, 2005
Messages
1,761
Location
Escondido, CA
There is likely an elbow in the wall. Shouldn't be much of an issue changing out that ******.
^^^This. I would try loosening the ******. If the fitting behind it turns, then chip out the tile around it to increase exposure.
After all, it's concealed by the cabinet, so cosmetic appearances shouldn't be an issue (or wouldn't be for me, anyway).
 

larry4406

Well-known member
Joined
Jan 27, 2006
Messages
19,636
Location
Northern Virginia
Might look like hell, but if hidden in a cabinet….

Saw cut the ****** off at the botom of threads. New ****** into other end.

Fernco.

Hard to understand where this is in the drain. Assuming outfall of trap and trap arm is horizontal.
 

51cub

Active member
Joined
Oct 11, 2015
Messages
43
Location
NH
Maybe I'm missing something but what I did when I had the same problem was make 2 cuts in the ****** and back it out. Then replace it with a trap adapter
 

JABgj

Well-known member
Joined
Nov 11, 2013
Messages
555
Location
So. California
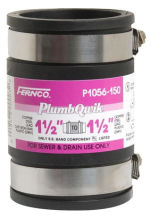
Found myself in a similar spot. Messed up threads and the fitting was not likely to budge (didn't try) found a rubber sleeve at the box store that clamps on to the stub and the trap. Easy peasy. These come in assorted sizes and shapes. Good luck.
1784406607033.png
 
OP
S

stickshift

Well-known member
Joined
Nov 16, 2011
Messages
1,245
Location
northeastern US
Found myself in a similar spot. Messed up threads and the fitting was not likely to budge (didn't try) found a rubber sleeve at the box store that clamps on to the stub and the trap. Easy peasy. These come in assorted sizes and shapes. Good luck.
1784406607033.png
Yeah, I think better to go the low risk route and get this done rather than risk turning this into a larger project.

Looks like this is what I need to go from the 1-1/2" ****** to the 1-1/4" pvc horizontal arm coming from the p-trap.
 
To avoid these ads, REGISTER NOW!
OP
S

stickshift

Well-known member
Joined
Nov 16, 2011
Messages
1,245
Location
northeastern US
Might look like hell, but if hidden in a cabinet….

Saw cut the ****** off at the botom of threads. New ****** into other end.

Fernco.

Hard to understand where this is in the drain. Assuming outfall of trap and trap arm is horizontal.
Can you elaborate on the bolded part? I don't understand at all.

If you're saying radially cut the ******'s threads that extend into the female coupling, by cutting from inside the pipe, and do that in two places, and then remove the ******, that I understand and have seen plumbers do that to avoid messing around with pipe inside the wall.
 

larry4406

Well-known member
Joined
Jan 27, 2006
Messages
19,636
Location
Northern Virginia
Can you elaborate on the bolded part? I don't understand at all.

If you're saying radially cut the ******'s threads that extend into the female coupling, by cutting from inside the pipe, and do that in two places, and then remove the ******, that I understand and have seen plumbers do that to avoid messing around with pipe inside the wall.
old ****** is broken. cut the end flush around the circumference at the root of the first thread.

old ****** connected to something. Perhaps it threaded into a female part.

Put a new male into the female part and point it at the old jagged male that you have trimmed.

Pick a new male with sufficient length to mate with the female such that the gap to the trimmed male works with the Fernco.

*** Ed 101
 
OP
S

stickshift

Well-known member
Joined
Nov 16, 2011
Messages
1,245
Location
northeastern US
old ****** is broken. cut the end flush around the circumference at the root of the first thread.

old ****** connected to something. Perhaps it threaded into a female part.

Put a new male into the female part and point it at the old jagged male that you have trimmed.

Pick a new male with sufficient length to mate with the female such that the gap to the trimmed male works with the Fernco.

*** Ed 101
Oh, I think I get it now. You're saying cut off threads, then install a ****** into whatever this old ****** used to be threaded into, which was an old brass p-trap, then Fernco the two male *******.

If that's what you mean, then even easier is @JABgj suggestion - just use Fernco to connect the old ****** to pvc horizontal arm from new p-trap. So I'd need 1-1/2" x 1-1/4" Fernco.
But yeah, Fernco seems like easy solution here. And to your point, probably a good idea to cut off the threads so those jagged edges don't stab into the fernco.

1784409683481.png
 

signcrafter

Well-known member
Joined
May 9, 2012
Messages
12,528
When I run into stuff like this my thinking is it's already damaged so dig in and see what happens. I'd throw a pipe wrench on it and crank away. There is either a 90 or Tee behind the wall so it should hold unless it's damaged also. If it's damaged and breaks off when trying to get the ****** out then cut into the wall and deal with it. The wall is hidden inside a cabinet so no a big deal if it doesn't look perfect when you patch it. You said you already removed the cabinet anyway so might as well keep going and see what happens and fix it right. I wouldn't use a fernco for the simple reason that if that ****** is in that bad of shape you don't know what shape the next fitting is in. If you use a fernco you will never know. If you try to take the ****** out and it comes out you will see the fitting, if it breaks off you know it was bad and can cut the wall and replace and not worry about if you are going to have leaks to make things worse. It's really not a lot more work to do it right in my opinion. But I get thrown these curve balls all the time and have learned to just keep going and deal with whatever you run into.
 

carlaisle

Well-known member
Joined
May 14, 2022
Messages
391
The other option is to collapse the existing damaged pipe with a heavy duty clamp. It will become much more cooperative after it's diameter has been reduced.
 

JABgj

Well-known member
Joined
Nov 11, 2013
Messages
555
Location
So. California
The Fernco was a great find as I had no room to swing a pipe wrench big enough to maybe break loose a 40 plus year old connection. So far, no leaks and would do it again as needed elsewhere in my home.
 

PoorUB

Well-known member
Joined
Mar 29, 2021
Messages
11,729
Location
Fargo, ND
My concern is if that ****** looks that bad, what is the condition of the pipe in the wall?
My kitchen drain was leaking. Actually, there was water on the basement floor at times and couldn't tell where it was coming from. I figured out the galvanized pipe in the wall was rusted through in 2-3 places after I tore out the wall. I left the vent going up in galvanized, but everything down to the cast iron pipe in the basement floor got swapped to PVC.
 
Last edited:

bwringer

Well-known member
Joined
Jan 1, 2013
Messages
10,328
Location
Indianapolis
I have nothing new to offer, except my sympathies. It's amazing how some long-past plumber or homeowner can reach out and make your life hell from the great beyond.

You just want to dig them up and scream "EXPLAIN YOURSELF! WHY IS THAT FLUSH WITH THE &^%$#@! WALL? WHAT ARE YOU HIDING?"
 
OP
S

stickshift

Well-known member
Joined
Nov 16, 2011
Messages
1,245
Location
northeastern US
My concern is if that ripple l9oks that bad, what is the condition of the pipe in the wall?
Agreed. But replacing the galvanized steel pipe is not a project I want to get into right now because it won't just be that pipe that is rusty, but the drain line in the slab it is connected to, and I think there is a good chance the connection to the drain line in slab is rust welded to the point it's not going to be separable. So I could Fernco right at bathroom wall, or Fernco where pipe behind wall meets main drain in slab or replace the main drain in slab. If there is a clog in the main drain that re-clogs after snaking, then I'll know it's time. Or when that floor is replaced, or if/when I remodel any part of the house, I will open walls, ceilings and floors and replace any steel drain pipe in that area.

Chatgpt tells me US residential homes built between 1930s and 1980s commonly used galvanized steel drain pipe, and this stuff has already surpassed life expectancy, so millions of homes have or will be dealing with this for years to come.
 
OP
S

stickshift

Well-known member
Joined
Nov 16, 2011
Messages
1,245
Location
northeastern US
The other option is to collapse the existing damaged pipe with a heavy duty clamp. It will become much more cooperative after it's diameter has been reduced.
An alternative technique based on same idea that is often employed by hydronyc on youtube, is cutting slot into threads using recip saw. Once that slot is knocked out, the male threads can be turned because they become smaller diameter as they turn.
 
OP
S

stickshift

Well-known member
Joined
Nov 16, 2011
Messages
1,245
Location
northeastern US
When I run into stuff like this my thinking is it's already damaged so dig in and see what happens. I'd throw a pipe wrench on it and crank away. There is either a 90 or Tee behind the wall so it should hold unless it's damaged also. If it's damaged and breaks off when trying to get the ****** out then cut into the wall and deal with it. The wall is hidden inside a cabinet so no a big deal if it doesn't look perfect when you patch it. You said you already removed the cabinet anyway so might as well keep going and see what happens and fix it right. I wouldn't use a fernco for the simple reason that if that ****** is in that bad of shape you don't know what shape the next fitting is in. If you use a fernco you will never know. If you try to take the ****** out and it comes out you will see the fitting, if it breaks off you know it was bad and can cut the wall and replace and not worry about if you are going to have leaks to make things worse. It's really not a lot more work to do it right in my opinion. But I get thrown these curve balls all the time and have learned to just keep going and deal with whatever you run into.
My hat is off to you. Old houses have lots of rabbit holes to go down and potentially turn a small fix into a much larger project, and I'm not inclined to go down those rabbit holes unless I need to, or it's otherwise a good time to do so (e.g., remodel of the area).
 

LOW1

Well-known member
Joined
Jul 20, 2018
Messages
2,657
Location
ontario
That ****** should unscrew easily. If doing so breaks the pipe in the wall that pipe was in its very last days anyway.
 

PCustoms

Well-known member
Joined
Jul 23, 2011
Messages
23,568
Location
VT
You just want to dig them up and scream "EXPLAIN YOURSELF! WHY IS THAT FLUSH WITH THE &^%$#@! WALL? WHAT ARE YOU HIDING?"

I guess I'm a.little confused how else you would run (galvanized) in wall drains?
 
To avoid these ads, REGISTER NOW!
Top Bottom