Im at such a premium for space right now that I am going to wrap the top and back of cab and call it good before installing the topper. Hopefully that goes well and gets me comfortable with doing the rest of the truck. The wrap definitely responds a lot differently than I had realized. Watching youtube video of installs it looked super easy to just stretch and go. Real life has proven to be different, but then again it may be the test pieces I tried were really flexible.Looking forward to seeing the topper come together. Are you going to get the bed wrapped before you start building/installing it?

You are using an out of date browser. It may not display this or other websites correctly.
You should upgrade or use an alternative browser.
You should upgrade or use an alternative browser.
Above 1200 Sq/FT My new garage build! 30x50 !
- Thread starter Xti04
- Start date
Wokspaces above 1200 squarefeet.
Im at such a premium for space right now that I am going to wrap the top and back of cab and call it good before installing the topper. Hopefully that goes well and gets me comfortable with doing the rest of the truck. The wrap definitely responds a lot differently than I had realized. Watching youtube video of installs it looked super easy to just stretch and go. Real life has proven to be different, but then again it may be the test pieces I tried were really flexible.
Yeah, somehow YT makes it seem easy, but my results have been more in line with what you mentioned....seems much harder than, "all you need is a heatgun, soapy water and a bondo spreader" LOL
OutlawDrifter
Well-known member
Definitely a steep learning curve on the vinyl application. Even with the stuff I did on the Tundra I had many "peel it off and start over" moments.
cccoltsicehockey
Well-known member
I once tried to do a trunk and was happy I bought enough material to do it twice and still then I was only partially happy with the results. Took me a couple tries also just to do some window trim. Videos definitely make vinyl look so much easier than it is. The higher end the product though the better results definitely applies with this one. Some just stretch better without distorting.
Not having enough may be a killer for this, I am tight on the od green and I have plenty of matte black, but i know the learning curve is going to have a few casualties along the way. My plan was originally to start on the bottom with the black and get a few pieces under my belt before working on the more visible stuff. I guess we will find out how it goes over the next couple of days.
Plan B fell thrpugh tonight as my buddy had a service call and had to cancel on bringing his truck over. I shot my neighbor a text and he has a mini x and offered to come lift my crate out. He ended up calling back and I took some jumper cables down to his place. We were unable to get his excavator started but he still offered to put it on charge overnight and meet me in the am to pull it out for me. Feeling pretty blessed to have a neighbor willing to help me like this!
madison069
Well-known member
Hopefully something pans out, don’t need to kill yourself!
Tommo3
Well-known member
Couldn't you back in and use you lift to hoist the crate and then drive out?
That was the original plan but I have a car on the lift being serviced thats in the way currently.Couldn't you back in and use you lift to hoist the crate and then drive out?
Cdubu52
Well-known member
Stupid customer's! Dont they know GJ crew are impatiently waiting for updates!That was the original plan but I have a car on the lift being serviced thats in the way currently.
Rats.....literally. my neighbor called this morning and said he got the battery charged but found some rodent damage on some wirong preventing his ma hine from starting. I offered to help repair it when he is ready. This puts me back to plan A which is using the lift to attempt to pull this large crate out.Stupid customer's! Dont they know GJ crew are impatiently waiting for updates!
Jeff finished the Subaru and as soon as we got it off the lift and test driven, I got the truck backed in and started using the lift and some ratchet straps to secure it.

I used the lift to pick it up and strapped to the opposite side lift arms to pull it across. Lift, tighten the ratchet straps, and repeat. Then we had to push the bottom over and lifted the last bit to get it upright. Once it was upright, I pulled the straps under the bottom of the crate, and one across the top to secure it. We got it up enough, and I drove out from under it. We used the lift to get it to the ground and got it flat. Jeff took off at this point, and I finally got the crate cut open.

 I got the plastic off and popped it open.

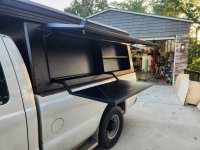
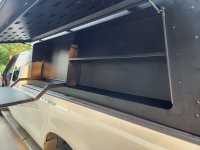
Im pretty excited at this point! Everything was looking really good, so I moved some stuff around and opened up the "kitchen" which is the drivers side of the topper.

The pull out table is on the left side and the shelves on the right side are nice, there were a couple of tiny rub marks from shipping so I have some minor touchup work. Everything has looked great so far, and I am really excited to get it all together.
Attachments

madison069
Well-known member
Looking good so far! Glad it was able to travel that far without any damage, you know those shipping folks weren't gentle with it!
Thanks Cody! Its an absolute disaster in there but most of it is packing, there are a few tiny marks but nothing that truly has me concerned.Looking good so far! Glad it was able to travel that far without any damage, you know those shipping folks weren't gentle with it!
This morning I woke up at 0430 and could not get back to sleep. At 6 I said screw it and got up and went to the shop and began putting seals on the front and rear of the topper portion.

Last night my son had helper me loosely put the rear section on to just hold up one side ,

With the rear bolted from the inside I installed the reinforcement brace that bolts thru from the outside.
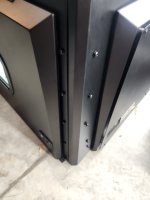 On each of these I will go back and torque the bolts once the whole unit it together. It didnt take long to get this whole thing together, but I did cut my finger drilling a hole thru the weather seal. Stopping blood from getting everywhere with some plastic wrap was enough to allow me to finish. Everything went together really well and I am pretty happy with the build quality so far.
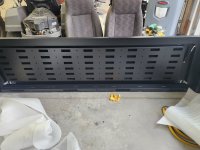 Interior molle panel on passenger side inner door
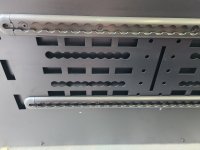 L track panel on outside of passenger door.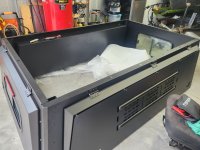
The lower unit all assembled

Overall I am pretty happy with it. The only thing I am a bit disappointed in ate the cross bars for the roof top tent. They are 2040 aluminum extrusions by the look of it, with an riser. I feel like I could have made these myself, but will see how it turns out. They may do better than I am expecting.
Attachments
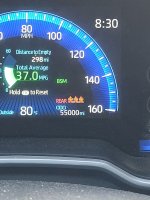
Yesterday I hopped in the car to head off to work and saw this 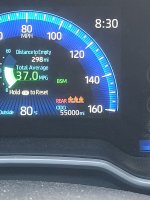
Dead nuts on 55k. In less than a year I have driven the **** out of this car, and it has yet to miss a beat. This little Toyota has been great so far and I hope it gives me many more years of trouble free service. The only things on the horizon currently are the 60k maintenance and a new set of tires.
I had help scheduled for last night to get the topper and tent onto the truck, but I forgot about meet the teacher night at school and had to cancel. Hoping I can get a few guys over here tonight and try again. I closed up the RTT and have it in a place where I can pick it up once I get a suitable piece of wood to lay across my lift arms. Once its up there, its just a matter of bolting it down and then opening it up and installing the fan so the roof penetration is sealed. Trying to determine what would be the best sealant for the roof fan currently. The marine side of my brain says 3m 4200 since it may need removed , but I know a lot of them just use butyl rubber or something similar to seal on rvs.
Dead nuts on 55k. In less than a year I have driven the **** out of this car, and it has yet to miss a beat. This little Toyota has been great so far and I hope it gives me many more years of trouble free service. The only things on the horizon currently are the 60k maintenance and a new set of tires.
I had help scheduled for last night to get the topper and tent onto the truck, but I forgot about meet the teacher night at school and had to cancel. Hoping I can get a few guys over here tonight and try again. I closed up the RTT and have it in a place where I can pick it up once I get a suitable piece of wood to lay across my lift arms. Once its up there, its just a matter of bolting it down and then opening it up and installing the fan so the roof penetration is sealed. Trying to determine what would be the best sealant for the roof fan currently. The marine side of my brain says 3m 4200 since it may need removed , but I know a lot of them just use butyl rubber or something similar to seal on rvs.
madison069
Well-known member
As for the sealant, maybe the same stuff Mike used on his rv recently?
That was my thought, but so many people post in there I would have to search 30 pages back to try and find it!As for the sealant, maybe the same stuff Mike used on his rv recently?
I did call my buddy who builds custom tear drop campers and he said for the rooftop fans he installs he uses sikaflex 221. I happen to have 2 tubes inbound from Amazon currently. Apparenty I had ordered it the other day but instead of purchasing it went into save for later.
madison069
Well-known member
That was my thought, but so many people post in there I would have to search 30 pages back to try and find it!
I did call my buddy who builds custom tear drop campers and he said for the rooftop fans he installs he uses sikaflex 221. I happen to have 2 tubes inbound from Amazon currently. Apparenty I had ordered it the other day but instead of purchasing it went into save for later.
Looks like he uses Dicor lap sealant?
Post in thread 'ZMotorsports Shop Projects 2.0'
https://www.garagejournal.com/forum/threads/zmotorsports-shop-projects-2-0.366802/post-11589009
Its done. Im beat and will probably be walking wIth a limp all weekend but its on the truck and all seems to be in place and working. Jeff stopped by and we flipped the topper on its side and we got the lower weather strip applied. We put it back upright and let the weight help stick the seal while we contemplated life over a beer. Once my father in law got here we were able to get the topper onto the truck. 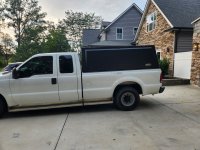
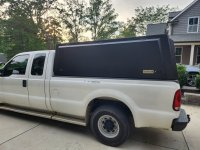
The next part was where we boarded the struggle bus. I had cut down some 2x4s to fit my lift and strapped the tent to it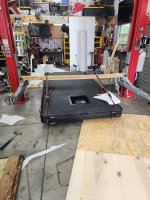 We used the rubber lift blocks to get some additional height after measuring and finding out we were not able to get it high enough. I pulled the valve cores from the rear tires and that helped drop the back down enough to get the tent angled on top of it. Up next was a dance of slowly backing the truck up under the tent while using my pole jack to stabilize the rear and trying to find a way to keep it straight and level. We ended up with a ratchet strap under the tent to pull it up higher so we could insert the bolts into the t tracks.
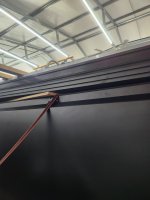 After much struggle and cursing all bolts were in and secured and I got to air up my tires and drive it out of the shop. It was late humid and I was beat but I popped the tent and my wife and Jeff's wife and the kids all got to check it out. My wife' s big ask is screens for the topper so we can have the rear and side door open for more airflow. That shouldnt be too big of a problem to fabricate. It was dark so no pics of the tent opened up, but I have to install the roof fan today so I will put some pics up once I get it opened up. I took all the packing trash off this morning and got my first impressions of driving with it. I can feel the weight up there, but its not terrible. I am looking forward to finishing up outfitting the rest of the truck and getting a chance to test it all out.
The next part was where we boarded the struggle bus. I had cut down some 2x4s to fit my lift and strapped the tent to it
We used the rubber lift blocks to get some additional height after measuring and finding out we were not able to get it high enough. I pulled the valve cores from the rear tires and that helped drop the back down enough to get the tent angled on top of it. Up next was a dance of slowly backing the truck up under the tent while using my pole jack to stabilize the rear and trying to find a way to keep it straight and level. We ended up with a ratchet strap under the tent to pull it up higher so we could insert the bolts into the t tracks. After much struggle and cursing all bolts were in and secured and I got to air up my tires and drive it out of the shop. It was late humid and I was beat but I popped the tent and my wife and Jeff's wife and the kids all got to check it out. My wife' s big ask is screens for the topper so we can have the rear and side door open for more airflow. That shouldnt be too big of a problem to fabricate. It was dark so no pics of the tent opened up, but I have to install the roof fan today so I will put some pics up once I get it opened up. I took all the packing trash off this morning and got my first impressions of driving with it. I can feel the weight up there, but its not terrible. I am looking forward to finishing up outfitting the rest of the truck and getting a chance to test it all out.I have worked on some minor touches to make the tent setup work better for me. First up was switching the placement of the spring loaded locks on the latches. I moved them so each one is on the outside.Wow! It's very unique, I like it. I hope you get years of service from it. Thanks for sharing. Can't wait to see it with the tent up!

Makes it easier to reach from the ground. Up next I backed the truck in after mowing and popped the top. I needed to mount the fan which has a thick rubber gasket, and my sikaflex showed up so I can put a layer on each side of the gasket as well. With the top up its massive.

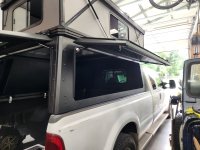

The last pic has both of the bed panels pushed to the front which gives about 6 feet open inside the bed. You can see the screens and blackout curtains which zip around the window frame hanging down.
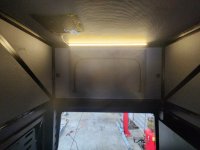
The tent has built in lighting powered by a small power bank. I will most likely add some lower lighting to run off the Jackery.
 sides have a nice fabric covering over the aluminum panels. My shop bay is too tight to get the fan installed in the shop so I will pull it outside and get it predrilled and ready to seal up early tomorrow before the sun melts my face.
Attachments

madison069
Well-known member
I thought that was a projector screen at first! Pretty cool tent setup!
Thanks Logan! Looking forward to using it soon!Looks great!
Its definitely a lot bigger than I thought it would be! Maybe I can shoot a movie onto that back wall when Im camping!I thought that was a projector screen at first! Pretty cool tent setup!
This morning started bright and early trying to beat the heat. I got the fan in place and a ladder on each side tp make it easier on me.

I predrilled all my holes and then removed the fan and gasket and laid down a thick bead of sikaflex. I got it all back in place and used my drill bit to locate my holes andran the screws into it until they were all started. After that I went back around and ran them all down and finished the install with another bead of sikaflex around the outside.
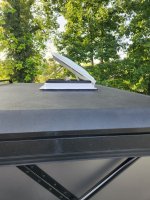 The interior trim ring went right in and 4 screws later it was complete.
 Wiring for the fan and lights up there will be interesting due to folding sidewalls. I will have to figure out how to have enough slack that my wiring doesnt get damaged when folding the tent down. I need to start working on an electrical plan for back there. Major things I will want to run off my Jackery will be 12 v fans and lights, diesel heater and a 12v cooler fridge. In colder weather I can just use my cooler, but warm weather camping I think the fridge unit will do better. The big drawback is the Jackery only has 1 12v plug and the rest are usb or usb C which makes powering accessories a bit more difficult. My other option would be to add a LifePo4 battery and a charger and build a setup that can run off that. The Jackery can run my stuff for a weekend, but wiring it all to it will be a pain. The battery is simpler, but costly since I dont have any of the stuff currently. Decisions Decisions.......
Scope creep of course....but going to permanently mount any solar panels for recharging the batteries? Or do you already have a mobile setup? Or a big enough Jakcery it doesn't matter lol
I have a 200w foldable panel I bought recently for charging the Jackery. I also added a shore power setup last year to be able to charge the Jackery if I am in a nicer campsite with power. I honestly dont use a ton of power over a weekend for just me,but with wanting to go to a 12v fridge that will be my biggest power consumer.
zmotorsports
ALLIANCE MEMBER
That's definitely a very unique RTT setup. Looks like well built as well.
cccoltsicehockey
Well-known member
Catching up. The rooftop tent came out awesome. Definitely a lot of space inside there. The kitchen fold down on the side is a really nice feature. Can't wait to hear about your first experience with it.
Its a lot different from most, and seems to be pretty well built so far. I have already found the first major issue with it. Aluminum is not magnetic. Sounds like a minor issue until you try and mount anythingin here. I have a workaround figured out but it caused a chuckle to be surrounded by metal and cant stick a magnetic light anywhere.That's definitely a very unique RTT setup. Looks like well built as well.
Oh I forgot to write about that!RTT looks nice for sure!
....also, whats the story with the hummingbird?
Im not sure what the deal is with my shop but it attracts hummingbirds. Usually if I see one in there I try to get them out before they cant fly anymore. This guy unfortunately didnt make it.

OutlawDrifter
Well-known member
I can't leave my door open in the summer very often for that very reason. Typically I have to kill the lights and try and usher them towards the open door.
Thats what I do when I see one in there. I have learned to turn off the lights when birds come in and I will use blasts of compressed air to push them towards the door.I can't leave my door open in the summer very often for that very reason. Typically I have to kill the lights and try and usher them towards the open door.
madison069
Well-known member
Currently it's just bugs in the garage for me. kind of a tradeoff though.
A few years ago I had a pair of humming birds that were stuck in my open garage.... It took me and my wife about an hour to get them out. We tried hanging feeders just below the garage door so they would be encouraged to leave the wide open space. For a small bird they make a lot of noise when they're pissed.
I find about two dead a semester in our Apparatus bay at the college. Same thing they fly in and wont leave.
My wife loves humming birds I gotta take or to Sedona Az they have a walk in humming bird experience.
I find about two dead a semester in our Apparatus bay at the college. Same thing they fly in and wont leave.
My wife loves humming birds I gotta take or to Sedona Az they have a walk in humming bird experience.
Last night the heat wave finally broke and while Jeff was working in the shop I decided to do some work on the truck the good old fashioned way, lying on my back questioning my life choices. 


These aluminum steps cause a ground clearance issue and are a pain to work around to get the truck on the lift. Im not so old I need a step so they had to go. Removing the steps will also make installing the wrap a lot easier. The steps were installed with self tapping screws and a few thru bolts. I removed about 20 lbs of angle iron the installers used to support them, and have a big pile of metal in the floor to get rid of now. truck looks better IMO without the steps, now to get my stance right. I looked at a few leveling kits last night, most of them use a shock lengthening adapter to work with the stock shocks. I would prefer to replace the shock with an appropriate longer unit. So here is the question, if a stock shock absorber is 15 inches extended, do I need a 17 in shock to compensate for a 2 in lift? Or is there a formula to determine what length I would order? Trying not to have my truck down too long waiting for a correct part if I can avoid it.
These aluminum steps cause a ground clearance issue and are a pain to work around to get the truck on the lift. Im not so old I need a step so they had to go. Removing the steps will also make installing the wrap a lot easier. The steps were installed with self tapping screws and a few thru bolts. I removed about 20 lbs of angle iron the installers used to support them, and have a big pile of metal in the floor to get rid of now.
truck looks better IMO without the steps, now to get my stance right. I looked at a few leveling kits last night, most of them use a shock lengthening adapter to work with the stock shocks. I would prefer to replace the shock with an appropriate longer unit. So here is the question, if a stock shock absorber is 15 inches extended, do I need a 17 in shock to compensate for a 2 in lift? Or is there a formula to determine what length I would order? Trying not to have my truck down too long waiting for a correct part if I can avoid it.Cdubu52
Well-known member
I know Bilstein offers shocks that are longer than stock. They are specific for your lift height. The truck looks way better without the steps. A small lift would make it look really good.
M.Brane
ALLIANCE MEMBER
Bilstien has good info on the shocks, but it's up to you to determine what you need if it's a non-stock application. I went through that with the rears on the Tool Box Truck™ since it was originally a chassis-cab. Nobody else could tell me either. I had to pull one of the stockers, and take measurements.
Lou's Garage
Well-known member
I wouldn't overthink it, 2 inches is 2 inches unless the shocks are on a steep angle. (Your rear shocks might qualify) If they are on a steep angle just pull out the ol' pythagorean theorem and you should be able to get close enough. Or, just buy shocks that are specific to your lift.
Lou
Lou