To avoid these ads, REGISTER NOW!

Jackson's Garage build/projects

To avoid these ads, REGISTER NOW!
OP
J

jacksonracingengines

Active member
Joined
Aug 28, 2026
Messages
25
Location
Mid West
IMG_7785.jpeg
I was tired of my Chicago electric ultrasonic cleaner (plastic body one), which only had an 8-minute timer and no temperature control other than (heat ON)

So I got the Vevor 6L. This thing was able to do in an hour by itself what my other one took me three hours of babysitting to do.


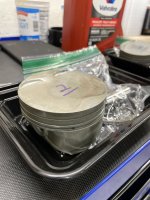
IMG_7781.jpeg
Piston #2 came out just as good as, or even better than, piston 1, which took 3 hours. And I did nothing other than dry it off.

I also started cleaning parts for the rebuild. IMG_7779.jpeg
I was quite happy to learn that the PSC-1000 dissolves the silicone on all the gasket surfaces. It makes quick work of cleaning, and I’m super happy with the results. IMG_7782.jpeg
Post-cleaning, still a little wet but much cleaner.

This will make the final clean before assembly so much easier.

Before final assembly, I re-clean all the oil galleys and use a lint-free towel and rubbing alcohol on all the internal parts. But it sure helps to have clean parts to start with for that procedure.
 
Last edited:
OP
J

jacksonracingengines

Active member
Joined
Aug 28, 2026
Messages
25
Location
Mid West
Was a long weekend cleaning parts for the engine build.

I stripped the heads, cleaned the rest of the pistons, and started cleaning the valves.

There’s a lot of carbon on the exhaust valves so I will need to figure out a good way to clean them without damaging them.

But I did start one item on my reassembly list, weighing the rotating assembly parts.

IMG_7802.jpeg
First I weighed all the parts individually and then together.

IMG_7828.jpeg
Within a gram seems pretty good so no need for me to do any balancing here.


IMG_7793.jpeg
Also bad photo of the stripped head but after this I cleaned it in the new parts washer.

A non engine build update. Last winter we had some snow that covered my second drive access to the propane tank.

Usually I don’t shovel my driveway I just drive through it because I’m lazy but that doesn’t fly for the propane delivery guys.

I spent an hour or so shoveling 3’ snow drifts and it was quite exhausting so I decided to pick up a snow blower for this year to make things easier.

IMG_7797.jpeg
Nothing fancy but if it takes half the effort of last time I’ll be happy. The shoot angle control is broken but I can move the shoot by hand. This will be fine for my second driveway. No need to care about the direction it’s shooting over there.
 
OP
J

jacksonracingengines

Active member
Joined
Aug 28, 2026
Messages
25
Location
Mid West
I was looking for a way to clean the left over gasket material from the head, I tried the parts cleaner with a plastic scraper which got most of it off.

But I asked a few coworkers at work what they would use and one of them let me borrow a ceramic gasket removal tool.

Honestly it was awesome, I will be purchasing one to add to my tool set.

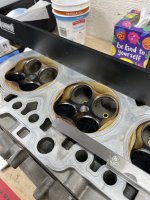
IMG_7841.jpeg

Before I started scraping (this one I didn’t spend a lot of time cleaning this head surface in the cleaner)

IMG_7832.jpeg

And after cleaning with the scraper and some wd-40

IMG_7836.jpeg
The image was a little blow out from the overhead lighting so I turned the brightness down in the editor.

I also checked the flatness of the heads. They were both good within 0.003” checked in every possible direction. I’m not sure what Porsche spec is but I have seen specs for other cast aluminum heads and it’s usually in that range. IMG_7840.jpeg
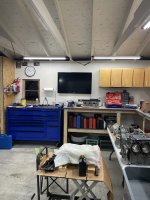
I also decided to hang a TV in the garage so I can toss something on in the background while I’m working. I’m a little concerned the winters might kill it here.

The garage can get down to 0 F in the winter and my heater can bring the temps up but it also makes things a bit damp since it is a kerosene heater.

IMG_7842.jpeg
 
To avoid these ads, REGISTER NOW!
OP
J

jacksonracingengines

Active member
Joined
Aug 28, 2026
Messages
25
Location
Mid West
IMG_7844.jpeg
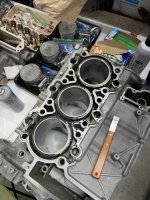
Today’s focus was case half 1-3 for almost final prep.
I scraped off all the old gasket material with my borrowed tool.

I also put the case half in the parts washer and cleaned it up a bit better.

IMG_7847.jpeg
Of course I also checked it for flatness and 0.003” didn’t fit through anywhere so it looks like everything is good!

I will check 4-6 tomorrow after scraping and cleaning.

Today 4-6 just got an initial super clean wash down and scrub, then ATF in the bores. Yes I avoided getting super clean in the bores by taping them off and oiling them before the cleaning process.
 

caleb383

Member
Joined
Aug 3, 2026
Messages
19
I have been reading the forum for years, and I finally have a project of my own to share.

One of my main sources of inspiration was the Olsen garage. It showed me what a small budget but resoursefullness can do to change a space.

The Olsen garage reminded me of where I worked in Japan. The green toolboxes and cream floors and walls were very reminiscent of my time in Japan.

I really like blue, so my theme will be blue, grey, and white.

Let's get into it!
My wife and I moved back to America in August 2024, bought an 1870's house, and started renovating.

IMG_7624.JPEG

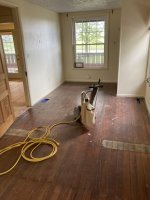
Before we moved in, we decided to rip out all the carpet and bring the original "soft" wood floors to life. We think they are the original yellow pine wood floors.
IMG_7376.JPEGIMG_7394.JPEGIMG_7393.JPEG

Being Ignorant and going into this, I figured it would take me about 3 days to sand and prep these floors for some Bona Traffic GO

The varnish was so thick I had to go all the way down to 18-grit sandpaper on the drum sander, which, of course, the rental place didn't sell anything below 24, so I had to overnight it.

Meanwhile, waiting on the 18 grit sand paper I had to make some patches for some missing boards. I am not a woodworker or carpenter or anything like that; my home is the machine shop, and wood takes a whole different skill set and patience.

IMG_4005 (1).JPEG

I was able to steal these boards from the attic, which I assumed was the same yellow pine... Spoiler: It's not. The attic's floorboards are also all different widths, making finding the right width boards long enough to fix the first floor pretty hard to do.

IMG_7420.JPEG
I had to change the sand paper pretty often as the varnis was gumming the paper up super fast.

IMG_4013.JPEGIMG_7424.JPEG
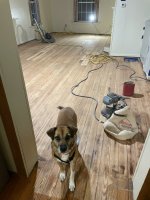
I watched what felt like 100 hours of people doing this on YouTube. There seems to be a divide on going 45° in the early stages, but I was desperate to get the varnish off, and the diagonal seemed to work. ^^This is after the 18-grit paper.
IMG_7422.JPEG
My helper was not happy with all the sounds during this process...

It's been almost 2 years since I did this, so my memory may be a bit fuzzy, but I think once I got to like 80 grit or 100, I switched over to a walk-behind orbital sander
IMG_7445.JPEG
It was about this time I realized that the attic boards were not the same... and my patches would be quite visible.

I called around to some flooring shops and some guys on Facebook who salvage floorboards from these old houses. There was some wood available in the area, but time was running out on our apartment lease and my wife's and my patience, since this sanding process took us maybe 7 days in total.

We had to make the hard call to just keep on going with the mismatched patches; this is a 150-year-old house, after all- what's a little character, right? Thats what I have to tell myself.

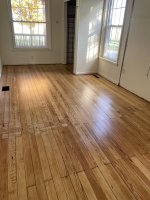
Here are some post-sanding, pre-finish photos.
IMG_7434.JPEG
IMG_7458.JPEG
Far from perfect, but in much better shape than they were in. We were just excited to be done with sanding and in the cleanup phase.

In total, we sanded about 800 sq ft. I only have photos of two of the 3 rooms we did. Now on to the primer and traffic-go application.

I elected not to fill my floorboard gaps with sawdust mixed with glue becuase there is nothing under these boards other than floor joists, so there would be quite a mess in the basement. The floor moves a lot under our feet; the joists are not up to today's standards, so there is some flex when walking through the rooms. This made me think that filling all the gaps would just eventually crack open, and we would be dealing with glue breaking out from between the boards for the rest of our lives.

Since we did not fill the gaps, the traffic rep at the store recommended we roll the primer and finish onto the floors to minimize the amount leaking through the cracks.

I have to hand this one to my wife, as she did all the primer and finish, since I had to return to work.
IMG_7501.JPEGIMG_7509.JPEGIMG_7504.JPEG

Overall, we were quite pleased with how the floors turned out. We made a lot of mistakes, and the floors are far from perfect, but we did it ourselves, and everyone who comes over compliments the floors. So that's a bonus!

I know this didn't start with the garage, but I will get to that eventually! Im at the limit for photos on this post, so I will end the first post here.
Great inspiration drawing from past experiences in Japan with a clean blue, grey, and white color scheme. Transforming an 1870s property with a dedicated garage build is an awesome project.
 
OP
J

jacksonracingengines

Active member
Joined
Aug 28, 2026
Messages
25
Location
Mid West
Great inspiration drawing from past experiences in Japan with a clean blue, grey, and white color scheme. Transforming an 1870s property with a dedicated garage build is an awesome project.

It’s been a lot of fun being able to build things exactly how I want them. In a way I’m happy the garage was in such bad shape before moving in. Otherwise I may not have done things the way I wanted to.
 

Pen & Wrench

Well-known member
Joined
Jan 12, 2015
Messages
671
Location
Huron, SD
You've done a very nice job on all of that, but it sure looks like it was a lot of work! But you have a home with a lot of nice features and more character than new houses seem to have. Well done!!
 
To avoid these ads, REGISTER NOW!
Top Bottom