To avoid these ads, REGISTER NOW!

Craftsman 150 drill press restoration

84scrambler

Well-known member
Joined
Nov 2, 2008
Messages
185
Location
Livermore Ca.
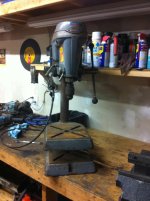
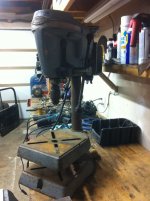
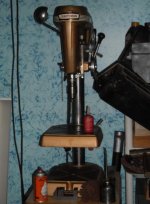
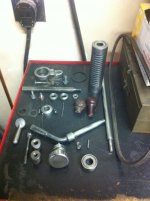
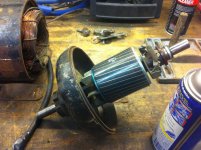
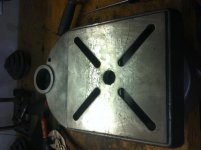
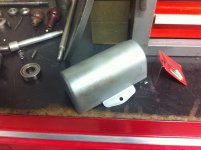
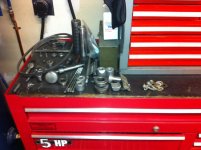
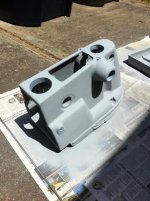
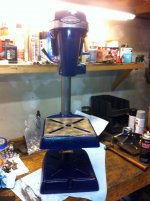
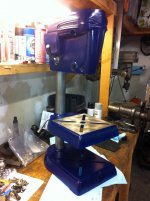
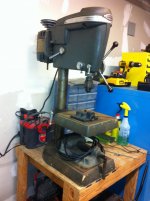
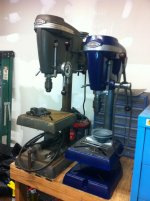
I just picked up a Craftsman 150 drill press this afternoon and started to rip it apart for a full restoration. I'll post a few pics as I progress on it. Currently I have the entire thing apart except for one of the pulleys and the post attached to the housing. Its going to soak overnight with some WD-40.
I picked it up from an older lady whose husband past away about 10 years ago. She told me they were the original owners.
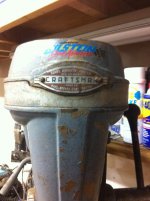
The interesting thing is that the part number is a bit off from all of the common Craftsman 150 drill presses. I have a 103.21760 bench top model. The noticeable difference is that I have a single handle as apposed to the triple handles that all of the other ones I have seen.

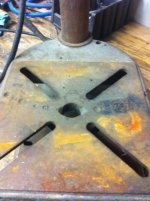
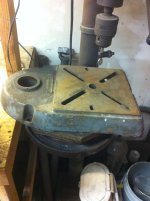
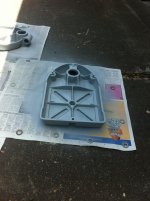
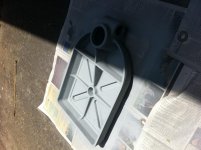
Anybody have a source for a replacement handle as one of mine is damaged? Also there is a few "lightning holes" in the base plate, would the best way to repair this is to fill the holes grind them flat and then take a skim pass with a fly cutter?
 

Attachments

  • IMG_0179.jpg
    IMG_0179.jpg
    139.5 KB · Views: 299
  • IMG_0183.jpg
    IMG_0183.jpg
    144.8 KB · Views: 263
  • IMG_0182.jpg
    IMG_0182.jpg
    142.3 KB · Views: 257
  • IMG_0181.jpg
    IMG_0181.jpg
    145.4 KB · Views: 265
  • IMG_0186.jpg
    IMG_0186.jpg
    148.8 KB · Views: 217
To avoid these ads, REGISTER NOW!

PSU Engineer

Well-known member
Joined
Dec 20, 2008
Messages
70
Location
Linglestown, PA
Just passing this along, but you may want to reference Eventho's thread here where he completely disassembles one of those units.

I gotta say, that is a really nice drill press you have there. Color me jealous.

CRAFTSMAN 150
 

Bootybug

Well-known member
Joined
Jun 5, 2008
Messages
193
That is a really nice drill. I bought a new drill and gosh do I wish I had the time to find a beauty like this. Congrats.
 

LoFlow

Active member
Joined
Nov 9, 2010
Messages
28
I think the straight handle ones are 13" and the tri-handle presses are 15". Nice press.
 
OP
8

84scrambler

Well-known member
Joined
Nov 2, 2008
Messages
185
Location
Livermore Ca.
Thanks for the link. I think that was the original post that inspired me to find one of these drills. It also aided me in some of the disassembly.

Is the 13" or 15" measurement taken on the overall length of the spindle? It would be interesting to compare what others have.
 

mrbreezeet1

Banned
Joined
Dec 6, 2010
Messages
3,694
Location
Moundsville, WV, 15 miles South Of Wheeling WV
Is the 13" or 15" measurement taken on the overall length of the spindle? It would be interesting to compare what others have.
No, 15" means you can drill to the center of a 15" wide board, or IOW 7 1/2" from the column to the center of the drill bit.
Tony
 

Attachments

  • Drill Press.jpg
    Drill Press.jpg
    77.7 KB · Views: 256
  • Drill Press save 1.jpg
    Drill Press save 1.jpg
    56.8 KB · Views: 253

shoot summ

Well-known member
Joined
Jun 8, 2010
Messages
2,958
Nice!!

My Dad has one of these in great condition, with the Atlas adjustable table on it, he has promised it to me.

In addition he has an extra head casting he picking up somewhere, I haven't seen it lately but the last time I did it was like brand new. He wants me to get rid of it for him.
 
OP
8

84scrambler

Well-known member
Joined
Nov 2, 2008
Messages
185
Location
Livermore Ca.
I have about 6 hours into thing so far. I took most of it apart the day I got it and spent about 4 hours cleaning all of the little things last night. I ran most of the greasy parts through my parts washer first and then started wire wheeling. I put my old craftsman wire wheel to work and killed the wire wheel in the process as you can see from the picture.

I am still trying to get the pole out of the head unit, I just keep spraying WD-40 and hitting it a few times with my deadblow and then repeating a few hours later. I might switch over to the acetone/ATF mix if this doesn't get me there.

I was planning on getting some electrical cleaner and spraying out the electric motor, anybody see anything wrong with doing that?

Hopefully I will get some more done tonight sandblasting the two big plates, have to go pick up firewood so I will see what I can get done.
 

Attachments

  • IMG_0206.jpg
    IMG_0206.jpg
    146.8 KB · Views: 168
  • IMG_0207.jpg
    IMG_0207.jpg
    143 KB · Views: 169
  • IMG_0208.jpg
    IMG_0208.jpg
    145.8 KB · Views: 154
  • IMG_0210.jpg
    IMG_0210.jpg
    145.9 KB · Views: 168
  • IMG_0211.jpg
    IMG_0211.jpg
    147.7 KB · Views: 175
  • IMG_0212.jpg
    IMG_0212.jpg
    147.3 KB · Views: 164
  • IMG_0209.jpg
    IMG_0209.jpg
    144.7 KB · Views: 184
OP
8

84scrambler

Well-known member
Joined
Nov 2, 2008
Messages
185
Location
Livermore Ca.
I just ran across another 150 except its a full height one. I have to wait and wait and all of a sudden two of them show up within a week of each other, now I am not sure if I should pick it up or not. Overall the thing looks in better shape then mine from the pictures. The close up of the front shows little to no evidence of chipped paint and the work surface doesn't look like its been abused with any drill bits. I might give the guy a call tomorrow.

Hey shoot summ, if you can you should post a picture of it.
 
OP
8

84scrambler

Well-known member
Joined
Nov 2, 2008
Messages
185
Location
Livermore Ca.
I forgot to setup a notification and missed your post mrbreezeet1. I have been slowly working on it with the end in sight. Here are a few pictures as I progressed over the past few months.

I attempted to fix the majority of the holes on the work surface. The picture I attached shows mid progress of the holes being fixed. I welded and grinded and welded and grinded some more. I had some contamination issues and couldn't get it out with the sand blaster or excessive cleaning which led me to believe its something that soaked into the metal or it had some impurities. I finished it off with a belt sander and it turned out fairly descent. The evidence of the repair is slightly noticeable but not bad. You can see the results in the picture of the assembled unit.

I also ended up getting two new bearings as the ones that I had I thought could make it through the sand blast cabinet. They looked sealed enough but I was wrong and the fine sand ruined them.
 

Attachments

  • IMG_0222.jpg
    IMG_0222.jpg
    136.8 KB · Views: 190
  • IMG_0214.jpg
    IMG_0214.jpg
    146 KB · Views: 150
  • IMG_0227.jpg
    IMG_0227.jpg
    147.8 KB · Views: 106
  • IMG_0382.jpg
    IMG_0382.jpg
    141.7 KB · Views: 123
Last edited:
OP
8

84scrambler

Well-known member
Joined
Nov 2, 2008
Messages
185
Location
Livermore Ca.
I was able to sand blast everything and clean it up with simple green before painting. I wish I had the room for a paint booth as it would really make everything come out that much cleaner. Instead I was stuck painting out side in the wind and dealing with contamination. At this point I figured I'm doing it outside and in the wind so I stuck with rustoleam spray paint. I painted a few coats of primer and a few coats of paint.
 

Attachments

  • IMG_0375.jpg
    IMG_0375.jpg
    146.1 KB · Views: 75
  • IMG_0376.jpg
    IMG_0376.jpg
    146.1 KB · Views: 75
  • IMG_0377.jpg
    IMG_0377.jpg
    146.8 KB · Views: 66
  • IMG_0383.jpg
    IMG_0383.jpg
    146.5 KB · Views: 76
  • IMG_0384.jpg
    IMG_0384.jpg
    139.6 KB · Views: 90
To avoid these ads, REGISTER NOW!
OP
8

84scrambler

Well-known member
Joined
Nov 2, 2008
Messages
185
Location
Livermore Ca.
Finally a picture of the partially assembled unit. I also ended up picking up the 150 drill press which I attached a picture of. The 150 is a lot bigger then the drill I am working on. I will post up some side by side comparisons when I am done. You can also see the finish of the main work surface from all of the welding and grinding. I was almost going to do a mill finish but the belt sander came really clean and very flat.

Since these pictures where take I have put together most of the drill. I still need to clean and paint the motor and motor bracket. I also need to figure out the depth indicator. every which way I try and assemble it it always kinks over to the side and isn't parallel with the quill.
 

Attachments

  • IMG_0392.jpg
    IMG_0392.jpg
    138.5 KB · Views: 194
  • IMG_0391.jpg
    IMG_0391.jpg
    137.8 KB · Views: 175
  • IMG_0390.jpg
    IMG_0390.jpg
    140.3 KB · Views: 187
  • IMG_0388.jpg
    IMG_0388.jpg
    137.9 KB · Views: 169
  • IMG_0386.jpg
    IMG_0386.jpg
    139.9 KB · Views: 196
  • IMG_0389.jpg
    IMG_0389.jpg
    139.4 KB · Views: 243

JohnFreeman

Well-known member
Joined
Jul 24, 2009
Messages
795
Location
central nc
I have one of those also (straight handle) also. Sold my chinese version and never looked back. They're mighty handy
 
OP
8

84scrambler

Well-known member
Joined
Nov 2, 2008
Messages
185
Location
Livermore Ca.
Here is a picture of the drill mostly assembled. The Depth indicator is slightly kinked and it looks like it is best assembled with the inscribed numbers facing backward.

I put both drills side by side so people can get an idea of the size difference between the two. Interestingly enough the bigger drill on the left has slightly different decorative inlays on the top then most that I have seen. most of the 150's that I have seen have 150 physically written on the decorative band while this one doesn't (check out MRBREEZEET1's pictures above).
 

Attachments

  • IMG_0408.jpg
    IMG_0408.jpg
    139.3 KB · Views: 316
Last edited:
OP
8

84scrambler

Well-known member
Joined
Nov 2, 2008
Messages
185
Location
Livermore Ca.
Thanks..Its been a while since I updated. I actually still need to get a switch hooked up but the project has been on hold since I have been going full steam on my jeep restoration. I have the craftsman 150, a walker 4 ton floor jack, and a blackhawk 4 ton I will be restoring in the near future so stay tuned.
 

GirlnAgarage

Well-known member
Joined
Jan 21, 2011
Messages
4,669
Location
Texas
I forgot to setup a notification and missed your post mrbreezeet1. I have been slowly working on it with the end in sight. Here are a few pictures as I progressed over the past few months.

I attempted to fix the majority of the holes on the work surface. The picture I attached shows mid progress of the holes being fixed. I welded and grinded and welded and grinded some more. I had some contamination issues and couldn't get it out with the sand blaster or excessive cleaning which led me to believe its something that soaked into the metal or it had some impurities. I finished it off with a belt sander and it turned out fairly descent. The evidence of the repair is slightly noticeable but not bad. You can see the results in the picture of the assembled unit.

I also ended up getting two new bearings as the ones that I had I thought could make it through the sand blast cabinet. They looked sealed enough but I was wrong and the fine sand ruined them.


Great job on your drill press. I'm researching restorations, preparing myself to do mine. My table has a couple smaller divots and a couple bigger holes (that I don't know if I'd be able to close up and keep the center hole). I hadn't thought of welding them up until I saw your post here. What method did you use to weld yours?
 

Attachments

  • drillpress5.jpg
    drillpress5.jpg
    57.7 KB · Views: 74
OP
8

84scrambler

Well-known member
Joined
Nov 2, 2008
Messages
185
Location
Livermore Ca.
I ended up using a MIG welder (its a 220 miller) to fill in the holes. I did small intermittent tack welds using whatever wire was in there. I then used a flapper wheel to grind it down and the last little bit I did with a file (was scared about digging in with the grinder). I also had to restore my center hole and I filled it in with small intermittent tack welds, grinded flat, used a round file to clean up the hole, and repeated until I filled in all the low spots and had a symmetric hole. I probably spent about 2 hours repairing my plate.

The few problems that I did have was weld contamination, even after sand blasting and acetone cleaning I still had issues (only in a couple of spots). There is also an apparent color difference in the welded region compared to the base material of the table which bothered me. I ended up using a paint removing plastic 4" wheel to do some final leveling and blending (if you want to call it that) and I also hit it with a belt sander. The combination of the two gave me a surface finish which masked the color difference pretty well. Another idea I was thinking about was using a mill and re-leveling the table and in the process putting nice consistent machining marks which would potentially mask any color variations but I ended up being satisfied with my results from the 4" wheel and belt sander. Hopefully that helps, let me know if you need any more details and please post up on your progress as you restore your drill press.
 

57JoeFoMoPar

Well-known member
Joined
Jul 21, 2010
Messages
194
Location
S. Plainfield, NJ
84Scrambler, your resto on this drill press is awesome!

I just grabbed one of these this week, where did you get the new bearings for it? I figure if i have to disassemble it for blasting I should put some new bearing in while I'm there

Keep up the good work!
 
OP
8

84scrambler

Well-known member
Joined
Nov 2, 2008
Messages
185
Location
Livermore Ca.
I copied and pasted the tag line from my purchase below. The bearings came from a company called southbendindustrial on ebay. I did a search of the serial number and manufacturer of my bearings and was able to find an exact replacement. Double check to make sure you have the same ones, with all of the variations of this drill press that I have run across I'm not sure if they share the same size bearings between them. There is also a pair of smaller bearings that ride directly on the quill shaft that I didn't replace but would assume are also available.

NEW SKF 6205-2Z/C3HT51 BEARING 62052ZC3HT51 6205-2Z/C3
 

Brad54

Well-known member
Joined
Jun 13, 2006
Messages
4,646
If you guys are trying to weld up the area around the center holes in the table, MIG welding won't stick to copper.

Get a piece of copper tubing, hammer one end flat and use it as a spatula behind the hole you want to weld. It'll keep the molten metal from falling through the hole.
For the center hole in the table, try getting a piece of copper tubing that is the same diameter as the hole, stick it in the hole, and fill the divots and pock marks around the copper tubing. This should allow you to recreate the original center hole.

-Brad
 
OP
8

84scrambler

Well-known member
Joined
Nov 2, 2008
Messages
185
Location
Livermore Ca.
Good advice Brad54, I used a copper plate as backing when I filled in holes on my jeep tub. This would have probably saved me a bunch of time on hand filing that hole into shape.
 

GirlnAgarage

Well-known member
Joined
Jan 21, 2011
Messages
4,669
Location
Texas
I ended up using a MIG welder (its a 220 miller) to fill in the holes. I did small intermittent tack welds using whatever wire was in there. I then used a flapper wheel to grind it down and the last little bit I did with a file (was scared about digging in with the grinder). I also had to restore my center hole and I filled it in with small intermittent tack welds, grinded flat, used a round file to clean up the hole, and repeated until I filled in all the low spots and had a symmetric hole. I probably spent about 2 hours repairing my plate.

The few problems that I did have was weld contamination, even after sand blasting and acetone cleaning I still had issues (only in a couple of spots). There is also an apparent color difference in the welded region compared to the base material of the table which bothered me. I ended up using a paint removing plastic 4" wheel to do some final leveling and blending (if you want to call it that) and I also hit it with a belt sander. The combination of the two gave me a surface finish which masked the color difference pretty well. Another idea I was thinking about was using a mill and re-leveling the table and in the process putting nice consistent machining marks which would potentially mask any color variations but I ended up being satisfied with my results from the 4" wheel and belt sander. Hopefully that helps, let me know if you need any more details and please post up on your progress as you restore your drill press.


I appreciate your time on this. I'm still debating...I've never ever tried to repair cast iron so its an ambitious first cast iron project anyway. I hadn't given thought to messing up the level on the table surace. I'd hate to get that out of whack.

I'll be thinking. Who knows, I might just leave it. I am looking for a good vise, preferably an X-Y cross slide. I don't have a spare hand to stupidly hold my workpiece. I've seen a couple vise-grip type clamps that look very helpful too.

Great job again on your restoration :)
 
To avoid these ads, REGISTER NOW!
Top Bottom