To avoid these ads, REGISTER NOW!

Snap On top Chest Redo Questions

kellyron500

Active member
Joined
Apr 9, 2011
Messages
35
Location
Memphis, TN
Hi all,

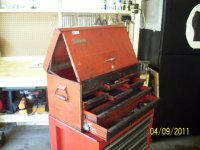
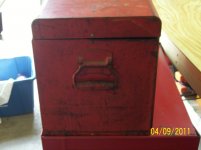
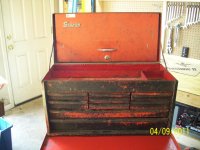
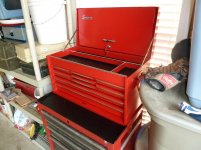
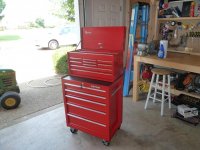
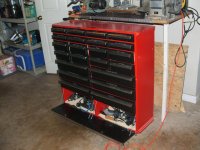
I have inherited my father's 1962 (same year I was born, BTW) Snap On top chest. He bought it immediately after opening his first gas station in 1963...The ol' Air Force plane mechanic did well. I have the roller cabinet too, but much newer and I believe Craftsman - Front emblem is off and I have not poked around too much, but black drawers, silver handles, all factory and smalls of Craftsman.

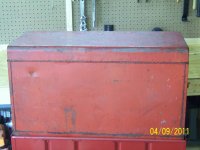
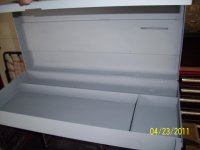
I have a lot of shots of the box as I began disassembling because I take on a lot of different restoration projects, mainly wood, and I kick myself when I have this beautiful piece at the end but can't show anyone how it looked when I started. When I get off work, I will throw some shots online of the SO box.

So I want to do this one justice and bring it back for another 5 decades of life. Here a few questions I have if anyone has traveled down the same road:

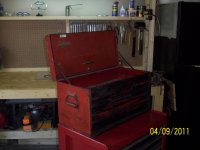
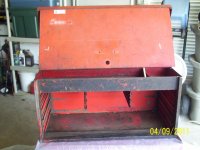
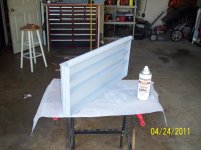
(1) I want to remove the drop cover and top lid. Both are hinged. I would rather separate them and strip/repaint versus trying to get the spray into all areas of the hinges once I am ready to do so.

Am I looking at a nightmare pulling out these hinge pins? I figure I can WD-40 them do death, drive them from one side and pull from the other???? These pins are what, 26, 28 inches long? There is no rust, but I am sure accumulated **** inside. Let me know if you have done this before and how you tackled it, or gave up and drank instead!!!

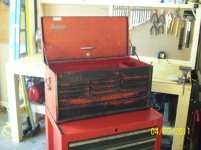
(2) I have stripped the handles on the sides. I really like the look of that silver metal handle...it has the enlarged metal grip and looks great the way it is stripped. It there anyway I can leave that bare and coat it with a clear coat or something? I think it would look great against the Snap On Red color of the box but I want it to last as long as the paint I put on the box.

I want to not only leave the handles that bare silver, but the handle plate that is welded to the box. The box will be in my home garage and I live in the mid south, so excessive humidity and exposure to the elements is not a problem. Regardless of what I coat the metal with, will it stay as long as the primer and paint I put on the box, or will it be more prone to rust getting under it?

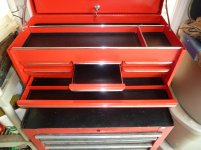
(3) The Snap On emblem is in great shape and only needed polishing when I took it off, but the front handle has a lot of little dents and dinks. Should I be looking at Snap On for a replacement or can I match this well at the big box stores? I think it is $5 from Snap On but I hear the wait for parts is ridiculous...maybe I just do both..order one from SO and buy a temp locally.

Same thing for the lock...looks like ol' Pops replaced that and there is no key. The cylinder that is on there does have the locking tab that rotates when the cover is down to secure the cover, but I noticed the holes on either side of the box frame in front of the lower drawers. I think it is safe to assume that when the key was turned, two rods inserted in the holes to secure the sides of the cover as well. The cylinder (with no key) that is there doesn't seem to have hardware that would accommodate rods, even if I had them. I can put on a temp lock and order the full lock and guts from SO, unless someone knows another route???

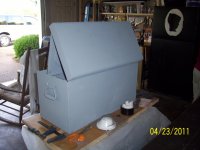
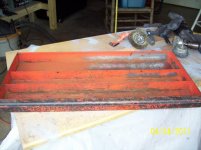
(4) The box is in incredible shape...the only major ding is in the back. Looks like it was hit with a ball peen or something. I was able to rework some other minor cosmetics, but this dent is in an area I can't get behind to work it out. Can I use bondo on this once the metal is bare? I know it is in the back and will never be seen, but I will know it and I want to take this thing back as close as I can get it to original. Any experience with bondo on a box, let me know if I am going the wrong direction please.

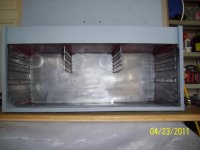
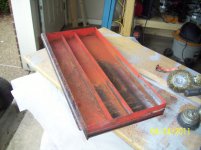
Even though I want it to be original, I was highly thinking about using brush on truck bed liner inside all of the drawers and the top tray. Has anyone done this?

Enough for my first post. This is my first real metal restoration and any help will do. I play more with wood...never got in the swing of bending over fenders for 8 hours a day like my Pops, but I can still turn a mean wrench. But as a good crossover, i will post some pictures I have on my work PC of a tool box I built for myself...made out of wood, although I cheat painted it to look like a roller cabinet. It makes a great conversation piece.

Anyway, thanks for reading and thanks for any thoughts you might have.

Best...
 

Attachments

  • DSCF2904.jpg
    DSCF2904.jpg
    138.7 KB · Views: 263
  • DSCF2905.jpg
    DSCF2905.jpg
    141.8 KB · Views: 271
  • DSCF2908.jpg
    DSCF2908.jpg
    141.2 KB · Views: 232
  • DSCF2906.jpg
    DSCF2906.jpg
    143.4 KB · Views: 215
To avoid these ads, REGISTER NOW!

billybudge

Well-known member
Joined
Apr 17, 2011
Messages
321
Location
UNITED KINGDOM
Hi,
Great looking box and a nice item to restore,
I have done a few of these over the years, I can only say from my experience with box restorations, and all boxes are different,
OK,
I have removed the hinge pins on 3 boxes in the past, and have never managed to put them back in, i found they become very twisted and warped, thats only my view, althought on many occasions I have cut the hinges of and replaced them with piano hinges, (thats what we call them in the UK )

And again, I have ploished tons of steel. handles etc, and used a clear laquer on them, but they sometimes do show signs of corrosion afetr a couple of years,
I also have a snap on restoration box on this forum, check it out, its the 1947 snap on box.
cheers
 
OP
K

kellyron500

Active member
Joined
Apr 9, 2011
Messages
35
Location
Memphis, TN
Billy,

I hear you on the hing pins. I think I am more worried about getting the hinge pins back in then I am getting them out. I just can imagine getting the hinges well painted with them intact.

And we call them piano hinges here in the states, as well...:)

Thanks!!!
 
OP
K

kellyron500

Active member
Joined
Apr 9, 2011
Messages
35
Location
Memphis, TN
It is wood...At the beginning of the post I said I would post the pics of the SO box when I got home...

...I stated at the end of the post that since I was more a wood worker than a metal worker, I would put pics of the wooden box I built. I think it's cool...other's MMV
 
OP
K

kellyron500

Active member
Joined
Apr 9, 2011
Messages
35
Location
Memphis, TN
Okay - home now...

Putting up pics of Pops box...sorry about the confusion with the wooden chest I had built. I thought I had made it clear at the end of the OP that I had built that one.

Anyway, as you can see, Pop's SO box has almost 50 years of service in several gas stations and garages he owned and was then relegated to his basement when he sold all and retired to the mountains of Virginia (I am a Memphis transplant).

You can see the big ding in the back...the one I was thinking of using bondo on...and the beat up cover handle.

Anyway, thanks for those who have responded already and those who may yet...

Good Friday and Happy Easter all...
 

Attachments

  • 100_0219.jpg
    100_0219.jpg
    133.3 KB · Views: 136
  • 100_0218.jpg
    100_0218.jpg
    139.4 KB · Views: 152
  • 100_0216.jpg
    100_0216.jpg
    132.1 KB · Views: 132
  • 100_0215.jpg
    100_0215.jpg
    131.6 KB · Views: 155
  • 100_0222.jpg
    100_0222.jpg
    133.9 KB · Views: 127
  • 100_0223.jpg
    100_0223.jpg
    145.8 KB · Views: 119
  • 100_0226.jpg
    100_0226.jpg
    133.2 KB · Views: 121
OP
K

kellyron500

Active member
Joined
Apr 9, 2011
Messages
35
Location
Memphis, TN
When I repainted my tool box, I used a roll on bedliner, Herculiner for mine. Then I used tray liners too.

You can see some pictures in my thread of my tool box redo.

http://www.garagejournal.com/forum/showthread.php?t=68893

I like it...I want original but I want the bed liner too...I rolled by own truck bed with Herculiner 6 years ago - still going strong. Hahahaha...the only thing I regretted was scratching up the paint in a brand new truck...but I got over it....and actually had fun doing that.

BTW...Meant scuffing up the paint in the truck box when I said scratching...was weird to do to a new truck.
 

NUTTSGT

Super Moderator
Staff member
Joined
Sep 14, 2009
Messages
50,948
Location
Northern Central Ohio
I used the liner because I felt it would be easier than trying to hold the drawer all different angles trying to spray the paint. . . . . mess.
 
OP
K

kellyron500

Active member
Joined
Apr 9, 2011
Messages
35
Location
Memphis, TN
I used the liner because I felt it would be easier than trying to hold the drawer all different angles trying to spray the paint. . . . . mess.

I hear ya...the biggest mess I am thinking of is trying to get the hinge areas sprayed evenly without removing them....You garage thread is fantastic, BTW...I could live in there.
 

JeremyManning

Well-known member
Joined
Oct 12, 2010
Messages
1,457
Location
Ontario, Canada
It is wood...At the beginning of the post I said I would post the pics of the SO box when I got home...

...I stated at the end of the post that since I was more a wood worker than a metal worker, I would put pics of the wooden box I built. I think it's cool...other's MMV

I was just joking I knew it was your wooden box, it is cool looking I hope to build a wooden box some day, like the look of yours as opposed to actually looking like a wood box:beer:
 

Carl B

Well-known member
Joined
Feb 3, 2006
Messages
525
Location
Clearwater, Florida USA
What a great project. There is a bottom SO box in your first picture - are you getting that one too?

Personally - I would take that box and the drawers to have them soda blasted. It may cost a few bucks, but it would save you a great deal of time trying to strip and sand the old finish, especially in all the corners and tight places.

Once stripped of all previous paint and present rust in the seams - I'd wash the entire box down with Ospho and let it sit for at least 8 hours. The Ospho will get into all the seams and hinges - and stop any rust that has gotten started.

Then rinse with water and blow dry. Put a coat of epoxy primer on everything. You'll need to follow that with a filling primer prior to painting.

Of course take the SO Emblems, front handle and lock off the box.

I'd try to work most of that dent in the rear out {hammer and dolly} - or perhaps call a Paintless Dent Remover - and have him do it. I wouldn't want to use too much body filler on such a flat and flexible surface.

Then I'd spray everything with SO Red. A good red enamel will be expensive but worth it in the end.

Good luck with the project...


FWIW,
Carl B.
 
OP
K

kellyron500

Active member
Joined
Apr 9, 2011
Messages
35
Location
Memphis, TN
What a great project. There is a bottom SO box in your first picture - are you getting that one too?

Personally - I would take that box and the drawers to have them soda blasted. It may cost a few bucks, but it would save you a great deal of time trying to strip and sand the old finish, especially in all the corners and tight places.

Once stripped of all previous paint and present rust in the seams - I'd wash the entire box down with Ospho and let it sit for at least 8 hours. The Ospho will get into all the seams and hinges - and stop any rust that has gotten started.

Then rinse with water and blow dry. Put a coat of epoxy primer on everything. You'll need to follow that with a filling primer prior to painting.

Of course take the SO Emblems, front handle and lock off the box.

I'd try to work most of that dent in the rear out {hammer and dolly} - or perhaps call a Paintless Dent Remover - and have him do it. I wouldn't want to use too much body filler on such a flat and flexible surface.

Then I'd spray everything with SO Red. A good red enamel will be expensive but worth it in the end.

Good luck with the project...


FWIW,
Carl B.

Carl,

The bottom box came with it...the pics were taken in my garage after I got it home. Are you saying it is Snap On as well? I have not poked around it too much...was concentrating on the top box. That would be incredible if it was. It has nothing more than dirt and grime and will clean up well, rther than a complete redo...albeit it short on a lock and a SO emblem.

For the top box, it is really in incredible shape...very little rust. Most of what you see around the seams is grime buildup.

Thanks much for the tip on Ospho...never herd of it but I am going to get some, especially for the nooks and crannies. And thanks for all the other tips. Again, I will be stoked if the bottom is Snap On as well...

Best...
 
To avoid these ads, REGISTER NOW!
OP
K

kellyron500

Active member
Joined
Apr 9, 2011
Messages
35
Location
Memphis, TN
Okay - home now...

Putting up pics of Pops box...sorry about the confusion with the wooden chest I had built. I thought I had made it clear at the end of the OP that I had built that one.

Anyway, as you can see, Pop's SO box has almost 50 years of service in several gas stations and garages he owned and was then relegated to his basement when he sold all and retired to the mountains of Virginia (I am a Memphis transplant).

You can see the big ding in the back...the one I was thinking of using bondo on...and the beat up cover handle.

Anyway, thanks for those who have responded already and those who may yet...

Good Friday and Happy Easter all...

Thought I would posst some "in Progress" shots after today's fun. This is the box after chemical stripping, angle grinder with course and fine wire cups, Dremel with multiple wheels and brass brushes. I think I have even used my wife's cat for clean-up...'course I hate the e'ffin cat.

I will finish with primer inside the drawer area tomorrow and the on to all the drawers themselves after that. Again, I think I will strip the face and just clean the sides, scuff inside the drawer boxes and use a Herculiner.

Happy Easter, all.
 

Attachments

  • 100_0233.jpg
    100_0233.jpg
    131.6 KB · Views: 66
  • 100_0234.jpg
    100_0234.jpg
    131.2 KB · Views: 52
  • 100_0235.jpg
    100_0235.jpg
    133.6 KB · Views: 58
OP
K

kellyron500

Active member
Joined
Apr 9, 2011
Messages
35
Location
Memphis, TN
Okay - home now...

Putting up pics of Pops box...sorry about the confusion with the wooden chest I had built. I thought I had made it clear at the end of the OP that I had built that one.

Anyway, as you can see, Pop's SO box has almost 50 years of service in several gas stations and garages he owned and was then relegated to his basement when he sold all and retired to the mountains of Virginia (I am a Memphis transplant).

You can see the big ding in the back...the one I was thinking of using bondo on...and the beat up cover handle.

Anyway, thanks for those who have responded already and those who may yet...

Good Friday and Happy Easter all...

Thought I would posst some "in Progress" shots after today's fun. This is the box after chemical stripping, angle grinder with course and fine wire cups, Dremel with multiple wheels and brass brushes. I think I have even used my wife's cat for clean-up...'course I hate the e'ffin cat.

I will finish with primer inside the drawer area tomorrow and the on to all the drawers themselves after that. Again, I think I will strip the face and just clean the sides, scuff inside the drawer boxes and use a Herculiner.

Happy Easter, all.
 

Attachments

  • 100_0237.jpg
    100_0237.jpg
    131.8 KB · Views: 42
  • 100_0236.jpg
    100_0236.jpg
    139.2 KB · Views: 45

Carl B

Well-known member
Joined
Feb 3, 2006
Messages
525
Location
Clearwater, Florida USA
Carl,
The bottom box came with it...the pics were taken in my garage after I got it home. Are you saying it is Snap On as well?

Hi KellyRon500:
Oops.... I guess I didn't look at that bottom box closely enough. Now looking again I do not believe the bottom box is SO - - SO usually has flush finished sides on their lower boxes. But I'm certainly not fully knowledgeable in this area.

Thanks much for the tip on Ospho...never herd of it but I am going to get some, especially for the nooks and crannies.

Oh yes - you did say your were a wood worker. Just FYI:
Ospho is a brand name - for a mild solution of phosphoric acid. It's been around for decades and most auto restoration shops use it to kill rust, or to prevent flash rust on bare metal. As I recall Ospho is about 12% phosphoric acid. When you put phosphoric acid on iron oxide {aka rust}, the phosphoric acid will chemically convert the iron oxide to iron phosphate. Iron phosphate is inert... No oxygen - no rust.

When you apply Ospho to rust - over a short time you will see it turn from red {iron oxide} to dark gray {iron phosphate}.

Rinse a mild solution of phosphoric acid like Ospho off with lots of water - right on your grass. Phosphate is a natural fertilizer found in most lawn care mixes. If you spill some on painted surfaces, and rinse it off fairly soon - it will usually not damage the painted surfaces.

Your progress looks great so far

FWIW,
Carl B.
 

billybudge

Well-known member
Joined
Apr 17, 2011
Messages
321
Location
UNITED KINGDOM
Thought I would posst some "in Progress" shots after today's fun. This is the box after chemical stripping, angle grinder with course and fine wire cups, Dremel with multiple wheels and brass brushes. I think I have even used my wife's cat for clean-up...'course I hate the e'ffin cat.

I will finish with primer inside the drawer area tomorrow and the on to all the drawers themselves after that. Again, I think I will strip the face and just clean the sides, scuff inside the drawer boxes and use a Herculiner.

Happy Easter, all.

Thats looking good, I think You and Me are restoring very similer top boxes, although mine still needs a bit nore sanding,
keep up the great work, its going to look fantastic.
 
OP
K

kellyron500

Active member
Joined
Apr 9, 2011
Messages
35
Location
Memphis, TN
Hi KellyRon500:
Oops.... I guess I didn't look at that bottom box closely enough. Now looking again I do not believe the bottom box is SO - - SO usually has flush finished sides on their lower boxes. But I'm certainly not fully knowledgeable in this area.


Oh yes - you did say your were a wood worker. Just FYI:
Ospho is a brand name - for a mild solution of phosphoric acid. It's been around for decades and most auto restoration shops use it to kill rust, or to prevent flash rust on bare metal. As I recall Ospho is about 12% phosphoric acid. When you put phosphoric acid on iron oxide {aka rust}, the phosphoric acid will chemically convert the iron oxide to iron phosphate. Iron phosphate is inert... No oxygen - no rust.

When you apply Ospho to rust - over a short time you will see it turn from red {iron oxide} to dark gray {iron phosphate}.

Rinse a mild solution of phosphoric acid like Ospho off with lots of water - right on your grass. Phosphate is a natural fertilizer found in most lawn care mixes. If you spill some on painted surfaces, and rinse it off fairly soon - it will usually not damage the painted surfaces.

Your progress looks great so far

FWIW,
Carl B.

Thanks Carl...I got lazy...I was at the HD getting more stripping and primer and of course I knew I could not find Ospho there, but there were many other products there that claimed to do the same, including Kleen Strip. That's when I remembered I had a spray can of some rust restorer I used on some surface rust of my boat trailer. It worked well...turned instantly black and remains that way after a year.

Anyway, I was able to use a combination of wire cup brushes, wheels and the same combo with my Dremel to get to to bare metal everywhere...tough, but I did it. I also used the air hose to blow all seams and corners and then hit it with the rust spray at the seams and corners. I am generally a patient man andf get the right tools/products for the job, but I figured this should do well for what I have...although if I stay at this hobby of refurbing boxes, which I like now, I am going to get some Ospho...

Thanks buddy,

Ron
 

BigAl62

Well-known member
Joined
Apr 18, 2011
Messages
2,286
Location
suburbs of Chicago
The bottom box is a newer Craftsman box. You can get a new lock kit for that on easily. Try a SO dealer for the lock on the top box. Looks good so far, keep up the good work!
 
OP
K

kellyron500

Active member
Joined
Apr 9, 2011
Messages
35
Location
Memphis, TN
Thats looking good, I think You and Me are restoring very similar top boxes, although mine still needs a bit nore sanding,
keep up the great work, its going to look fantastic.

Thanks Billy...possibly my successes and failures will give you aid...even if you only get the experiences of "what not to do", cuz I screwed it up.

I spent the day with more stripping and priming...I'll hijack your post to post some pics of my progress...forgive me...

Today was my day with some pretty junked up drawers and some final carcass tweaking with a good rubber mallet...the drawers cleaned up far, far better than I would have ever imagined.
 

Attachments

  • 100_0218.jpg
    100_0218.jpg
    139.4 KB · Views: 29
  • 100_0238.jpg
    100_0238.jpg
    135.8 KB · Views: 27
  • 100_0239.jpg
    100_0239.jpg
    140.4 KB · Views: 27
  • 100_0240.jpg
    100_0240.jpg
    135.7 KB · Views: 27
  • 100_0244.jpg
    100_0244.jpg
    135.7 KB · Views: 30
  • 100_0243.jpg
    100_0243.jpg
    140.1 KB · Views: 36
  • 100_0241.jpg
    100_0241.jpg
    137.2 KB · Views: 29
OP
K

kellyron500

Active member
Joined
Apr 9, 2011
Messages
35
Location
Memphis, TN
The bottom box is a newer Craftsman box. You can get a new lock kit for that on easily. Try a SO dealer for the lock on the top box. Looks good so far, keep up the good work!

Thanks Al....I did a Google last night and confirmed what you said...it is a Craftsman...but a nice one...my next project, I guess...hehehehehe...and thanks for the kudos...learning and doing is fun.
 

BigAl62

Well-known member
Joined
Apr 18, 2011
Messages
2,286
Location
suburbs of Chicago
I have an OLD Craftsman tool chest from my wifes grandfather that I want to refinish, that's why following your adventures is helpful. Keep posting updates!
 
Last edited:
OP
K

kellyron500

Active member
Joined
Apr 9, 2011
Messages
35
Location
Memphis, TN
I have an OLD Craftsman tool chest from my wifes grandfather that I want to refinish, that's why following your adventures is helpful. Keep posting updates!

Will do BA...I do hate waiting for the weekends, though...tempted to take Friday off and just be with the box...:bounce:
 
OP
K

kellyron500

Active member
Joined
Apr 9, 2011
Messages
35
Location
Memphis, TN
It has been too long and I am ashamed I have not posted the "after" pics...thank you everyone on this board for your help, your viewing and your enthusiasm. My father sees these boxes, I know!!!
 

Attachments

  • P1010324.jpg
    P1010324.jpg
    139.3 KB · Views: 64
  • P1010325.jpg
    P1010325.jpg
    142.4 KB · Views: 60
  • P1010326.jpg
    P1010326.jpg
    138.9 KB · Views: 57
OP
K

kellyron500

Active member
Joined
Apr 9, 2011
Messages
35
Location
Memphis, TN
Oh, and by the way, because of what I learned here I decided WTH - let's do the Craftsman.

THANK YOU ALL!
 

Attachments

  • P1010347.jpg
    P1010347.jpg
    139.8 KB · Views: 41
  • P1010345.jpg
    P1010345.jpg
    146.4 KB · Views: 42
  • P1010343.jpg
    P1010343.jpg
    143.8 KB · Views: 39
Last edited:
To avoid these ads, REGISTER NOW!
Top Bottom