To avoid these ads, REGISTER NOW!

Above 1200 Sq/FT Restored 1930's Auto Shop

Wokspaces above 1200 squarefeet.
OP
B

BB767

Well-known member
Joined
Dec 24, 2009
Messages
3,724
Location
Philo, IL
I had to do a triple take on that photo you just posted. That's my GTO behind your '64!!! 70 GTO.jpg
For me, it's all wheel spin off the line. Ahhh, the almighty torque :)

Getting a decent start in 4 speed cars on bias ply tires is the ultimate challenge in drag racing I think. It's all about the too's! :) Too much clutch or too much throttle too soon and you're spinning, not going forward. :( Cameron's zeroing in on it.

Nice GTO, very nice. :thumbup:

Thomas
 
To avoid these ads, REGISTER NOW!
OP
B

BB767

Well-known member
Joined
Dec 24, 2009
Messages
3,724
Location
Philo, IL
My wife says too bad the plane doesn't have a horn you could blow as you fly over so we know it's you! As for your Walker rebuild - nobody can say that you don't know JACK! lol

Many, many years ago I flew for a small commuter airline and one of our captain's parents lived on a farm out in the country very near the airport. Sometimes we would depart empty at 05:30 while it was still dark outside. He'd keep the aircraft low at around 1,500' for a mile after departure and fly toward their house and put the props out of sync a little. It made a very distinctive noise when he did that and we'd see the front porch light flash on and off a couple of times and they knew their son was on his way. Way back then flying had a charm all it's own that's long been lost. It was a different era all together. ;)

Thomas
 
OP
B

BB767

Well-known member
Joined
Dec 24, 2009
Messages
3,724
Location
Philo, IL
... As for your Walker rebuild - nobody can say that you don't know JACK! lol

A friend of mine made these stickers at work and I think they are good words to live by:

1975179984_432a04720c_d.jpg


This thread and the work you do, Thomas, fits the bill!

I just read the entire thread in one sitting. I've been on GJ for a while, and subscribe to quite a few threads, but I have thus far ignored yours. No longer.

Thank you.

And speaking of flying, I was in the crew room at 0'dark thirty this morning checking the thread before I left on a trip and read both of these and let out howl!! BigAl I will forevermore think of that when I hear someone say "you don't know jack" !!! :bounce:

And tig, glad you finally decided to check us out here. Your friends sticker is a definite keeper. I could see that made as a poster that you'd see hanging in every college dorm room all over the country. Maybe even in an old 1930's auto shop! :thumbup:

Thank you both for those day brighteners. It's just making this thread that much more ah,.......well, informative. ;)


Grinning Thomas

BTW, I'll be home soon and I've got Walker information that Don is dying for me to post.
 
OP
B

BB767

Well-known member
Joined
Dec 24, 2009
Messages
3,724
Location
Philo, IL
I REALLY want one of those stickers tig!!!!

As always Thomas you blow me away

Ahem, is that a modified P 51 on your avatar? You must know I have a weakness for taildraggers and WW II aircraft in general. We'll never see their likes again. Nice going....:thumbup:

Wishful Thomas
 

Sweet Old Bill

Well-known member
Joined
Mar 20, 2009
Messages
362
Location
N. California
Thomas, Chris, & Cameron,

I join the rest of the chorus in singing your family's praises for the work done!

I also have an old Walker Jack. HiBall provided the repair kit, mine is the 2ton model.

I look forward to seeing your continuous progress.

Thanks Greatly for sharing your passion.

Sweet Old Bill
 

tinbender 66

Well-known member
Joined
Mar 23, 2011
Messages
2,294
Location
Western Washington State
Ahem, is that a modified P 51 on your avatar? You must know I have a weakness for taildraggers and WW II aircraft in general. We'll never see their likes again. Nice going....:thumbup:

Wishful Thomas

Yeah, that's race #7 P-51 "Strega" owned by Bill "Tiger" Destefani, from the Reno Air Races. 500 mph airplane. Steven Hinton Jr. pilots it now. He took over a couple years ago at the ripe old age of 22. Won the race too.
 
OP
B

BB767

Well-known member
Joined
Dec 24, 2009
Messages
3,724
Location
Philo, IL
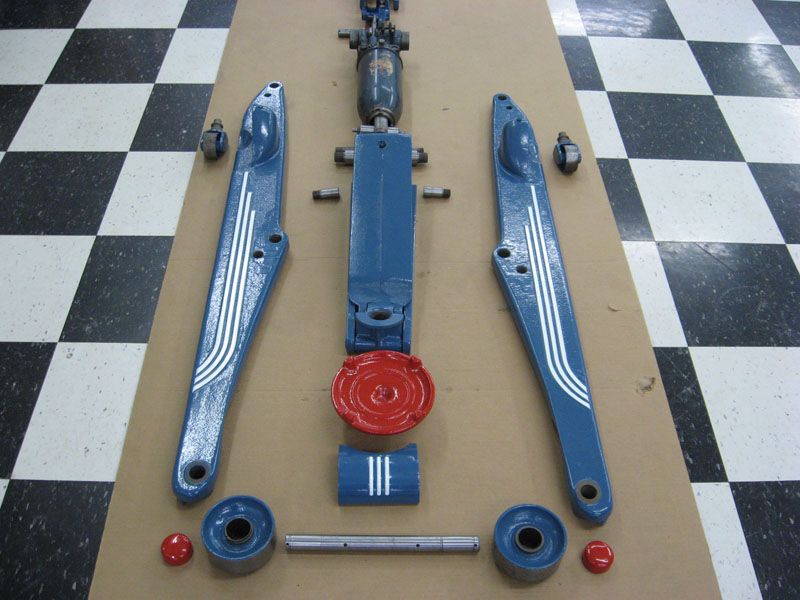
Coming down the home stretch with the Walker floor jack. Here are some of the more challenging aspects and parts of powder coating it.

IMG_4675.jpg


The lifting arm return springs needed to be coated but the springs had to be stretched a bit to allow powder in between each coil. So this is the rig Don's shop came up with to do that.

IMG_4677.jpg


One end was hooked here...

IMG_4676.jpg


...while the other end was secured here on a "Jay" bolt. Then as the "Jay" bolt was tightened (on the far right) it pulled the "Jay" hook to the right which stretched the spring enough to allow powder to be applied between each coil. Doing it this way allowed the spring tension to be varied as necessary to open the coils just enough. Then while still stretched the whole apparatus was put in the oven to cure.

IMG_4711.jpg


As they turned out, perfect. 1 mil of powder covers the whole spring inside, out and in between. It'll never rust now and there was not so much powder build up in between the coils that it lengthened the spring either.

IMG_4685.jpg


Some of the parts had no good way to hang them, so Don used Cobalt magnets to provide a means to do that. The red object on the right is the magnet, the orange is tape to prevent powder on that surface. This was a pin that needed to be coated on both ends but not in the middle.

IMG_4687.jpg


All of the nuts were coated. To prevent powder from getting on the inside threads, a silicone plug was placed there and then a wire hook pressed into the plug to hold the nut. However powder coating relies on a small electrical charge being passed through the piece being coated to attract powder to the object. The silicone plug prevented that electrical charge, so a small amount of heat was used to warm up the nut so the powder would stick.

IMG_4709.jpg


Another tricky part was this multi joint connecting the release knob rod (say that fast 3 times!) to the jack power cylinder.

IMG_4710.jpg


This had heavy grease build up all over it from years of use. I soaked it in a cleaning solution for a month to slowly desolve the grease. I used an old tooth brush on it periodically to help remove old, softened material. I didn't want to put it in the grit blaster to clean it up because I was concerned that I couldn't get all the grit particles cleaned out of all the joints. That would result in the joint not working smoothly and premature wear on the joints. Turns out Don still needed to grit blast it a little to rough up the surfaces in preparation for coating. But because it was already clean he only needed to use a minimal amount of grit and then throughly rinsed it with alcohol multiple times and blew it out well each time. Next a layer of only 1 mil thick powder was applied to keep all the joints moving freely which they do. :)

IMG_4714.jpg


That multi joint is attached to the power cylinder and secured with this small nut and bolt. I used a dime to give an idea how small this bolt and nut are. All powder coated of course. The dime is a period one from 1967 by the way. :dunno:

IMG_4715.jpg


This is where the bolt will be installed on the joint, far right end.

IMG_4689.jpg


IMG_4691.jpg


Various parts in the oven prior to curing at 400 degrees F (204 C).

IMG_4694.jpg


Many of the shafts could only be done on the ends. This is when...

IMG_4697.jpg


... all the various parts...

IMG_4696.jpg


...were all done. The front axle is seen below the nuts and washers; the polished areas on it near the ends are where the needle bearings will be installed. It should roll as smmoooth as a babies bu.., ah.................posterior. :thumbup:

IMG_4214.jpg


This was the front axle before removal and subsequent clean up and refurbishment.

There was just a bit more work done before we'll see the reassembly and subsequent rebirth of this piece of rolling sculpture. :D

Thomas
 
OP
B

BB767

Well-known member
Joined
Dec 24, 2009
Messages
3,724
Location
Philo, IL
Thomas, Chris, & Cameron,

I join the rest of the chorus in singing your family's praises for the work done!

I also have an old Walker Jack. HiBall provided the repair kit, mine is the 2ton model.

I look forward to seeing your continuous progress.

Thanks Greatly for sharing your passion.

Sweet Old Bill

Hey there S O B (Sweet Old Bill, oh ya, I caught that! :)) welcome. HiBall is invaluable isn't he? And a pretty nice guy to boot! The 2 tons were called the Tom Boy and are very versatile. My 4 ton models are wonderful but at 4' long and 187 pounds they are enormous and a handful to move around. Stable on the job though which is what really matters. Thanks for rebuilding yours and giving it another chance to be useful instead of taking up space in a landfill or becoming razor blades. :sad: Don't be afraid to post a picture or two of it if you can, always nice to see them. :thumbup:

Sharing my passion has been my pleasure, thanks for the kind thought.

Thomas
 
OP
B

BB767

Well-known member
Joined
Dec 24, 2009
Messages
3,724
Location
Philo, IL
Yeah, that's race #7 P-51 "Strega" owned by Bill "Tiger" Destefani, from the Reno Air Races. 500 mph airplane. Steven Hinton Jr. pilots it now. He took over a couple years ago at the ripe old age of 22. Won the race too.

I first started following the Reno air races when his dad, Steve Sr was tearing Reno up racing and his future son was still a twinkle in his eye. Airmanship must run in the family. Never been out to the Unlimited Races but it's on the list! Thanks.

Thomas
 

BigAl62

Well-known member
Joined
Apr 18, 2011
Messages
2,286
Location
suburbs of Chicago
That Walker rebuild is awsome! Can't wait to see finished project. Here is a picture of my assistant:
 

Attachments

  • Mechanics assistant.jpg
    Mechanics assistant.jpg
    54.3 KB · Views: 120

Gummo

New member
Joined
Apr 23, 2011
Messages
3
Hi. I recently bought a Walker floor jack (at a police auction for $40) and ran across this forum while looking for info online. Mine is an 884 and is nearly identical to BB767's/Thomas' jack. I can't thank you enough Thomas for the info that you posted. It has been invaluable in getting my jack apart. (there were a couple pins under the grime that I wouldn't even have know where there.

Interestingly, after reading all the posts up to this point, it seems my jack is a bit strange. It's red. At least it's mostly red. It has a blue handle. I think it had a yellow top knob and front wheels. And the hydraulic pump is blue. But the rest of the body is all red.

Anyway. Here are a few pics.

1.jpg


2.jpg


3.jpg


4.jpg


5.jpg


6.jpg


7.jpg


8.jpg


Here is the grime I was able to remove from just ONE front wheel.

9.jpg


Also, I took a picture of my front nose piece to show you the raised stripes. It looks like mine don't have those little dents.

10.jpg


I have a couple questions for you Thomas, if you don't mind. One, how did you remove the lift plate, or bucket, or basket, or whatever it's called? I can't find any obvious way for it to come off. And two, where did you get all those great brochures and stuff for your jack? I'd love to see some stuff like that for my 884.

Also, Hiball, if you're reading this, I'm interested in either buying a kit from you, or having you rebuild my unit. (Not sure if shipping it to you would be cost effective as I'm in AZ.) I'm not sure I have the proper tools to rebuild the unit myself. If I end up finding a local shop to do it, I'd at least like to have one of your kits so I know the shop was using the proper parts. Feel free to PM me or email or call (I can PM you with some contact info).

Thanks a bunch for all the posts you guys have both provided. They have been invaluable!

Chris
 
Last edited:

Gummo

New member
Joined
Apr 23, 2011
Messages
3
Also, for anyone interested in Walker jacks, it looks like there is one at the auction taking place Saturday the 30th. Probably will go for cheap.

It's mislabeled as a Hopper (whatever that is) but I'm pretty sure it's a Walker. A little newer than mine or the one Thomas is restoring, but a decent jack none the less.

http://bids.auctionandappraise.com/cgi-bin/mnlist.cgi?asaa21/344

That link should get you right there, but if not, try the main page here:

http://www.auctionandappraise.com/auctions.html

and just go to the auction on the 30th and search for hopper. :wtf:

Chris
 
OP
B

BB767

Well-known member
Joined
Dec 24, 2009
Messages
3,724
Location
Philo, IL
Hi. I recently bought a Walker floor jack (at a police auction for $40) and ran across this forum while looking for info online. Mine is an 884 and is nearly identical to BB767's/Thomas' jack. I can't thank you enough Thomas for the info that you posted. It has been invaluable in getting my jack apart. (there were a couple pins under the grime that I wouldn't even have know where there.

Interestingly, after reading all the posts up to this point, it seems my jack is a bit strange. It's red. At least it's mostly red. It has a blue handle. I think it had a yellow top knob and front wheels. And the hydraulic pump is blue. But the rest of the body is all red.

Anyway. Here are a few pics.

1.jpg


2.jpg


3.jpg


4.jpg


5.jpg


6.jpg


7.jpg


8.jpg


Here is the grime I was able to remove from just ONE front wheel.

9.jpg


Also, I took a picture of my front nose piece to show you the raised stripes. It looks like mine don't have those little dents.

10.jpg


I have a couple questions for you Thomas, if you don't mind. One, how did you remove the lift plate, or bucket, or basket, or whatever it's called? I can't find any obvious way for it to come off. And two, where did you get all those great brochures and stuff for your jack? I'd love to see some stuff like that for my 884.

Also, Hiball, if you're reading this, I'm interested in either buying a kit from you, or having you rebuild my unit. (Not sure if shipping it to you would be cost effective as I'm in AZ.) I'm not sure I have the proper tools to rebuild the unit myself. If I end up finding a local shop to do it, I'd at least like to have one of your kits so I know the shop was using the proper parts. Feel free to PM me or email or call (I can PM you with some contact info).

Thanks a bunch for all the posts you guys have both provided. They have been invaluable!

Chris

Hello there Chris and welcome to our world here. Nice score on the Walker by the way! Good assortment of pictures, thanks. The #884's were the follow on to the #784 series. The change over occurred as best I can tell from research in 1949. I have advertisements in 1948 that still refer to the 4 ton model as #784 and then in 1949 they were referred to as #884's so I think that pretty well pins it down. I don't know of any real change made to the 884's from the 784's, just paint changes mostly.

Walker changed the paint scheme over the years and I do know they used yellow at some point in time for the release knob and front wheels as seen on yours. Are there any traces of yellow on the handle hand grips? The overall red paint I believe is from a repaint. Look at your data plate and you can see red paint on top of blue. Particularly note that red paint is on top of some of the letters on the data plate, like the E on WALKER. The factory would not have done that. I'm pretty sure it started life with blue paint and yellow trim and was painted red at some point. Is there any original paint left on the saddle, that's the round part on the lifting arm?

FloorJack4sm.jpg


To remove the saddle see page 135, post # 2699. The pin that retains the saddle was peened into place from the factory making it a permanent installation. To remove it you'll have to grind one end off so it will slide out. If that pin is still well secured I'd be reluctant to remove it. If you do remove it you'll have to fabricate a replacement for it as you'll most likely destroy the original removing it.

I got my vintage Walker advertisements from old copies of Motor Age. You should be able to find them at swap meets, eBay or Craig's list. The latest ad I have is from 1954 and it shows the jacks with mostly blue and white trim paint on the top of the handle and wheel hub caps so I'd look for copies after that date.

If you can't find a shop you're confident would do a good job rebuilding the power cylinder, even with Hiball's correct parts, strongly consider shipping only the cylinder assembly to him. He knows what he's doing, has the right specialty tools and just think of the shipping cost as part of the overall cost of the project. Heck I drove both of mine to him and drove back to pick them up because I wanted him to do an overall assessment of them. If you do ship it I would suggest packing it in a box within a box, minimum 2"-3" crush zone between boxes. Wrap the cylinder with plastic wrap so if it leaks hydraulic fluid it won't soak the boxes and weaken them.

Lastly, make sure to save all the grime you scrap off the jack. If you dilute it with a little solvent, bottle it and sell it as vintage old shop smells you'll make a fortune! :D

Happy to help out Chris and please keep us informed with your progress. You've got a great piece of equipment there and it looks to be overall in pretty good condition. :thumbup: Enjoy the restoration.

Thomas
 
Last edited:

Gummo

New member
Joined
Apr 23, 2011
Messages
3
Are there any traces of yellow on the handle hand grips? ... Is there any original paint left on the saddle, that's the round part on the lifting arm?
...

Thomas

Nothing but traces of blue on the handles. Almost none though. They are worn down to the metal almost completely.

And the saddle doesn't have a trace of anything.

It's interesting. If this is a repaint, they had this jack apart at least as far as I do. There's red way down in places that you can't even get to when it's together. They also must have blasted it or something, as there is no blue under the red anywhere that I could find.

11.jpg


12.jpg


13.jpg


Strange too, on the pic you pointed out about the red over the letters. It's also pretty cleanly around the patent numbers at the bottom and not over them. I can't imagine how that happened.

5.jpg


I guess the only thing that makes sense is that somebody took it apart and painted it.

Chris
 

hkunz

New member
Joined
Mar 18, 2011
Messages
4
Also, none of us were "prissy girls" needing to primp in front of the mirror for any length of time. Dad was smart (hesays) . He got the full bath most of the time (his reading room) and we all shared the 1/2 bath, scheduling shower/bath time for Dad's bathroom. It worked (I actually never thought about it until after college - where I had to share a bathroom with 6 toilet stalls, 6 shower stalls and one tub on the dorm floor with 50 other girls - alot worse than back home!). How did other big families manage back in the 50s/60s with only one bathroom in the house? It was unusual for there to be 2 full bathrooms, even with large families - I certainly didn't know anyone with 2 bathrooms until I was in high school. You make do with what you have.

Chris


The boys used the outhouse, complete with Sears catalog for TP. We weren't inside much anyway, what with farm work to do, and leaves will work if the need arises. We didn't know any better, but one winter Dad decided to put in an extra bathroom upstairs, about the time I was heading off to college. Then there were suddenly bathroom wars, with the girls hogging it all the time. Who have thought that adding a bathroom would make it worse? Oh, and there were seven of us..
 
OP
B

BB767

Well-known member
Joined
Dec 24, 2009
Messages
3,724
Location
Philo, IL
Here are a new found series of photographs taken outside the shop in late March or early April, 2006. That would be 6-7 months after I bought the property.

Shop-2006-1.jpg


The carports have just been finished and the garage overhead doors installed. Look where the 2 entrance doors should be to the right of each overhead door and you'll sheets of plywood covering them up. I ordered commercial steel insulated doors with steel frames and it took almost 2 months for them to arrive. Then it turned out they made an error on the smaller of the two. It was made too wide by 4" (10 cm) so they expedited the replacement and that only took 4 weeks. That's why on some early pictures you'll see one door installed but plywood covering the other one. Since the plywood was screwed into place we just used the remote and opened the overhead doors to go in or out. A bit of a hassle but the shop was finally somewhat secured. No exterior lighting installed anywhere yet but at the peak of the carport the electrical box for that light can be seen.

Shop2006-2.jpg


No landscaping at all has been done. You can still see some material (mostly future scrap) scattered about outside in places.

Shop2006-3.jpg


Here's some of that future scrap to the left. That's old shelving and the old work benches that were removed from inside the shop awaiting their fate.

Shop2006-4.jpg


Here's a more distant view of the old benches and shelving, tool shed behind them plus the International M tractor. I now wish I had taken a few pictures of the old benches, there were two main ones, but they were just so very nasty. I really just wanted them to go away. No hope at all of trying to resurrect them, none, zero, zip, nada, not happening. :(

Shop2006-5.jpg


To the left is part of the old steel wheeled McCormick planter I tried so hard to give away and eventually scrapped. The bent wheel is really the only damage it had. The other side was perfect. You'll see a current reverse view of this whole area in the last picture of this post.

Shop2006-6.jpg


The faithful Terraplane with some scrap still laying around it. The orange paint on the outside shop wall is from the time in the mid 1970's when heavy duty trailers were being made at the shop and they were all painted orange. They must have taken some parts outside here and painted them and it splattered on the wall.

Shop2006-7.jpg


This is the two car garage before the new overhead doors have been installed. Where the white SUV is parked is where the red '60's Chevy pickup was parked for a few decades. The International M tractor is to the left waiting for one of the sons to claim it.

Shop2006-8.jpg


Here you can see the planter much better to the left. The '57 was the last car to leave the property. I tried mightily to give it away and kept it for about 9 months before I gave up. It's long been turned into razor blades. :sad:

The barn will be built off to the right about where that dirt pile is.

IMG_4704.jpg


Just in front of the barn in the distance, among those trees back there is where the '57 was resting. This picture take last week, April, 2011 about 5 years after the pictures above it were taken.

Thomas
 
OP
B

BB767

Well-known member
Joined
Dec 24, 2009
Messages
3,724
Location
Philo, IL
Nothing but traces of blue on the handles. Almost none though. They are worn down to the metal almost completely.

And the saddle doesn't have a trace of anything.

It's interesting. If this is a repaint, they had this jack apart at least as far as I do. There's red way down in places that you can't even get to when it's together. They also must have blasted it or something, as there is no blue under the red anywhere that I could find...

Strange too, on the pic you pointed out about the red over the letters. It's also pretty cleanly around the patent numbers at the bottom and not over them. I can't imagine how that happened.

5.jpg


I guess the only thing that makes sense is that somebody took it apart and painted it.

Chris


Chris I'm with you, I'd think you'd find some trace of blue somewhere. Especially since those look like the original rivets on the data plate. You'd think you'd find some vestiges of blue around/under the edges of the data plate if it was repainted won't you? The data plate has me puzzled. There is blue as a first coat with red on top of that. There are several letters on it with red overpaint. I really can't believe Walker would do that, especially over painting their name. If those letters are all raised as mine are, any paint on the patent numbers could have been worn off the tops of them. Just a guess.

The only other thought is as with ECO air meters, the manufacture would do a run of special color at the buyers request. Since you said it was owned by the police department they might have ordered several jacks and specified the main part of the jacks be painted red and Walker would have done that. Just puzzled by the overpainted data plate is all. :dunno: We may never know for sure, nor does it really matter in the end. When you finally reach Hiball, he might be able to help you with what would have been a typical factory color for your vintage jack should you wish to repaint is as such. Keep us posted and good luck. We'll be here...waiting. :)

Thomas
 
To avoid these ads, REGISTER NOW!

Lou's Garage

Well-known member
Joined
Feb 12, 2008
Messages
581
Location
Anderson, SC
5.jpg


I guess the only thing that makes sense is that somebody took it apart and painted it.

Chris

In the "old days" it was commom for the local hydraulic jack rebuilder to do a complete clean and repaint. Some rebuilders repainted in their own "house" color while others tried to match original colors. When my Walker came back it was in a blue that was close to original accented with yellow where the white used to be. I suspect your Walker received an overhaul from someone who liked red.

Alas, I sold mine along with the other assets of North Rockland Amoco. I wanted to keep it (it originally belonged to Lou's Garage) but at only 2 1/2 ton capacity, there were lots smaller jacks that fit beter in my tiny work area.

Lou
 
OP
B

BB767

Well-known member
Joined
Dec 24, 2009
Messages
3,724
Location
Philo, IL
In the "old days" it was commom for the local hydraulic jack rebuilder to do a complete clean and repaint. Some rebuilders repainted in their own "house" color while others tried to match original colors. When my Walker came back it was in a blue that was close to original accented with yellow where the white used to be. I suspect your Walker received an overhaul from someone who liked red.

Alas, I sold mine along with the other assets of North Rockland Amoco. I wanted to keep it (it originally belonged to Lou's Garage) but at only 2 1/2 ton capacity, there were lots smaller jacks that fit beter in my tiny work area.

Lou

Thanks Lou for that bit of information. If it was repainted they were certainly thorough. Just a little sloppy on the data plate is all. I can understand not wanting one of these if you had small work space. They do have a commanding presence! Is your avatar a picture of Lou's Garage?

Thomas
 

Lou's Garage

Well-known member
Joined
Feb 12, 2008
Messages
581
Location
Anderson, SC
Thanks Lou for that bit of information. If it was repainted they were certainly thorough. Just a little sloppy on the data plate is all. I can understand not wanting one of these if you had small work space. They do have a commanding presence! Is your avatar a picture of Lou's Garage?

Thomas


LOL! The data plate was what made me think of it. The rebuilders seemed to always paint over the data plate, no matter the make or model.

Not to hijack but my avatar is indeed Lou's Garage, where I spent a good part of my childhood. If you were able to read the lettering on the front it says "Lou's Esso Servicenter." It was never named that but Esso (who provided the letters) seemed to prefer that moniker.

Thomas, you've done a tremendous job with the Johnson place. Thanks for bringing us along for the ride.

Happy Motoring!

Lou
 
OP
B

BB767

Well-known member
Joined
Dec 24, 2009
Messages
3,724
Location
Philo, IL
Here's some of the legacy left from material just being left haphazard around the property.

IMG_4446.jpg


This is a chimney flue liner...

IMG_4448.jpg


...that was left near the base of this tree. Like the Terraplane if you don't move it, nature will just adapt to it being in the way. Look closely on the ground and you can see small squares of old car windshield glass. Over time I've slowly picked up most of the glass and other debris. It used to be I could set down a 5 gallon bucket and not move it and I'd fill it up with what I found in one spot without moving. Now some 5 + years later there isn't a whole lot left on the 5 acres. The frost still brings a little to the surface each winter but the amount is greatly reduced anymore. I kept telling Cameron, there's only a finite amount of thrash and every bucket full we remove there's that much less remaining. There was a little serenity in spending a couple hours at a time just picking up debris. It was amazingly satisfying restoring the land after it had been abused for so long.

IMG_4451.jpg


This is what's left of some piece of equipment that was by these trees...

IMG_4452.jpg


The trees are nice little Walnuts that were in a good spot so...

IMG_4453.jpg


...I just cut the equipment out as best I could and this is what was left. In a few years you won't even see this I suppose.

IMG_4449.jpg


Notice how bent this trunk is. I can't remember what was here but it certainly was in the way of how the tree was growing...

IMG_4450.jpg


...so it just bent itself around the object. There was a awful lot of Ag and other equipment that had to be cut out over the years. I lost some very nice trees out there because they were just too distorted from growing too close to something. I didn't think they would survive because some of them were so severely bent. The good news is that there are so many trees, losing a few wasn't real noticeable. At some point when some of the trees are cut down and they contain metal, rocks or other objects that has grown into it, will be a problem for who ever does the cutting. If I'm around I'll be able to tell them and If I'm not, one look at the Terraplane should serve as a warning that all is not as it seems out there. :dunno:

Thomas
 

johno

Well-known member
Joined
Oct 16, 2009
Messages
2,418
Location
Southern Ont.
Hey Thomas

Thanks for the new pics, I love the way nature will grow around things, rocks Hudsons what ever, I have to admit I can't remember a better one than your Hudson tho.

I'm curious is that chimney flu clay? Has it managed to bend that much or is it all cracked?

Inquiring minds and such...:dunno:
 
OP
B

BB767

Well-known member
Joined
Dec 24, 2009
Messages
3,724
Location
Philo, IL
Hey Thomas

Thanks for the new pics, I love the way nature will grow around things, rocks Hudsons what ever, I have to admit I can't remember a better one than your Hudson tho.

I'm curious is that chimney flu clay? Has it managed to bend that much or is it all cracked?

Inquiring minds and such...:dunno:

johno, it is clay, but of course it was fired in a kiln when new. There are no large visible cracks in it. I suppose after sitting outside in the elements for several decades it got a little soft and with the tree applying constant pressure, over time it began to assume that slanted shape. I've got a few more odd things of that nature out there, but don't have any good pictures of them as yet. As you can see I left several in place as reminders of what the property has gone through...including the Terraplane. I've been watching the steering wheel, comparing pictures from day 1, to see if I can detect any further growth in the last 5 years as the tree is slowly devouring it but no sign yet. It's a slow process. :)

Thomas
 
OP
B

BB767

Well-known member
Joined
Dec 24, 2009
Messages
3,724
Location
Philo, IL
OP
B

BB767

Well-known member
Joined
Dec 24, 2009
Messages
3,724
Location
Philo, IL
Continuing with the Walker project...

IMG_4609.jpg


The side "feathers" needed to be taped off in order to apply the white stripes. That was much easier on these than the cover plate as these stripes were cast into the frame and not stamped into it. As a result they have a crisp, distinctive edge allowing us to accurately and consistently place the tape.

IMG_4613.jpg


So Don and I spent a little "quality time" together on that. Turns out that Walker did this side feather/stripe detail as a means to reinforce the sides of the jack frame. These side frames are about 4' (1.2 m) long and the stripes act as reinforcing ribs which allowed them to make the frame material thinner and reduce the overall weight of the jack. Back then when style mattered they did quite an elegant job of it I think.

IMG_4615.jpg


The dark blue seen here is painters tape used to hold paper on the frame as everything BUT the stripes was covered up prior to the powder being applied.

IMG_4622.jpg


With white powder applied...

IMG_4625.jpg


... it would only stick to the exposed stripes. Don is making sure we got good overall coverage on everything.

IMG_4626.jpg


Into the oven for a few minutes till the white powder just starts to turn and then they are brought out and all the tape and paper is removed. You have to be careful not to touch any of the white on the stripes at this point or it will smear it. Then they are placed back in the oven for final curing.


IMG_4629.jpg


After they have cured, they are hung up to cool down. Because there is so much metal in the frames it took over 1/2 hour before we could handle them with our bare hands.

IMG_4631.jpg


The results are excellent with crisp, clean, uniform edges. All that needs to be done on the frames now is clean up of all the holes where various parts are attached to the frames or are placed through them.

Thomas
 
Last edited:

ZRX61

Well-known member
Joined
Aug 15, 2006
Messages
28,716
Location
Solar Blight Valley, SoCal
How in the world did you stumble across THAT?? What a great piece of work. Who would even dream of such a thing? I'm in ops right now and there are several of "the guys" looking over my shoulder admiring it. Whoa........

Many, many thanks Rick from all us "guys". :beer:

Thomas

Friend was asking about *industrial* BBQ's, so I sent him a link to Kloses website, that's when I spotted the Continental one :)
 

slimpickins

Well-known member
Joined
Mar 27, 2011
Messages
2,404
Location
Canada
Here's some of the legacy left from material just being left haphazard around the property.

This is what's left of some piece of equipment that was by these trees...

IMG_4452.jpg


The trees are nice little Walnuts that were in a good spot so...

IMG_4453.jpg


...I just cut the equipment out as best I could and this is what was left. In a few years you won't even see this I suppose.

... At some point when some of the trees are cut down and they contain metal, rocks or other objects that has grown into it, will be a problem for who ever does the cutting. If I'm around I'll be able to tell them and If I'm not, one look at the Terraplane should serve as a warning that all is not as it seems out there. :dunno:

Thomas

I was thinking about the same thing as I was looking at your pictures ... That's gonna play hell with someone's chain saw some day... You almost need to put up a RIP monument as a warning to posterity.
...
I know!! ... you could create a time capsule with a copy of all the pics and this thread!!! :bounce:
 
OP
B

BB767

Well-known member
Joined
Dec 24, 2009
Messages
3,724
Location
Philo, IL
Walker update 3.02....

IMG_4716.jpg


This is how the nose piece turned out...

IMG_4668.jpg


...and how all the various parts look...

IMG_4285.jpg


...when compared with before...

IMG_4663.jpg


IMG_4286.jpg


IMG_4669.jpg


IMG_4670.jpg


IMG_4671.jpg


IMG_4664.jpg


Of course some assembly required. :thumbup:

Thomas
 

JC23

Well-known member
Joined
Dec 31, 2009
Messages
11,718
Location
Northcoast
No offense but, ah.........no! :D

Thomas

Then I guess a monster is out of the question, eh?

Sorry, Thomas. When I see really, REALLY good lookin' garage tools I wanna paint 'em!

But yours is so good lookin' I would probably leave it as is, too... I'm not sure if it was the journey to restore it or how the finished product looks but you done good either way.
 
OP
B

BB767

Well-known member
Joined
Dec 24, 2009
Messages
3,724
Location
Philo, IL
post #77 in the ,mopar made tools?? I never knew that

They did indeed. Mopar tools show up on eBay every so often. If you read this thread from the beginning and stick around to the end (who knows when THAT will be?? :dunno:) I expect you will learn many things you didn't know thanks to all the input from everyone. It'll be the equivalent to a college degree. :D

BTW I was an original owner of a Omni GLH back in 1985. Love of my life at the time (sorry Chris). Sold it with 130,000+ miles in 1993 and it still looked like new. It did indeed Goes Like Hel.......:thumbup:

Thomas
 
OP
B

BB767

Well-known member
Joined
Dec 24, 2009
Messages
3,724
Location
Philo, IL
Then I guess a monster is out of the question, eh?

Sorry, Thomas. When I see really, REALLY good lookin' garage tools I wanna paint 'em!

But yours is so good lookin' I would probably leave it as is, too... I'm not sure if it was the journey to restore it or how the finished product looks but you done good either way.

JC23 I haven't the slightest doubt that any flames or monsters you would paint would be in the absolute best of taste and would greatly enhance the subtle styling cues the Walker engineers slaved to perfect. But being the stuck in the mud "as per the factory" kind of a guy that I am, I just knew you'd understand. :)

Thomas
 

3bay

Well-known member
Joined
Dec 29, 2007
Messages
157
Location
Indiana
BTW I was an original owner of a Omni GLH back in 1985. Love of my life at the time (sorry Chris). Sold it with 130,000+ miles in 1993 and it still looked like new. It did indeed Goes Like Hel.......:thumbup:

Thomas
We won't hold that against ya Bud!

Rich
 
To avoid these ads, REGISTER NOW!
Top Bottom