Wow, I never anticipated such a response. Thanks for all the comments, everyone.
I want to do this behind my garage, along with possibly enclosing an area within the shed for my compressor. Yard tools belong in a shed, not the garage. A room for the compressor would be an added bonus.
I'd be careful - even with some vents this is an unconditioned space. In my first thread I asked about moisture control and one member (
bczygan) pointed out that with humidity surface rust can be expected on garden tools, and storing something like a damp bag of fertilizer in there will only make things worse.
You could run some sort of air pump system to keep it dry, though.
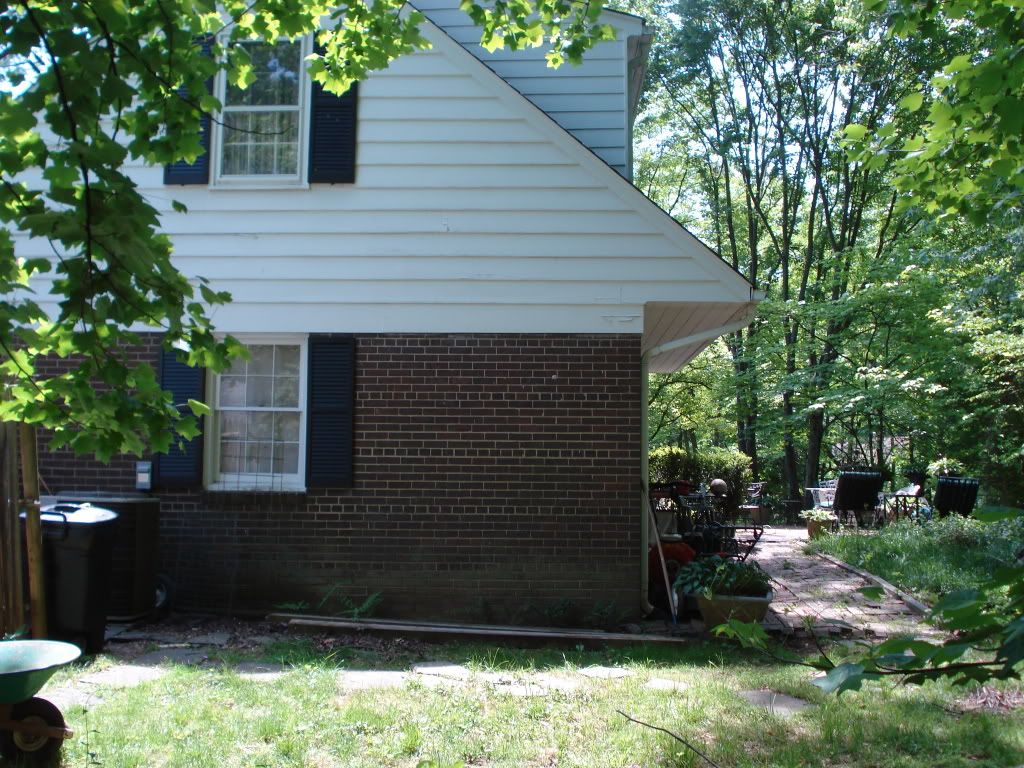
It looks good, plain and simple. I would suggest some type of skirting to keep leaves and deter little critters from getting underneath, maybe a deck board.
Didn't think about it during planning, but I noticed that after I finished the foundation. Some rot boards with gravel and maybe brick is fuzzy concept I'm planning on.
this looks great. I could use something like this along the side of my house.
Nice! Very helpful for when I go to make mine...
I was hoping this may prove useful for others. Good luck.
Looks good. Only two issues I can think of. One is the fact that it is free standing. Not much weight and a good strong wind could move it around.
The second is the idea of caulking the side walls along the house. If in fact you do end up moving it, you will be left with a caulk line on your bricks that may be a pain to remove. I would maybe use some thick foam weather stripping between the house and the structure and a few concrete anchors to secure the building to the house. That way if you do need to move it, all you are left with is a few holes on the brick/mortar joints that could be easily caulked/patched.
Other than that, you could give the inside a good coat of paint as well to help prevent any moisture damage.
Well I don't know about wind moving it around - at least around here. But yes, some extra stability couldn't hurt.
I agree with the idea about the caulk being messy. I was suggested the weather strip before and I didn't think it would compress into the mortar joints.
Well I tried it anyway.
Doesn't quite fill the gap. You'll notice on the package they advertise it as "Minimum Compression". I couldn't find anything else, and that's the thickest stuff they have. But really, it's damn close, and I don't see it being an issue unless I'm really hosing it down from the sides, so I'm gonna go with it unless somebody makes a big fuss about it.

That is a good looking shed. Have you kept track of the cost? Curious how much the materials would run.
I got a pile of receipts. I'll add it up at the end.
I built the same type of structure off the back of my 8' x 12' tool shed. Works great as a wood shed. I extended it 2-1/2' past the corner of the tool shed so I can store 10' sticks and all my plywood.
I have a shed in the back, back yard, the ugly shed. It's a long, sad story that involves a cheap metal shed (that you buy in a cardboard box from the big orange box), a collapsed roof, and a perilous rise from the ashes using random stuff I scraped together to build something that could roughly be described as a 'structure'. Well I built a little "porch" off of that using some pallets and I keep some scrap wood there. Kinda the same idea.
I'm not really saying anything here, but it interjected a little drama into this whole write up (I don't think I have pictures), so...moving on.
whats your plan for doors?
Ive been contemplating doing this myself, but I have 4"doublelap vinyl siding and I havent come up with a solution besides scribing a piece of trim to fit the vinyl.
...
Build a frame out of the same 2x3 stock and skin it with the removed LP Smartside that isn't in the door frame as it stands. Then add some trim pieces, surface mounted hinges, a latch. Add a locking mechanism that will hold one door in place. That sort of thing.
Custom scribed trim piece sounds like it would work. I saw that (with wood trim) in an issue of popular mechanics from the 60s that I found online somewhere. Jigsaw it.
Your construction looks clean and solid....nice job.
On the roof flashing....I would get some aluminum about 6" wide and the width if the 'shed'. Bend one end about 1" up, or enough to reach under the existing siding....slide thed edge up under the side board....then put the other edge over the roof....that should keep water from going down the back wall.
On the sides that are against the brick....I agree....calk might be and issue if you ever go to remove it. Instead, use that foam that you put under your bottom plate when your doing walls on top of a footing.
I personally would put in a couple of anchors on each side to **** the shed up agains the wall. sink them into the motar between the bricks...it will be easy to patch the hole afterwards.
And yes on the skirt....otherwise, Peter Rabit and Thumper the squirl will be living under there....that is if Mighty Mouse does not kick them out....
Thanks.
I bought an oversized roll of flashing before I really had an idea what I was getting. It's maybe 14 inches wide. I got a book from the library ("Essential Guide to Roofing" by JLC) that recommended 5 vertical inches, and then 4 inches onto the roof. I'll have plenty of overlap.
Foam? This stuff:
http://building.dow.com/na/en/applications/building/foundations/foundationsillplate.htm
?
I didn't know this existed. Hmm. This probably would have been a good bet. I'm out 8 bucks on the weatherstrip, but maybe worth a shot. I'll look for it at the store.
I plan on adding something to secure the walls. A few masonry nails at least.
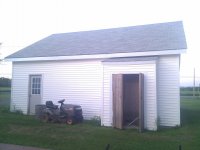
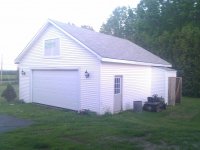
Here is mine all finished. Yours looks good and rugged!
Thanks.
Nothing wrong with that build. The only thing I'd do is attach it to the house wall at a few points. Buck a 2x4 flatside against the outer walls on the inside of the building and screw to house and shed. Three or four screws each way will give you considerable wind resistance. What's the 2x4 in the doorway for do you really need it? Might end up being a trip point.
Are the siding panels LP SmartSide, if they are, here's a link to information site.
http://www.lpcorp.com/smartside/panel/resources/
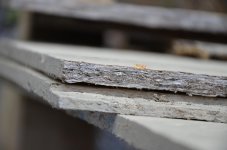
I didn't think to go to the website until after I built my shed last year. The important issue with this material is it can wick water through unfinished (any place you cut) edges that come in contact with water which will cause it to swell and separate. They also recommend 16" centers(I did 24" no problems so far, and it's gone though a couple of windy Nor-Easters already). These pics are really an extreme example of what can happen to this material (horizontal and up), but it is less than a year exposure. As you can see a little bit of paint stops it from happening.
I'm not trying to be 'Chicken Little' here (your shed will last a long time as built, mind will too, I think
")
). This is just info that might be of use to people will use this product in the future. "You don't know what you don't know, until you know you don’t know it"

Primed the edges (even though they come pre-primed) and the cut ones, too. Extra especially at the bottom.
OSB is a decent material but bad with water. That's why I'm making the roof out of the stuff.
(more details with another update, but plan is 3/12 rise sheathed w/ 5/8 OSB with 2 layers of felt and then shingles.)
And you're correct, the board in the doorway isn't for anything at this point. I found it easiest to build the wall with the full 8 foot bottom plate, then I set it up and only secured the plate to the foundation on the sides. Cut out the middle flush with a recip. saw.
You'll see it in later pictures, I'm sure.
It looks great!
I'll second others remarks about anchoring it into the brick morter in few locations. also I'd use loose foam bead to fill the gap not chaulk.
Please post some pics of the doors when that are done.
Do you mean the spray foam? Too messy for this application, but it would work I'm sure. Or something else?
I'll keep posting updates.
Again, thanks for all the responses.