To avoid these ads, REGISTER NOW!

Show off your sheet metal fab projects

NASTYZEN

Well-known member
Joined
Jun 11, 2010
Messages
2,823
Location
St-Colomban,Que. Canada
I just spent at least a half hour reading this thread from post #1. I have dabbled in many of the processes shown here as a hobbyist. I'm afraid I'm a bit of a kludge by comparison. But, having tried makes me appreciate what I've seen even more.

However, you guys are so good at your craftsmanship that I'm afraid a lot of GJ members won't post here for fear of being embarrassed.

So, let me open the gates to others that struggle along and show you something I did several years ago in the beginning of my foray into metal work and car restoration (or mostly rust repair as many have pointed out is the bulk of the work).

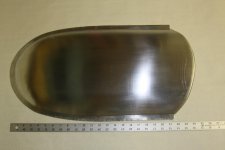
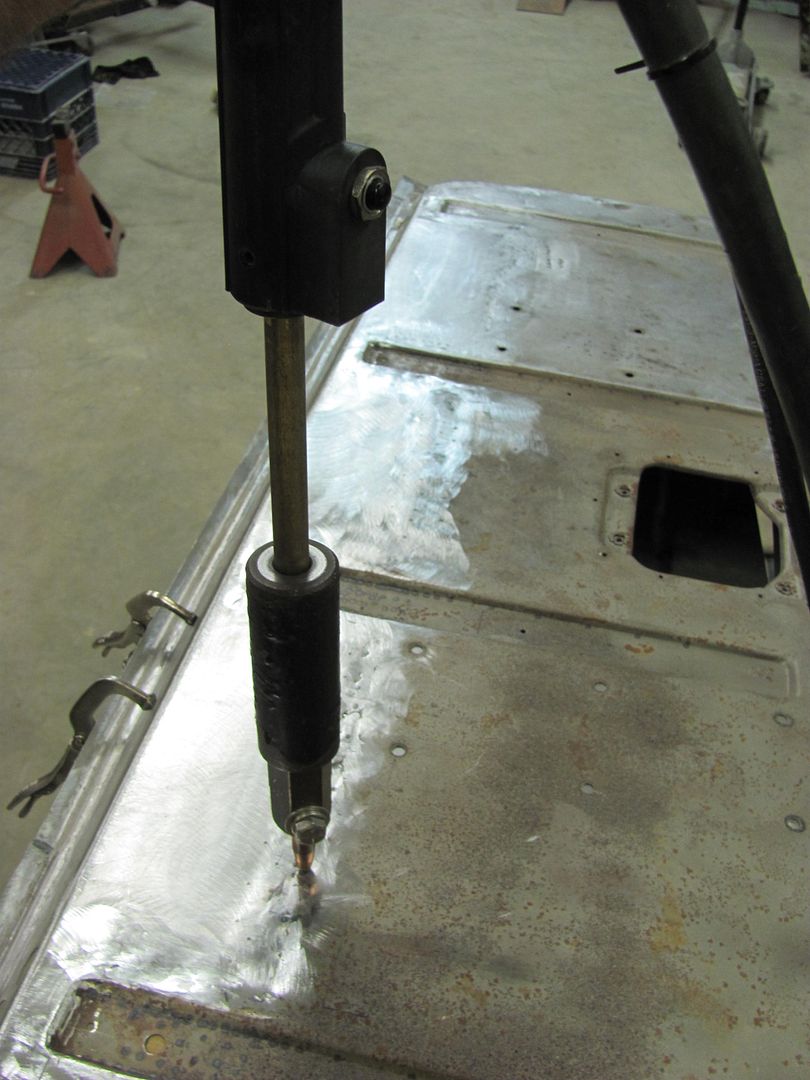
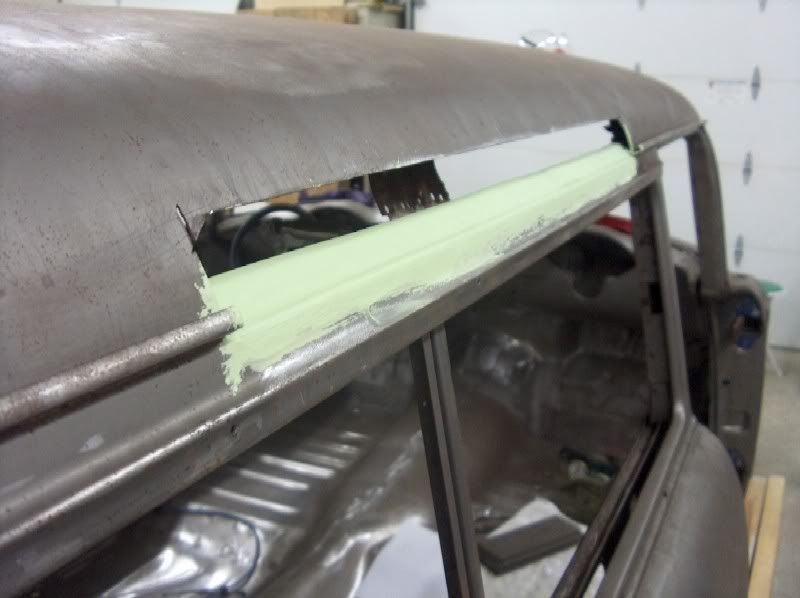
This is the lower portion of the rear quarter of a Porsche 911. It's a common rust repair that comes with replacing the rockers, lock post and sills (already done).

Dcp010651143857918.jpg


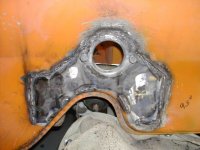
This is the worst pic and it shows every flaw in the work. When finished, it looked fine and painted out well. You can see I missed the radius that matched the door. I was able to save that with a little more work with a hammer and filing a bit off the door. the door was from another car ad Porsche doors don't always fit the same anyway.

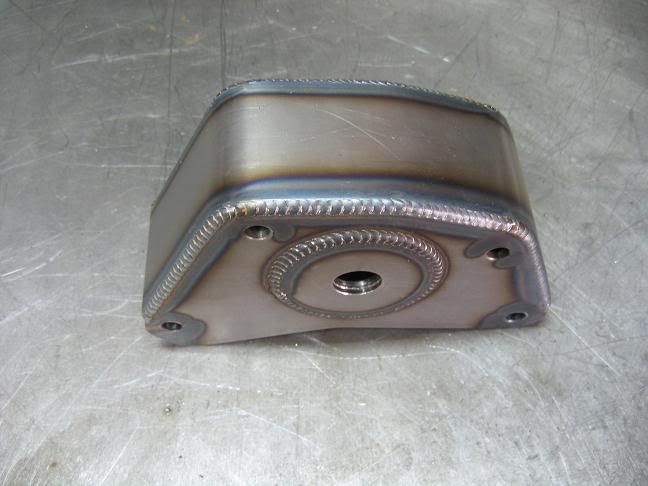
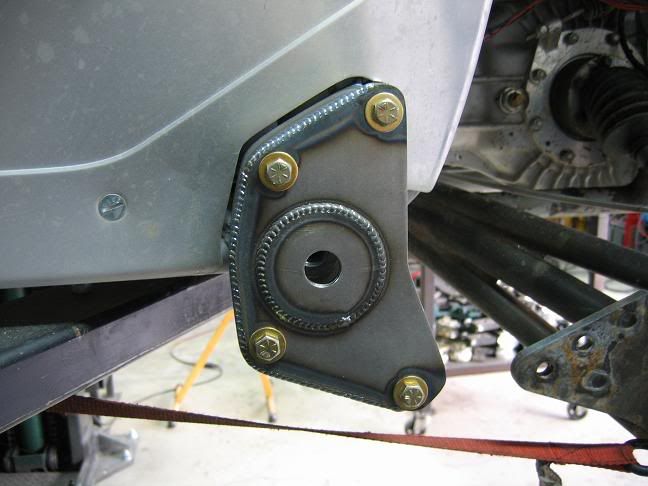
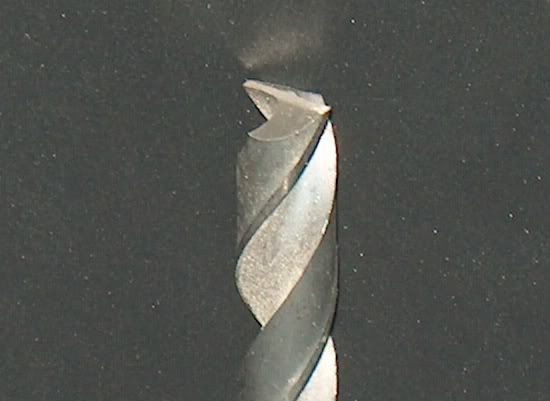
The piece is rolled to fit the body contour. Then I formed the flange. I had read about a trick and I did it. I cut a slot in the end of a 1/2" steel dowel that fit over the thickness of the sheet metal and cut it to the depth of the flange.

By slipping it around the inner circle and bending a degree or two at a time, eventually you will get your 90 degrees. I remember that winter and my carport/shop was wet 24/7. The rust looked like that overnight even with Ospho. But I got 'er done and went of to some interesting "rustoration."

So you guys that are just readers here, post up some stuff. The guys that are the best in the business would be the last guys to criticize you and I know that.

Thank's for your comments Milt. That's what this thread is about really,show us stuff that you've done in your garage.
I don't want to scare off any GJ members by posting. I happen to be a fabricator by trade and do all of this in my home shop. It shows that you can do anything out in the garage if you put your mind to it.
I remember when I first started out on my own in a tiny garage with almost no tools. My first project had been a set of front wings for a Formula Ford. I cut out the sheet with tin snips,bashed the ribbs out between two pieces of plywood with a claw hammer and used a broomstick and a scuba tank to pre bend the skin. I drilled out the rivet holes with an ancient B&D drill and pulled the rivets with a hand rivet puller. It was hell and took me days but I got her done.
Oh btw, nice (rustoration):thumbup:
 
To avoid these ads, REGISTER NOW!

NASTYZEN

Well-known member
Joined
Jun 11, 2010
Messages
2,823
Location
St-Colomban,Que. Canada
OK, so something a bit different.
A dual industrial cement mixer! I'm such a weldin whoore.:bounce:

imgp4549j.jpg


When they brought it to me, all the shafts were bent and someone had made a sad attempt to attach this huge pneumatic motor to the tubs.
Re made the motor to tub brkt's,impellers, shafts. Modified the old existing ROPE shaft seals.
Because of the torque of this monster, I idiot proofed all moving parts with sheet metal and put screens to keep stuff and body parts out of the mixer impellers.
Lastly I added some framing with attach points for on site transport.

imgp4527u.jpg


imgp4528i.jpg


imgp4529r.jpg


imgp4546.jpg


imgp4547g.jpg


imgp4548.jpg


:beer:
 

MP&C

Well-known member
Joined
Oct 21, 2009
Messages
4,396
Location
Leonardtown, MD
Milt, thanks for posting. Keeping those radiused door gaps consistent is definitely a challenge..


Nasty, I'm starting to realize you and I both share the inability to say no to a job... :lol_hitti You work on anything!
 

z28snksknr

Well-known member
Joined
Jul 8, 2009
Messages
1,827
Location
Turnersville, NJ
Question for the fabricators:

What tool are you using to get those nicely radiused holes in your steel? I asusme you cut the circles out to save weight, and then radius (if I'm even using the correct term here) the holes to add strength to the piece, but I can't think of how you accomplish the task.

Wwould it be possible for a hobbyist goof like me to form those using a hammer and a large curved surface?
 

NASTYZEN

Well-known member
Joined
Jun 11, 2010
Messages
2,823
Location
St-Colomban,Que. Canada
A picture is worth a thousand words.
This is how I do it.

imgp5947w.jpg


imgp5948.jpg


imgp5949.jpg


imgp5950.jpg


imgp5951.jpg


imgp5952t.jpg


imgp5953.jpg


Ta da!

imgp5954.jpg


It can be done with hammer and dolley or back die. But that requires a lot of practice to get right.
Where your part will go also determines the method of dimpling.
 

NASTYZEN

Well-known member
Joined
Jun 11, 2010
Messages
2,823
Location
St-Colomban,Que. Canada

914forme

Well-known member
Joined
Mar 19, 2006
Messages
106
Location
North of Dayton, Ohio
Nasty, is that MDF you are using for that flare die? Great Idea for an occasional die. And thank you Jim, I keep thinking about the Harbor Freight Punch set, I have an entire set of british punches, and a few green lines. But now that I see that setup, and I can build flaring dies for it, dang it, wish I never saw it.

Milt here you go. I redid my sway bars on my 914 to full roller bearing pivots in the body, and reinforced the front mounts. So I have some nasty pictures of my functional yet unattractive work.

I welded nuts onto the inner bearing support. And welded that to the inside of the 914, now I don't have to pull the gas tank to swap out sway bars.

First shot is the hole saw guide, I had to move the bar down a little to get clearance under the tank. So I welded in the inner bracket, and made this guide, bolted it up and ran a hole saw down it.

2nd pict show the 16 ga outside reinforcements I built to make sure the new bar would not ripe the 20 ga shell out. Next two are the close to finished products, sealed from the elements then painted with Eastwood Corroless. Next one is assembled so you get an idea of what I was doing. And the last one is a rear toe adjuster for the rear suspension. And if any of you like Milt and I own old cars you know what happened next. I opened up the other side for that toe adjuster and found no real metal to attach to. Which lead to a logitudal replacement. Not sure where my pictures are of that project.
 

Attachments

  • Rear Toe adjuster.jpg
    Rear Toe adjuster.jpg
    33.8 KB · Views: 170
  • Finished product before paint.jpg
    Finished product before paint.jpg
    35.4 KB · Views: 183
  • Under the tank.jpg
    Under the tank.jpg
    32.6 KB · Views: 165
  • Finished Welding.jpg
    Finished Welding.jpg
    32.6 KB · Views: 174
  • Hole Saw guide.jpg
    Hole Saw guide.jpg
    20.9 KB · Views: 162
Last edited:

NASTYZEN

Well-known member
Joined
Jun 11, 2010
Messages
2,823
Location
St-Colomban,Que. Canada
Nasty, is that MDF you are using for that flare die? Great Idea for an occasional die. And thank you Jim, I keep thinking about the Harbor Freight Punch set, I have an entire set of british punches, and a few green lines. But now that I see that setup, and I can build flaring dies for it, dang it, wish I never saw it.

Milt here you go. I redid my sway bars on my 914 to full roller bearing pivots in the body, and reinforced the front mounts. So I have some nasty pictures of my functional yet unattractive work.

I welded nuts onto the inner bearing support. And welded that to the inside of the 914, now I don't have to pull the gas tank to swap out sway bars.

First shot is the hole saw guide, I had to move the bar down a little to get clearance under the tank. So I welded in the inner bracket, and made this guide, bolted it up and ran a hole saw down it.

2nd pict show the 16 ga outside reinforcements I built to make sure the new bar would not ripe the 20 ga shell out. Next two are the close to finished products, sealed from the elements then painted with Eastwood Corroless. Next one is assembled so you get an idea of what I was doing. And the last one is a rear toe adjuster for the rear suspension. And if any of you like Milt and I own old cars you know what happened next. I opened up the other side for that toe adjuster and found no real metal to attach to. Which lead to a logitudal replacement. Not sure where my pictures are of that project.

Yes that is MDF.I only had three parts to make.
Nice job on the sway bar.
Looking at your trailing arms, I see they are only in single shear. You might want to upgrade to a double shear setup similar to what ZTfab has done for his buggy.You don't have to go as heavy gauge, maybe 14G. or so.
:beer:
 

slowmo5o

Well-known member
Joined
Jul 23, 2009
Messages
125
Location
Minnesota
I make these candle holders and each hole needs a 3/4" pilot hole to use the knock out punch mentioned above. It takes quite a while to drill all the pilot holes so I made a punch to punch them out in the shop press instead of drilling. It is still a work in progress but it works.
 

Attachments

  • p2.jpg
    p2.jpg
    56.5 KB · Views: 252
  • p1.jpg
    p1.jpg
    47.8 KB · Views: 316
  • cp.JPG
    cp.JPG
    90.6 KB · Views: 251
  • c1.JPG
    c1.JPG
    131.2 KB · Views: 256

slowmo5o

Well-known member
Joined
Jul 23, 2009
Messages
125
Location
Minnesota
Looks good and works too! I did the same when I first started.Soon your going to make yourself a 3/4 and be even more efficient.

The one in the picture is 3/4". I think the next step I will take is fitting the dies from the knockout punch to the one I made.
 

914forme

Well-known member
Joined
Mar 19, 2006
Messages
106
Location
North of Dayton, Ohio
Yes that is MDF.I only had three parts to make.
Nice job on the sway bar.
Looking at your trailing arms, I see they are only in single shear. You might want to upgrade to a double shear setup similar to what ZTfab has done for his buggy.You don't have to go as heavy gauge, maybe 14G. or so.
:beer:

Yeah for three parts MDF is the way to go. :bounce:

I have thought about running double sheer, the lower arm mount is double sheer. But yes the upper is single. Thinking about it the double sheer would lighten the part. Sounds like a great project for in a week or two. Right now I am cleaning my garage after a huge house renovation. I hate a messy garage.

Now I am wondering what it would take the make that part out of a lighter material. My rear bar uses Aluminum arms. But the force generated on them is so little poundage wise that the Aluminum could do the job.
 

MP&C

Well-known member
Joined
Oct 21, 2009
Messages
4,396
Location
Leonardtown, MD
Had the day off today and picked up some fresh sandblasting media so I could finally finish the inside of the gate. One thing I noticed, even though the weld dots were planished as we went, you could see where the metal had shrunk from welding around the lower perimeter of the bead detail. As the inside (bottom) of the bead did not shrink, this caused the metal to deform in the shape of an arc, or concave bow.


Picture103.jpg


To help to remedy this situation, and since we had already stretched the welds a bit, I thought I'd try my hand at shrinking the bottom area of the bead detail.. I put the heat tip in the trusty dent puller....


Picture108.jpg


Picture109.jpg


.......And working alongside the lower edges of the bead.....


Picture111.jpg


....was able to get most of the deformation out.


Picture105.jpg


Picture102.jpg


Picture106.jpg


Picture107.jpg


Some of the other shrinks outside our repair area were to help flatten out where the "loading side" of the tailgate has been used and abused over the years.


Picture112.jpg


Test fitting some of the internal components:


Picture113.jpg


Picture115.jpg


Picture117.jpg


Why is it I always miss something.....one more piece to bend up.......


Picture116.jpg
 
To avoid these ads, REGISTER NOW!

MP&C

Well-known member
Joined
Oct 21, 2009
Messages
4,396
Location
Leonardtown, MD
For today's progress, here's some more pictures showing the shrinks and the results in straightening the bead details.....


Picture118.jpg


Picture120.jpg


Picture119.jpg


Picture121.jpg


Checking the angle to form up the second stiffener brace.....


Picture123.jpg


Picture124.jpg


In the booth for a good coat of epoxy primer before all the parts get welded together......


Picture125.jpg


Picture126.jpg


Picture127.jpg


Picture128.jpg
 

NASTYZEN

Well-known member
Joined
Jun 11, 2010
Messages
2,823
Location
St-Colomban,Que. Canada
These wings and deflector plates were made to fit a racing simulator.
Yes some people have more money than they know what to do with...:bounce:
The tire was only to test clearances and the white on the wings is a pvc film to protect the bare Alu.


miscprojects238.jpg


miscprojects237.jpg


:beer:
 

MP&C

Well-known member
Joined
Oct 21, 2009
Messages
4,396
Location
Leonardtown, MD
House of Kolor KP-2CF.

FYI, not compatible with Ospho type rust conversion coatings. But I've used it on Steel, Aluminum, carbon fiber, and F/G. Good results on everything I've used it on other than Ospho.
 

JC23

Well-known member
Joined
Dec 31, 2009
Messages
11,718
Location
Northcoast
House of Kolor KP-2CF.

FYI, not compatible with Ospho type rust conversion coatings. But I've used it on Steel, Aluminum, carbon fiber, and F/G. Good results on everything I've used it on other than Ospho.

What happens when you weld on it?
 

MP&C

Well-known member
Joined
Oct 21, 2009
Messages
4,396
Location
Leonardtown, MD
Just prior to welding, I will clean the epoxy primer out of the hole (for plug welds) using a drill bit the same size as the plug welds, that I have flattened and backfaced to form a cutter similar to an end mill. Does a nice job of cleaning out the plug weld hole, and by the end being flat, it is has little to no tendency to drill into the adjacent panel:


146d4d8e.jpg


pic001.jpg


pic002.jpg


I've found that if the epoxy is allowed to cure for about a week there is less damage from heat, mostly just discoloration. If the metal has been media blasted for better adhesion, especially so. (Of course, I can only speak to the EP I am using, I have not tried this using other brands) But I can say there is a noticeable difference in how the EP will react to heat from welding from a one day cure to a one week cure. With the discoloration, normally hitting it with a piece of scotchbrite reveals the green paint again on the cured stuff. For other than plug welds, you will need to clean as much paint back to allow the weld process. This stuff is not a weld through primer.
 

SWT Racing

Well-known member
Joined
Jun 13, 2009
Messages
137
Location
South Carolina
Here's a spoiler I made for the back of my twin turbo '72 Vega drag car. All 5052-H32 Aluminum with 4130 strut supports. The wickerbill is fully adjustable from 1/8" to 3/4":
 

Attachments

  • IMG00039-20100730-1914[1] (Medium).jpg
    IMG00039-20100730-1914[1] (Medium).jpg
    100.5 KB · Views: 218
  • DSCN5997 (Medium).JPG
    DSCN5997 (Medium).JPG
    106.9 KB · Views: 183

ckpitt55

Well-known member
Joined
Jan 15, 2011
Messages
108
Location
PA
Here are some pieces I made for my buddies Chenowth Explorer Dual Sport desert car. These are the spring plates that go on the end of the rear torsion housing and are setup for coil-overs, basically eliminating the torsions just providing a pivot point for the trailing arm.

The originals were made by another shop (that is now out of business for obvious reasons). They failed on the second trip with the car.

I re-did them using 3/16" Cold rolled Steel for the main plates, 11ga CRS for the cap and laminate washer. I also made them a double-shear mount rather than single.

The new ones:

IMG_2554.jpg


IMG_2560.jpg


IMG_2561.jpg


IMG_2563.jpg


IMG_2565.jpg


IMG_2567.jpg

:bow:

zt your welds are unreal. i feel like it would be a sin to cover them in paint or anything that would hide them from view.

some serious craftsmen on this site, my hat goes off to you all. hopefully one day ill be able to hold my own
 

ZTFab

Well-known member
Joined
Jan 6, 2008
Messages
397
Location
Upland, CA
:bow:

zt your welds are unreal. i feel like it would be a sin to cover them in paint or anything that would hide them from view.

some serious craftsmen on this site, my hat goes off to you all. hopefully one day ill be able to hold my own

Thank you very much!

There are definitely a lot of talented folks here.
 

Shawn 007

Member
Joined
Nov 14, 2010
Messages
11
Here are a few parts I have made for customers this year..
 

Attachments

  • air scoop 014.jpg
    air scoop 014.jpg
    130.9 KB · Views: 211
  • Miscellaneous Pictures and sheetmetal 010.jpg
    Miscellaneous Pictures and sheetmetal 010.jpg
    135 KB · Views: 296
  • 3-29-2011 photos 098.jpg
    3-29-2011 photos 098.jpg
    43.3 KB · Views: 261
  • fender bead 081.JPG
    fender bead 081.JPG
    143 KB · Views: 219
To avoid these ads, REGISTER NOW!
Top Bottom