To avoid these ads, REGISTER NOW!

My DIY cabinets/shelves

OP
R

redman43

Well-known member
Joined
Aug 2, 2010
Messages
181
Location
Lake Stevens, WA
Freddy,
I'll try to remember to get some measurements tonight and post em up.

Both shelves in the smaller "car care" cabinet have roughly the same open vertical space. Its a few inches taller than the paper towel roll, so I guess roughly 14-15 inches.

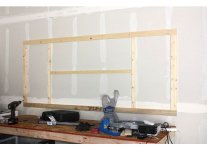
I was willing to accept the 4"+ for the overall shelf thickness because I wanted the strength that went along with it. A 2x3 might have been strong enough for my application, but I don't know. If you're tying it to the floor with vertical legs or back to the wall with 45* legs, I would think you'll probably be fine with 2x3 lumber. The only concern I might have is when assembling the shelf frames, you have to secure everything by butting one end of the side piece up against the inside face of the front/rear pieces. A 2x3 doesn't offer a whole lot of real estate for that kind of attachment. The 2x4 gave me the screw seperation I was comfortable with.

dreamingmuscle,
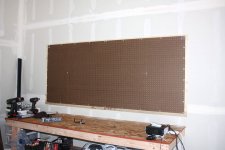
Base trim on the large cabinets will happen when doors go up. I'm now leaning towards closet door applications for closing off the big unit.
 
To avoid these ads, REGISTER NOW!

John in OH

Well-known member
Joined
Jun 2, 2007
Messages
2,444
Location
SE Ohio & Eastern Virginia
redman43 -- Very nice job! It looks as if you gave this layout a lot of thought before you began and it has turned out well.

Were the multiple outlets on the wall originally (which I doubt if it was a tract house build) or did you add them when you built your bench? If you added them, good thinking! Ya can never have too many outlets or lights! .... Which then begs the question -- are you going to add any lights over the workbench?
 
OP
R

redman43

Well-known member
Joined
Aug 2, 2010
Messages
181
Location
Lake Stevens, WA
John,
You have no idea how much planning this took. I must have drawn up 5 or more different layouts for each of the units, using slightly different dimensions for width, shelf height, shelf frame material, etc, just trying to get something I was comfortable with that used as little materials as possible. I even factored in my cutting diagrams to make sure there would be little to no scrap material left over. Many hours were wasted at work. :lol_hitti

There was only one outlet above the bench when the house was built for us. I knew I would need others, so I added the conduit for the rest of the outlets after the bench was completed. I might send one run up to the corner unit so I can plug in a stereo up there and get it off the benchtop. I'm thinking at least one magnifying light on an articulating arm for soldering and other small tasks and a few small fixtures under the top cabinets to light the benchtop.
 

freddyaudiophile

Well-known member
Joined
Aug 3, 2011
Messages
49
Location
New Brunswick, Canada
another question for you redman... those cabinets above your workbench, how tall and deep are they? I think you mentioned earlier that the left bank is 3 feet wide and the others are 2 feet wide.

Also, about how far up off your benches are these shelves and how high is that strip of peg board on top of your workbench?

Sorry for all the questions! I'm trying to plan out my space (in Microsoft Visio) and am trying to put your fine workmanship into perspective in my 22'x28' storage barn with 10' ceilings.
 
OP
R

redman43

Well-known member
Joined
Aug 2, 2010
Messages
181
Location
Lake Stevens, WA
alright, some measurements...

The pegboard is 15 inches tall.

The cabinets above the bench are all 12 inches deep by 24 inches tall. Each unit in the bank on the left is 24 inches wide (interior width) and each unit in the bank on the right is 32 inches wide (interior width). Add 1.5 inches to each unit for the exterior width. The lower shelves are 12.75 inches tall and the upper shelves are 9 inches tall. It's 25 inches to the ceiling and 23 inches to the benchtop.

The "car care" cabinet shelves are 13 inches tall.

Need any other measurements? Just ask away.
 

freddyaudiophile

Well-known member
Joined
Aug 3, 2011
Messages
49
Location
New Brunswick, Canada
Thanks man!!! Will print out your shelving pictures and write all the dimensions down on them for reference. My barn is still another 3 or 4 weeks until it is done... waiting on the electrical now and that is holding up the show.

What depth of flush-cutting bit did you use? I was going to buy a Freud one that is either 1.5" or 2" deep. Hopefully, I can find a good fixed-based router on sale over the next few weeks... :)
 
OP
R

redman43

Well-known member
Joined
Aug 2, 2010
Messages
181
Location
Lake Stevens, WA
By the way, the corner unit was just cut to fit whatever hole was left over after mounting the left and right bank. I purposefully angled it such that the opening would be larger than it would have been at a 45*. Plus, my bench top isn't 24" deep on both legs. The left leg is 24", but the right leg is only 20". Angling the corner unit made accessing it easier with the bench top depths I was working with.
 

mishenka

Member
Joined
Aug 10, 2011
Messages
19
Jared (redman43) - amazing work! I cannot even imagine how much time went into planning all that:) I have a question - sorry if it is a stupid question; I am new here and perhaps not as handy as most of the guys here.

I have a similar size garage (20x20) and just finished painting it, here are pics if interested http://www.garagejournal.com/forum/showthread.php?t=112823. I want to place a peg board, perhaps a bit larger size than you had but I am not sure what is the proper way of attaching it to the wall. Please help. Sorry if this is a dumb question. How did you screw it into the wall so there is still some space between the pegboard and the wall? I assume there should be some space left between the wall and the pegboard, right? I thought of placing some metal spacers on a screw between the wall and the back of the board as it goes into the wall. Any advice or pictures are greatly appreciated.

Another quick question - do you ever plan to actually park two cars in the garage? would there be enough space to park two cars with all the nice things you built there?

Thank you very much!
 

freddyaudiophile

Well-known member
Joined
Aug 3, 2011
Messages
49
Location
New Brunswick, Canada
One option would be to make up a frame roughly the same size as your peg board using 1"x lumber. Once built, secure the peg board to frame and secure both to the wall wherever you want to mount your peg board (as attached). These are not my photos mind you but from all sources. I've installed peg boards this way in the past.

Some people just want to see the peg board and not the frame, so you can make the frame the exact same width and length as the piece of peg board. Some people prefer to have the frame stick out a bit around the peg board... whatever you want basically. Use 2", 3" or 4" wide lumber depending on the look you want.

You might want some mid-supports too, as shown.

Have fun... and there is no such thing as a stupid question.
 

Attachments

  • ry=400.jpg
    ry=400.jpg
    26.3 KB · Views: 329
  • ry=480.jpg
    ry=480.jpg
    50.1 KB · Views: 328
Last edited:

mishenka

Member
Joined
Aug 10, 2011
Messages
19
freddyaudiophile - that's a great idea. Thank you very much. I didn't think of the frame obviousely:) having a frame, especially with the mid-support perhaps makes this installation more rigid than frameless? Will wait to see how Jared did just so I can compare.

Where can I buy all this pegboard attachments to hang the tools? Or people usually just use whatever hard wire they have around to bend any hooks needed?
 
To avoid these ads, REGISTER NOW!

Blivit

Member
Joined
Jul 28, 2006
Messages
7
redman43, your wall cabinet setup above your workbench is the exact setup I am planning. Same corner, just different sizes.

My question is how did you construct these? I can see the pocket holes and the bolts holding the 2x4(?) to the wall but how is the actual cabinet held to the 2x4? Did you fasten the back boards to the wall then build the cabinet to that or build the cabinet with the back board attached then hang the whole assembly?

...after thinking about it and looking some more...I may have figured it out but would still like to hear how you constructed them.
 
OP
R

redman43

Well-known member
Joined
Aug 2, 2010
Messages
181
Location
Lake Stevens, WA
mishenka,
I just used 1x2 lumber to build a frame and then mounted the whole assembly to the wall. The only downside is that you lose the ability to use the outer two holes all the way around due to the frame back there. I would have loved to get steel pegboard, but the budget wouldn't allow it. The hangers can be found online or in just about any home improvement or hardware store (Home Depot, Lowes, Ace Hardware, etc). I would imagine you could even make your own if you are handy with a welder.

Blivit,
The mounting plates (3/4 plywood) for the cabinets above the bench are also pocket holed to the cabinet units. I attached them prior to mounting the whole unit to the wall. The only challenge was getting those mounting plates to align with the back edge of the unit. I did it by hand and got them all within 1/16 of an inch or so. A simple jig could probably do even better.
 

DIYKiah

Well-known member
Joined
Mar 15, 2012
Messages
255
Location
Harnett County, North Carolina
I agree with the comment "stain it because paint is for covering up woodworking mistakes"

Thought that was very funny and true! It reminds me of all of my father's woodworking "projects" that needed about 10 coats of paint to cover up all his mistakes lol

Also be sure to check out DIYGarageShelf if you are thinking about doing garage shelving... not that you can't build shelves yourself its just that it is that much easier if you already have all the brackets pre-built for ya. Makes the project go a lot faster! :bounce::bounce:
 

FrankHotdog

New member
Joined
Jul 27, 2013
Messages
4
Location
Charlotte, NC
I really like your cabinets above the bench. I built some last weekend. Thanks for the inspiration.
4gsu9e.jpg
 

zcar751

Well-known member
Joined
Apr 15, 2013
Messages
837
Location
Knoxville, TN
Nicely done. I like the use of the pocket hole screws. I will be doing the same once I finish up on the dry wall.
 

nesw20

Well-known member
Joined
Oct 17, 2013
Messages
182
looks great! i might be doing something similar above my utility sink
 

ebroaddus

New member
Joined
Mar 4, 2014
Messages
1
I know this thread originated a few years ago, but I was hoping I could get some help. I am in the process of doing some much needed organization in my garage. I am going to first put up some shelving similar to your larger wall cabinet/shelf (the one that is 72'' X 24"" X 7'). I have a couple of questions:

1) did you use pocket hole joinery for the larger wall cabinet/shelves similar to the way you did the smaller cabinets over your workbench?

2) I noticed there is not a vertical support on the middle front-side of the large wall cabinet/shelves. Are your shelves still holding up and not sagging too much without this support? I am planning on storing most of my heavier items (portable air compressor, small & large yetties, etc.) and was wondering if I should consider having this vertical support on the front side.
 

mdbeck1

Well-known member
Joined
Mar 7, 2010
Messages
2,297
Location
Norman, OK
I know this thread originated a few years ago, but I was hoping I could get some help. I am in the process of doing some much needed organization in my garage. I am going to first put up some shelving similar to your larger wall cabinet/shelf (the one that is 72'' X 24"" X 7'). I have a couple of questions:

1) did you use pocket hole joinery for the larger wall cabinet/shelves similar to the way you did the smaller cabinets over your workbench?

2) I noticed there is not a vertical support on the middle front-side of the large wall cabinet/shelves. Are your shelves still holding up and not sagging too much without this support? I am planning on storing most of my heavier items (portable air compressor, small & large yetties, etc.) and was wondering if I should consider having this vertical support on the front side.

It wasn't my post but if you are worried about the shelving sagging and don't want a "post" going down, put one going up (tie into a rafter). Make sure you don't have just a "****" connection. Those aren't real strong.
 

hambobby

New member
Joined
Oct 9, 2014
Messages
1
Hi Jared,

Do you have any instructions on how to do this? I am a complete beginner to DIY and would love to build the large storage units you've shown here but no idea how to start.

Thank you

H
 
To avoid these ads, REGISTER NOW!
Top Bottom