To avoid these ads, REGISTER NOW!

Reorganization, it's like a renovation.

Status
Not open for further replies.
OP
G

GirlnAgarage

Well-known member
Joined
Jan 21, 2011
Messages
4,668
Location
Texas
I. Am. So. Tired. Can. Barely. Lift. My. Beeeeeer.


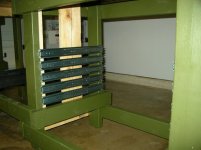
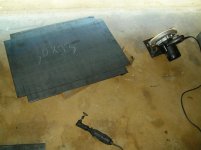
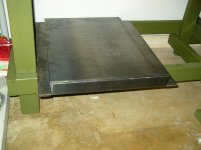
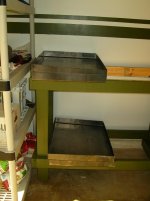
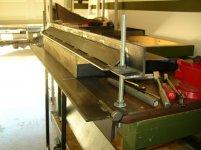
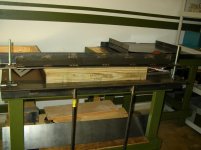
Let's see, today I drew the folds lines. Then drilled my corner relief holes. Ate lunch then went out and cut 8 of 10 drawer corners. That made a lot of scrap tabs. Cleaned up the edges and they were ready for folding. Folded one side of all eight. Then went back and folded the second side. Reason being I have to undo one side of the brake to slide out the sheet after it has a bend on each end. I got four done and called it a day. I busted my ****. Literally. As I was undoing a nut it got crossed threaded something fierce. As I cranked down harder on the ratchet, POP!, and my azz was on the ground. I guess throwing my leg up to apply more force to the wrench holding the bolt head left me a little off kilter. I rested a moment, wondering if any neighbors happened to see that graceful move. Got up and got the last one bent and pulled out.

Called it a day at that point. Doesn't look like I got a whole lot done but I sure spent a lot of time and effort.

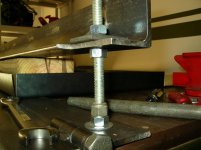
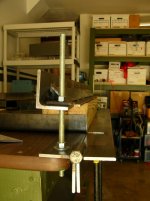
The nut & bolt setup is extraordinarily inefficient. Takes too long to pull out a bent sheet and insert the next for bending. Streamlining that would be awesome.

Ok, gotta scare up some supper.


haha sorry I forgot the pics.
 

Attachments

  • drawer2.jpg
    drawer2.jpg
    75.7 KB · Views: 260
  • drawer3.jpg
    drawer3.jpg
    64.4 KB · Views: 264
  • drawer4.jpg
    drawer4.jpg
    46.8 KB · Views: 318
  • drawer5.jpg
    drawer5.jpg
    66.8 KB · Views: 308
Last edited:
To avoid these ads, REGISTER NOW!

rickairmedic

Well-known member
Joined
May 31, 2005
Messages
4,165
Location
louisville ,Ky
Looks like you got quite a bit done to me all things considered . The drawers are shaping up nicely. I am guessing the final plan is to weld up the corners after getting everything bent up .


Rick
 
OP
G

GirlnAgarage

Well-known member
Joined
Jan 21, 2011
Messages
4,668
Location
Texas
Looks like you got quite a bit done to me all things considered . The drawers are shaping up nicely. I am guessing the final plan is to weld up the corners after getting everything bent up .


Rick


That is correct, gonna weld up the seams at each corner. I need to run some practice beads on the scrap tabs and get a feel for my settings. Should go ok, I've run thin wall material before, it was hairy at first but figured it out.
 
OP
G

GirlnAgarage

Well-known member
Joined
Jan 21, 2011
Messages
4,668
Location
Texas
That's looking awesome. Very ingenuitive (word?).

What color are you going with?


Not certain yet.

I don't think I want green. I'm considering semigloss black like the other metal accessories. (If I go with wrench handles they'd really stand out). Plus I have black spray paint on the shelf.
 
OP
G

GirlnAgarage

Well-known member
Joined
Jan 21, 2011
Messages
4,668
Location
Texas
Yay my little Craftsman name plate arrived. Don't know where I'll put it but it's cool.
 

Attachments

  • Cman.jpg
    Cman.jpg
    113 KB · Views: 71

rickairmedic

Well-known member
Joined
May 31, 2005
Messages
4,165
Location
louisville ,Ky
That is correct, gonna weld up the seams at each corner. I need to run some practice beads on the scrap tabs and get a feel for my settings. Should go ok, I've run thin wall material before, it was hairy at first but figured it out.


When you get your corners set up tack the top of the corner then put a tack halfway down . Do this to each corner on the drawer and then go back and burn them in . Keep your BFH handy incase you need to pursuede them back into line before doing the final beads . 16 guage shouldnt give you to much fuss .

Rick
 
OP
G

GirlnAgarage

Well-known member
Joined
Jan 21, 2011
Messages
4,668
Location
Texas
Thanks Rick. I will do that. So far looks like I got my corners pretty close . That ought to help the weld up.


Well I got a little closer. And I have four drawers :rocker:


19" (bends 1 & 2): http://img52.imageshack.us/img52/765/ylwz.mp4

26" (bends 3 & 4): http://img171.imageshack.us/img171/2552/ht7.mp4


I cut a piece of 4x6 for my inside-the-box clamping jig. I'll let the photos explain the rest. You'll see I added nuts under the top piece. I figured that out after I slide the wood and box out from under and dropped the top on my hand. Not cool. But I'm a quick learner.

I had trouble getting the shim to stay put when I tried to get past full 90*. It slid up and out between the slick faces of the bender and drawer side. Since the sides were pretty close I decided to get the full 90* with a rubber mallet and some persuasion. Worked like a charm.

Four more of these drawers, then the smaller two and I can start attaching draw slides, mount them and get handles on. I know I'm kinda slow :eek:
 

Attachments

  • bend34setup6.jpg
    bend34setup6.jpg
    59.7 KB · Views: 352
  • bend34setup5.jpg
    bend34setup5.jpg
    68.8 KB · Views: 364
  • bend34setup4.jpg
    bend34setup4.jpg
    75.2 KB · Views: 337
  • bend34setup3.jpg
    bend34setup3.jpg
    63.5 KB · Views: 342
  • bend34setup2.jpg
    bend34setup2.jpg
    68.6 KB · Views: 359
  • bend34setup1.jpg
    bend34setup1.jpg
    68.9 KB · Views: 363
  • bend34setup.jpg
    bend34setup.jpg
    68.1 KB · Views: 348

rickairmedic

Well-known member
Joined
May 31, 2005
Messages
4,165
Location
louisville ,Ky
Well looky there nice finger brake adapter :D. I also dont think your moving slow at all " set up " is most of the job and usually takes longer than the actual job :D. You also need to remember most of us know you are doing all of this " single handedly " " litteraly " :D.


Rick
 
OP
G

GirlnAgarage

Well-known member
Joined
Jan 21, 2011
Messages
4,668
Location
Texas
Thanks Gents :)


As I finished cutting the 4x6 today I stepped back and looked at everything I put together. Almost couldn't believe how deep I'm in. And the stuff is working too. That's the craziest part.
 

nkachur

Well-known member
Joined
Jun 29, 2008
Messages
798
Location
Manitoba Canada
I am totally in awe. The idea of a shim to convert the brake is brilliant. The brake works awsome. I have had access to manufactured brakes for my projects but I must say that you have taken "nessistity is the mother of invention" to a whole new level.

Congratulations
 
Last edited:
OP
G

GirlnAgarage

Well-known member
Joined
Jan 21, 2011
Messages
4,668
Location
Texas
I am totally in awe. The idea of a shim to convert the brake is brilliant. The brake works awsome. I have had access to manufactured brakes for my projects but I must say that you have taken "nessestity is the mother of invention" to a whole new level.

Congratulations


:beer:


Just wrapped up bending the other four drawers. Got all my sides up where I want them and I'm satisfied with the corner match up. We'll see if I feel the same when I'm welding them.

Gonna have lunch and watch some football, then I got a hair appointment. I'll start welding this afternoon or tomorrow.
 

melliott28

Well-known member
Joined
Jul 26, 2010
Messages
181
Location
Plano, TX
This is a great project and your work is very impressive. I am looking forward to seeing the finished product.
 

rickairmedic

Well-known member
Joined
May 31, 2005
Messages
4,165
Location
louisville ,Ky
I just want to make sure I got this right . You went to get your hair done so you can mess it up by putting on your hood right :D.


Rick
 
OP
G

GirlnAgarage

Well-known member
Joined
Jan 21, 2011
Messages
4,668
Location
Texas
I just want to make sure I got this right . You went to get your hair done so you can mess it up by putting on your hood right :D.


Rick

Well yeah :spit:


I'm gonna maybe start welding tomorrow. I took the day to goof around with DH and chill. He's been gone all week so we're catching up :drunk:
 
To avoid these ads, REGISTER NOW!

c/o say

Well-known member
Joined
Mar 8, 2011
Messages
322
Location
Indiana
Great job on bending your last two sides you had me wondering how you were going to do it. Worked like a charm its looking good.
 

The Slurpee King

Well-known member
Joined
Jun 19, 2011
Messages
173
Location
Behind the wheel of my truck
Watching those two videos helped me to understand most of what I was reading about how to modify and/or improve your brake; I know what a brake is for, but...that's it (metal shop was a compulsory 2-month component in a "life skills" course in junior high, a Very Long Time Ago, in another province). Everything else was pretty obscure to me. All the pictures helped some, but actually seeing it work, and how, put power to the light bulb. Thanks.
 
OP
G

GirlnAgarage

Well-known member
Joined
Jan 21, 2011
Messages
4,668
Location
Texas
Thanks yall :)


One corner down, 31 to go. Welding these will be a pretty good challenge. Only welded up one drawer. I'm not feeling too good so, just enough to get my marks. I'll be on it this week though. Hopefully it's just a full lazy Sunday.


Edit: Ok, got four drawers welded up. It's not the prettiest. Tough with .035" fluxcore. I'm running as low as I can go with still enough juice to burn the wire. I'm running vertical down and giving the gun a good angle so I'm not firing straight into the workpiece (to ward off burn through).
 

Attachments

  • cornercomplete.jpg
    cornercomplete.jpg
    63.7 KB · Views: 292
Last edited:

c/o say

Well-known member
Joined
Mar 8, 2011
Messages
322
Location
Indiana
Girl go get a piece of copper bar use it as a backer while your welding works as a heat sink to help from burning /blowing thru alum will also work.
 

rickairmedic

Well-known member
Joined
May 31, 2005
Messages
4,165
Location
louisville ,Ky
Girl that corner looks like it dressed up pretty nice to me . I have to ask is that steel galvanised ? Let us know if it is as welding galvanised is pretty bad news especially indoors .


Ok now apart from that you can actually throw some decent heat at 16 guage without to much fear of burn through . I have welded up sheetmetal on a ford ranger ( think bud light can ) :D with .035 fluxcore . The trick is to move around like I said earlier . Put a tack at the top of a corner . Move to the next corner and tack the top . Keep doing this all the way around . Then tack the center of each seam . Thsi will leave you pretty short beads to run between tacks . When I was doing thinner guage sheetmetal maybe 22 guage on a good day and putting in a patch panel . I would work around the patch with tacks adding a new tack between the last set of tacks as I worked around the patch .


This gave the metal time to cool down between tacks and eventually all the tacks worked out to a fully welded seam . I dont think you will need to do all that on 16 guage . I am sure that with tacks like I said to do it you will be fine . You could also run a bead between a set of tacks on one corner and move to the next corner and work your way around that way to keep the heat down .


Rick
 

rickairmedic

Well-known member
Joined
May 31, 2005
Messages
4,165
Location
louisville ,Ky
Girl go get a piece of copper bar use it as a backer while your welding works as a heat sink to help from burning /blowing thru alum will also work.


A short piece of 3/4" copper plumbing pipe " flatened out " will also work well in this application and is much easier to source .


Rick
 
OP
G

GirlnAgarage

Well-known member
Joined
Jan 21, 2011
Messages
4,668
Location
Texas
Thanks for the tips. I've got some aluminum I might stick under there. Since I have my right angle clamps on there it's a little tight but I'll figure it out.

Rick, I'm using mild steel. It looks galvanized because it's ground down to shiny metal.
 

rickairmedic

Well-known member
Joined
May 31, 2005
Messages
4,165
Location
louisville ,Ky
Ok good on the galvanized just had me worried when you said you were feeling sick :).

I wouldnt worry to much about getting a backer in there like I said 16 guage is pretty stout steel.


Rick
 
OP
G

GirlnAgarage

Well-known member
Joined
Jan 21, 2011
Messages
4,668
Location
Texas
Ok good on the galvanized just had me worried when you said you were feeling sick :).

I wouldnt worry to much about getting a backer in there like I said 16 guage is pretty stout steel.


Rick


Ahhh, yeah. That crossed my mind, "Did I burn and sniff something I wasn't suppose too?" :wtf: Nah, I've been dragging all week. The change in weather has kicked up allergies and now being cool instead of hot my body is acclimating...I'm a delicate flower :spit:


Drawers are looking awesome! Keep it coming!


:beer:
 
OP
G

GirlnAgarage

Well-known member
Joined
Jan 21, 2011
Messages
4,668
Location
Texas
Keep welding 'til the hole's too big :D


Welding up the final four drawers. Hopefully have most of them cleaned up, all if I'm lucky.
 
OP
G

GirlnAgarage

Well-known member
Joined
Jan 21, 2011
Messages
4,668
Location
Texas
All drawers welded and ground, except for two corners on the lats drawer :eyecrazy: Gonna grab more grinding discs tomorrow and finish that up.

Once that's done I can start poking holes for drawer slides. Before final assembly I'm going to prep, prime and paint. I think I'm going with black.


No pics today, they'd be boring. Now to work on dinner.
 
OP
G

GirlnAgarage

Well-known member
Joined
Jan 21, 2011
Messages
4,668
Location
Texas
So what's for Dinner? :D

Brisket, steamed rice and ranch style beans.


Awesome :D so have we made a decision on drawer handles yet :D.


Rick


Not yet. This might go down to the wire. I"m tossing up the wrenches idea and the idea using aluminum U channel that was posted in the general section a few days ago.

I think I'll have to do a photoshop selection to help me choose.
 

jtbinvalrico

Well-known member
Joined
Jan 2, 2010
Messages
1,375
Location
Tampa FL
....your metal brake project has me considering one of my own....you've done nice work.

Not sure about your circumstances, but have you considered dropping a 12k window AC unit through a garage wall? The units go for less than 3 bills new. I did mine about a year ago and it has made a night and day difference. I keep my garage/shop at a comfy 77 degrees in the FL heat.

Of course, a major consideration is in any HOA limitations you may have to work around. My HOA has said nothing about mine, but some of those outfits are beyond proactive. Regardless, there's some options to make it work while falling substantially within HOA parameters......it costs significantly less than a split system.

I'm into a bit of welding myself.....plans call for a hood/fan arrangement near one wall to vent welding fumes and offending vapors to the outside without compromising the cooling setup.

Here's a link to my install:
http://www.garagejournal.com/forum/showthread.php?t=70420
 

mdbeck1

Well-known member
Joined
Mar 7, 2010
Messages
2,297
Location
Norman, OK
...Not yet. This might go down to the wire. I"m tossing up the wrenches idea and the idea using aluminum U channel that was posted in the general section a few days ago.

I think I'll have to do a photoshop selection to help me choose.

I seem to remember a couple issues of Shopnotes or one of the other woodworking magazines that I get using buffed out angle aluminum. At least one of them had the angle pointing out so that the angle formed a finger grip on the front (Think riveted on top of the drawer and the angle going down). Another one had the angle riveted to the front of the drawer pointing out. Then they made a finger grip by adding a thin strip of wood to the bottom side of the angle.

If this was too confusing let me know and I'll see if I can find one or more of the issues.
 
OP
G

GirlnAgarage

Well-known member
Joined
Jan 21, 2011
Messages
4,668
Location
Texas
Finished up grinding the last two corners. Then began installing the drawer slides on the bench. The slides are sort of intimidating and I wasn't sure where to start. So, I figured jump in. Got 5 of 8 installed. I got bored and tired of sitting in a little ball under there. Will put on the other three tomorrow and then I'll mock up the drawers and see how I'll attach the slide portion to the drawer. Sure hope I measured right. I'll find out. Hurts my brain to worry about it until I get there.

I did find that my drawer side height is 2 1/8" instead of 2". Guess the bending had something to do with hat. The sides are also off a little here and there from the cuts and whatnot. So, just a few of the little things that will come into play. Like I said, find out when I get there.

Looking forward to wrapping up the drawers so I can finally get the top on there. Still have a bit to do on the sides for the shelves, but the work intensive pieces will be done.


Hmmm, sounds like a great meal! I'll have to just suffer though some venison this Friday up in camp... :bounce:


Sounds rough :drool: Hunting trip??


....your metal brake project has me considering one of my own....you've done nice work.

Not sure about your circumstances, but have you considered dropping a 12k window AC unit through a garage wall? The units go for less than 3 bills new. I did mine about a year ago and it has made a night and day difference. I keep my garage/shop at a comfy 77 degrees in the FL heat.

Of course, a major consideration is in any HOA limitations you may have to work around. My HOA has said nothing about mine, but some of those outfits are beyond proactive. Regardless, there's some options to make it work while falling substantially within HOA parameters......it costs significantly less than a split system.

I'm into a bit of welding myself.....plans call for a hood/fan arrangement near one wall to vent welding fumes and offending vapors to the outside without compromising the cooling setup.

Here's a link to my install:
http://www.garagejournal.com/forum/showthread.php?t=70420


AC has crossed my mind but with brick walls and no insulation in the walls, its a turn off. Luckily we have no HOA to deal with. But a portable AC unit would be nice. My neighbor has one in her garage that she lives off of (she hangs out out there watching tv, she's a smoker). I haven't even looked at estimating the cost of use.


mdbeck1, your explanation makes perfect sense.
 

Attachments

  • slides1.jpg
    slides1.jpg
    62.4 KB · Views: 451
  • slides2.jpg
    slides2.jpg
    72.6 KB · Views: 431

Outlawmws

Well-known member
Joined
Aug 9, 2011
Messages
39,238
Location
The Badlands
Progress is looking great Girl!

Yep, hunting trip, the left coast has the oddest seasons in the US... WAY too early...

The good news is it's been raining for most of a week, and that should improve things. I leave tomorrow at O'dark thirty, and come home next Tuesday.
 
Status
Not open for further replies.
To avoid these ads, REGISTER NOW!
Top Bottom