To avoid these ads, REGISTER NOW!

installing a can light - what are these connections? (pic)

Cobra6

Well-known member
Joined
Oct 23, 2007
Messages
1,380
Location
Tennessee
Just when I think I have stuff figured out -

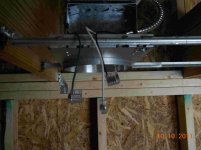
I bought a can light to install over the landing of my stairway, got it mounted where I wanted it, then opened the box to see how to rough the wiring in, and I see these - ????????? (pic)

Do I need to buy a connector set for this? or cut these off and just hook up the wires in the metal box?
 

Attachments

  • can light connection.jpg
    can light connection.jpg
    140.5 KB · Views: 456
To avoid these ads, REGISTER NOW!

stingry

Well-known member
Joined
Oct 14, 2006
Messages
732
Location
Western Nebraska
can't see for sure but I believe that those are connectors where you just push in the wire after stripping off the insulation. I just installed a dozen of these and they seem to work very well.

Cheers
Steve
 

garagemahal1

New member
Joined
Jun 10, 2011
Messages
3
Location
Rochester NY
Hi,

Just strip your feed wire as you normally would and plug the wire into the connector. You should get a solid connection. Be careful you won't be able to pull the wire out once it is plugged into the connector.

Good luck on your project!:thumbup:
 

BigJohn20

Well-known member
Joined
Sep 4, 2011
Messages
168
They're what are commonly referred to as "Wago" connectors (Wago being one of the first and most prevalent manufacturers of that and similar products). Like others have said, strip and insert. I don't know if those specific versions have them, but many of those types of connectors will have a strip length gauge so you don't overstrip the wire.

If you need to remove them, some have a release on the side, or you can patiently wiggle them back and forth and they will eventually pull out.

Some people love 'em, some will cut 'em off and do things the old fashioned way.
 

MrMark

Well-known member
Joined
Jan 25, 2010
Messages
4,626
Location
Southern Cal.
You can cut them off, but I personally think they are OK in that application. Probably not much of anywhere else, except lighting. Strip 1/2", this is critical, and push all the way in.
 

7echo

Well-known member
Joined
Feb 16, 2008
Messages
433
Location
coastal Georgia
I cut them off and do it the old fashioned way. Never liked these lazy connections and I also refuse to use the cheap push in 110 outlets.

I won't use the push in connections on receptacles either but the connectors on cans work well and are set up to string multiple cans together, saves time over using all the wire nuts.
 

ishiboo

Well-known member
Joined
Oct 27, 2010
Messages
9,481
Location
Oshkosh, WI
I've used the Wagos before in temporary situations and I really like them, seeing as they're UL listed/NEC approved and well engineered, I think they're probably 100% fine for permanent installs.

On lighting circuits like recessed cans, IMO its preferential to use the push-ons if present or a push-in "luminaire connector", because the 18ga stranded from the fixture tends to get mauled when you attempt to wire nut it up with one or two 14ga solids.
 

54FordPanel

Well-known member
Joined
Aug 7, 2009
Messages
5,711
Location
Fort 54, Littleton, Co
I like those connectors. I've done quite a few can lights, and that's the only kind I will buy for that application. I think they're more reliable than wire nuts.
 
OP
C

Cobra6

Well-known member
Joined
Oct 23, 2007
Messages
1,380
Location
Tennessee
Well,
thanks for the info (everyone) -
they are very simple - probably meant for #14 wire, but #12 snugged in OK.
the ground plug was even already bonded to the metal box - too bad I am only using one of these.

maybe someone else will see this and learn - that is why I ask stupid questions.
 

MrMark

Well-known member
Joined
Jan 25, 2010
Messages
4,626
Location
Southern Cal.
I only use 12 gauge wire. They are listed for that too. No questions are stupid when it comes to electrical. There are very few (if any) instructions provided with the cheap stuff they sell as electrical and it's important to gain knowledge. Ask away and read and do.
 

fenderwasher

Member
Joined
Mar 22, 2006
Messages
6
Location
New York
I use these push in connectors all the time. I have a wide assortment of plugs with varying number of “ports”…from just 2 up to 4. They can be used for #12 and #14 wires. I have never had a problem with any of them coming loose. The difference between these and the push-in connection on outlets and switches (which I don’t use) is that the outlets / switches use a spring to keep tension on the wire(which can come loose over time) whereas these push-ins use a sold metal fin that really clamps down on the wire. I use them when ganging multiple connections together in a box. They take up much less room than the caps and you can rotate and position the wire “bundle” much more easily in the box and not worry about a cap connection coming loose. Also, you can don’t need as much wire in the box to make the connection. The downside (and upside), is that that are almost impossible to take apart. If I can tug with over 30 lbs of force and not pull them apart, they won’t just pop off sometime down the road. In the rare cases where I had to take one apart, I simple used side cutters to cut the wires at the connection as close as possible. I also found them extremely useful when I go into a box and find just a nub of wire to work with. You only need a quarter inch of wire to plug in and to make a tail.
 

fenderwasher

Member
Joined
Mar 22, 2006
Messages
6
Location
New York
I use these push in connectors all the time. I have a wide assortment of plugs with varying number of “ports”…from just 2 up to 4. They can be used for #12 and #14 wires. I have never had a problem with any of them coming loose. The difference between these and the push-in connection on outlets and switches (which I don’t use) is that the outlets / switches use a spring to keep tension on the wire(which can come loose over time) whereas these push-ins use a sold metal fin that really clamps down on the wire. I use them when ganging multiple connections together in a box. They take up much less room than the caps and you can rotate and position the wire “bundle” much more easily in the box and not worry about a cap connection coming loose. Also, you can don’t need as much wire in the box to make the connection. The downside (and upside), is that that are almost impossible to take apart. If I can tug with over 30 lbs of force and not pull them apart, they won’t just pop off sometime down the road. In the rare cases where I had to take one apart, I simple used side cutters to cut the wires at the connection as close as possible. I also found them extremely useful when I go into a box and find just a nub of wire to work with. You only need a quarter inch of wire to plug in and to make a tail.
 

JimDon

Well-known member
Joined
Jan 23, 2007
Messages
602
Stranded to solid is a piece of cake -- here's how --
Take your needle nose, or your lineman's and put about a 45 degree bend at the very tip of your stripped solid wire. This "kink" is just about an eighth of an inch or so -- very slight. Now take your stranded and just place it next to the solid wire so they are about even. Twist your wire nut on. Then to test it, try to pull the wires out of the wire nut. They should not come loose if you did it correctly. The kink at the end grabs the insert of the wire nut and firmly twists the two together as you turn the wire nut on. After you do a couple it will become second nature, and you'll just automatically do it whenever you need to join dissimilar wires, and even wires of different gauges.
Cheers, JimDon

PS those new style inserts where you just push the wire in will really speed up can installation, and work extremely well
 

NUTTSGT

Super Moderator
Staff member
Joined
Sep 14, 2009
Messages
51,087
Location
Northern Central Ohio
I used the ones that were on my can lights under the garage ovehang. I beleive they werew also in the flourescent strip lights that I used inside last year. Those got cut off and wire nutted.
 

Aceman

Well-known member
Joined
Jan 28, 2007
Messages
2,513
Location
Eastern Oregon
Just something to think about, those connections get buried behind drywall after you're finished. I don't like stringing an entire lighting circuit through Wago's, one bad connection and you lose the rest of the string. And you're tearing apart the can to get to the j-box hidden behind the drywall.

This is one place I make damn sure I have good connections by pretwisting and using wirenuts. I only use wagos for 18 AWG ballast wires.

But to each their own...
 

z28toz06

Well-known member
Joined
Nov 30, 2005
Messages
1,012
Location
Connecticut
I haven't used these yet, and I hope they are not the same "technology" that electrical duplex outlets use. They have that push in connector on the back and I have found many of them just get tired after years of use and just shut a whole circuit of outlets down because of one tired connection. I would cut them off and wire nut them properly for a forever connection, especially if they are hard to reach afterwards.
 
To avoid these ads, REGISTER NOW!

NUTTSGT

Super Moderator
Staff member
Joined
Sep 14, 2009
Messages
51,087
Location
Northern Central Ohio
Just something to think about, those connections get buried behind drywall after you're finished. I don't like stringing an entire lighting circuit through Wago's, one bad connection and you lose the rest of the string. And you're tearing apart the can to get to the j-box hidden behind the drywall.

This is one place I make damn sure I have good connections by pretwisting and using wirenuts. I only use wagos for 18 AWG ballast wires.

But to each their own...

Mine are just under a porch roof. I can pull a piece of soffit and shimmy my *** up there and replace what needs afixin.
 

Zeke

Well-known member
Joined
Aug 13, 2009
Messages
17,176
Location
Long Beach CA, the sewer by the sea.
Just something to think about, those connections get buried behind drywall after you're finished. I don't like stringing an entire lighting circuit through Wago's, one bad connection and you lose the rest of the string. And you're tearing apart the can to get to the j-box hidden behind the drywall.

This is one place I make damn sure I have good connections by pretwisting and using wirenuts. I only use wagos for 18 AWG ballast wires.

But to each their own...

Seems to me that you'd push the assembled connection back into the box. Lots of cans that I have worked with have access to the box from below if you remove a few screws.
 

slickgt1

Well-known member
Joined
Oct 11, 2010
Messages
1,674
Just something to think about, those connections get buried behind drywall after you're finished. I don't like stringing an entire lighting circuit through Wago's, one bad connection and you lose the rest of the string. And you're tearing apart the can to get to the j-box hidden behind the drywall.

This is one place I make damn sure I have good connections by pretwisting and using wirenuts. I only use wagos for 18 AWG ballast wires.

But to each their own...

I completely agree with you.

I have another scenario. Those damn cans get got. I have seen these connectors fail, having to wrestle the can out, just to get to that box, cut that connector off, and put on a regular wire nut.

My house, sealed cans, 3 did that. I have 30 more, out of which about half still have those connectors. I hope they never fail. I am glad I realized this issue while most of the sheetrock was still in a pile downstairs. By realize, I mean an electrician told me his same experience, and said he only uses them in outlet and switch boxes. Something he can access easy, and where it doesn't get hot.
 

slickgt1

Well-known member
Joined
Oct 11, 2010
Messages
1,674
Seems to me that you'd push the assembled connection back into the box. Lots of cans that I have worked with have access to the box from below if you remove a few screws.

Nah Zeke, look at that pic. The connections are in a box, next to the can. Once the sheetrock is up, you have to pull the can down, or push it up, then you can access the connector box. If you can't push the can up, this is the case usually, you need to pull it down. This is where it gets effffed up. You might have a really hard time getting it down because of the tabs. Putting it back in, those arms might not be strong enough to force the can up. I'm telling you guys, when that connector fails, you will remember this.

I say cut those shits off and use a regular wire nut. Wire nuts don't fail, and don't let go when they get warm. These do.
 
Last edited:

ishiboo

Well-known member
Joined
Oct 27, 2010
Messages
9,481
Location
Oshkosh, WI
Nah Zeke, look at that pic. The connections are in a box, next to the can. Once the sheetrock is up, you have to pull the can down, or push it up, then you can access the connector box. If you can't push the can up, this is the case usually, you need to pull it down. This is where it gets effffed up. You might have a really hard time getting it down because of the tabs. Putting it back in, those arms might not be strong enough to force the can up. I'm telling you guys, when that connector fails, you will remember this.

I say cut those shits off and use a regular wire nut. Wire nuts don't fail, and don't let go when they get warm. These do.

What exactly is the high tech secret with wire nuts? Modern wire nuts do not require the wires to be pre-twisted. They're a piece of coiled spring steel with a plastic housing. The sharp edge "bites" the wire.

The push-wire connectors are a piece of spring steel in a plastic housing. The edge of the spring steel is sharp and "bites" the wire.

I'd venture a guess that as a percentage, more modern home wire nutted installations fail than modern push-wire connectors. (The nut variants, not push-wire outlet receptacles)
 

Aceman

Well-known member
Joined
Jan 28, 2007
Messages
2,513
Location
Eastern Oregon
There is no secret. But pretwisting lets you SEE the connection before putting the wirenut on. The other method, simply stripping the wires, trying to hold them tight and straight as well as the same length on the end while trying to twist the wirenut on(no pretwist) leaves a lot of room for error IMO. I have seen many of these connections come loose when I've opened boxes. I have never seen a pretwisted connection come loose.

You're welcome to use Wagos, they're listed, they'll work, I'd use them in a pinch if I only had a little stub of wire to hook onto where I couldn't make a wirenut work. But I know my pretwists haven't failed yet...so I'm going to stick with it.
 
OP
C

Cobra6

Well-known member
Joined
Oct 23, 2007
Messages
1,380
Location
Tennessee
Well -
I never thought a simple can light would stir up so much controversy -

The good thing is mine is on the ceiling where it will be accessible if I need to get to it - hopefully just roll back some insulation from the ceiling from the back of the light.

The metal box where the connections are has a spring-loaded cover, so thye make it easy to pop open if you have access.
 

slickgt1

Well-known member
Joined
Oct 11, 2010
Messages
1,674
Yea the boxes seem easy to get to, if you can get to them from the top. Like attic and some sort of crawlspace.

But I can tell you for sure, none, I mean ZERO, of my twist wire connectors have given me any trouble ever. I have not had to go back and trace a circuit to figure out what messed up, ever.

These connectors, specifically in these cans have failed. I am one of the unfortunate ones, where I had to pull the can down, rewire with wire nuts and stuff the damn can back in there. It was a miserable job, especially when everything is closed up and painted. Those arms, holding the can between the joists are not strong enough to support the can from a serious shove UP. ****, pulling them down, I though I was going to bring my sheetrock down.

It is also not fun when your brand new renovation, takes out a light circuit because of one stupid connector.

Yea you can say I learned my lesson.

Not saying you shouldn't use them. Just letting you know what happened to me, and hoping to save you some frustration. You can do what you want. Just saying that twisted wire nut connection is superior, and have never let me down. This is confirmed by and electrician that does this every day, and also like the speed of the wago connectors, but not where access is limited.
 
OP
C

Cobra6

Well-known member
Joined
Oct 23, 2007
Messages
1,380
Location
Tennessee
Just saying that twisted wire nut connection is superior, and have never let me down. This is confirmed by and electrician that does this every day, and also like the speed of the wago connectors, but not where access is limited.

I am guessing this is the bottom line - they are put in for speed of installation for a contractor to get a lot in quickly and really doesn't care if they fail later.
speed=time=$$$
 

slickgt1

Well-known member
Joined
Oct 11, 2010
Messages
1,674
I am guessing this is the bottom line - they are put in for speed of installation for a contractor to get a lot in quickly and really doesn't care if they fail later.
speed=time=$$$

Exactly. The thing that pissed me of the most, is that those hold the 12ga wire no problem. The stranded wire, which is part of the can, that is what seems to come out every time. Those teeth that grab, seem to be one plate, when the 12ga goes in, it loosens the stranded wires grip. Trust me, if you don't want to have any concerns after you finish your reno, just clip those shits off, and wire nut the connections.
 

MrMark

Well-known member
Joined
Jan 25, 2010
Messages
4,626
Location
Southern Cal.
I am guessing this is the bottom line - they are put in for speed of installation for a contractor to get a lot in quickly and really doesn't care if they fail later.
speed=time=$$$

If an electrician knows they are failure prone, why would he put them in boxes with heavier demands?
Also, the lights, at least the 6 inch cans have an inner liner that pushes straight up after you remove you 1/4" head sheet metal screws. The box is easily accessible then. Not much could be easier if you have the stubby Klein nutdrivers, which they make for precisely that issue, by the way.
 
Last edited:

slickgt1

Well-known member
Joined
Oct 11, 2010
Messages
1,674
MrMark, I am not speaking for the OP, but I am pretty sure those cans actually come with those connectors already attached. This is what I have been noticing lately with the 6" new-construction cans.

Also, depending on the installation, and if those are sealed cans (they can be installed against insulation), you might not be able to push them up. Pulling them down is a *****.
 

MrMark

Well-known member
Joined
Jan 25, 2010
Messages
4,626
Location
Southern Cal.
MrMark, I am not speaking for the OP, but I am pretty sure those cans actually come with those connectors already attached. This is what I have been noticing lately with the 6" new-construction cans.

Also, depending on the installation, and if those are sealed cans (they can be installed against insulation), you might not be able to push them up. Pulling them down is a *****.

Yes, they have the connectors attached and that is what was confusing to me about your post stating your trouble with pushing in the stranded wires.

Right on the insulation too. I've never tried pulling them down, but I don't think they will come very far.

Thanks for clearing that up.

I actually like the look of the 5" cans so much better that I would not be buying anymore 6" cans. I don't know if you can get your hand up in the 5" can to rewire like you can the 6" can.
 

slickgt1

Well-known member
Joined
Oct 11, 2010
Messages
1,674
LOL, yes I can rewire a 5" can. I feel like a gynecologist when I have to do this. But I like leaving long tails, so that I can pull out the wires below the ceiling. Sometimes this is not possible though.

I like how the 5" ones look as well. My ceiling is 10' up, and I went with 6" thinking it would look good because of the distance, but no, they don't. Should have done 4" or 5" like I recommend for everyone else.

And I didn't mean pushing in the stranded, I meant that when I push in the solid "Line" wire, it weakens the hold on the stranded "load" wire. That is why I believe these things let go when it heats up.

I actually managed to pull these cans down. Not easy, especially if you need to be careful with a finished ceiling. You have to take a pic/pin/screw, and actually bend back the screw tabs so that they don't catch the top hat or rivets. Even then, you have to massage it to come down.

Did I mention how much I hate those connectors in the cans?

If anyone missed it, I hate those connectors in the recessed lights.
 
Last edited:

MrMark

Well-known member
Joined
Jan 25, 2010
Messages
4,626
Location
Southern Cal.
Just so I understand, you are taking the wiring box that mounts to the frame down too?

On a normal 6" can you can remove the small sheet metal screws to free the lamp socket part from the can frame. This has a short MC whip to the box. How do you do get the lamp socket portion down without taking out the box somehow. And what about the staple that is supposed to be securing the wire? You are able to reach in and get that too? I've had to do that a few times and it can put some cuts on your arms.
 

slickgt1

Well-known member
Joined
Oct 11, 2010
Messages
1,674
No wiring box stays on the frame.

I take out trim.

Remove the 4 metal screws from the can.

Pull down the can. The MC whip will reach down. It looks short when the can is in place, but when pulling down, that length is enough to get the can below the sheetrock.

I don't understand which staple you are talking about. Only thing that comes out is the can, still attached to the MC. Look at the first pic. The MC goes all the way up to the top of the can. It's long enough to come down below sheetrock too.

And yes, when the can is down, the wire box can be opened from the can side as well. You don't need to reach over the wire box to open it from the side you install it. It can be opened from the can side. And yes, I get cuts on my hands.

Cobra, can you take a pic of the whole thing, but focus between the can and the wire box.
 

ishiboo

Well-known member
Joined
Oct 27, 2010
Messages
9,481
Location
Oshkosh, WI
And I didn't mean pushing in the stranded, I meant that when I push in the solid "Line" wire, it weakens the hold on the stranded "load" wire. That is why I believe these things let go when it heats up.

Interesting. On the Waco "wire nuts", each hold down contact is an independent spring tab, so pushing one in does not affect the other side at all. You can safely install any rated size on either side.

I would not try running the 18ga fixture wire on those though. They make a luminaire connector specifically for lighting cans, the line side plugs into the load side. The load side is designed for 18ga stranded, while the line side will accept 12-14ga solid... perhaps stranded as well.

The nuts you are referring to definitely sound like a safety hazard.
 

slickgt1

Well-known member
Joined
Oct 11, 2010
Messages
1,674
I am sure I am talking about the Wago "style". I say "style", because the ones on those cans, are pieces of China ****.
 
To avoid these ads, REGISTER NOW!
Top Bottom