To avoid these ads, REGISTER NOW!

Aluminum piping and 5hp compressor install

Burn1

Well-known member
Joined
Sep 30, 2011
Messages
181
Location
Texas
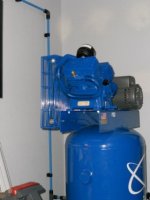
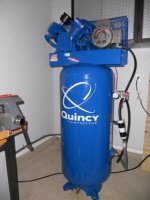
I recently installed a Quincy 5hp 2 stage 60gal compressor in the garage. After looking at various air-pipe options between copper, black iron pipe and aluminum went with aluminum for some automotive spaying needs and did not want to deal with rust or any galvanizing material in the system. Copper was considered, but did not want to mess with sweating fittings and did not find any copper pipe stand off mounting brackets for use over sheet rock that I liked.

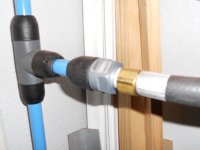
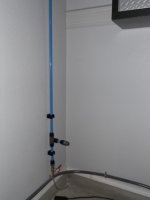
Went with Rapid Air's Air Net aluminum piping system. 3/4 OD which is plenty for the requirements I have. Especially liked the Air Net compression fitting system and easy to cut and debur the lengths of aluminum tubing. Went with the 9 ft sticks which are easy to work with and UPS ships that size. Rapid Air offers longer pipe lenght available via oversized trucking if need be.

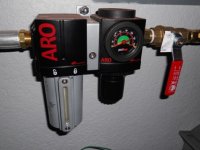
With the compressor located and holes drilled for anchors, bolted it down via iso damping pads and ran high pressure flex line from compressor to aluminum piping as well as a high pressure flex line for each air outlet to filter/regulator. Have two air outlets in the garage and total of three drop legs for moisture collection-one right off compressor leg, one per outlet. Two outlets should work fine. If need be, can tee off a main line and add more drops very easy.

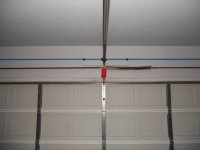
The plastic pipe mounting brackets were easy to work with. Keeps the aluminum piping approx 1-1.5 inch from the drywall and each fastened via wood screws at stud locations. Unions and 90deg fittings again easy to work with. A great do it yourself weekend project. Very happy with how the system turned out.

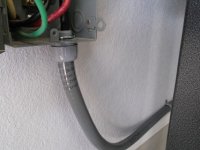
For the electrical, I installed a sub panel w/disconnect below my main breaker box for the the dedicated 240 single phase circuit. Ran flex conduit under workbenches along wall and terminated at compressor with 50amp twist lock male/female connectors(plugs). This way, should I need power for a 240v welder, I can unplug the compressor and plug into a welder as needed.

Even though the compressor requires a 3 wire hook up(2 hots &ground), I pulled a 4 wire 8 gauge cable. The feeder run was approx 25ft from panel to compressor. Having a 4 wire set up provides for any future 120v accessory if needed(1 hot, neutral, ground from the 240v feed). Even though the compressor electric motor is rated at 21 amp running, installed a 50 amp main breaker for starting load requirements.

Pictures attached.
 

Attachments

  • Quincy Compressor arrives.jpg
    Quincy Compressor arrives.jpg
    104.4 KB · Views: 221
  • AC disconnect for compressor 240v.jpg
    AC disconnect for compressor 240v.jpg
    95.2 KB · Views: 223
  • Disconnect conduit run.jpg
    Disconnect conduit run.jpg
    94.8 KB · Views: 227
  • conduit run.jpg
    conduit run.jpg
    93.5 KB · Views: 306
  • location of compressor.jpg
    location of compressor.jpg
    101.3 KB · Views: 267
Last edited:
To avoid these ads, REGISTER NOW!
OP
B

Burn1

Well-known member
Joined
Sep 30, 2011
Messages
181
Location
Texas
Additional pictures of the piping.
 

Attachments

  • air filter and regulator.jpg
    air filter and regulator.jpg
    99.3 KB · Views: 184
  • air line fitting and hose.jpg
    air line fitting and hose.jpg
    102.3 KB · Views: 204
  • AirNet pipe run4.jpg
    AirNet pipe run4.jpg
    90.9 KB · Views: 174
  • AirNet pipe run3.jpg
    AirNet pipe run3.jpg
    89.4 KB · Views: 188
  • AirNet pipe run2.jpg
    AirNet pipe run2.jpg
    95 KB · Views: 182
  • AirNet pipe run1.jpg
    AirNet pipe run1.jpg
    90.8 KB · Views: 193
  • AirNet Tee into hose line.jpg
    AirNet Tee into hose line.jpg
    87.9 KB · Views: 233

Mmfh

MEMBER EMERITUS
Joined
Oct 8, 2011
Messages
1,423
Location
Portland Oregon
Damn Nice Setup!!

I'm jealous of that compressor, its one of the best. You didn't spare the horses on that air line either. If you don't mind me asking, how much is that stuff and did you need any special tools for the fittings.

Thanks

Mm
 
OP
B

Burn1

Well-known member
Joined
Sep 30, 2011
Messages
181
Location
Texas
Thanks guys I really do appreciate the compliments. Took me awhile to figure out what I wanted to do, save up and then pull the trigger. Funny enough, after installing the compressor thought maybe I should have bought a bigger air pump.

Sandblasting and HVLP moves some CFM, but for my restro projects and painting requirements, think I'm right where I need to be.

Next on the list is considering some sound damping treatments. Compressor placement in the corner w/ four hard surfaces, would be nice to down a few db if possible for the neighbors and running the compressor in the evening on a limited basis.
 
OP
B

Burn1

Well-known member
Joined
Sep 30, 2011
Messages
181
Location
Texas
Damn Nice Setup!!

I'm jealous of that compressor, its one of the best. You didn't spare the horses on that air line either. If you don't mind me asking, how much is that stuff and did you need any special tools for the fittings.

Thanks

Mm

No problem at all. For 12-8ft 10" coated aluminum pipe pieces, all the fittings-tee's, unions, 90deg, pipe to hose adapters, 2-2ft high pressure flex lines w/fittings pressed on, and hangers I'm in for approx $625.00 shipped. Throw in a run to home depot for the ball valves and adding in the 1/2 inch aluminum IR filter and regulator the tab came in under a grand. I ended up with a couple extra fittings and a 1 stick of pipe left over. Might add one more drop down the road.

For 3/4" dia and smaller pipe you can hand tighten the fittings as recommended. I purchased a tool that looks like a pickle fork with two barbs from the company. There are two slots on each fitting and after hand tighten each one, I gave each fitting a little extra love with that special wrench. Not one fitting leaked the first go around. Its really a simple system to install. Tools included: pen/paper, tape measure, level, sharpie, pipe cutter, debur tool, screwdriver, open end wrench, drill, soapy water spray bottle and some Shiner beer on ice were all the tools that weekend. No helpers needed.
 

Mmfh

MEMBER EMERITUS
Joined
Oct 8, 2011
Messages
1,423
Location
Portland Oregon
You know as far as noise goes, I used a few office panels for my indoor compressor. If you go into a large office building they sometimes have standup panels separating the different cubicles.

Don't know if they still use this type, but I was able to get a few off Craigslist they were giving away, and they look good and made a big difference.

Wondering what the output is on that Quincy you have. I'm thinking somewhere around 18 cfm @100psi?? Is that close? What kind of blast cabinet are you using? I'm trying to dial in my system right now so I'm curious as to what you have going.

Mm
 

LS7DAVE

Member
Joined
Jan 25, 2011
Messages
5
Very Nice!!! That is the same compressor that I will buy when I can. Best price I found is at Northern Tool at 1,399.00. One thing that will help on noise is the rubber insulators that goes under the feet of the compressor.
 
OP
B

Burn1

Well-known member
Joined
Sep 30, 2011
Messages
181
Location
Texas
You know as far as noise goes, I used a few office panels for my indoor compressor. If you go into a large office building they sometimes have standup panels separating the different cubicles.

Don't know if they still use this type, but I was able to get a few off Craigslist they were giving away, and they look good and made a big difference.

Wondering what the output is on that Quincy you have. I'm thinking somewhere around 18 cfm @100psi?? Is that close? What kind of blast cabinet are you using? I'm trying to dial in my system right now so I'm curious as to what you have going.

Mm
Great idea on the office panels. I think a rating I saw was 15CFM@ 175PSI somewhere. I will be buying a blaster that needs 12 at 80-90psi. Leaning towards a blast cabinet made in Texas using a 55 gal drum for the cabinet base. http://www.barrelblaster.com/BarrelBlaster1.htm
 

Omphaloskeptic

Well-known member
Joined
Oct 11, 2008
Messages
2,346
Location
Ultima Ratio, Wa.
Very nice set-up! I've heard that for blasting and painting it is very desirable to include a drying device of some type; any plans in that regard? As for noise suppression, there have been some threads about the use of large air intake piping and filters to drastically reduce that source of noise.
Those office partitions sound like a cheap way to get some db reduction!
 

John123180

New member
Joined
Dec 13, 2012
Messages
1
Hey guys, great discussion!

I sell the AIRnet product, so let me know if there is anything I can help with.

Just an FYI, in the month of AUG we are covering all shipping cost. Email me if you're interested in a quote. [email protected]
 
To avoid these ads, REGISTER NOW!

Kellyblues

Well-known member
Joined
Jul 27, 2015
Messages
139
Location
Indiana
Nice setup!!! Very clean. I just purchased the same compressor and am in the process of installing it. Myself I'm using copper though I see nothing wrong with the Rapid Air system.

Can you post a picture of the side of the motor as your standing next to the compressor?
 

Kellyblues

Well-known member
Joined
Jul 27, 2015
Messages
139
Location
Indiana
I know since its single phase it should only rotate in the correct direction but I wondered how many left the factory tagged like mine. Mine rotates the direction of the big red arrow.


Black Mariah

New member
Joined
Oct 12, 2009
Messages
3
This seems like a good thread to use to ask my question.

I'm about to install air compressor piping in my shop. I've been considering using the Aluminum pipe systems. One thing I've noticed about the Al systems is that they don't seem to ever use the "gooseneck" on drops that is recommended configuration for black iron pipe (for helping to keep condensate in main line/loop).

Even when I see pictures of industrial installations with Al pipe, there are no goosenecks. Are the properties of the Aluminum systems and connectors such that this is not required (vs. iron pipe), or is it that it is just too expensive or impractical to implement with the Aluminum systems?

Here are some pictures to illustrate. One of them is a screen cap from an "AIRNet Challenge Video" where they compare the installation of Al to iron pipe. The iron pipe install has a gooseneck, the Aluminum does not… but the video never bothers to explain why.

Thanks in advance.
 

Attachments

  • Compressed Air Pipe Layout.jpg
    Compressed Air Pipe Layout.jpg
    30.3 KB · Views: 53
  • Airnet Challenge screen cap.jpg
    Airnet Challenge screen cap.jpg
    33.4 KB · Views: 52
  • IR brochure.jpg
    IR brochure.jpg
    124 KB · Views: 49
Last edited:

94EG8

Well-known member
Joined
Apr 5, 2015
Messages
248
I'm about to install air compressor piping in my shop. I've been considering using the Aluminum pipe systems. One thing I've noticed about the Al systems is that they don't seem to ever use the "gooseneck" on drops that is recommended configuration for black iron pipe (for helping to keep condensate in main line/loop).

Even when I see pictures of industrial installations with Al pipe, there are no goosenecks. Are the properties of the Aluminum systems and connectors such that this is not required (vs. iron pipe), or is it that it is just too expensive or impractical to implement with the Aluminum systems?

You should still use a gooseneck if possible (I couldn't due to height limitations) They do exist though. I know Topring definitely makes them in 15mm and 22mm. They look like this:
 

Attachments

  • $_35.JPG
    $_35.JPG
    5 KB · Views: 18

Kellyblues

Well-known member
Joined
Jul 27, 2015
Messages
139
Location
Indiana
This seems like a good thread to use to ask my question.

I'm about to install air compressor piping in my shop. I've been considering using the Aluminum pipe systems. One thing I've noticed about the Al systems is that they don't seem to ever use the "gooseneck" on drops that is recommended configuration for black iron pipe (for helping to keep condensate in main line/loop).

Even when I see pictures of industrial installations with Al pipe, there are no goosenecks. Are the properties of the Aluminum systems and connectors such that this is not required (vs. iron pipe), or is it that it is just too expensive or impractical to implement with the Aluminum systems?

Here are some pictures to illustrate. One of them is a screen cap from an "AIRNet Challenge Video" where they compare the installation of Al to iron pipe. The iron pipe install has a gooseneck, the Aluminum does not… but the video never bothers to explain why.

Thanks in advance.

Ive noticed few people here install goose necks as they should be. Don't forget that to get the drain effect you need 1 inch of fall for every 10 feet. A 10 foot run the supply end will be 1 inch higher than the other end.

Also the MOST important things you need to know to be a plumber. **** rolls down hill, hot on the left and cold on the right, payday is Friday, and for gods sake don't bite your fingernails . Now your a plumber! HAHA
 

Black Mariah

New member
Joined
Oct 12, 2009
Messages
3
Thanks for the replies. Definitely answers my questions.

94EG8: Thanks a ton for the National Pneumatic document! I've already saved it to my hard drive. This pretty much gives you everything you need to know in one place.

They even show an internal view of the "Water Trap T" connector. Perhaps most of the T's in use have this design… So maybe that's why you don't see the goosenecks as much in the Aluminum installations. (Still, I'm going to put in goosenecks.)
 

Attachments

  • Water Trap T.jpg
    Water Trap T.jpg
    34.1 KB · Views: 20

matt_i

Well-known member
Joined
Mar 14, 2008
Messages
10,728
Location
SE Michigan
You have a serious electrical problem. A 50A breaker serving #8 downstream wiring does not protect the integrity of the conductors. In other words 50A continuous draw would melt the insulation off the wiring and probably start a fire and the breaker would not trip until you have a dead short.

I would derate (iow install a lower amp breaker) to 40A or upgrade your wiring to #6.
 

Kellyblues

Well-known member
Joined
Jul 27, 2015
Messages
139
Location
Indiana
You have a serious electrical problem. A 50A breaker serving #8 downstream wiring does not protect the integrity of the conductors. In other words 50A continuous draw would melt the insulation off the wiring and probably start a fire and the breaker would not trip until you have a dead short.

I would derate (iow install a lower amp breaker) to 40A or upgrade your wiring to #6.

I didn't read that part until seeing your post and you are spot on correct. I'm installing the exact same Quincy model compressor. I'm using 6 ought and 50 amp breaker. I almost had enough 4 but didn't so I went with 6. Wouldn't go any smaller.

Being an industrial maintenance mechanic I cant count the number of times I've seen insulation smoke off without tripping the circuit protection until it shorted to ground or together because someone used under sized conductors.

Good catch.

Follow his advice. The conductors probably aren't getting warm so you may think there no problem but it wont take much to cause one. small drag of some kind that places an additional draw of current and the insulation will give.
 

sberry

Banned
Joined
Jun 18, 2005
Messages
35,747
Location
Brethren, Michigan
Where do you learn this?
You have a serious electrical problem. A 50A breaker serving #8 downstream wiring does not protect the integrity of the conductors. In other words 50A continuous draw would melt the insulation off the wiring and probably start a fire and the breaker would not trip until you have a dead short.

I would derate (iow install a lower amp breaker) to 40A or upgrade your wiring to #6.
Good catch.

Follow his advice. The conductors probably aren't getting warm so you may think there no problem but it wont take much to cause one. small drag of some kind that places an additional draw of current and the insulation will give.

The 50A on an 8 for a compressor is fine, this is not continuous and wouldn't start a fire if it was. There are some specialty circuits allow 12 wire with 50A.
As fo0r the goosenecks, mostly a waste of effort here. While these ideas are good in an industrial setting they don't always help much at home where the demands, circuit length and number of users are different.
If you use gooseneck there needs to be somewhere for the condensate to go, an angled pipe to a drip leg following it.etc
 
Last edited:

sberry

Banned
Joined
Jun 18, 2005
Messages
35,747
Location
Brethren, Michigan
This comp can be wired number 10 in pipe with 50, you wont need it, the thing will run from 30. Thebreaker in this case does not provide thermal, the applied load does and so does the thermal overload in the motor, it will trip before it draws enough to overload the incoming wire or its own internal wiring.
The circuit breaker is merely a disconnect and has to be within the short circuit rating or the wire which would be 12 for 50 and would need to be 10 for 60.
 
Last edited:

stonesfan68

Well-known member
Joined
Apr 19, 2012
Messages
2,758
Location
Houston, TX
You made a good choice with the aluminum piping. There's just no reason to use copper or iron pipe in a standard garage when aluminum piping is so easy to use and install.
 

94EG8

Well-known member
Joined
Apr 5, 2015
Messages
248
94EG8: Thanks a ton for the National Pneumatic document! I've already saved it to my hard drive. This pretty much gives you everything you need to know in one place.

You're welcome :thumbup:

They even show an internal view of the "Water Trap T" connector. Perhaps most of the T's in use have this design… So maybe that's why you don't see the goosenecks as much in the Aluminum installations. (Still, I'm going to put in goosenecks.)

It's possible. I know Topring doesn't make a water trap T until you get up into 28mm tubing. Perhaps the brand you have is different.

You made a good choice with the aluminum piping. There's just no reason to use copper or iron pipe in a standard garage when aluminum piping is so easy to use and install.

I love my aluminum piping, but it is considerably more expensive than copper, the biggest culprit being the fittings. Less than a dollar each vs $30 each adds up fast.
 
Last edited:
To avoid these ads, REGISTER NOW!
Top Bottom