To avoid these ads, REGISTER NOW!

Really?? On your daughters graduation!!??

leeklm

Well-known member
Joined
Jul 15, 2011
Messages
72
Location
Minneapolis
Yes, those words from my wife still echo in my mind from last June. What can I say, it was a beautiful Saturday, and the cement guys were available!

Although the following is somewhat of a build thread, it is more of a look back at the build... What did I like, what would I do different, etc.. I am by no stretch a carpenter or garage expert, but thought I would share my experience, and if you first time builders out there can pick up an idea or two, then great!

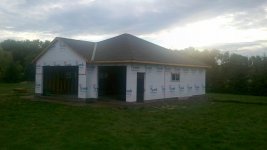
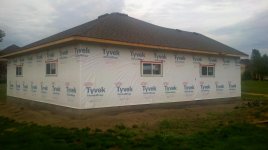
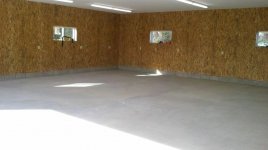
The largest slab allowed in my area is 1,300 sqf, so I decided on a 34x38. I actually had the plans for 12 years, but finally decided to put them to use. My original plans called for 12ft walls, 10ft drs, and even a rear door so that you could pull a trailer straight through. But, I wanted to scale back a little, and felt that something back to "standard" garage size was sufficient. Here are a few shots from the beginning...

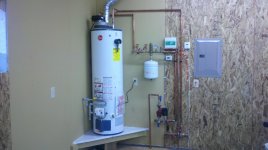
The one thing i decided not to skimp on was floor heat. I spent a winter working in a buddies garage with radiant heat and was hooked! The floors were so warm I was too hot in my work boots, and had to wear sneakers!

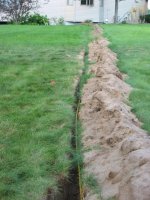
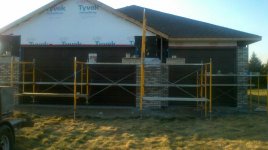
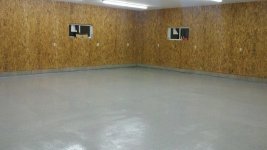
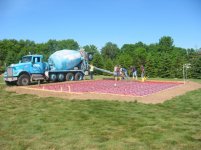
As seen in the picks, 2" XPS and 6mil poly was used under the slab. I also ran 2" foam up along the slab and 8" block. In hindsight, I should have dug out along the forms and install foam down about 4ft before the pour. I started to dig down along the slab afterwards, but did not like how the dirt would fall out from under the slab footings (very lose and sandy soil). Figured I would do more damage than good if I kept digging. So for now, the foam only goes the depth of the slab.

I worked with Radiantec.com for the pex supplies, heat analysis, etc. The plans called for a single zone with 5 runs of approx 240ft each. I used staples to hold pex to the foam, then put down rebar & risers. The complete package from Radiantec (less boiler) was $2,300 incl shipping.

And yes, the cement guys did show up on the morning of my daughters grad party, but they were out by noon, and I really did not participate, so all went well with party prep...
 

Attachments

  • garage 016.jpg
    garage 016.jpg
    149.9 KB · Views: 329
  • garage 019.jpg
    garage 019.jpg
    147.2 KB · Views: 335
  • garage 027.jpg
    garage 027.jpg
    141.3 KB · Views: 306
Last edited:
To avoid these ads, REGISTER NOW!
OP
L

leeklm

Well-known member
Joined
Jul 15, 2011
Messages
72
Location
Minneapolis
A buddy of mine is a carpenter, so gave me a great deal on labor if he could use this project as filler-work inbetween jobs. This allowed me to stay mostly involved during weekends and evenings.

The floor looked great when poured, but when it setup, the finish was plenty rough and bumby in areas. I should have insisted on the guys using a machine trowel, but they were the experts, and troweled by hand. If doing over, it would be by machine !!

I had 8" block put down, and used standard 9ft studs. I have seen a few guys stack two 8" block and use the 9ft walls, which I kind of like for a little more height. But, I decided 9.8 walls were going to be good.
 

Attachments

  • 2011-06-13_20-38-21_112.jpg
    2011-06-13_20-38-21_112.jpg
    145.2 KB · Views: 231
  • 2011-06-24_20-28-55_230.jpg
    2011-06-24_20-28-55_230.jpg
    140.7 KB · Views: 231
OP
L

leeklm

Well-known member
Joined
Jul 15, 2011
Messages
72
Location
Minneapolis
My wife was looking forward to having to having storage in the attic, but that idea fizzled as we decided to install a hip roof. We considered using engineered trusses that would open it up some for storage, but decided it was not worth the extra cost.

The guys put up the trusses while I was at work, so did not get pictures. From what I heard, a video camera should have been on hand while just the 2 of them were putting up trusses! One of the guys almost took a spill, but they got it done.
 

Attachments

  • 2011-06-24_20-29-38_303.jpg
    2011-06-24_20-29-38_303.jpg
    140.8 KB · Views: 201
OP
L

leeklm

Well-known member
Joined
Jul 15, 2011
Messages
72
Location
Minneapolis
Went with Timberline shingles and complete wrap. Ordered the same shingles that were put on my house about 5 years ago, but of course they did not match all that well...

You can see one sheet of XPS foam in the first picture along the slab. As mentioned earlier, I dug down about 4 ft below the slab to install this sheet, but the loose & sandy soil would tend to fall out from under the slab, so nixed that idea. I dont have any good pictures, but dug down to the bottom of slab, then ran the foam up along the 8" block and up to the OSB. I used PL300 to glue the foam along the slab & block, plus the dirt will hold it in place.

Another option for slab insulation is to trench out a ditch about 3-4 feet wide from the wall, and a depth to the bottom of the slab. You then lay the foam flat and bury. Since I was running short of time this fall, I opted to skip the extra insulation. I will keep an eye on how hard the heating system has to work this winter, and if needed, will trench and isulate next spring before the landscaping project.

I then had a guy bend up some roofing steel that would seal the foam from the elements. The steel came in 10ft lenths, so I added a rivet to hold them together. I will eventually have river rock along the perimeter, which will keep the steel out of the dirt.
 

Attachments

  • 2011-07-15_19-24-12_680.jpg
    2011-07-15_19-24-12_680.jpg
    141.7 KB · Views: 207
  • 2011-07-15_19-26-14_942.jpg
    2011-07-15_19-26-14_942.jpg
    141.8 KB · Views: 176
Last edited:
OP
L

leeklm

Well-known member
Joined
Jul 15, 2011
Messages
72
Location
Minneapolis
Time for some electrical... Since the path from house to garage is near a septic drain field and crosses a couple of lawn irrigation lines, I opted to dig the trench by hand. Figured I could use the calorie burning exercise as well! Again, soil is light & sandy, so digging by hand is actually pretty easy, even in the dead heat of summer!

As you can see in the pic, I started running in to too many tree roots, and changed direction on the ditch. This did cause extra work while running line, but no major issues. I planned on laying 1.5" conduit in the 18" trench, then pulling the lines. However, another guy recommended I lay the line first, then piece the conduit as I go. This may have been fine if the trench was straight & clear, but I did have a couple of bends and going under the irrigation lines. If I were to do it over, I would lube the lines good, and pull them through after the conduit is put down.

The run is about 120ft, so I ran 3- 3ga copper lines along with a 6ga green/copper ground. I have 100amp service in the garage, which is coming from my 200amp service in the house.

After checking local regulations, I opted to run 1/2" poly gas line in the same trench along with a 3-season water line tapped into the lawn irrigation. I put down the yellow tracing wire, and then a red marker tape close to the surface of trench.

I found the poly line very easy to work with and used a chamfer tool to clean the line ends up where it connects to the risers. The line comes off my house meter, which is at 2lbs of NG.
 

Attachments

  • electrical3.jpg
    electrical3.jpg
    149.7 KB · Views: 97
  • gas4.jpg
    gas4.jpg
    148.7 KB · Views: 105
OP
L

leeklm

Well-known member
Joined
Jul 15, 2011
Messages
72
Location
Minneapolis
The plan was to put vinyl on the sides, and brick up over the garage doors, finishing the gable with cedar siding. But, after getting quotes from the brick guy, it was only $700 more to finish the gable with brick (I had to provide the non-functional vent.) This plan made the wife happy since it now matches the front of our attached house garage. (speaking of which, the attached garage is a small 3-stall, but only 20 feet deep. Not too many years ago I would have been ecstatic to have my house garage, but as you all know, stuff piles up after a while...

My buddy and his hired guy finished the siding in a couple of days. Saved me about $1K compared to quotes from the siding professionals. We just used a double-dutch lap in the best quality that Menards had to offer. It was either .44 or .46, I am forgetting now. I rented a bender for a 1/2 day for the garage door wrap, and my buddy and I threw that up in short order.

There is one area where we screwed up a little... As you can see, we only have a short roof overhang on the front. Problem is that as we were framing, we measured the overhang on the house garage, which has brick. Since the original intention was to not have brick on the gable, the overhang ended up a little short after the brick was layed. Oh well, my wife is the only one who complains about that one...
 

TurboCup87

Well-known member
Joined
Mar 26, 2010
Messages
160
Location
WV
Looks like a great project! I'm formerly from Bloomington. Still get back to visit both sets of parents. Love the heated floor, I could even use that here.
 
OP
L

leeklm

Well-known member
Joined
Jul 15, 2011
Messages
72
Location
Minneapolis
Now the pics are loading...
 

Attachments

  • 2011-10-29_16-53-12_455.jpg
    2011-10-29_16-53-12_455.jpg
    144.3 KB · Views: 157
  • 2011-10-29_16-52-55_779.jpg
    2011-10-29_16-52-55_779.jpg
    145.7 KB · Views: 165
  • 2011-10-11_17-37-13_257.jpg
    2011-10-11_17-37-13_257.jpg
    143.8 KB · Views: 118
To avoid these ads, REGISTER NOW!
OP
L

leeklm

Well-known member
Joined
Jul 15, 2011
Messages
72
Location
Minneapolis
I was really undecided on how to finish the interior. After lots of searching here on the garage journal, I opted to finish the walls with 1/2" OSB, and 5/8 sheetrock on the ceilings. Insulated the walls with R19 batts and lined with 6mill vapor barrier. Attic was blown with 15" of fiberglass, which is about R40

I used 12 ft rock on the ceiling, and decided not to tape/mud. Instead, I used the $600 I saved for a floor coating... I did prime and paint the ceilings, which look good. In addition, I was able to run my 3 rows of 8ft lights along the seems, which cover up several of them! The lights are the T8 fixtures that sell for about $60 at Home Depot. I used 9 of the 8ft fixtures, and have good light with the white ceiling.

Garage doors are top of the line Ideal from Menards. They are 2" thick with good R value, and very heavy duty! Probably a little overkill, but they are nice!
 

Attachments

  • pre-clean.jpg
    pre-clean.jpg
    142.6 KB · Views: 161
  • pre-etch.jpg
    pre-etch.jpg
    141 KB · Views: 133
Last edited:
OP
L

leeklm

Well-known member
Joined
Jul 15, 2011
Messages
72
Location
Minneapolis
Time to turn the heat on! The instructions from Radiantec were pretty straight forward. I flip-flopped on the heating source throughout most of the summer. Do I go electric, natural gas, boiler, residential water heater, and on and on.

My heating plan only called for 40K BTU, so just about anything would "work". I happened to run into a guy (at a volleyball tournament of all places) that worked for a water heater distributor. He was telling me about the new Rheem XP90, which is a 30gal NG unit that was designed for dual purpose (potable water and radiant heat) applications, It is a 65K BTU unit that has a fast recovery time, which I thought might work well for those times when I want to generate more heat as quickly as possible (thinking hours, not days). It is also relatively efficient with a rating of .70. The XP90 is power vent assisted, but still requires a Type B venting/exhaust system.

I filled the system with 50/50 Glycol and distilled water, purged the air, and cranked it up! The remaining air quickly worked its way out, and the system is perfectly silent. While looking for Glycol, Menards had "radiant specific" Glycol for $20 per gallon, or I could walk across the store and buy automotive anti-freeze with the same glycol, lubricants, and anti-corrosion for $10 per gallon. Considering my dad used automotive glycol in his hog building 20+ years ago and had yet to have a problem, I opted for the $10/gal option.

So far I have been keeping the heat at a constant 60, and the system rarely comes on! We have had some single digit temps, but nothing below 0 just yet, but it is likely coming soon!

In summary, Radiant heat is a bit costly, but sure is nice!
 

Attachments

  • 2011-12-11_15-28-50_689.jpg
    2011-12-11_15-28-50_689.jpg
    141.3 KB · Views: 105
  • plumbing.jpg
    plumbing.jpg
    143.6 KB · Views: 100
OP
L

leeklm

Well-known member
Joined
Jul 15, 2011
Messages
72
Location
Minneapolis
Looks great.:beer:

Those rebar chair/risers are the sh** aren't they.

They do work slick. We did not have all the cross bars wired together at first, but quickly got it done when the first load of concrete was knocking over the risers! All was good once we tied it all together.
 
OP
L

leeklm

Well-known member
Joined
Jul 15, 2011
Messages
72
Location
Minneapolis
Last but not least... time for the floor coating. To summarize my long-winded thread in the flooring section, it was a last minue decision for me to coat the floor, which I did over Thanksgiving. I went with RockSolid Polyurea single coat system. It turned out nice considering the rough surface I started with. A few stripes are noticeable from roller overlap, but the coating seems to be "rocksolid" and is supposed to be highly resistant to oil/gas/chemicals, which was my primary goal.

All that is left now is to fill up the garage! I have a little trim work to do with windows and such, along with a bench and shelving, which of course are good winter projects. But for now, time to get some work done around the house!

Happy Holidays!
 

Attachments

  • floor close up.jpg
    floor close up.jpg
    150.8 KB · Views: 50
  • floor- rough spots.jpg
    floor- rough spots.jpg
    150.2 KB · Views: 50
  • floor-finished.jpg
    floor-finished.jpg
    144.8 KB · Views: 86

Big-Foot

Well-known member
Joined
Jan 30, 2005
Messages
1,951
Location
Midlothian, TX
Very nice!!!!!

I wish I had radiant heating in the floor of my shop. Unfortunately the previous owner didn't think about that...

I also have a place in MPLS and was curious if they will give you any grief over the lack of sheet rock on the walls in a heated space? I did the walls in my MPLS shop with 1/2" plywood and now am told that it will not pass inspection ( I am going to sell it soon ) unless I put sheetrock up over the plywood... Maybe because you are radiant heat and mine is a gas furnace?

Still - very very nice job you are doing!
 
OP
L

leeklm

Well-known member
Joined
Jul 15, 2011
Messages
72
Location
Minneapolis
Very nice!!!!!

I wish I had radiant heating in the floor of my shop. Unfortunately the previous owner didn't think about that...

I also have a place in MPLS and was curious if they will give you any grief over the lack of sheet rock on the walls in a heated space? I did the walls in my MPLS shop with 1/2" plywood and now am told that it will not pass inspection ( I am going to sell it soon ) unless I put sheetrock up over the plywood... Maybe because you are radiant heat and mine is a gas furnace?

Still - very very nice job you are doing!


My shop is 120ft from the house, so I am thinking that is why they do not care about OSB on the walls. If attached or close to the house, then sheetrock is definitely needed. I did put sheetrock up around the hot water heater, but only because I had 3 sheets, and did not want to return them to Menards :) In addition, I figured some sheetrock around the heating source was not a bad idea anyway... Of course that heater is not working very hard right now with 40 degrees in the middle of December!
 
Last edited:
OP
L

leeklm

Well-known member
Joined
Jul 15, 2011
Messages
72
Location
Minneapolis
Any idea what the $ amount is?

Nice garage:thumbup:

Here is a general idea...

--Pex, manifold, pump, expansion tank, etc. (Radiantec kit) = $2,300 w/ship
--2" XPS R10 Foam Board = $900
--Rheem XP90 Water Heater = $725, less $100 rebate from gas Co.
--Misc. copper & fittings = $50
--20 Gallons of Glycol/Antifreeze = $200
 
To avoid these ads, REGISTER NOW!
Top Bottom