To avoid these ads, REGISTER NOW!

Cant fit new joists for sistering

Ryland

Well-known member
Joined
Jan 14, 2010
Messages
294
Location
Rhode Island
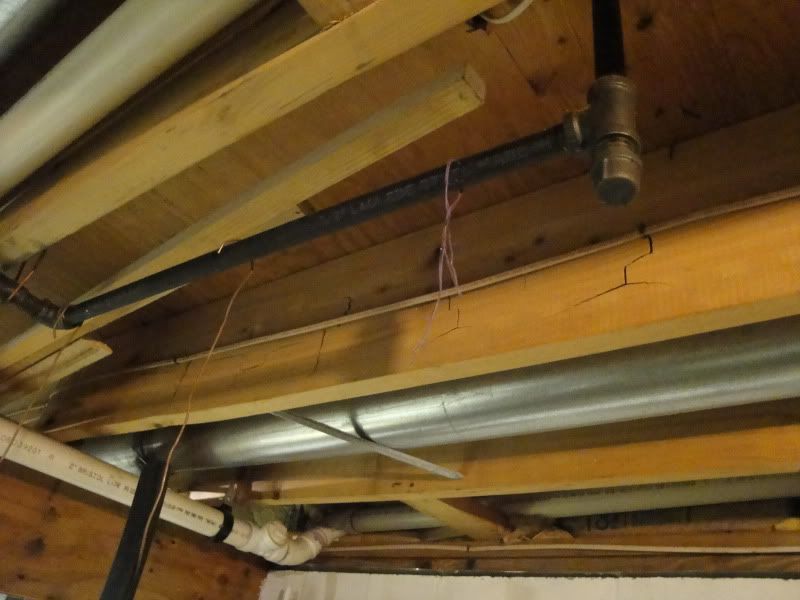
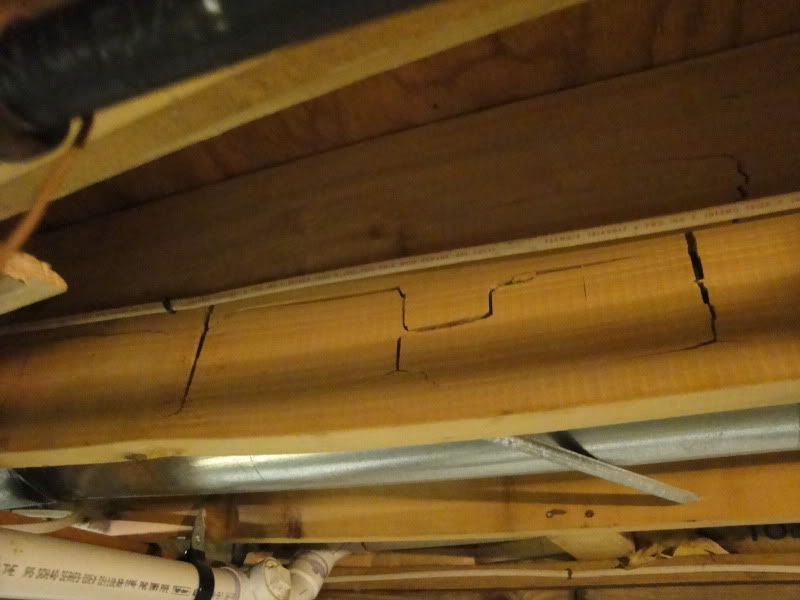
I have 3 dry cracked joists in my basement and want to sister 2x8's next to them but im not sure I can get a full length joist in place with the wiring and piping thats there although I can get one into place that more than covers where the cracks are. If I can get one the full length would it be better to splice 2 sections together on a 45 or a V in the end of the board?
 
To avoid these ads, REGISTER NOW!

bassman

Well-known member
Joined
Feb 13, 2005
Messages
198
Location
florida
remove the wiring and pipes, install the new joists, then reinstall the pipes and wire. Also, I bet theres some kind of steel plate, teco maybe, that you could use in a shorter section with a lot of screws that would work well.
 

cyamaha2007

Well-known member
Joined
Apr 20, 2009
Messages
2,001
Location
St.Charles MO
I was told to sister the beam on both sides of the crack at least 3ft. Glue and bolt in the new patch. I would also put one on each side.
 

Kev442

Well-known member
Joined
Jan 15, 2009
Messages
5,386
Location
Wi
More like an elongated "Z" at least 8". Hard to describe, it's these 2 combined:

<
>
 

rlitman

Well-known member
Joined
Oct 18, 2010
Messages
24,663
Location
Long Island
I was told to sister the beam on both sides of the crack at least 3ft. Glue and bolt in the new patch. I would also put one on each side.

This is true. I prefer a large number of nails for sistering, than bolts. Bolts can lead to more cracks when holding this ********** force. If you have a pneumatic framing nailer, just go to town on the length joint, and don't put too many nails in a single line.
Anyway, there isn't much need to sister the entire length (unless you really want to increase the floor loading capacity above).

BUT, why did it crack in the first place, and what way is the crack running? Pictures (especially ones that expose the grain of the original joist, and flaws such as knots) would be very helpful.
Joists shouldn't just dry out and crack.
 
OP
R

Ryland

Well-known member
Joined
Jan 14, 2010
Messages
294
Location
Rhode Island
The joists are 15 years old and there really isnt much to the cracking. It looks like a small crack started on a bottom edge that started running the length of the joist. Im not looking to increase the load capacity of the floor. One thing that was mentioned was to use 3/4" plywood on both sides of the joist, glue and nail it.
 

theoldwizard1

Well-known member
Joined
Feb 22, 2011
Messages
43,264
Location
SE MI
Before you do any sistering, check to see it the joists have sagged, If so, you may want to jack the sag out of them using a 4x6 or 1/4x3x3 steel angle from underneath.

Use good quality construction adhesive. I would use 3 or 3½" screws and something heavier than drywall screws. Leave any supports in for at least 24 hours before removing jacks.
 

theoldwizard1

Well-known member
Joined
Feb 22, 2011
Messages
43,264
Location
SE MI
Googling around for some ideas, you could run a piece of 1-3/4 wide by 3/8-1/2" thick steel underneath the crack, extending 12-18" side of the crack. Then, doubling that stock, put pieces across the beam, top an bottom and connect the cross pieces with 1/2" bolts/all-thread.

Another thing you could do, is look for some 1/4" thick angle steel, that is 1-1/2 by 6. They need to extend about 12-18" each side of the crack. Place one on each side of the beam with the short part of the angle under the beam, jack the sag out and through bolt.
 
OP
R

Ryland

Well-known member
Joined
Jan 14, 2010
Messages
294
Location
Rhode Island
I am going to either:
a) Glue and nail 3/4" plywood to either side
b) Glue/nail 2x8 on one side.

At this point I think I am going to do the 3/4 on 2 of the joists and the 2x8 on the 3rd one that is the worst of them. The first two are just superficial cracks but I want to deal with it before they get worse. The 3rd one has a crack running all the way through it but it looks like someone might have filled the crack with some kind of sealant due to a hardened substance that is on the outside of the joist.
 

K'ledgeBldr

Well-known member
Joined
Aug 22, 2011
Messages
1,925
Location
Johns Creek, GA
RI- Lumber is probably Hem or Fir.
What is the size of the floor joist?
What is the overall span of those joists?
Where are the cracks? Ends? Middle? Somewhere in between?
What is above this area? Open Floor? Wall (parallel or perpendicular)?
 

Hudd02

Member
Joined
Jan 1, 2012
Messages
14
Go to any sawmill and you can special order any length and size you need. It will not be much more expensive and will be rough cut. (most mills don't have planers). But you must negotiate a price before they cut it for you, otherwise, they will be at liberty to charge their own price. If they don't have any at the time, place it on order, so when they get the right logs in, they'll be able to cut it for you. It won't take them but a few seconds to spin the wheel out for your size, then back to their normal cut. Butting depends on the length of the rail. Just make sure when you put it up, you have at least two jacks and keep at least a full hand's width from the sister joist in case you have to do any plumbing repairs in the future. Also, predrill screwholes, a single screw will hold more than five nails.
 

rlitman

Well-known member
Joined
Oct 18, 2010
Messages
24,663
Location
Long Island
sister one side is all thats needed,glue and nail with nail gun. If you don't have a nail gun 2 to 2 1/2" drywall screws will work.

A 2x beam is 1 1/2" thick. A 2" drywall screw would only reach 1/2" into the rear joist. That's not going to hold anything, AND drywall screws are NOT meant to be loaded in shear structurally like that.

If you don't have a framing nail gun, then three 3/8" diameter carriage bolts (NOT arranged in a line, or else you would encourage more cracking) on each side of the damage should be ok to use.

Yes, you should check the beam for sag (if it is in need of repair, then you're pretty much guaranteed it has sagged somewhat) before sistering. Very good point raised above by theoldwizard1!

PICTURES will still help a lot.
I'm not sure what you're describing as a sealant, but I have seen sap come out of cracks in framing lumber around here before. It will be pretty hard (like a screwdriver handle), and look a little like amber.

As I said above, beams do not just get dry, and crack in ways that will affect the structure. They can split between the grain, and I've had some framing poorly selected, where a knot made the grain turn out the side of the piece, which started a crack. In these cases, sistering (after jacking it back to straight) was all that was required.
Have you checked for termite damage out of curiosity?
 

Hudd02

Member
Joined
Jan 1, 2012
Messages
14
Go to any sawmill and you can special order any length and size you need. It will not be much more expensive and will be rough cut. (most mills don't have planers). But you must negotiate a price before they cut it for you, otherwise, they will be at liberty to charge their own price. If they don't have any at the time, place it on order, so when they get the right logs in, they'll be able to cut it for you. It won't take them but a few seconds to spin the wheel out for your size, then back to their normal cut. Butting depends on the length of the rail. Just make sure when you put it up, you have at least two jacks and keep at least a full hand's width from the sister joist in case you have to do any plumbing repairs in the future. Also, predrill screwholes, a single screw will hold more than five nails.

A sideways split is far more serious than a lengthwise split. A sideways split almost always comes from a knot or a younger fracture from the tree. A lengthwise split doesn't sound like much concern to me from your explanation, unless it eventually runs across all grains. If it doesn't, put a few good screws in the center bottom that will reach well up past the split, at strategic points (by looking at it), to secure the split together. This should be good enough to last the lifetime of the house.
 
To avoid these ads, REGISTER NOW!

srmofo

Well-known member
Joined
Oct 15, 2009
Messages
6,161
Location
SW ohio
When I fixed the ones in my basement I simply cut notches where pipes or electric went through. Since I sistered them on both sides, I placed the grooves up on ones side and the grooves down on the other. I realize this isnt the best way, however this was about 7-8 years ago and I havent had a problem with the repair yet. I was in my early 20's at the time, and didnt have much disposable income so I made due. My sistered repair boards did NOT run the entire length, just a few feet past each crack.

I first jacked the floor back up level and in plane with the other joists, then applied construction adhesive inside the crack(before jacking) and on the new boards, and put the boards in place. Clamped them up and drilled holes for some large bolts. 2 at each end a few scattered throughout the board. I reused old head bolts because 1/2 bolts in the 6" length are not cheap. I also used large fender washers to avoid pulling the heads into the new boards. Pounded in some 16d coated nails to finish it off. It stiffened my floor up significantly and stopped the shaking when a drunken buddy would come barrelling through the house.

The wood in my house is the OLD stuff that is true 2x and if Im not mistaken has petrified at this point. Its so old and dry that it is difficult to drive nails in let alone drill holes or drive screws. I believe I have another crack forming on another joist and plan to repair this one in the same manner.
 

theoldwizard1

Well-known member
Joined
Feb 22, 2011
Messages
43,264
Location
SE MI
When I fixed the ones in my basement I simply cut notches where pipes or electric went through. Since I sistered them on both sides, I placed the grooves up on ones side and the grooves down on the other.
:thumbup: from me !

I first jacked the floor back up level and in plane with the other joists, then applied construction adhesive inside the crack(before jacking) and on the new boards, and put the boards in place. Clamped them up and drilled holes for some large bolts.
:thumbup: :thumbup:
 

WQ59B

Well-known member
Joined
Feb 18, 2010
Messages
762
Location
NJ
While we're on the subject of floor joists- WTH? I have clearance to sister the entire length on the other side (about 12')- top has not moved but the bottom edge has gotten mad wonky...

DSC01284.jpg

DSC01287.jpg
 

DekeT

Well-known member
Joined
Aug 12, 2011
Messages
2,234
Location
USA
While we're on the subject of floor joists- WTH? I have clearance to sister the entire length on the other side (about 12')- top has not moved but the bottom edge has gotten mad wonky...
QUOTE]

Is there a wall above that joist and does that air duct get hot?
 

WQ59B

Well-known member
Joined
Feb 18, 2010
Messages
762
Location
NJ
Wall actually crosses diagonally in the general area above. Duct doesn't get so hot it'd do anything- this is the only joist like this in the house & all the rest of the ductwork runs throughout the basement too. Freak piece of fir? I never saw a piece of wood do this (unless it was seriously rotted).
 

betterbillt

Active member
Joined
May 31, 2011
Messages
44
Wall actually crosses diagonally in the general area above. Duct doesn't get so hot it'd do anything- this is the only joist like this in the house & all the rest of the ductwork runs throughout the basement too. Freak piece of fir? I never saw a piece of wood do this (unless it was seriously rotted).

That looks like cell collapse. It was probably dried wrong. I've seen that before but not in conventially dried lumber. Usually see it in stuff coming out of small kilns.
 

Kevin54

MEMBER EMERITUS
Joined
Jan 12, 2005
Messages
29,341
Location
Urbana, Ohio
I have 3 dry cracked joists in my basement and want to sister 2x8's next to them but im not sure I can get a full length joist in place with the wiring and piping thats there although I can get one into place that more than covers where the cracks are. If I can get one the full length would it be better to splice 2 sections together on a 45 or a V in the end of the board?

How bad are the splits actually? Do they go all the way through?

Are they large, are they small, cosmetic, or structural. Before you go to raising the house and having all new laminated beams put in, can you snap a picture?

It may be as simple as a bottle of Gorilla Glue and some plywood and a few nails, or it may be as bad as having to add steel "L" brace in and a support underneath. You may or may not have to sister in full length 2x's. Also what caused them to crack in the first place? Is there a wall on top of them, are they actually supporting a wall or just supporting the floor boards? Are the joist themselves 2x8's or are they 2x10's and where and how long are the cracks?

Before you start ordering lumber, "zeeing" the ends of the boards, cutting them on 45's, making finger joints, or whatever else, just how bad is it really and how long has it been like this?
 
OP
R

Ryland

Well-known member
Joined
Jan 14, 2010
Messages
294
Location
Rhode Island
Well I found a 4th joist that Im going to sister but that one just has some surface cracks in it. The first two have 2-3 foot cracks length wise along the bottom but havent sagged. The 3rd one has cracks straight through it but it looks like someone injected something into the crack to stop it from moving. All joists are getting issterd since each one has one side clear that I can get a 2x8 into. All joists were 2x8x12's.

Edit: No wall on top and no extra weight being supported by them. They just look like they dried out and cracked esp since the cracks are all near the bottom.
 

Kevin54

MEMBER EMERITUS
Joined
Jan 12, 2005
Messages
29,341
Location
Urbana, Ohio
Well I found a 4th joist that Im going to sister but that one just has some surface cracks in it. The first two have 2-3 foot cracks length wise along the bottom but havent sagged. The 3rd one has cracks straight through it but it looks like someone injected something into the crack to stop it from moving. All joists are getting issterd since each one has one side clear that I can get a 2x8 into. All joists were 2x8x12's.

Edit: No wall on top and no extra weight being supported by them. They just look like they dried out and cracked esp since the cracks are all near the bottom.

What color does it look like that was injected into the crack? Is it like a clear amber color? If it is, it is more than likely just sap that has dried when it went through the kiln. You will see a darker edge around the outside of the crack and the clear amber on the inside.

Can you take a picture of the joist in question?
 
OP
R

Ryland

Well-known member
Joined
Jan 14, 2010
Messages
294
Location
Rhode Island
What color does it look like that was injected into the crack? Is it like a clear amber color? If it is, it is more than likely just sap that has dried when it went through the kiln. You will see a darker edge around the outside of the crack and the clear amber on the inside.

Can you take a picture of the joist in question?

Its clear amber in color. I originally assumed it was sap with a few larger bubbles of it on the outside of the wood. I might be able to get a photo but its pretty dim down there.
 
OP
R

Ryland

Well-known member
Joined
Jan 14, 2010
Messages
294
Location
Rhode Island
Well I am essentially finished. The two with minor cracking both have 2x8's covering at least 3 feet on either side of the ends of the cracks held in place with construction adhesive and lots of 3.5" nails. The worst of the three that had cracks running all the way through it has a 12 foot 2x8 that runs the entire span and is held in place by 3.5" nails. The joist with the most minor cracks is going to wait until the old kitchen is ripped out because the piping that is currently in my way is going to be removed which would greatly simplify doing this one.
 

toolmaker1

Well-known member
Joined
Oct 3, 2010
Messages
533
Location
Northwest Pa
Well I am essentially finished. The two with minor cracking both have 2x8's covering at least 3 feet on either side of the ends of the cracks held in place with construction adhesive and lots of 3.5" nails. The worst of the three that had cracks running all the way through it has a 12 foot 2x8 that runs the entire span and is held in place by 3.5" nails. The joist with the most minor cracks is going to wait until the old kitchen is ripped out because the piping that is currently in my way is going to be removed which would greatly simplify doing this one.

sounds good but you are going to have to keep an eye on the rest of the framing because that is some of the worst looking lumber I have ever seen.
 
To avoid these ads, REGISTER NOW!
Top Bottom