To avoid these ads, REGISTER NOW!

Who has tried aligning your car yourself???

outtaplace

Active member
Joined
Jan 21, 2011
Messages
37
Location
Central NJ
I did the alignment on my S2000 a little while back. I autocross the honda regularly and am too cheap to pay the $125 each time i want to make a suspension tweak (not to mention having to argue with the guy at the garage who says that my tires are going to wear out and its unsafe for the road and all that ****, lol).

<a href="http://s1127.photobucket.com/albums/l628/rjh233/Car-Garage%20Work/?action=view&current=IMG_9265-1.jpg" target="_blank"><img src="http://i1127.photobucket.com/albums/l628/rjh233/Car-Garage%20Work/IMG_9265-1.jpg" border="0" alt="Photobucket"></a>
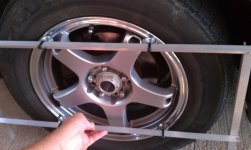
In this pic you can see the very simple jack stands and string line I use to set the toe.


<a href="http://s1127.photobucket.com/albums/l628/rjh233/Car-Garage%20Work/?action=view&current=IMG_9261.jpg" target="_blank"><img src="http://i1127.photobucket.com/albums/l628/rjh233/Car-Garage%20Work/IMG_9261.jpg" border="0" alt="Photobucket"></a>

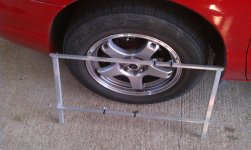
In this pic you can see the overall setup. The "alignment tool" i use is near the right rear tire.

I've asked around at my local autocrosses and no one seems to have tried this. I was curious if anyone on GJ has or if there are any other autocrossers with tips.

thanks,

rob
 
To avoid these ads, REGISTER NOW!

Alchymist

Well-known member
Joined
Mar 1, 2009
Messages
4,423
Location
Central PA
Used to DIY on the trucks - caster and toe-in. Caster via wedges on the solid front axle, toe-in with string and tape measure. Camber required bending axles, didn't attempt that. Newer stuff - alignment shop, esp 4X4.
 

IDASHO

Well-known member
Joined
Mar 5, 2007
Messages
1,809
Location
Moscow, Idaho
I do my own toe alignments. Similar to our setup.

What is the purpose of the lumber under the tiles though?

I just use two ceramic tiles w/ grease between them on all 4 corners, right on the concrete.
 

J Persons

Well-known member
Joined
Jul 27, 2010
Messages
640
Location
Louisiana
I do my own, I use a Longacre mag caster camber gauge modified with a Dunlop adapter, and a Longacre toe gauge. I also use the "grease between two tiles" type of turn plates. I tried making turn plates out of 1/8" aluminum plates and ball bearing turntables, but due to the wheel offset, I couldn't get them to work correctly.
 

Frank The Plumber

Well-known member
Joined
Feb 19, 2011
Messages
2,644
Location
Chicago.
I use a laser to find the vehicle center line. From that point I do similar to what you are doing but use a laser. I mark the floor to get my two perfectly parallel straight lines. From this point I measure from the front and rear of the line ahead of and behind the tires. To set caster I use a digital level with a magnet to the back of the brake discs.
You must center the alignment.
 

soob

Well-known member
Joined
Jul 11, 2011
Messages
551
I did it myself once after replacing all my steering parts. Barely made it 2 miles to a shop to have it straightened out. Heh.
 

Zengineer

Well-known member
Joined
Apr 10, 2010
Messages
781
Location
British Columbia, Canada
I've been doing string alignments for 15ish years, they've never let me down. Confirmed my alignment on a full digital alignment rack once, it was bang on. The method you are using is perfectly adequate.
 

MotecM

Well-known member
Joined
Feb 3, 2010
Messages
79
+1
I've used the string method many times. If you're patient and pay close attention to detail you will get great results.
 

Lotek

Well-known member
Joined
Dec 9, 2007
Messages
9,098
Location
Los Angeles, Ca.
Back in the day, the fancy machine used strings. :thumbup:

Longacre makes a magnetic caster/camber gauge that would complete the setup, or you could find an old one. Over the years, I have collected a pair of gauges, wheel mounts and turntables, but being lazy, I just use the magic laser machine at work. :bounce:

Finding an alignment tech who understands suspension geometry instead of just doing what the machine says can be tough. :headscrat
 

williaty

Well-known member
Joined
May 16, 2010
Messages
829
Actually just did it tonight on my own car. Well, half of it. I just retrofitted an Impreza STi front end under the bonnet of an Impreza 2.5RS station wagon :lol: Couple that with the camber plates and the crazy modifications for added caster and, well, it was a bit of a mess to get into the ballpark of right. I managed to achieve 0.0* +/-0.05* of cross-camber, 0.0* +/-0.01* of thrust angle, and 0.0* +/0.09* of toe. That's a hell of a lot better than I could get at any professional alignment shop. Tomorrow afternoon, I have to align the rear end and then bleed the brakes again and it should finally be ready to come out of the garage. It'll be nice to have a car again after 2.5 weeks without one!
 

William Payne

Well-known member
Joined
Mar 15, 2010
Messages
7,707
Location
Wanganui, New Zealand
I was staying at a motel once and there just happened to be a rally team staying in the next room (and other rooms at the motel), anyway they were working on the car in the parking lot outside the room and they were doing their own wheel alignment. I have pictures somewhere.

WilliamDunedin034.jpg

WilliamDunedin035.jpg


An old school mechanic I know has a metal plate thats pressure sensitive that he pushes the cars on one wheel at a time and it has a degree wheel with an arrow on it and adjusts alignment using that but I think that tool he uses is really old and he has been a mechanic for ever and has alot of old gear.
 

markw365

Well-known member
Joined
Aug 16, 2011
Messages
207
You can get "toe plates" which will let you set toe. I know a lot of racers use those. I set my honda autocrosser and my jeep myself. Can't use the toe plates on the jeep but the Civic Si (91) I just use two tape measures and toe plates. No issues with tire wear. As for camber you can measure it with a temp gun right after a run. Take readings across the face of the tire and try to get even temps. Hotter on inside vs outside is too much negative camber and visa versa. Not sure if your car has camber adjustment, the civic doesn't but I've added ingall's adjusters to it. The car is dialed, national champ was almost as quick in it as his own car so it's not the car. :)
 

Jim Stabe

Well-known member
Joined
Feb 18, 2009
Messages
801
Location
San Diego, Ca
If you autocross a lot you can make a quick string setup so you can make adjustments at the track and change back to street settings before you leave for home. Especially good for cars with IRS. What I don't like about traditional string methods is that you can't move the car without resetting up the strings and you need to settle the car after making an adjustment. I made some holders that attach to nuts welded to the bumper brackets and accept a length of tubing and holds it at hub center height front and rear. The tubing has a stop so it always ends up in the same place. The ends of the tube have grooves to locate the strings.

I accurately located the centerline of the car using the suspension inner pickuppoints and located the center of the of the tubing along that centerline. The outer grooves for the string are equidistant from the centerline. With the tube accurately located I welded a washer to the tube as a stop against the drivers side bracket so it would reposition repeatedly. With the brackets in place it only takes about 2 minutes to set up the strings. The big advantage is that they are attached to the car so you can roll it back and forth after making an adjustment without disturbing the strings.

Alignment 011.jpg

Alignment 008.jpg

Alignment 009.jpg

Alignment 010.jpg

Alignment 012.jpg
 
Last edited:

DoyleDee

Well-known member
Joined
Jun 17, 2007
Messages
689
Location
North Texas
I've got a setup that I use made out of aluminium angle, that I mount to the wheel (with added spacers to touch four points on the rim). It looks like a rectangle that the two outer sides drop down , I use my tape measure to measure from this distance to get my toe. I don't currently have camber adjustments on my cars, so I don't worry about that. I also use alignment plates under the front wheels (or rear-I only have two).... My setup works great to align either the front or rear....I'm not set up to do all four. All four will be using string and two ten ft pieces of conduit to make a "box" around the car..(found online somewhere). I'll add pics later when I get them..
 

Gary S

Well-known member
Joined
Dec 27, 2008
Messages
2,972
Location
Bismarck, ND
I drive old rear wheel vehicles, so as long as I don't run into a curb or do something else stupid, they basically don't ever need realignment until I replace suspension components after 20 or 30 years. When I replace suspension components, I can realign camber and toe in by simply measuring it. If I feel it needs a caster adjustment, I pay the Man who knows how to do it right.
 

nehog

Well-known member
Joined
Jan 2, 2010
Messages
7,935
Location
Jaffrey, NH
I do my own usually... I have an old alignment tool to show camber/caster (the tools' probably about 50 years old, maybe more) and use a straight piece of aluminum square tube for toe adjustments. I've also used the string method, and that works just fine too...

In my case I lay down a few (say 3) pieces of reinforced plastic sheet (about 12 x 12, or a bit larger) with some light oil between each sheet so that the sheets move well in relation to the floor. This is necessary as to set the caster you have to be able to turn the wheels, and to set toe the wheels will turn slightly as well.

Always double check, align as best you can, do a test drive with some turns, then come back and recheck the alignment. I've found about 40% of the time the alignment needs touching up when rechecking.
 

Sureshot

ALLIANCE MEMBER
Joined
Jan 3, 2011
Messages
3,134
Location
Bridge Creek, OK
So with the string jig on the front and back how do you square the assembly? Line one side from a rear wheel and then make the other parallel?

Some info on procedure please.
 

Jim Stabe

Well-known member
Joined
Feb 18, 2009
Messages
801
Location
San Diego, Ca
So with the string jig on the front and back how do you square the assembly? Line one side from a rear wheel and then make the other parallel?

Some info on procedure please.

The brackets that hold the bars screw into nuts welded on the bumper brackets so they are are always in the same place and the bars are perpendicular to the centerline of the car. The brackets are marked lf, rf, lr, rr and the tubes are marked front and rear. The bars (tubes) slide in from the drivers side and each one has a washer welded on as a stop. When I was constructing the setup, I marked the center of each bar and cut a groove on the ends of each one equidistant from the center (same distance front and rear). I then set up the bars so the the center was exactly in line with the centerline of the car as determined from the suspension pickup points. I then welded the washer onto the bar so that each time I set up the rig I could slide the tube in until the washer was up against the bracket and the bar would be perfectly centered. The strings sit in the grooves (it is shown outside the groove in the picture just so you can see the groove).

To set it up you screw in the brackets and lock them in place with the jamb nuts. Slide in the bars from the drivers side until the washer hits the bracket and lock them in place with the wing set screws. Set the strings in the grooves and you have a perfect rectangle with each side parallel to the other and also equidistant from and parallel to the centerline of the car. With the brackets in place it takes less than a minute to set up - add anothet 2 minutes to put the brackets in place.
 
To avoid these ads, REGISTER NOW!

NUTTSGT

Super Moderator
Staff member
Joined
Sep 14, 2009
Messages
50,953
Location
Northern Central Ohio
When I changed over from a power rack to a manual rack, I got mine close enough with a tape measure/tape/string for drag racing. After I swapped to a tubular k-member and coil overs, I got it close enough to be "straight" but I took it in to the shop for an after hours alignment.


You may want to find a shop that will stay late and do an alignment some a side job (cash). If you can, they may be more happier to take the time to adjust to the specs you want for autocrossing.
 

DoyleDee

Well-known member
Joined
Jun 17, 2007
Messages
689
Location
North Texas
Here is a few pics of what I have so far.
 

Attachments

  • jig3.jpg
    jig3.jpg
    148 KB · Views: 105
  • jig2.jpg
    jig2.jpg
    140.7 KB · Views: 120
  • jig1.jpg
    jig1.jpg
    147.7 KB · Views: 126

Sureshot

ALLIANCE MEMBER
Joined
Jan 3, 2011
Messages
3,134
Location
Bridge Creek, OK
The brackets that hold the bars screw into nuts welded on the bumper brackets so they are are always in the same place and the bars are perpendicular to the centerline of the car. The brackets are marked lf, rf, lr, rr and the tubes are marked front and rear. The bars (tubes) slide in from the drivers side and each one has a washer welded on as a stop. When I was constructing the setup, I marked the center of each bar and cut a groove on the ends of each one equidistant from the center (same distance front and rear). I then set up the bars so the the center was exactly in line with the centerline of the car as determined from the suspension pickup points. I then welded the washer onto the bar so that each time I set up the rig I could slide the tube in until the washer was up against the bracket and the bar would be perfectly centered. The strings sit in the grooves (it is shown outside the groove in the picture just so you can see the groove).

To set it up you screw in the brackets and lock them in place with the jamb nuts. Slide in the bars from the drivers side until the washer hits the bracket and lock them in place with the wing set screws. Set the strings in the grooves and you have a perfect rectangle with each side parallel to the other and also equidistant from and parallel to the centerline of the car. With the brackets in place it takes less than a minute to set up - add anothet 2 minutes to put the brackets in place.

I understand if it is for one vehichle but if you were to build one to fit many vehicles. With large magnets or brackets that tarp stap to many bumpers and some adjustability you should be able to make semi-universal setup.

I am thinking you would make two sides(string) parrallel then go from the front hub to string on both sides then use half the total for a front hub to string distance then do the same on the rear with the axle or hub center to string and make them equal on both sides. Could you not get an idea of thrust angle from an arrangement like this using rear alignment on a solid rear axle?
 
OP
O

outtaplace

Active member
Joined
Jan 21, 2011
Messages
37
Location
Central NJ
I do my own toe alignments. Similar to our setup.

What is the purpose of the lumber under the tiles though?

I just use two ceramic tiles w/ grease between them on all 4 corners, right on the concrete.

The wood is to get some clearance so that I can squeeze under the car to adjust the bolts. I can't fit with the car on the ground.

The tiles are from Home Depot. Vinyl, 59 cents each or so and I put the shiny sides facing each other with a few drops of 3-in-1 oil - its so slippy you could probably push the car off the tiles sideways. The steering wheel turns effortlessly and you can watch the rear tires move as you adjust the cam bolts.

I locate the vehicle center line from the suspension points, drop marks to the garage floor with a plumb line from the car's front and rear center points then snap a chalk line as my reference for the strings on the jack stands. I set the rear camber and toe first, double check the settings, then move to the front and after making sure the center line is still on, set the front camber, caster, then toe. I haven't checked it afterward on an alignment rack, but I have had pretty good results based on how the car rides down the road, and tire temperature readings at the autocross.

IMG_9408.jpg


This is the tool I made. There is a "Smart Camber" tool for sale online, which sells for like $250, but I made this one for $100 (cost of the digital level).

IMG_9409.jpg


It uses a "Smart Tool" digital level and the frame is fab'd from 3/4" angle iron and machine screws to zero it out. It's adjustable for 14", 15" and 17" wheels.
 

Graham08

Well-known member
Joined
Dec 10, 2007
Messages
713
Location
Iron Station, NC
I made a set of bars similar to Jim's for my sprint car. It had tubular bumpers, so mine simply plugged into the bumper mounts. The difference was mine had sawcuts in the ends of the tubes to make sure the strings were always in the same place.

It was very nice to just attach the fixture to the car, and know I had two strings parallel to the vehicle centerline...saved a ton of time when I checked the alignment every time the car went to the track.

Mine was a low-rent version of what I had seen IRL teams use to check alignments.

Something to pay attention to is how the steering is centered when you're doing an alignment. If you have any Ackermann geometry built into your steering system, it becomes very important to have the steering centered when you set the toe, because the total toe changes depending on the steering wheel position.

In my case, I had a fixture that locked out the Pitman arm to make sure it didn't move. For rack & pinion steering, you can usually have some sort of rack stops to make sure it's centered the same way every time.
 

Seanbev24

Well-known member
Joined
Mar 25, 2010
Messages
1,000
Location
Lynnwood, Wa
It's unfortunate that so many people have trouble finding a good alignment tech. I had a guy bring in a Fiero a couple weeks back. It was lowered and had brand new everything, and he gave me a list of all the angles he wanted. It took me a while, but he left very happy. I get so sick of seeing the guys that think "green means good" and have no real understanding beyond what the computer says.

The average alignment is so quick and easy, it doesn't bother me to spend extra time when someone really cares how the car is set up.
 

Jim Stabe

Well-known member
Joined
Feb 18, 2009
Messages
801
Location
San Diego, Ca
I understand if it is for one vehichle but if you were to build one to fit many vehicles. With large magnets or brackets that tarp stap to many bumpers and some adjustability you should be able to make semi-universal setup.

I am thinking you would make two sides(string) parrallel then go from the front hub to string on both sides then use half the total for a front hub to string distance then do the same on the rear with the axle or hub center to string and make them equal on both sides. Could you not get an idea of thrust angle from an arrangement like this using rear alignment on a solid rear axle?

If you were to purchase some kind of universal rig you would still have to go through the setup process - determine the vehicle centerline and make sure the strings are parallel to and equidistant from the centerline and at hub height. I just made it for my car so it was easy to make the setup quick and repeatable. As for thrust angle, you could mark the spindle centers on the string front and rear and compare the wheelbase measurements side to side.

It's unfortunate that so many people have trouble finding a good alignment tech. I had a guy bring in a Fiero a couple weeks back. It was lowered and had brand new everything, and he gave me a list of all the angles he wanted. It took me a while, but he left very happy. I get so sick of seeing the guys that think "green means good" and have no real understanding beyond what the computer says.

The average alignment is so quick and easy, it doesn't bother me to spend extra time when someone really cares how the car is set up.

I wish there were more techs like you out there, I wouldn't have to learn how to do so much of the stuff myself.

Thank you!
 

Stephenw

Well-known member
Joined
Dec 21, 2006
Messages
1,911
Location
Utah

Attachments

  • Fastrax.jpg
    Fastrax.jpg
    37.6 KB · Views: 53
Last edited:

Jim Stabe

Well-known member
Joined
Feb 18, 2009
Messages
801
Location
San Diego, Ca
I have a Smartrax caster/camber gauge with toe attachments that I purchased from Summit Racing. A four wheel toe setting can be done with strings carefully set square to the vehicle on jack stands or other homemade string holders.

http://www.summitracing.com/parts/SPS-91000/

Check this site for a good concept...

http://www.smartracingproducts.com/catalog/alignment.htm

The Smart Strings is almost exactly what I made for my car except I eliminated all the setup steps in their instructions. Sureshot was asking for a universal kit and here it is. Mine functions identically to the Smart Strings but takes less than a minute to set up on my car. If you want detailed instructions on how to string your car open the owner's manual on the Smart Racing Products link above.
 

Milton Shaw

Well-known member
Joined
Feb 11, 2011
Messages
4,838
I was a ASE master tech for 15 or so years 25 years ago and so I hate to have anyone do anything to my car I could do myself. Most of the techs working on alignment machines now "don't really understand" alignment. They know how to do what the machine tells them but they don't know how to tell the machine is off. Last time I had my car on someone elses alignment machine, 4 old tires had come off with even wear on all tires, no camber/toe/ cupping tire wear, and over 50,000 miles, so I knew the alignment was good. They offered free alignment check I said OK. They came back with readings on RF wheel of 1.8 too much camber and toe in of .85. Some one had dropped the RF alignment machine head and not told anyone. They had been aligning cars for several weeks or months with everyone having the RF wheel camber and toe adjusted wrong. Their mechanics were not smart enough to know if every car has the same problem, its probably the machine that's giving the wrong readings. I bought my own used Hunter Alignment machine and had it calibrated by Hunter tech. Now I know when I align my car its right. They are available on Ebay for under 2000 most of the time, calibration was under $200. Made my own car stands and turn plates, I check my fleet (SUV, Pickup and two cars) about once a year unless I replace something and it will pay for itself in another year or so.
 

Milton Shaw

Well-known member
Joined
Feb 11, 2011
Messages
4,838
I made them out of 1/4 inch plate with a plastic separator to hold 1/2 steel ball bearings that I ordered I think from MSC. I used about 24 bearings per plate I think in about a 1/8" piece of flex plastic. I had cleaned and greased Hunter Rack turntables so I knew how they were put together. The center bolt is free to move about an inch or so for suspension wheel movement. They work fairly good, If I ran across a good deal where shipping was not more than the plates i would go for store bought for the front ones. The stands I made about 18 inches high 24x24 square with a 6" skirt to reinforce the legs. I put 3/4 bolts on each leg to level them to my garage floor and marked them RF, LF etc. They work out that for different length cars they are within 1/4 inch to level so they don't affect the alignment. The stands I made so that I could stack them angling each one as they go up and made a roll around base to stack them on so they don't take up too much space.
 

Jim Stabe

Well-known member
Joined
Feb 18, 2009
Messages
801
Location
San Diego, Ca
I made them out of 1/4 inch plate with a plastic separator to hold 1/2 steel ball bearings that I ordered I think from MSC. I used about 24 bearings per plate I think in about a 1/8" piece of flex plastic. I had cleaned and greased Hunter Rack turntables so I knew how they were put together. The center bolt is free to move about an inch or so for suspension wheel movement. They work fairly good, If I ran across a good deal where shipping was not more than the plates i would go for store bought for the front ones. The stands I made about 18 inches high 24x24 square with a 6" skirt to reinforce the legs. I put 3/4 bolts on each leg to level them to my garage floor and marked them RF, LF etc. They work out that for different length cars they are within 1/4 inch to level so they don't affect the alignment. The stands I made so that I could stack them angling each one as they go up and made a roll around base to stack them on so they don't take up too much space.

Thanks. I think I have the picture. There is a center circle of plastic that is slightly thinner than 1/2", then the balls and a ring of plastic outside the balls to keep them in place. Sounds simple and easy to make.

Jim
 
OP
O

outtaplace

Active member
Joined
Jan 21, 2011
Messages
37
Location
Central NJ
I made them out of 1/4 inch plate with a plastic separator to hold 1/2 steel ball bearings that I ordered I think from MSC. I used about 24 bearings per plate I think in about a 1/8" piece of flex plastic. I had cleaned and greased Hunter Rack turntables so I knew how they were put together. The center bolt is free to move about an inch or so for suspension wheel movement. They work fairly good, If I ran across a good deal where shipping was not more than the plates i would go for store bought for the front ones. The stands I made about 18 inches high 24x24 square with a 6" skirt to reinforce the legs. I put 3/4 bolts on each leg to level them to my garage floor and marked them RF, LF etc. They work out that for different length cars they are within 1/4 inch to level so they don't affect the alignment. The stands I made so that I could stack them angling each one as they go up and made a roll around base to stack them on so they don't take up too much space.

Do you have some pictures of the plates you've made and your overall alignment setup?? Also, do you know the accuracy of the Hunter Alignment Machine? I've never checked my home alignment against a machine, but when I perform the alignment, I'm pretty meticulous about it. I read the ruler down to the 1/64" and the Smart Tool level reads to 0.1 degrees but also the instructions say that the tool accuracy is +/- 0.1. :headscrat So I've got a little uncertainty there.

After performing my first alignment, I noted the settings and took the car for a test drive. When I got back, I double check all the values and everything was spot on, so at least I know it's repeatable.

rob
 

Jim Stabe

Well-known member
Joined
Feb 18, 2009
Messages
801
Location
San Diego, Ca
Here's a thread from another board for DIY alignment without using strings. Principals are all the same, but this looks like an easier system to set up and appears to produce excellent results.

CB

http://forums.pelicanparts.com/pors...581498-stringless-wheel-alignment-diyers.html

I don't know about the toe method being easier but I do like his camber gauge.

BTW caster is usually the most difficult parameter to measure on a car because it involves turn plates and a camber gauge to do. I ran across this idea a while back (don't have the source to give credit) that uses a tool that locates off the ball joint threads and allows a direct measurement with an angle finder. You just have to make sure the 2 elements are exactly 90* to each other.

Caster tool1.jpg

Caster tool.jpg

On my front suspension on the project car I set up the front spindles on the mill with the ball joint bores parallel to the table and milled flats on the ball joint bosses so I could use a digital angle finder against the spindle and measure caster directly.

I also found this for those who want to use the standard method but don't have turnplates.

Caster turn.jpg
 

csmitty

Well-known member
Joined
Dec 17, 2010
Messages
1,542
I do the Jeep with a tape measure. Toe only though. Need to get some adjustable front CA's to do caster. camber is kinda how it is. :)
 

dho

Active member
Joined
May 29, 2008
Messages
37
Use your iphone! The iHandy carpenter app measures plumb, level and angles to .1 degree.

dho
 

williaty

Well-known member
Joined
May 16, 2010
Messages
829
Use your iphone! The iHandy carpenter app measures plumb, level and angles to .1 degree.

dho

.1* isn't really good enough for an alignment. You need to be able to match to 0.1*, which means you need to be able to read at least to 0.05*, with 0.01* being better.
 

donnie m

Well-known member
Joined
Dec 22, 2011
Messages
218
Location
wisconsin
replaced the ball joints + tie rod ends on my 2001 expidetion and alligned it with tape measures and string and sharpie marks on the concrete and never had a problem since and that was 20,000 miles ago.
 
To avoid these ads, REGISTER NOW!
Top Bottom