To avoid these ads, REGISTER NOW!

My Texas Dream Garage

OP
N

Nighttrain

Well-known member
Joined
Aug 6, 2009
Messages
2,682
Location
Dripping Springs, Tx
mws - thanks, we need update pictures of your garage too.

kippie - thats how I planned to do the doors but I would like to do one door per cabinet (32") +/- and that woud be a huge door that would swing out too much. So I am thinking about putting a face on the cabinets then a track system with sliding doors. The top cabinets I will make a true door with stiles and rails and a inserted panel to match the bottom. I hav etoday off so I am hoping to have it figured out.

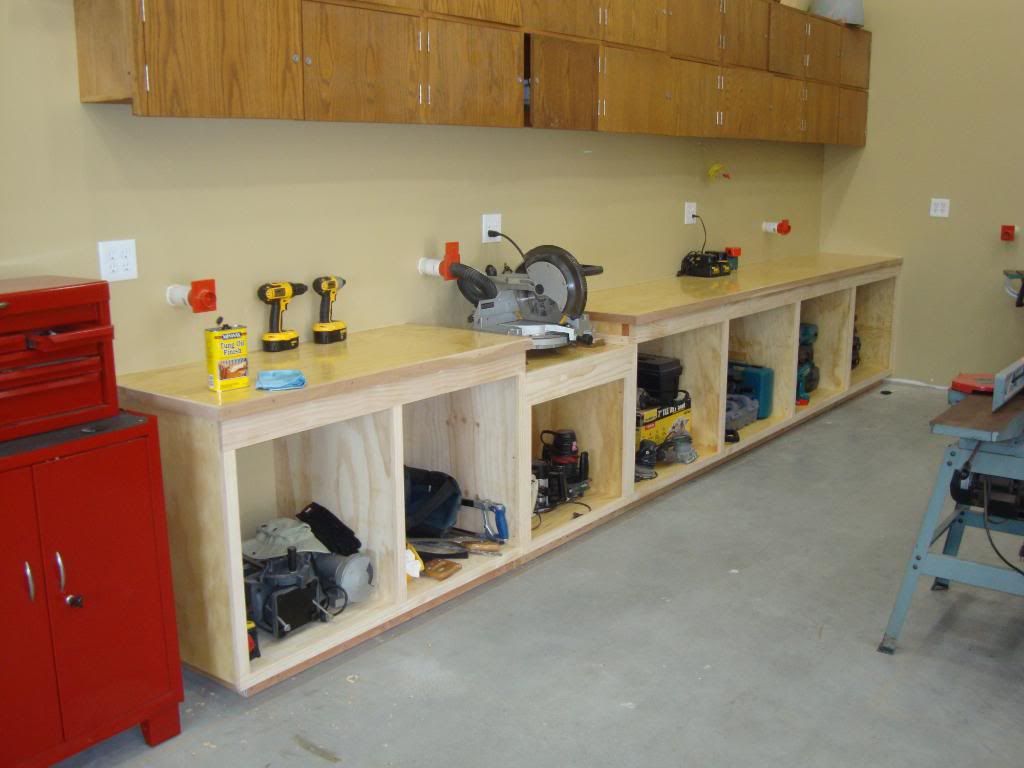
TF- I have heard those cyclones are the way to go. I will still have a little room under the stairs for one or may bump it out through the side wall. I don't have to worry too much about heat loss with it. I envy you for not having to move the tools. I want to be able to keep the 60' side of the shop clear to move trucks etc in so I am kinda stuck in the back 20x20 for the wood shop. Right now I think only the planner and joiner will have to be mobile. And I will be replacing the 2'x8' stationary work bench currently in the 60' section, with a mobile 3'x6' assembly/worktable. I am hoping to get a new powermatic table saw and will have this work bench the same height of the saw.

Thanks for keeping up with my build.
 
To avoid these ads, REGISTER NOW!
OP
N

Nighttrain

Well-known member
Joined
Aug 6, 2009
Messages
2,682
Location
Dripping Springs, Tx
Time for some updates :thumbup:
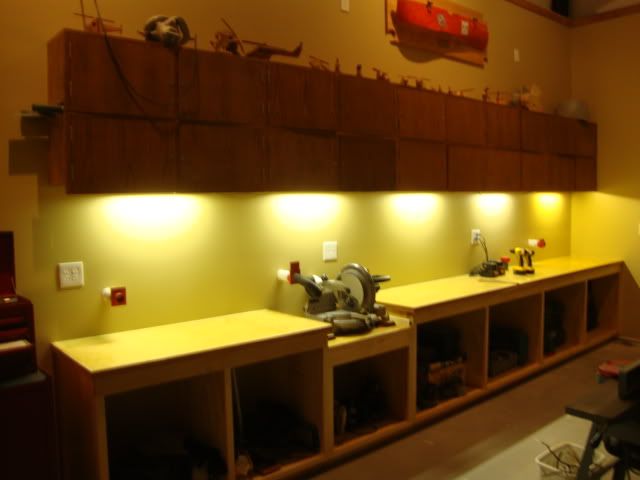
, I have been wondering how to clean up the top cabinets a bit so I used some cedar and covered the ends. I think that will bring them up to the look I am after. I will be removing the doors and replacing them with single doors to match the bottoms.

Before

DSC03186.jpg


After

DSC03187.jpg


For the trim on the tops I still had several boards of cherry so I cut them up and attached them to all the edges.

DSC03188.jpg


DSC03190.jpg


DSC03192.jpg


I ended up getting some pine for the face frame.

DSC03193.jpg


DSC03192.jpg


For my chop saw I I made the lower section for deep enough for a future saw, so this current one I had to put spacers under it. The next saw will be a slider/compound/miter saw and will be much lager. With these saws they will stick out from the wall more than the 24" of counter top than I have. So I made up this slider top so I can retract it when not in use.

Here is the current saw in place.

DSC03191.jpg


DSC03194.jpg


To make the top slide easier I put the guides on an angle.

DSC03195.jpg


Used a metal ruler to lift the front.

DSC03196.jpg


added the face trim.

DSC03197.jpg


Spacer for saw to bring to level with counters.

DSC03199.jpg


Added dust hose and swings clear both left and right.


DSC03200.jpg


DSC03201.jpg


cherry trim (i will be putting a tung oil on this)

DSC03202.jpg


The shop is starting to become more workable. I had to finish a couple of the lights and trim up high and took down the scaffold that has been up for the last two years. That was a good feeling to get that out of the shop.

DSC03205.jpg


Next on list is the cabinet doors top and bottom, finish the stair rail, bathroom then the floor.
 

e-tek

Well-known member
Joined
Dec 19, 2007
Messages
10,690
Location
Saskatoon, SK
I'm in awe of your talent, forethough and motivation. Thanks for posting up all the details - it allows those of us who only dabble in wood to aspire for more!


....and the view from the window......awesome.
 
Last edited:
OP
N

Nighttrain

Well-known member
Joined
Aug 6, 2009
Messages
2,682
Location
Dripping Springs, Tx
I'm in awe of your talent, forethough and motivation. Thanks for posting up all the details - it allows those of us who only dabble in wood to aspire for more!


....and the view from the window......awesome.


Thank you e-tek, but no where near the talent you have in your car rebuilds. I am watching those close and learning. I hope to have a project in my garage by summer and am sure will be seeking advise from you and others here.
 

machine_punk

Well-known member
Joined
May 14, 2011
Messages
2,540
Location
Napa Valley, California
It looks like you are putting a great deal of thought into what you are doing with the shop. I'm sure this is going to be a fabulous place to work, once you get it set up.

M_P
 

tinbender 66

Well-known member
Joined
Mar 23, 2011
Messages
2,294
Location
Western Washington State
Great piece of work:thumbup:. That is gonna be a fantastic place to imagineer stuff! That shot down the length of the shop reminded me of the overall awesomeness of the place.

I certainly hope you didn't get too warm while you were working out there:).
 

mws444

Well-known member
Joined
Jan 2, 2011
Messages
245
Location
Texas
Simply awesome! What sets anything apart from the ordinary are the details, you my friend take care of the details. Rather than going after a few big items you have choosen to put a very nice package of very well executed plans. From the 45 degree cuts on your trim to countersinking the robust screws, you have nailed it.
Detail is the hardest thing to teach my employees, it seems this world is full of "good enough" people who just lack pride in a job done right. Sad part is every year it only seems to get worse.
 

mws444

Well-known member
Joined
Jan 2, 2011
Messages
245
Location
Texas
Thank you guys. Comments like yours helps me to keep pushing to do my best to have a place I really will enjoy working in.

That last part says it all....."enjoy working in" That is what matters most of all. The fact your boys join you every once in a while just make it that much better.
Enjoy the build, then enjoy the creating and mantaining in the space you designed and built.:thumbup:
 

cfaas416

Well-known member
Joined
Jan 10, 2012
Messages
68
Location
Texas
This is a great thread. I love you cabinet work. perfect for a shop like yours. KEEP US POSTED THIS IS A GOOD ONE!!!
 
OP
N

Nighttrain

Well-known member
Joined
Aug 6, 2009
Messages
2,682
Location
Dripping Springs, Tx
Thanks guys. I had a little time today to get some of the trim oiled and also the first coat of ploy on the face trim. I will sand and apply one more tomorrow.

Before

DSC03218.jpg


After

DSC03219.jpg


Here is on of the sit down areas with oil and poly.

DSC03222.jpg


I posted these in another thread about pinewood derby cars. The one on the left was mine from 1976 and the rest are from the last six years with the boys. The two on the right end are mine and my daughter from the outlaw class.

DSC03217.jpg


I should be buying the material for the door fronts tomorrow and hope to have most of the cutting done by the weekend. :beer:
 

flybefree

Well-known member
Joined
May 18, 2008
Messages
1,111
Location
Ohio/Kentucky
Nighttrain...every time I walk by the "pinewood derby" display in Lowes I can't wait for my boys to grow so we can make some cars. What a great display those cars make.

Shaun
 

02chuck

Well-known member
Joined
Sep 11, 2007
Messages
69
Location
Collegeville, Ca
Nighttrain after touring the complete thread, you have set the bar high, I like the fore thought put into organizing and the placing plugs and your dust collection system. You spent a lot of time standing in the space figuring what goes where. I can only hope that I can use your ideas and those of others here to build out my garage to the standard set here.
Your counters are awesome, they look sweet!!!!!
 
To avoid these ads, REGISTER NOW!
OP
N

Nighttrain

Well-known member
Joined
Aug 6, 2009
Messages
2,682
Location
Dripping Springs, Tx
02 chuck you did not mention but I will the amount of beers I drank standing in the shop just looking at where or how I place things. :beer:

I had a little time yesterday to finish mounting the under cabinet lights on the back wall. The CFL are a "cool white" with the exception of the very last one which is a "warm white" I will be replacing that one to keep them the same.

DSC03233.jpg


Later without the overhead lights on.
DSC03237.jpg


South wall.

DSC03235.jpg


DSC03236.jpg


The Hurricane will be going up on that platform for display. Still trying to figure out how to get that up there. May just rent a forklift for the day. Also I am looking the best way to secure it up there. I think a front and rear wheel jack stand that I can bolt threw the floorr to the beams the a couple of cables to the steel girt behind it. Any one have any better ideas?

Nice sunset out the south window.

DSC03230.jpg

:thumbup:

I picked up the pine for the lower cabinet door fronts and 24 gauge sheet metal for the inserts on Thursday and hope to start those doors this week.
 

tinbender 66

Well-known member
Joined
Mar 23, 2011
Messages
2,294
Location
Western Washington State
WooHoo!! Those lights look awesome!!

I've got 4 of mine wired together and just waiting on bulbs (Amazon). I really like the way they look.

That scooter should look righteous up there:thumbup:.
 
OP
N

Nighttrain

Well-known member
Joined
Aug 6, 2009
Messages
2,682
Location
Dripping Springs, Tx
Thanks TB, I am really happy with the lights, hope yours work the same way. I had no problems with any of them and they start just fine and make no noise. I need to order 6 more of the plastic covers to protect the bulbs. If I find them i'll let you know.
 

DoyleDee

Well-known member
Joined
Jun 17, 2007
Messages
689
Location
North Texas
Nice place you have going!
One thing though, have you seen the new "sliding" miter saws? It doesn't have rails- and can pretty much be pushed up to the wall (I think Bosch makes it?).
I have a cheaper Northern Tool sliding miter saw and it does take up a lot of room (I did fit it into one of my storage cabinets though-it fit).
Hey, did you get much snow/ice up there about a week or so ago? I saw where the storm stalled- I'm near the Mckinney are and we haven't had anything yet.

FYI---The saw is a glider saw. Model GCM12SD (although it looks to cost $800....)
 
Last edited:
OP
N

Nighttrain

Well-known member
Joined
Aug 6, 2009
Messages
2,682
Location
Dripping Springs, Tx
DoyleDee - I have seen that Bosch saw and am very impressed with it. The rail is replaced with like three hinges which all move together. Very neat design and as you stated not much room needed behind it. As my garage is getting close to being done my tool list is getting bigger, slider saw, powermatic table saw, Hobart or Miller 200 series Mig, Miller welding table, Metal brake, metal shear is my short list. So I would like the Bosch but I think I am going to have to re-look at what I really need and what I want.

No snow here yet, we were in the high 70's last week. I hope that white stuff stays way up North.
 

lt1driver

Well-known member
Joined
Dec 1, 2010
Messages
141
I have to say I am really impressed with what you have done, envy of many I am sure. If you don't mind my asking, what did you do and what service did you retire from. I am retired AF aircraft maintenance (99). Again, great shop you have built for you and family to enjoy for years to come.
 

DoyleDee

Well-known member
Joined
Jun 17, 2007
Messages
689
Location
North Texas
Hey, I'm 37 and understand about tools and money--with a wife and 2 kids, I just can't afford anything I want, I have to use what I can.
One reason I am using tools my father gave me... he's in his late 70's and doesn't do much anymore (too hard on our bodies too early- I feel the same way).

I love Texas weather, but I think we might get carried away this summer by the insects.
 

mws444

Well-known member
Joined
Jan 2, 2011
Messages
245
Location
Texas
Wow, looking absolutely amazing! Love the lights, CGL's are much brighter than the LED's I went with, but I wanted them to tuck up tight and not stick out much.
I guess you getting the wind that went thru here last night, batten down the hatches.
 

SpeedinLemon

Well-known member
Joined
Oct 23, 2011
Messages
307
Location
North Texas
Looking great NT! I'm really liking what you've done with the cabinets and lighting. Have you mentioned yet what you're planning on doing for doors or leaving open? Love the pinewood cars....some cool designs there. My boys have enjoyed that the last few years. You might have too many cycles when you start using them for decorations! :thumbup:
 

dave67fd

Well-known member
Joined
Apr 25, 2011
Messages
872
Location
Southern NH
NT,
Fabulous transformation taking place. Love your wood skills and the pine wood derby cars, especially the hand and foot lol. Keep up the good work.
Dave
 
OP
N

Nighttrain

Well-known member
Joined
Aug 6, 2009
Messages
2,682
Location
Dripping Springs, Tx
Thanks guys!
lt1driver, don't mind at all, I did just over 23 years in the Coast Guard, first ten were enlisted and doing search and rescue and a lot of law enforcement from down deep in the Caribbean to embargo in the Red Sea. The last 13 + years I was fortunate to go to flight school and fly helicopters for the remander of my time. My dad was AF and retired at Shepard AFB in Wichita Falls, I imagine you may have gone through there. He retired in 79 as the Wing Commander of the tech school there.
DoyleDee and MWS, this weather has been crazy. the wind was really strong two days ago, I flew up to Dallas and it took me 1.5 hours to get there and only .8 hours to get back. At least its warm today.
Speed and Dave the pinewood cars are priceless! :beer:
 
OP
N

Nighttrain

Well-known member
Joined
Aug 6, 2009
Messages
2,682
Location
Dripping Springs, Tx
Was able to spend a bit of time in the shop yesterday and started the lower cabinet doors. I like how it came out and will be doing the same for the top cabinets.

Material ready for cutting. I used 3/4 x 2 1/2 x 8' select pine for the rails and stiles. In the back you will see 1/4 luan plywood for the panels and under that I have 24 ga galvanized tin.

DSC03258.jpg


I used a clamp as a stop to do the multiple cuts. Mad it go pretty quick, and all ended up the same length. I was able to get 3 rails and 1 stile from each board with only about 4" of waste.

DSC03259.jpg


all cut and ready for a rabbit cut for the panel.

DSC03261.jpg


I used my stacked dado blades to cut the 1/4" rabbit. Notice the blu tape, I used this as the start/end point on the rails so as not to have the rabbit show up on the outside ends of the doors when assembled.

DSC03262.jpg


I built a jig out of an old maple counter top and installed a 90* fixture to help in the assembly of the doors.


DSC03269.jpg


I glued and screwed the three side together and inserted the luan plywood then the tin.

DSC03270.jpg


DSC03271.jpg


Here it is in place. I will be re-using the hinges from the top cabinets and am thinking of stealing the idea from "The Shrine" another Texas Hill Country garage and use threaded eye bolts for the door handles.


DSC03272.jpg


DSC03279.jpg


Now only 21 more to assemble. I need a metal shear something bad. :willy_nil
 

kippieland

Well-known member
Joined
Oct 22, 2011
Messages
1,123
Location
Western Washington
Love it! I used pocket screws for my stiles and rails...but I love pocket screws!:lol_hitti. The only problem I had was with the groove for the 1/4 insert....I had to keep it away from the pocket screw placement or they wouldn't fasten. I have a Milwakee metal sear that I love...Sell it at HD...not cheap but great quality. Good job!:thumbup:

They look like this:
DSCF3766.jpg
 
Last edited:

tinbender 66

Well-known member
Joined
Mar 23, 2011
Messages
2,294
Location
Western Washington State
That looks awesome Nighttrain:thumbup:.

I've been looking for a shear too. And a box and pan brake. And a 36" bench roller. Etc. etc. etc. Hard to find at a "reasonable" price.

Looking forward to more, you're really rollin' now
 

Amazzen

Well-known member
Joined
Nov 24, 2011
Messages
168
Location
Southern Ontario, Canada
I've been watching this one too and I need to let you know that I'm a huge fan of your craftsmanship. I like the galvanized panel, but did you consider some of the wood laminates that have faux metal finishes (like stainless) as an alternative?

The place looks fantastic! :rocker:

Continued success,

Paul
 

machine_punk

Well-known member
Joined
May 14, 2011
Messages
2,540
Location
Napa Valley, California
Absolutely beautiful woodworking, my friend. Great Job! I really like the look of that tin in the front. If you put up at tin 'backsplash,' you could use it to hold plans and drawings of future projects (with magnets), while you work on them...

M_P
 

Fury5

Active member
Joined
Jan 22, 2012
Messages
39
Location
Milan, NY
Take a bow Nighttrain, that is some top-notch work! Your attention to detail and thoughtful planning really shine through. I'm gonna be studying this thread closely for ideas!

Thanks for sharing.
 
To avoid these ads, REGISTER NOW!
Top Bottom