To avoid these ads, REGISTER NOW!

My Bendpak XPR-10A and Racedeck Install

chickenhauler

Well-known member
Joined
May 31, 2011
Messages
473
Location
Pennsylvania
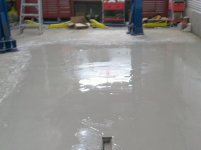
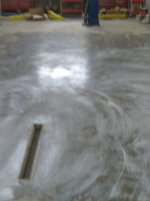
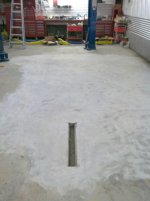
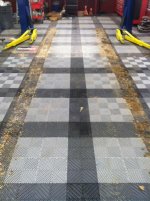
I had the idea to wait until everything was in and perfect before I posted, but it just seems to be one snag after another getting all of my ducks in order. I'll start out by revisiting my Bendpak delivery. Forks on the backhoe made it easy to pull out of the trailer, then I used my famous black foam "cribbing" to support the end of it, while I carefully re-positioned in the middle. No pics, since I don't like to hold up the driver, and I'm a one man crew.
 

Attachments

  • IMG_0381.jpg
    IMG_0381.jpg
    95.6 KB · Views: 183
  • IMG_0382.jpg
    IMG_0382.jpg
    137.2 KB · Views: 199
To avoid these ads, REGISTER NOW!
OP
C

chickenhauler

Well-known member
Joined
May 31, 2011
Messages
473
Location
Pennsylvania
Someone got a little rambunctious with a forklift at one point, as they burned their tires into one of the posts. But nothing major, and a quick call to Bendpak got a can of touch up paint on it's way.

Setting up the posts was a little daunting, so I enlisted the help of my terrified wife to help me get the "light" top end above my shoulders, where I could walk them up with out much effort. They can be spun around pretty easily, but I probably wouldn't want to move them more than 10 or 15 feet like that, since I'm ... ok, I'm just a little lazy.

On a side, note, I laughed a little too much at one of the warning signs... But the guy booking it should have had a little balloon caption "FTW!" :lol_hitti
 

Attachments

  • IMG_0384.jpg
    IMG_0384.jpg
    148 KB · Views: 265
  • IMG_0386.jpg
    IMG_0386.jpg
    114.6 KB · Views: 175
OP
C

chickenhauler

Well-known member
Joined
May 31, 2011
Messages
473
Location
Pennsylvania
Once I got them up, and roughly where I wanted them, I realized that the right post would be nearly 3/8th of a inch low. I could have shimmed it, but the fact that the floor was less than stellar has bugged me ever since the first puddles showed me that flatwork is not my specialty. So, I moved the posts out of the way, and picked up a Hitachi grinder and 7" DeWalt cup wheel from Lowes. The Hitachi isn't bad, but there's no lock on it - they were out of DeWalt's, and mine died cutting the I-beam last summer.

2 minutes of grinding resulted in a cloud I couldn't see through, so Amazon Prime to the rescue - I got a "Dust Buddie" shroud, and some fine particle bags for the Shop Vac the next day.

I tried to take as much of the highs off as I could, but the 4500 psi concrete didn't agree with the (I assume, hard) cup grinding wheel. I guess I did an area around 12x24 or so, and the wheel has plenty of life left on it.
 

Attachments

  • IMG_0389.jpg
    IMG_0389.jpg
    119.3 KB · Views: 209
  • IMG_0387.jpg
    IMG_0387.jpg
    124.6 KB · Views: 192
  • IMG_0388.jpg
    IMG_0388.jpg
    116.9 KB · Views: 184
OP
C

chickenhauler

Well-known member
Joined
May 31, 2011
Messages
473
Location
Pennsylvania
I used 9 bags of "self leveling" concrete. It's called Flo-Top I believe, made by Euclid. I'm not sure what bonding adhesive is, but it looks and smells like Elmer's Glue to me. Brushed on, with a 45 minute cure time, then my hour long task of mixing and pouring out the concrete. I knew it wouldn't "self level", so I used a squeegee to flatten it. I wanted to form a very gradual vee towards the drain, or I would have just used a screed on it.
 

Attachments

  • IMG_0396.jpg
    IMG_0396.jpg
    81.4 KB · Views: 185
  • IMG_0393.jpg
    IMG_0393.jpg
    85.1 KB · Views: 149
  • IMG_0392.jpg
    IMG_0392.jpg
    93.5 KB · Views: 162
OP
C

chickenhauler

Well-known member
Joined
May 31, 2011
Messages
473
Location
Pennsylvania
28 day cure is somewhere around 5100 psi, but it's technically an underlayment, and not meant for surface wear. Epoxy would probably work fine on it, but after putting some RaceDeck down around my workbench and abusing it for a while, I decided to just finish the floor with it. But, back to the lift...

Lines on the floor, lifts in place, and some very minor touch up with the grinder, and I have a nice level, install. I must have hit rebar on one hole, as it joggled a little about 2/3rds of the way down, so that anchor pulled up a 1/2" more before it seated, otherwise, the process was painless, and now I have two perfectly plumb and level posts.

But... (we'll get to that later)
 

Attachments

  • IMG_0397-1200.jpg
    IMG_0397-1200.jpg
    81.9 KB · Views: 253
  • IMG_398-1200.jpg
    IMG_398-1200.jpg
    132.8 KB · Views: 213
  • IMG_399-1200.jpg
    IMG_399-1200.jpg
    97 KB · Views: 200
OP
C

chickenhauler

Well-known member
Joined
May 31, 2011
Messages
473
Location
Pennsylvania
When it came time to put the arms on, I noticed that they were not even close to level. :headscrat 
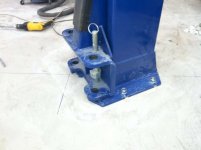
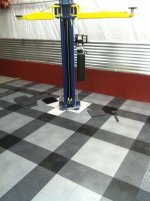
I must have really screwed up by leveling the posts? :( So, I loosened my anchors and started to shim the posts...

Something doesn't look right at all, and to get the arms level, I'm shimming up to 1/2" on opposite sides of each post. :dunno: I tried adjusting the cables, tightening them, loosening them, thinking I screwed something up for sure. Then I noticed...

It must have been a bad day for the welder when the carriages were done, or someone didn't think they needed to double check the jig, because the arm attachment's were welded on to the carriage tilted clockwise. So the right post's rear lift arm was on the ground, and the left post's front lift arm was dragging. It's not off and incredible amount, but 1/16th of an inch at the carriage made for 3/4 of a inch difference from side to side when you compounded both carriages being off just a tad. I really didn't care to call Bendpak on it, because even if they would have sent new carriages (which I have no doubt they probably would - their service is completely over the top), I would have to pretty much take everything back down to replace them. So.... I put a bead of weld around the holes on the low sides of the carriages to shim up the arms. And took a little slack out of the arms by putting a half moon bead inside the lift arm pivot holes and smoothing them up with a die grinder. It sounds like a lot more than it actually was, and I didn't take any pics, because, at first I was pissed, and then I was just glad it worked out.
 

Attachments

  • IMG_400-1200.jpg
    IMG_400-1200.jpg
    71.4 KB · Views: 221
OP
C

chickenhauler

Well-known member
Joined
May 31, 2011
Messages
473
Location
Pennsylvania
Back to the floor.

I decided to go with Free-Flow tiles right inside the door. The thing is, with free flow, you can see what's underneath them, and I had a hodgepodge of self leveling concrete and dyed concrete, and some parts were ground... So, back with the grinder, and I lightly ground the entire area - again. I should buy knee pads, but I don't plan on making this a career. I coated it with the cheap Epoxy Seal from Seal Krete. I'm not worried about tire lift, I just want a nice uniform color to show through the tiles...

It actually seems like a decent product, and one coat was too thin, but like I said, it's just there for the color more than anything.
 

Attachments

  • IMG_0403-1200.jpg
    IMG_0403-1200.jpg
    101.3 KB · Views: 241
  • IMG_0404-1200.jpg
    IMG_0404-1200.jpg
    112.3 KB · Views: 218
  • IMG_0401-1200.jpg
    IMG_0401-1200.jpg
    127.7 KB · Views: 224
  • IMG_0402-1200.jpg
    IMG_0402-1200.jpg
    83.3 KB · Views: 209
OP
C

chickenhauler

Well-known member
Joined
May 31, 2011
Messages
473
Location
Pennsylvania
I spent the last couple of days cleaning up my construction mess more than anything, but I did get a chance to use my lift for the first time tonight, and I have to say, despite the small issue, I love my Bendpak, and I would buy it again without a thought. I'll get more pictures as I finish off my floor, and some better pics of the lift once I get my mess under control.
 

nehog

Well-known member
Joined
Jan 2, 2010
Messages
7,935
Location
Jaffrey, NH
...

On a side, note, I laughed a little too much at one of the warning signs... But the guy booking it should have had a little balloon caption "FTW!" :lol_hitti

:D Yea, funny, they are on all lifts--I think they come from the lift certification organization.
 
To avoid these ads, REGISTER NOW!

James E

Well-known member
Joined
Jun 21, 2010
Messages
16,507
Location
Raleigh, NC
Really nice shop space! I like the floor layout and I look forward to more pics as you progress.

What's the deal with the RaceDeck logo tiles? Did they throw those in for free? Have you got some sponsorship deal with them?

Also, you won't have to worry about anyone breaking in, what with that German Shepherd and his lazer-beam eyeballs. Spooky.
 
OP
C

chickenhauler

Well-known member
Joined
May 31, 2011
Messages
473
Location
Pennsylvania
I told them I would be happy to promote their flooring. I've talked to several people when I called in since I've done a few orders, changing my mind as I put the floor together, and have to say that I've never dealt with a company that had so many professional, courteous and NICE people. I really like the product, but I have to say that I love the company.
 
OP
C

chickenhauler

Well-known member
Joined
May 31, 2011
Messages
473
Location
Pennsylvania
I finally got a chance to to do some service to my vehicles. The Bendpak lifted my little Subaru like it was nothing. Next was my Dodge Ram. I stacked both extensions, and despite my frame pads being on back order, it was incredibly steady and solid. No strain from the motor, and no flex from the 2 post. A little "bounce and spring" from the arms when setting it down on the locks, but nothing unsettling. I figure I loaded it with a worst case scenario, and I felt confident while under it, pulling wheels to do my parking brakes and differential service.
 

Attachments

  • IMG_0413-1200.jpg
    IMG_0413-1200.jpg
    87.5 KB · Views: 222
  • IMG_0411-1200.jpg
    IMG_0411-1200.jpg
    84.5 KB · Views: 194
OP
C

chickenhauler

Well-known member
Joined
May 31, 2011
Messages
473
Location
Pennsylvania
Due to our warm winter, and a lot of rain, the fact that I didn't get my concrete apron in last year has been paying me dividends...in mud. Nothing like some heavy abuse to my Racedeck on day one. While the free flow tiles are great for winter slop melting and rain runoff from vehicles, mud is just plain mean to it. Scooping the clumps up, then running a shop vac over the tiles will get old quick. Since heavy equipment makes up 1/4 of my work, mud is unavoidable. I may reduce the free flow tile area, with solid diamond, which makes clean up so much easier. The free flow would be perfect for a detailing bay, or even a garage for the daily driver though.
 

Attachments

  • IMG_0414-1200.jpg
    IMG_0414-1200.jpg
    150.5 KB · Views: 250
Joined
Feb 18, 2012
Messages
9
I would keep an eye on the pads. We burned through brand new pads in two weeks after installing two of the same lifts. I'll have to look up the parts we ended up using to replace/improve them and send you the info.
 
OP
C

chickenhauler

Well-known member
Joined
May 31, 2011
Messages
473
Location
Pennsylvania
I would keep an eye on the pads. We burned through brand new pads in two weeks after installing two of the same lifts. I'll have to look up the parts we ended up using to replace/improve them and send you the info.

Thanks :thumbup: 
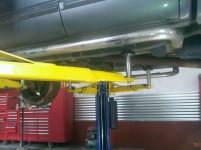
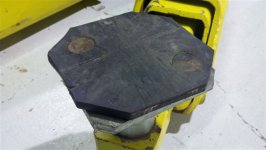
I did notice that the pinch welds on the Subie left cuts in them. I was thinking Rhino liner (or my cheap knockoff) would probably adhere to the metal good, and should hold up to the pinch welds.
 
Joined
Feb 18, 2012
Messages
9
The pinch welds are the preferred lift point on most vehicles, but it is also what ripped our pads to shreds.

I ended up using a rubber pad from another manufacture and fastening it to the lift plates. They've been working flawlessly ever since. I'll take photos and upload tomorrow.
 
Joined
Feb 18, 2012
Messages
9
I ended up using SVI Part number BH-7235-90K to replace the original pads that came with the lift. We've been using them 17 hours a day for four months straight and they show very little wear (pics were from last night)

Simply measure and drill two holes per plate and secure the pad to it. The fasteners came with the kit I purchased from my local supplier in Portland.

The catalog for SVI is can be found here:

http://www.sviinternational.com/files/pdfs/Height Extensions_LRC7090.pdf
 

Attachments

  • 2012-02-19_20-49-41_206.jpg
    2012-02-19_20-49-41_206.jpg
    61.5 KB · Views: 103
  • 2012-02-19_20-49-20_711.jpg
    2012-02-19_20-49-20_711.jpg
    59.8 KB · Views: 100
  • 2012-02-19_20-49-04_513.jpg
    2012-02-19_20-49-04_513.jpg
    62.9 KB · Views: 123
OP
C

chickenhauler

Well-known member
Joined
May 31, 2011
Messages
473
Location
Pennsylvania
Finally got things cleaned up enough to snap some pics...
 

Attachments

  • IMG_0575-1200.jpg
    IMG_0575-1200.jpg
    97.6 KB · Views: 220
  • IMG_0577-1200.jpg
    IMG_0577-1200.jpg
    95.8 KB · Views: 210
  • IMG_0579-1200.jpg
    IMG_0579-1200.jpg
    83.6 KB · Views: 190
  • IMG_0580-1200.jpg
    IMG_0580-1200.jpg
    85.5 KB · Views: 180
To avoid these ads, REGISTER NOW!
Top Bottom