dennis111
Well-known member
Over the winter I installed the ultimate home garage accessory--a full sized lift:
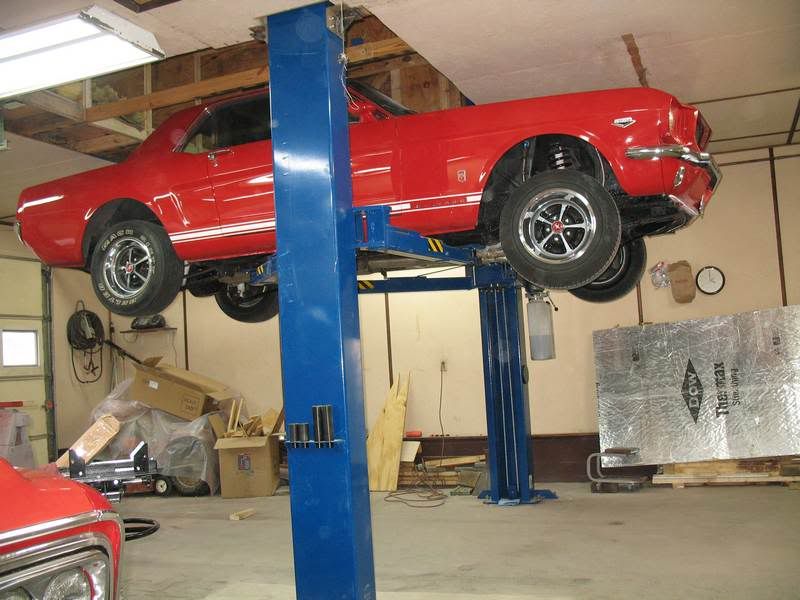
When I first decided that I wanted one, I made a list of what I wanted in a lift with general vehicle maintenance being the top priority. I also wanted a lift that would allow me to swap the transmission in and out almost effortlessly any time I wanted-which is common since I race this car weekly at the local strip. I also needed one to rotate tires and perform general maintenance on all my other vehicles, which vary quite a bit in length and width. With all this in mind, the 2 post lift was the most accommodating choice for my needs.
After shopping around for a couple of months, I purchased a TP11KAC-D asymmetrical 2 post lift from Best Buy Automotive Equipment in CA. The TP11KAC-D is rated at 11,000lbs lift capacity-more than enough to lift any of my projects including my 2500HD. It has large 1 pc continuous columns and being a "clear floor lift", it doesn't have a trough on the floor for the hoses and cables. This as also one of my major priorities and also lead to much more work than the other lift types would have required.
Installing the lift wasn't as simple as just ordering one and setting it up as my garage ceiling is only 9' 3" high and these lifts are normally 12' or more. Rather than build an all new stall or raise the roof, I decided to make one of the existing bays lift friendly. Me being 6'2", I needed the the Mustang to be lifted as high as possible. Needless to say I had some serious work to do.
First I needed to modify my trusses in the center to allow the Mustang's roof to protrude above the ceiling. I bought some 2x4" and 2x6" Southern White Pine from the local truss shop, plus several sheets of 3/4" plywood and then went to work on the old fink trusses. I started with an engineered drawing that I found here and then modified it to my needs:


I used 3 1/2" 16d nails, clenching the ends.
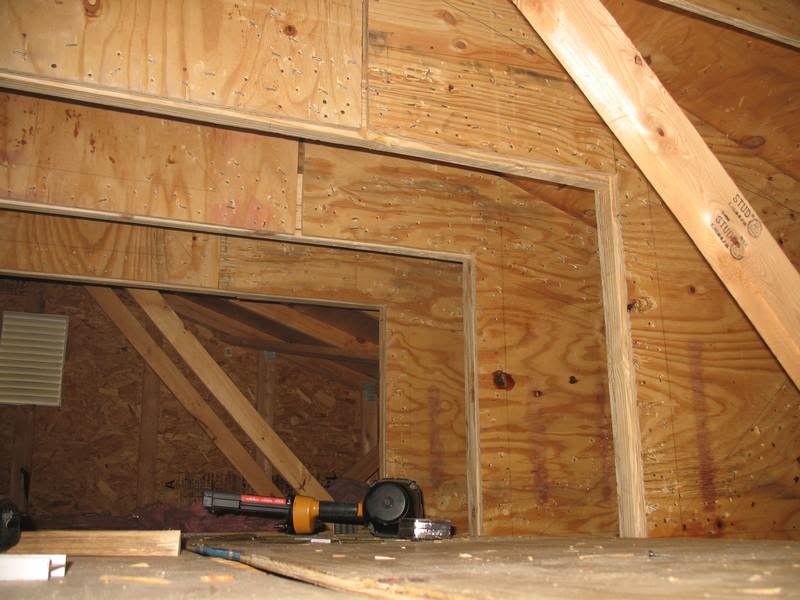
I created an 8' 3" x 10' x 34" deep boxed area above the old ceiling, giving me 145.5" to work with.

(There is still more trim work to be done.)
Next up I checked the depth of the concrete floor to see if it was thick enough to install the necessary concrete anchors. I did this by drilling several holes all the way through the concrete and then sliding a coat hanger with a hook into it. I found that the LH side was 6" thick which was more than adequate considering the minimum requirement was 4 1/2". My excitement was short lived when I found that the RH side of the bay was only 3 1/2" deep. Not wanting to break up the whole slab and redo the floor, I decided to cut out a 4' x 6' section and go deeper. For this I rented a concrete wet saw for a couple of hours and again went to work:


The hole was undercut under the existing slab and was 14" deep. Then I put 4" of limestone in the hole, tamping it down:

Note how the concrete tapered down to as little as 3" on the RH side of the above photo.

Note that I left larger holes in the center of the rebar so that I wouldn't risk the chance of drilling into it when later setting the studs.

That is a full cubic yard of concrete, 10" thick.

The lift arrived at the factory that I work at only 1 week after I ordered it and and I carted it home on a trailer:


Over 10" of adapters where included.


The anchors were included too:

The engine hoist allowed me to remove the columns from the trailer and was also used later when standing the columns upright.

Although the instruction were poor at best, assembly was easy thanks to the help of a couple of assembly videos and lots of photos found on the internet.

All the pulleys are steel, not cast.


Once the individual columns were assembled, I raised them with some help:

The narrowness and shortness of the bay required that I place columns where other trusses were so I modified the trusses and added some 1/4" thick brackets to help support them:

The anchor holes were drilled all the way through the concrete on both sides of the lift using the Hilti with a 12" long bit that I borrowed from work.
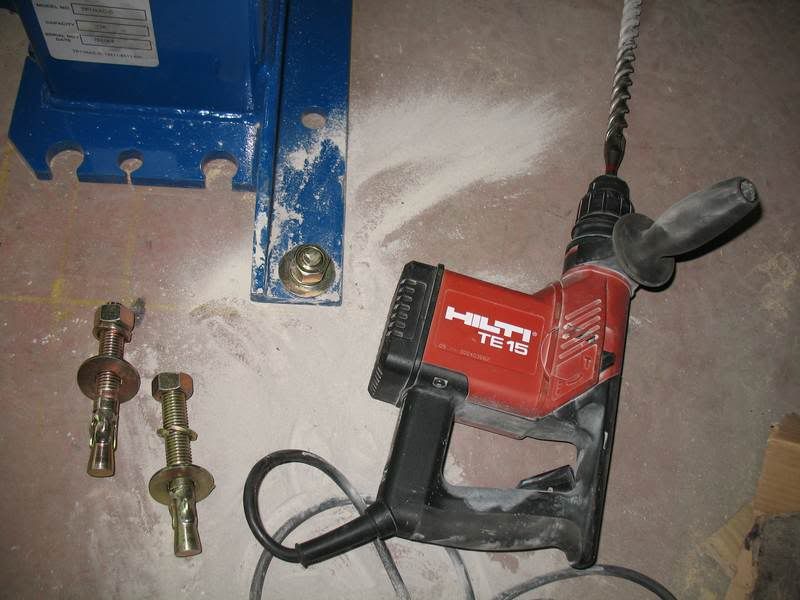
Since the RH concrete was thicker, I purchased 7" long 3/4" anchors just for this side for added safety.


Before I installed the power unit shown, I added a little over 3 gallons of AW32 light weight hydraulic oil to the reservoir. It was much easier to do it in advance than it would have been to hold a 5 gallon can high up in the air.

The cross brace supports the cables and the hydraulic lines.


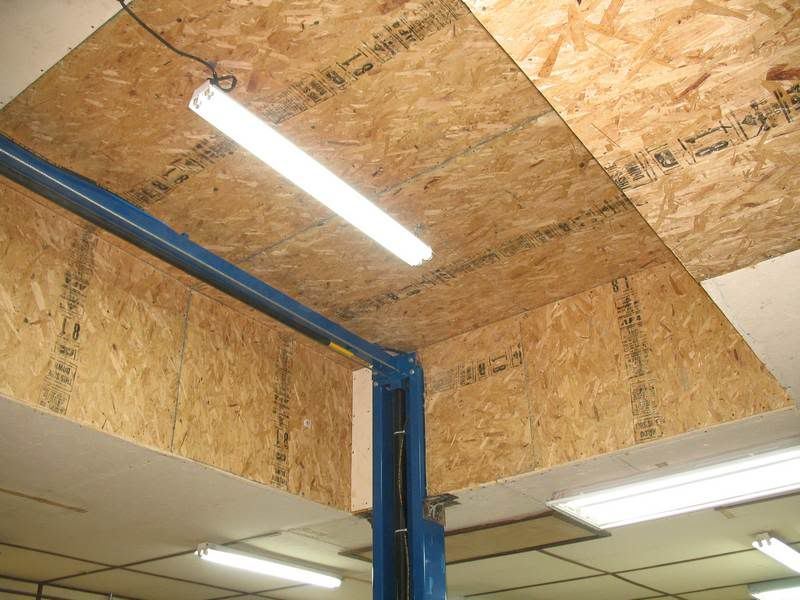
Fully raised on the short adapters, the Mustang's roof goes above the garage ceiling about 6-7":


Using taller extensions would raise it even more, but then it would be harder to work on the car as it would then be too high.
Here's my old GMC:
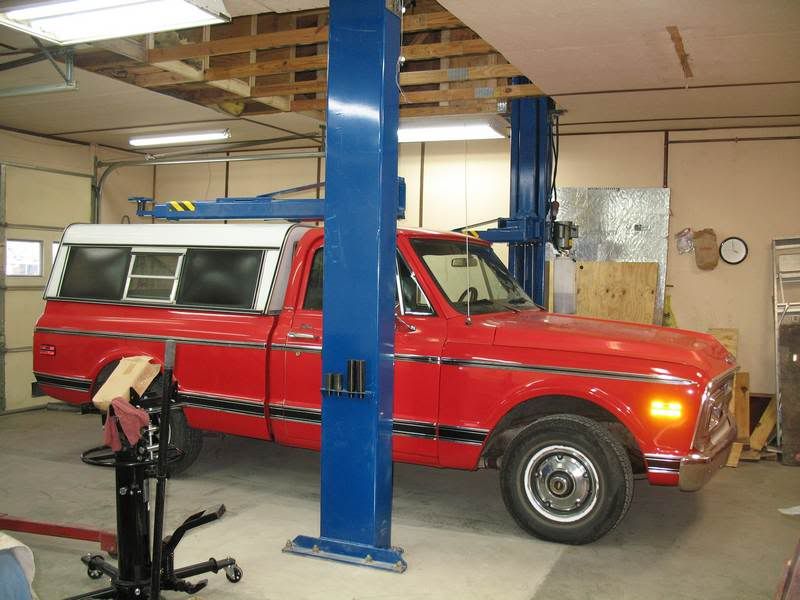

Although it is not possible to raise the GMC fully due to the ceiling height, I can raise it over 4' off the floor. This is the perfect height for a creeper chair, with the convenience of being able to sit and work on anywhere under the truck.
The transmission jack shown is a 2 stage model with a working range of 31" to 74". That easily covers the classic vehicles that I own.
So far I like the lift and especially its asymmetrical arms which allow me to open the doors without hitting the upright columns.
When I first decided that I wanted one, I made a list of what I wanted in a lift with general vehicle maintenance being the top priority. I also wanted a lift that would allow me to swap the transmission in and out almost effortlessly any time I wanted-which is common since I race this car weekly at the local strip. I also needed one to rotate tires and perform general maintenance on all my other vehicles, which vary quite a bit in length and width. With all this in mind, the 2 post lift was the most accommodating choice for my needs.
After shopping around for a couple of months, I purchased a TP11KAC-D asymmetrical 2 post lift from Best Buy Automotive Equipment in CA. The TP11KAC-D is rated at 11,000lbs lift capacity-more than enough to lift any of my projects including my 2500HD. It has large 1 pc continuous columns and being a "clear floor lift", it doesn't have a trough on the floor for the hoses and cables. This as also one of my major priorities and also lead to much more work than the other lift types would have required.
Installing the lift wasn't as simple as just ordering one and setting it up as my garage ceiling is only 9' 3" high and these lifts are normally 12' or more. Rather than build an all new stall or raise the roof, I decided to make one of the existing bays lift friendly. Me being 6'2", I needed the the Mustang to be lifted as high as possible. Needless to say I had some serious work to do.
First I needed to modify my trusses in the center to allow the Mustang's roof to protrude above the ceiling. I bought some 2x4" and 2x6" Southern White Pine from the local truss shop, plus several sheets of 3/4" plywood and then went to work on the old fink trusses. I started with an engineered drawing that I found here and then modified it to my needs:
I used 3 1/2" 16d nails, clenching the ends.
I created an 8' 3" x 10' x 34" deep boxed area above the old ceiling, giving me 145.5" to work with.
(There is still more trim work to be done.)
Next up I checked the depth of the concrete floor to see if it was thick enough to install the necessary concrete anchors. I did this by drilling several holes all the way through the concrete and then sliding a coat hanger with a hook into it. I found that the LH side was 6" thick which was more than adequate considering the minimum requirement was 4 1/2". My excitement was short lived when I found that the RH side of the bay was only 3 1/2" deep. Not wanting to break up the whole slab and redo the floor, I decided to cut out a 4' x 6' section and go deeper. For this I rented a concrete wet saw for a couple of hours and again went to work:
The hole was undercut under the existing slab and was 14" deep. Then I put 4" of limestone in the hole, tamping it down:
Note how the concrete tapered down to as little as 3" on the RH side of the above photo.
Note that I left larger holes in the center of the rebar so that I wouldn't risk the chance of drilling into it when later setting the studs.
That is a full cubic yard of concrete, 10" thick.
The lift arrived at the factory that I work at only 1 week after I ordered it and and I carted it home on a trailer:
Over 10" of adapters where included.
The anchors were included too:
The engine hoist allowed me to remove the columns from the trailer and was also used later when standing the columns upright.
Although the instruction were poor at best, assembly was easy thanks to the help of a couple of assembly videos and lots of photos found on the internet.
All the pulleys are steel, not cast.
Once the individual columns were assembled, I raised them with some help:
The narrowness and shortness of the bay required that I place columns where other trusses were so I modified the trusses and added some 1/4" thick brackets to help support them:
The anchor holes were drilled all the way through the concrete on both sides of the lift using the Hilti with a 12" long bit that I borrowed from work.
Since the RH concrete was thicker, I purchased 7" long 3/4" anchors just for this side for added safety.
Before I installed the power unit shown, I added a little over 3 gallons of AW32 light weight hydraulic oil to the reservoir. It was much easier to do it in advance than it would have been to hold a 5 gallon can high up in the air.
The cross brace supports the cables and the hydraulic lines.
Fully raised on the short adapters, the Mustang's roof goes above the garage ceiling about 6-7":
Using taller extensions would raise it even more, but then it would be harder to work on the car as it would then be too high.
Here's my old GMC:
Although it is not possible to raise the GMC fully due to the ceiling height, I can raise it over 4' off the floor. This is the perfect height for a creeper chair, with the convenience of being able to sit and work on anywhere under the truck.
The transmission jack shown is a 2 stage model with a working range of 31" to 74". That easily covers the classic vehicles that I own.
So far I like the lift and especially its asymmetrical arms which allow me to open the doors without hitting the upright columns.