I figured this was the most active discussion of vintage crafstman tools - so there is a 1940s/1950s Craftsman scroll saw at the Habitat Restore in Raleigh NC. It looks straight industrial with like a 24" throat on a homemade stand. Belt drive. Machine turned trim plate on the head. Priced at $300.00 currently.

You are using an out of date browser. It may not display this or other websites correctly.
You should upgrade or use an alternative browser.
You should upgrade or use an alternative browser.
Between 265 & 485 SQ/FT 1950s Craftsman Garage retro remodel
- Thread starter Red Leader
- Start date
Workspaces sized between 265 and 485 squarefeet.
OP
Red Leader
Well-known member
I figured this was the most active discussion of vintage crafstman tools - so there is a 1940s/1950s Craftsman scroll saw at the Habitat Restore in Raleigh NC. It looks straight industrial with like a 24" throat on a homemade stand. Belt drive. Machine turned trim plate on the head. Priced at $300.00 currently.
You are referring to the 103.23340 type scroll saw:
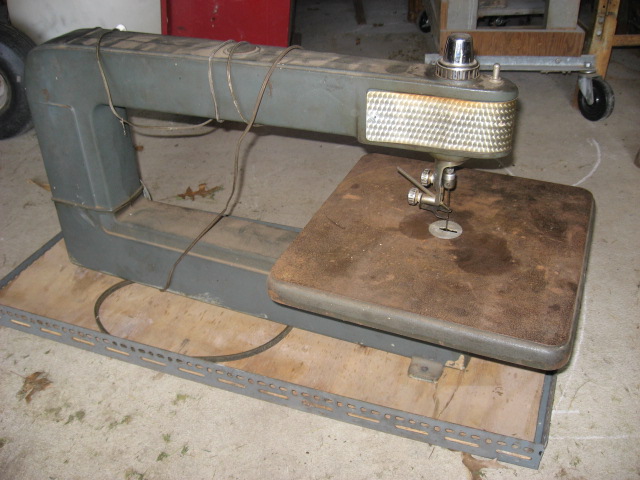
In my limited opinion, you could do better than $300. I see them around for about $100-$150. Then again, if you really love it, you determine the value. There is no set value on these tools. What is only worth $50 to me may be worth $500 to someone else (and frequently is - I'm cheap
 )
)In my area as well the ReStores tend to price power tools extremely high.
ckadams00
Well-known member
I figured this was the most active discussion of vintage crafstman tools - so there is a 1940s/1950s Craftsman scroll saw at the Habitat Restore in Raleigh NC. It looks straight industrial with like a 24" throat on a homemade stand. Belt drive. Machine turned trim plate on the head. Priced at $300.00 currently.
These are pretty common (not as common as the 18"). There are some neat features on this saw like the built in light, the fact that it is 24" and - many people don't know this - you can actually pull off the top arm entirely and use it as a sabre saw to cut any size material. I usually see these around $125-$150 in IL in good shape. Occasionally you get lucky and there will be a useable motor or stand with it for a bit more. Some people who do not know what these machines are worth assume any "antique" machine should be worth $3-500. Usually this is preceded by the line "they don't make 'em like this anymore!".
It really depends on your area and what comes up for sale. Some of the old CMan tools on the west coast or in CA fetch much higher prices then they do in the midwest and parts of the east coast.
Also, it is always wise to consider the "accessories" - retirement lamps, stands, power switches, blade guards, miter gauges, fences (in general, not for this specific machine) add a lot of value, because they are usually the more expensive and harder to find pieces. Even a pulley can run $20-$20 if you need to replace it. Don't worry about "Consumables" like belts and blades as you will most likely replace these anyway.
It all comes down to the tools you want to own and how hard they are to come by that determines the price. I have learned though to be patient, and keep your eyes open for deals - they do come along when you least expect it!

Yup, thought the price was high too. But if it sits there long enough it may come down. I have no room for it at this time, just figured I'd pass the word on. They did have an earlier skil circular saw and a earlier Craftsman sabre saw for $15.00 a pop. As much as I love older tools, I have to say I'm more in love with my Bosch sabre saw and my arsenal of modern sidewinder and worm drive circular saws. Some advancements are worth buying into.
Grandad
Active member
well, how about that?
You said earlier that your wife hadn't changed one bit. I assumed you were exagerating.
You're not.
You're right!
She hasn't changed.
You're a blessed man.
Cheers
Jim
You said earlier that your wife hadn't changed one bit. I assumed you were exagerating.
You're not.
You're right!
She hasn't changed.
You're a blessed man.
Cheers
Jim
Wingnut65
Well-known member
Agreed, you are a blessed man. I only have 19 under my belt so far and plan on hitting the 5-0 with my sweetheart. Congrats again Mr & Mrs H!
Sorry Dave for the hi-jack. It IS tool related...
Sorry Dave for the hi-jack. It IS tool related...
Last edited:
Amazzen
Well-known member
Agreed, you are a blessed man. I only have 19 under my belt so far and plan on hitting the 5-0 with my sweethart. Congrats again Mr & Mrs H!
Sorry Dave for the hi-jack. It IS tool related...
I agree!
Jeff, you and I together would smoke that 50 barrier (I'm at 32 years)...LOL!
I need to send my congrats as well....

That includes this incredible thread....
Well done Red Leader, I can't imagine getting that obsessed with a hobby (....okay, okay..... a tool hobby!).
The thing I admire most is the history that accompanies the item... its a great way to incapsulate the memories and preserve them for generation to generation.
Continued success...
OP
Red Leader
Well-known member
Alright guys! A little progress made!
My wife was really cool with me spending some time out in the garage on Saturday (thanks hun!) and so I knocked some things out with the bench cabinets.
First things first. Here is what I'm starting with:

After putting them together, I didn't think that they had enough 'dimension' so-to-speak...they just looked kind of flat, the way the inside panels transitioned to the posts, so I moved the panels in 1/2" on all sides except the rear, which I actually moved out to be flush with the posts on the back side, which will make attaching the header a lot easier.
Here is what it looked like with that change. This is a comparison shot (unchanged one on left, changed one on the right):

It is subtle, but it does add some depth.
Next was reinforcing the insides. This took several hours as I measured and cut piece by piece, not to mention pre-drilling and counter-sinking all the holes. This was done because the posts were a little twisty and hardly equal with spacing when finally assembled:


Here is what the completed bracing on the inside looks like:

It is 2x2s on the top and 2x3s on the bottom. Why 2x2s and 2x3? Well, that is because it was free scrap wood Don't forget, this is still very much budget build!
Next up were the casters - things were on a roll, literally!

I picked these up at a Lowe's that was going out of business for about $2 each. Had to wait in line about an hour and a half. Was it worth it? Now that the wait has passed, I'll say yes!
I spent about an hour trying to prep one of the cabinet bottoms to install the wheels underneath the cabinet next to the post, instead of on top of it, in hope's to make the wheels appearance less noticeable and to make it look like the cabinet posts still went all the way to the floor. After messing around for quite a while, I decided to just try them on the bottom of the posts before anything else and if I didn't like it I could do something more. I'm glad I skipped to that. I think they look just fine and honestly having the bench that high will put the secondary intersecting rolling workbench at a still-decent height. If I had made this bench drop nearly to the floor with the casters, it probably would have put the other bench that will slide into (under) it too low.
Enough words, more pictures!


The finished (not really) project:

Top of the bench, still completely uneven and unsanded:

A few glamour shots:

And this one just to make me feel more like all the other guys on the GJ who actually have a functional bench:

I can at least pretend, right?
Now the workbench is not quite done (oh, really?) The actual work surface will be expanded going backward until it meets the wall, but I had to first make it flush with the back of the cabinet back posts so I can install the vertical supports for the header unit and build out the rest of the workbench top around it. Then, the plan is to completely sand the surface flat, jigsaw the corners with a nice little curve, sand the edge smooth, finish the top and then get some of that fancy 1950's style ribbed diner table edging and throw that on. That doesn't include any of the work I still have to do to the actual bench cabinets. I'm still deciding on some stylizing on those guys.
On those, here are my thoughts:
1) Do a raised 'art deco' 3 strip design in the center of the front panels and paint it all the same teal color, natural finish on the posts.
2) Paint the panels the teal color, finish the posts natural, then add the raised 'art deco' 3 strip design onto the posts, painted black.
3) Do both.
#1 is how a lot of the old tools, Walker Turner and Delta made their art deco lines:
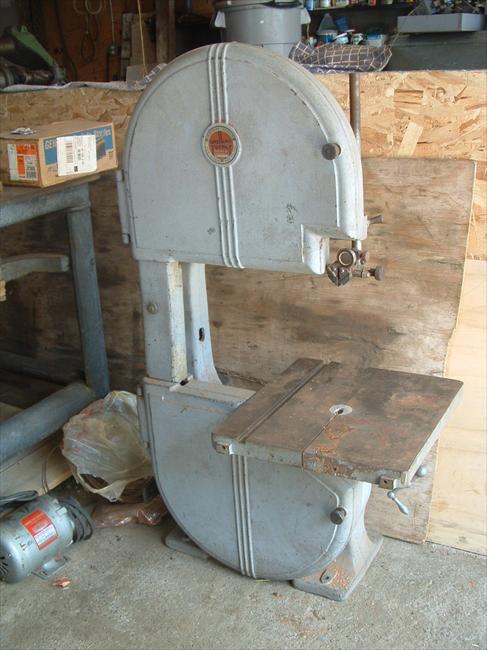
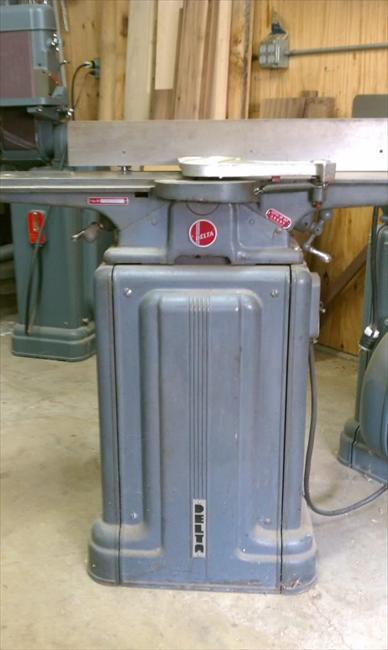
And #2 is how I did the art deco strips on my cabinets:

Thoughts? I'm tempted to do both but I'm worried it might look crowded. If I could find a way to make that raised circular pattern like on the Walker Turner bandsaw, I'd be real tempted to do that. Any ideas welcomed/appreciated.
My wife was really cool with me spending some time out in the garage on Saturday (thanks hun!) and so I knocked some things out with the bench cabinets.
First things first. Here is what I'm starting with:
After putting them together, I didn't think that they had enough 'dimension' so-to-speak...they just looked kind of flat, the way the inside panels transitioned to the posts, so I moved the panels in 1/2" on all sides except the rear, which I actually moved out to be flush with the posts on the back side, which will make attaching the header a lot easier.
Here is what it looked like with that change. This is a comparison shot (unchanged one on left, changed one on the right):
It is subtle, but it does add some depth.
Next was reinforcing the insides. This took several hours as I measured and cut piece by piece, not to mention pre-drilling and counter-sinking all the holes. This was done because the posts were a little twisty and hardly equal with spacing when finally assembled:
Here is what the completed bracing on the inside looks like:
It is 2x2s on the top and 2x3s on the bottom. Why 2x2s and 2x3? Well, that is because it was free scrap wood
Don't forget, this is still very much budget build!Next up were the casters - things were on a roll, literally!
I picked these up at a Lowe's that was going out of business for about $2 each. Had to wait in line about an hour and a half. Was it worth it? Now that the wait has passed, I'll say yes!
I spent about an hour trying to prep one of the cabinet bottoms to install the wheels underneath the cabinet next to the post, instead of on top of it, in hope's to make the wheels appearance less noticeable and to make it look like the cabinet posts still went all the way to the floor. After messing around for quite a while, I decided to just try them on the bottom of the posts before anything else and if I didn't like it I could do something more. I'm glad I skipped to that. I think they look just fine and honestly having the bench that high will put the secondary intersecting rolling workbench at a still-decent height. If I had made this bench drop nearly to the floor with the casters, it probably would have put the other bench that will slide into (under) it too low.
Enough words, more pictures!
The finished (not really) project:
Top of the bench, still completely uneven and unsanded:
A few glamour shots:
And this one just to make me feel more like all the other guys on the GJ who actually have a functional bench:
I can at least pretend, right?
Now the workbench is not quite done (oh, really?) The actual work surface will be expanded going backward until it meets the wall, but I had to first make it flush with the back of the cabinet back posts so I can install the vertical supports for the header unit and build out the rest of the workbench top around it. Then, the plan is to completely sand the surface flat, jigsaw the corners with a nice little curve, sand the edge smooth, finish the top and then get some of that fancy 1950's style ribbed diner table edging and throw that on. That doesn't include any of the work I still have to do to the actual bench cabinets. I'm still deciding on some stylizing on those guys.
On those, here are my thoughts:
1) Do a raised 'art deco' 3 strip design in the center of the front panels and paint it all the same teal color, natural finish on the posts.
2) Paint the panels the teal color, finish the posts natural, then add the raised 'art deco' 3 strip design onto the posts, painted black.
3) Do both.
#1 is how a lot of the old tools, Walker Turner and Delta made their art deco lines:
And #2 is how I did the art deco strips on my cabinets:
Thoughts? I'm tempted to do both but I'm worried it might look crowded. If I could find a way to make that raised circular pattern like on the Walker Turner bandsaw, I'd be real tempted to do that. Any ideas welcomed/appreciated.
OP
Red Leader
Well-known member
Agreed, you are a blessed man. I only have 19 under my belt so far and plan on hitting the 5-0 with my sweethart. Congrats again Mr & Mrs H!
Sorry Dave for the hi-jack. It IS tool related...
3 going on 4 myself. I always joke with my wife that I'm glad she has stuck with me through all these years. Although, deep down, I really am still glad
OP
Red Leader
Well-known member
I agree!
Jeff, you and I together would smoke that 50 barrier (I'm at 32 years)...LOL!
I need to send my congrats as well....
That includes this incredible thread....
Well done Red Leader, I can't imagine getting that obsessed with a hobby (....okay, okay..... a tool hobby!).
The thing I admire most is the history that accompanies the item... its a great way to incapsulate the memories and preserve them for generation to generation.
Continued success...
Amazzen,
Thanks for your encouragement, I'm glad you've enjoyed the thread thus far. Am I'm glad too, because there is still a lot I'm going to put you and the rest of the readers through
Even though I feel like a lot has been done, I am not nearly done. Even with the shelves alone, I still have 3 or 4 more projects for them, including hidden drop down shelves, more lighting, more trim work and who knows what else. It is like I was just telling someone today, I could have built the shelves in 1 day if I wanted to. Same thing with the workbench. However, having all these crazy ideas in my head wouldn't allow me to do it like that. It is both frustrating and fulfilling all at the same time. I both admire the guys that have a completely function garage in no time and at the same time the obsessive, complicated work that has been done out there so far for the feeling of accomplishment it brings from that level of detail.
And still, I have a lot of people not understand why I do what I do. They shake their heads and wonder why I do it, why I spend so much time making it look the way it does. To some degree, I agree with them and wonder myself why I do it.
Aww heck, why not?
Last edited:
tinbender 66
Well-known member
Aww heck, why not?
Exactly!
I'm kinda stuck between #2 and #3 for your bench. Either way, I'm sure it will be awesome.
BTW, thanks for the info on the RAS's. I'm not in any hurry. I don't need a big HP, heavy duty one so I'm looking for decent quality and cool looks. What do ya think of the old Dewalt MBF? They show up quite a bit for 50 or 60. Except the guy last week that called it a "collector's item" and wanted 300hahaha.
It's really good to see you havin' at it again! I'm hopin' for more boards this week. Mean time, I'm remodeling the old little shop for my wife. Just for the record, we will hit 32 years in Sept. No regrets.
ChristopherLutz
Well-known member
Red -
I'm a little confused. Are you putting doors on the workbench supports? (to make cabinets out of the boxes?)
FWIW - my vote is to leave the posts "natural" - from the pics, they look to tie in nicely witht he wormwood top.
I'm a little confused. Are you putting doors on the workbench supports? (to make cabinets out of the boxes?)
FWIW - my vote is to leave the posts "natural" - from the pics, they look to tie in nicely witht he wormwood top.
Wingnut65
Well-known member
Nice work on those bases. That workbench will be sweet.
4) On the face of the doors, put MDF panels with rounded coreners with roundover edged with the 3-strip design. Kinda like the deco style wood too cabinet bases that were posted many pages ago. The doors could look something like the front of this old Delta
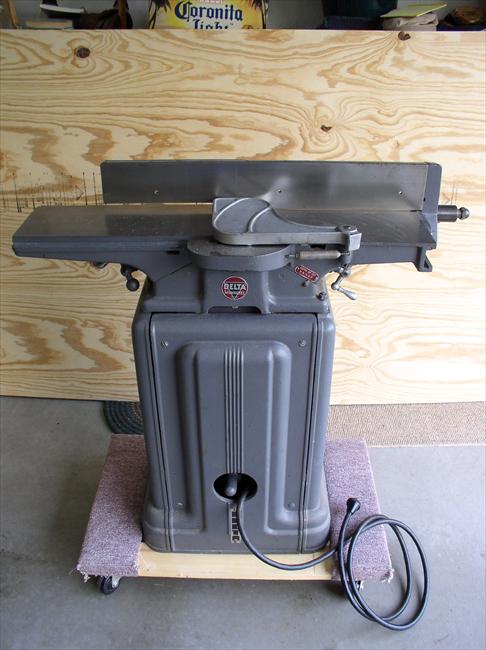
Just a thought...
.
On those, here are my thoughts:
1) Do a raised 'art deco' 3 strip design in the center of the front panels and paint it all the same teal color, natural finish on the posts.
2) Paint the panels the teal color, finish the posts natural, then add the raised 'art deco' 3 strip design onto the posts, painted black.
3) Do both.
4) On the face of the doors, put MDF panels with rounded coreners with roundover edged with the 3-strip design. Kinda like the deco style wood too cabinet bases that were posted many pages ago. The doors could look something like the front of this old Delta
Just a thought...
.
OP
Red Leader
Well-known member
Red -
I'm a little confused. Are you putting doors on the workbench supports? (to make cabinets out of the boxes?)
FWIW - my vote is to leave the posts "natural" - from the pics, they look to tie in nicely witht he wormwood top.
Chris,
Yep, that big open 'square' in both cabinets will be getting a door in each.
I didn't think about Jeff suggestion, but I like it - if I do the raised panel in the center, that will give it even more dimension.
I do plan on keep the wood posts natural like you said and for that exact reason.
OP
Red Leader
Well-known member
Exactly!
I'm kinda stuck between #2 and #3 for your bench. Either way, I'm sure it will be awesome.
BTW, thanks for the info on the RAS's. I'm not in any hurry. I don't need a big HP, heavy duty one so I'm looking for decent quality and cool looks. What do ya think of the old Dewalt MBF? They show up quite a bit for 50 or 60. Except the guy last week that called it a "collector's item" and wanted 300hahaha.
It's really good to see you havin' at it again! I'm hopin' for more boards this week. Mean time, I'm remodeling the old little shop for my wife. Just for the record, we will hit 32 years in Sept. No regrets.
I'm not really the expert on the DeWalts, but the wisdom passed on to me was to try and find at least a 10", 1HP saw. 1.5HP is even better. Some of those saw, I believe, were max 9" blade and either a 1/2HP or a 3/4HP motor, which may be a little limiting, both power and capacity wise. Also, DeWalt made plenty that were 3 phase (although those tend to be bigger machines) but just confirm before you buy. An old DeWalt with good bearings and good ways is the cream of the crop - right up there with the old Deltas and Multiplexes.
Not having to buy right away gives you lots of options. By the way, I did a search in your area on RASs several days ago, as saw about 7 vintage Craftsman RASs, some late 50s, some 1960s, and some with the base cabinet, but several cheaper than the one you posted. However, the one you posted was in pretty great condition and with the paperwork, so that does say something.
Glad to hear that things are moving in the shop (for both of us!) and that you're able to tackle some projects for the wife. For me, it makes everything in the garage that I do all the worthwhile.
And congratulations, 32 years is awesome and incredible.
We all sure have good (and patient) wives
OP
Red Leader
Well-known member
Nice work on those bases. That workbench will be sweet.
4) On the face of the doors, put MDF panels with rounded coreners with roundover edged with the 3-strip design. Kinda like the deco style wood too cabinet bases that were posted many pages ago. The doors could look something like the front of this old Delta
Just a thought...
.
Thanks Jeff, I appreciate it. You also have some great ides with the design. I'll let all of these ideas 'percolate' in my head for a while and then go from there.
How is your shop coming along? I hope things have sort of settled down for you in a sense, for the better that is. One of these days I'll give you a call just to see how things are going.
OP
Red Leader
Well-known member
I agree!
Jeff, you and I together would smoke that 50 barrier (I'm at 32 years)...LOL!
I need to send my congrats as well....
That includes this incredible thread....
Well done Red Leader, I can't imagine getting that obsessed with a hobby (....okay, okay..... a tool hobby!).
The thing I admire most is the history that accompanies the item... its a great way to incapsulate the memories and preserve them for generation to generation.
Continued success...
Thanks so much for your very humbling praise. The real praise goes to all these guys who have been making things work in their families. I work with a lot of kids that come from broken/destroyed families and almost daily sees what happens when My hat is off to them and I really look up to them. I'm pretty fresh on the journey, but my hope is to be that old codger that's tellin' all the young'ins what its like to be married for 80 years
I can tell you for absolute sure that this didn't start out as an obsession
I was just remodeling the garage. The GJ and all the great folks on here and the inspiring ideas are what sealed my fate But now, I wouldn't have it any other way!
Last edited:
OP
Red Leader
Well-known member
So I had to make a quick stop by H/D today to pick up some locks for file cabinets at work today. Of course, being at H/D, I decided to stop by the 'furring strip' section. WOW! I found some awe-inspiring wood! Check it out below:


This wood will be absolutely GORGEOUS by the time a finish goes on it.
At first, I thought "Man, I don't know what I'm even going to use this for, but I will find a project that needs it!"
Then later I thought of the perfect project - trimming around the suspended ceiling once it is up. The wood will be nice and visible and will showcase the unique streaks and grain in this beetle kill wood. They are 1x3 furring strips.
Total price? Bout $15
This wood will be absolutely GORGEOUS by the time a finish goes on it.
At first, I thought "Man, I don't know what I'm even going to use this for, but I will find a project that needs it!"
Then later I thought of the perfect project - trimming around the suspended ceiling once it is up. The wood will be nice and visible and will showcase the unique streaks and grain in this beetle kill wood. They are 1x3 furring strips.
Total price? Bout $15
Last edited:
That bench is looking great Red Leader. I would definitely do the raised panels as Wingnut65 suggested. I would also add more black pinstriping, like the wall shelves. I don't know if it violates some Art Deco rule or something, but I always thought that stuff needed more color accents to go along with the wild geometric shapes (like the center ribs on that jointer being striped black). I guess I just like contrast - buy hey, I'm a square engineer, so take it for what it's worth.
BTW, you can probably get that gray striped look on any wood you want - just get it wet and leave it out in the sun for a while. Just be sure to constrain it so it doesn't warp as it dries, like tying it in a tight bundle or something.
Keep up the great work - it's nice to see that bench materializing!
BTW, you can probably get that gray striped look on any wood you want - just get it wet and leave it out in the sun for a while. Just be sure to constrain it so it doesn't warp as it dries, like tying it in a tight bundle or something.
Keep up the great work - it's nice to see that bench materializing!
Last edited:
Ok
I had to go digging for the inspiration for your cabinet doors, but over on OWWM ther are two threads with shop made bases
http://www.owwm.org/viewtopic.php?f=1&t=87267&start=0&hilit=cream+of+the+crop
http://owwm.org/viewtopic.php?f=1&t=87267&p=756892&hilit=stands#p756892
And one that migh be perfect fit for your shop doors

I had to go digging for the inspiration for your cabinet doors, but over on OWWM ther are two threads with shop made bases
http://www.owwm.org/viewtopic.php?f=1&t=87267&start=0&hilit=cream+of+the+crop
http://owwm.org/viewtopic.php?f=1&t=87267&p=756892&hilit=stands#p756892
And one that migh be perfect fit for your shop doors
Ok
I had to go digging for the inspiration for your cabinet doors, but over on OWWM ther are two threads with shop made bases
http://www.owwm.org/viewtopic.php?f=1&t=87267&start=0&hilit=cream+of+the+crop
http://owwm.org/viewtopic.php?f=1&t=87267&p=756892&hilit=stands#p756892
And one that migh be perfect fit for your shop doors
Those guys are artists!
ckadams00
Well-known member
I vote for #2 - it needs to match your shelves.
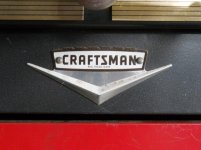
That chevron with the Craftsman crown logo is killer - don't let bluebolt see that one!!!
I didn't notice at first about the "crown" being part of that logo. Looking at my 1963 Craftsman Power Tools catalog I see it on the circular saw case 99M1483C and I saw on Ebay the 99M1806C 3/8 drill kit with case had it as well. In the catalog I also see it on the 99M22188N7 5-Tool Power Shop (bench saw, jointer-planer, disc sander, Jig saw and Sabre saw) and the 9 inch bench saw 99M2218N (which appears to be the basis for the 5-tool power shop) The Radial arm saw base by that time had a different logo.
Wingnut65
Well-known member
bluebolt, I got a better shot of it when I went back home. Found out this is a 1963 Craftsman 113.29401. I see there is a little surface rust that needs a little TLC.

An now, back to our regularly scheduled vintage tool and garage entertainment...
An now, back to our regularly scheduled vintage tool and garage entertainment...
Attachments
OP
Red Leader
Well-known member
Great links and ideas all around guys. I started some preliminary drawings. I think I may do a little bit of the Walker Turner thing by having some art deco lines in the center, painted the same color as the panels to blend them in a little, then do the black art deco lines on the legs to go along with the shelf theme. I'm also thinking about cutting/resawing those 1 or 2 of those 1x3 boards I picked up with crazy figuring and using them as an extra dimensional layer on the front of the front cabinet 4x4 posts. They would be stepped in from the corners of the post (3" wide vs 4" of the post) to create a nice deco dimensional effect, then add the black art deco lines at the very top and the very bottom, 3 lines, arrow pattern.
I'm thinking it could look really cool.
I also picked up some decal paper today. FINALLY! I'm finally going to get around to designing the 1950s Craftsman Garage logo and printing it out as a decal to put on the headboard of the shelves. I am also printing out the Garage Journal and OWWM logos and putting them to the right and left of the main logo, to symbolize where a lot of inspiration came from and, quite honestly, to pay homage and respect to these places and the people that have helped me on this journey from these places.
I'm looking forward to it
I'm thinking it could look really cool.
I also picked up some decal paper today. FINALLY! I'm finally going to get around to designing the 1950s Craftsman Garage logo and printing it out as a decal to put on the headboard of the shelves. I am also printing out the Garage Journal and OWWM logos and putting them to the right and left of the main logo, to symbolize where a lot of inspiration came from and, quite honestly, to pay homage and respect to these places and the people that have helped me on this journey from these places.
I'm looking forward to it
OP
Red Leader
Well-known member
The 'duds'...
Its no secret - I'm an admirer of Craftsman tools. From the mid 1930s all the way up until about 1960 is considered the 'golden age' for Craftsman. During this time they made some of the most famous, well-known, and well respected tools. We're not going to talk about any of those.
It is also no secret that Craftsman also released, or, tried to release some tools where about the only thing they inspired was a "huh?". These are the tools that you see and do a double take on...and not because they're pretty. Some of these tools fall into the realm of the bizarre, where others could be considered downright dangerous. All of them should be considered downright funny.
It is a humorous trip down memory lane and through the annals of history to discover that these old elegant and classy 1940s, 1950s and 1960s tools...well...just weren't really that elegant or classy.
Craftsman made a lot of great tools. We're going to look at some of their duds.
Dud #8
Craftsman 6" Metal Turning Lathe

Now before you get out your ropes and pitchforks, remember that there were several lathes before this one, and more robust, that Craftsman labeled as hobbiest lathes.
This is not a hobbiest lathe, this is a metal turning lathe. According to Craftsman. According to everyone else, its either "don't ever touch one" or "stay far, far away" or "don't waste your time with that piece of ****" or "the headstock spindle breaks just by looking at it" or "avoid at all costs". Unless it costs you $50, because for some reason, folks will still scramble to pay a good $200-$300 for one.
Dud #7
Saber Saw Attachment...$14.95

I've never seen one of these, and neither have you. And for good reason. Can you imagine opening up your tool storage closet, pulling out your circular saw case, opening the case and pulling out your circular saw, getting your circular saw arbor wrench, loosening the blade, taking off the blade, searching your garage for 1/2 hour for that stupid saber saw attachment that you threw in your rat hole swearing that you'd never used again, attaching it to your circular saw, tightening up, looking at it for about 10 minutes just wondering what the heck someone was thinking when they designed it and what the heck were you thinking when you bought it, then setting up your piece of wood and getting ready to make then cut when remembering that you put your $10 jigsaw right next to your circular saw in the tool storage? Neither could I.
The folding steel workbench, on the other hand, is pretty flipping cool. No wonder that jigsaw thing never took off - look what they put it next to!
Dud #6
Chain-saw Attachment

From the 1961 Catalog. Very short lived. Ya think? Just one thing to remember here folks-
Just because you can...doesn't mean you should.
Dud #5
Feature-packed Electric Drill Stand

The title of this one alone should promote caution among potential buyers when they realize that this offering is basically a metal pipe. To be more accurate, the feature-packed drill stand turns out to be - amazingly, a stand. For your electric drill. To turn your electric drill into a drill press. Read that last sentence over and over a few times.
To be honest, this tool can be somewhat handy for drilling into very large or immobile objects that can't fit into the space of the garage. Until you realize that you could probably just hold the drill with your hands, as people have done for hundreds of years.
Dud #4
Craftsman Impact Tool

Price in 1955: $130
Price if purchased in 2012: Eleven hundred dollars.
Taking 3rd place in the 'Most ridiculous overpriced vintage tool' is the handy dandy Craftsman impact tool. It's rocket-inspired design looks like it could take you to the moon.
Not really, of course. It's already taking your wallet.
Dud #3
Craftsman Electric Hand Saw

2nd place winner in our 'Most ridiculous overpriced vintage tool' contest!
Even though this saw is preceded by others dating to the mid-1920s, and some even by Craftsman themselves, Sears decided to market the 'new' electric hand saw for 1940 and slapped an $87.50 price tag on it.
Price in 1940: $87.50
Equivalent price in 2012: Fourteen hundred and twenty-two dollars and eighty nine cents.
Price I'm willing to pay in 2012: $87.50
Despite the price gouging, this saw is awesome and I'd LOVE to find one or one of it's earlier relatives
Dud #2
Power Timber Saw

Sears thought it might be cool to release a chainsaw. So in 1949, they introduced the Power Timber Saw at the introductory price of $455 which, in today's money, equates to FOUR THOUSAND ONE HUNDRED AND SIXTY ONE DOLLARS. Sears was forward thinking. Just in case some people thought it might be slightly unreasonable to buy a chainsaw that cost as much as a car, they offered a budget model.
Price of budget model in 2012: $3,969.75
Craftsman's 'chainsaw' is our winner for the 'Most ridiculous overpriced vintage tool'
For some unknown reason, it was not found in the 1950 and subsequent Craftsman Power Tool Catalogs. A mystery to this day
And the number one 'dud' tool Craftsman offered?
Dud #1
Drill Shop

This is my favorite 'dud' that Craftsman made, for the simple reason that I laugh every time I see it. To be honest with you, I probably would have bought one if I lived back in the 1950s so that I could get a good chuckle on a bad day.
Originally called the "Loan This Tool to Your Neighbor to Get Him to Stop Borrowing Your Tools Drill Shop", legend has it that a printing error erased most of the name, only printing the last two words in the original image. The legend continues that when the error was found, plans to continue the line were halted. Out of the anticipated wild success of the first tool, a double set was originally planned:

Drill Shop with Feature-packed Drill Stand, ensuring a great time for your neighbor
...as well as a portable version:

Alas, when the marketing punch was lost, Craftsman had to release them as plain old, poorly-functioning attachments that were unfortunately inferred to be taken seriously.
And while not really a 'dud', a worthwhile study at the tail end of Craftsman's golden era started to raise a few eyebrows:

...and in the same catalog:


And here they even snuck in a 90-day guarantee:

And just in case you missed any of the limited guarantees in any of the individual tool sections, they have a neat and tidy reminder that covers all the bases:

A just in case anyone started to wonder if the Craftsman name wasn't quite up to snuff, there was the confident reminder at the end of the catalog to assuage all fears:

And here is the guarantee from 1933:

So there you have it. I love Craftsman tools. However, in this world it is important to remember that nobody/nothing is going to be perfect. Some things just tend to serve as more humorous reminders of the beautiful fragility of life.
Now go out there and enjoy it to the fullest (hopefully not using any of the tools above, except that awesome hand saw)
Its no secret - I'm an admirer of Craftsman tools. From the mid 1930s all the way up until about 1960 is considered the 'golden age' for Craftsman. During this time they made some of the most famous, well-known, and well respected tools. We're not going to talk about any of those.
It is also no secret that Craftsman also released, or, tried to release some tools where about the only thing they inspired was a "huh?". These are the tools that you see and do a double take on...and not because they're pretty. Some of these tools fall into the realm of the bizarre, where others could be considered downright dangerous. All of them should be considered downright funny.
It is a humorous trip down memory lane and through the annals of history to discover that these old elegant and classy 1940s, 1950s and 1960s tools...well...just weren't really that elegant or classy.
Craftsman made a lot of great tools. We're going to look at some of their duds.
Dud #8
Craftsman 6" Metal Turning Lathe
Now before you get out your ropes and pitchforks, remember that there were several lathes before this one, and more robust, that Craftsman labeled as hobbiest lathes.
This is not a hobbiest lathe, this is a metal turning lathe. According to Craftsman. According to everyone else, its either "don't ever touch one" or "stay far, far away" or "don't waste your time with that piece of ****" or "the headstock spindle breaks just by looking at it" or "avoid at all costs". Unless it costs you $50, because for some reason, folks will still scramble to pay a good $200-$300 for one.
Dud #7
Saber Saw Attachment...$14.95
I've never seen one of these, and neither have you. And for good reason. Can you imagine opening up your tool storage closet, pulling out your circular saw case, opening the case and pulling out your circular saw, getting your circular saw arbor wrench, loosening the blade, taking off the blade, searching your garage for 1/2 hour for that stupid saber saw attachment that you threw in your rat hole swearing that you'd never used again, attaching it to your circular saw, tightening up, looking at it for about 10 minutes just wondering what the heck someone was thinking when they designed it and what the heck were you thinking when you bought it, then setting up your piece of wood and getting ready to make then cut when remembering that you put your $10 jigsaw right next to your circular saw in the tool storage? Neither could I.
The folding steel workbench, on the other hand, is pretty flipping cool. No wonder that jigsaw thing never took off - look what they put it next to!
Dud #6
Chain-saw Attachment
From the 1961 Catalog. Very short lived. Ya think? Just one thing to remember here folks-
Just because you can...doesn't mean you should.
Dud #5
Feature-packed Electric Drill Stand
The title of this one alone should promote caution among potential buyers when they realize that this offering is basically a metal pipe. To be more accurate, the feature-packed drill stand turns out to be - amazingly, a stand. For your electric drill. To turn your electric drill into a drill press. Read that last sentence over and over a few times.
To be honest, this tool can be somewhat handy for drilling into very large or immobile objects that can't fit into the space of the garage. Until you realize that you could probably just hold the drill with your hands, as people have done for hundreds of years.
Dud #4
Craftsman Impact Tool
Price in 1955: $130
Price if purchased in 2012: Eleven hundred dollars.
Taking 3rd place in the 'Most ridiculous overpriced vintage tool' is the handy dandy Craftsman impact tool. It's rocket-inspired design looks like it could take you to the moon.
Not really, of course. It's already taking your wallet.
Dud #3
Craftsman Electric Hand Saw
2nd place winner in our 'Most ridiculous overpriced vintage tool' contest!
Even though this saw is preceded by others dating to the mid-1920s, and some even by Craftsman themselves, Sears decided to market the 'new' electric hand saw for 1940 and slapped an $87.50 price tag on it.
Price in 1940: $87.50
Equivalent price in 2012: Fourteen hundred and twenty-two dollars and eighty nine cents.
Price I'm willing to pay in 2012: $87.50
Despite the price gouging, this saw is awesome and I'd LOVE to find one or one of it's earlier relatives
Dud #2
Power Timber Saw
Sears thought it might be cool to release a chainsaw. So in 1949, they introduced the Power Timber Saw at the introductory price of $455 which, in today's money, equates to FOUR THOUSAND ONE HUNDRED AND SIXTY ONE DOLLARS. Sears was forward thinking. Just in case some people thought it might be slightly unreasonable to buy a chainsaw that cost as much as a car, they offered a budget model.
Price of budget model in 2012: $3,969.75
Craftsman's 'chainsaw' is our winner for the 'Most ridiculous overpriced vintage tool'
For some unknown reason, it was not found in the 1950 and subsequent Craftsman Power Tool Catalogs. A mystery to this day
And the number one 'dud' tool Craftsman offered?
Dud #1
Drill Shop
This is my favorite 'dud' that Craftsman made, for the simple reason that I laugh every time I see it. To be honest with you, I probably would have bought one if I lived back in the 1950s so that I could get a good chuckle on a bad day.
Originally called the "Loan This Tool to Your Neighbor to Get Him to Stop Borrowing Your Tools Drill Shop", legend has it that a printing error erased most of the name, only printing the last two words in the original image. The legend continues that when the error was found, plans to continue the line were halted. Out of the anticipated wild success of the first tool, a double set was originally planned:
Drill Shop with Feature-packed Drill Stand, ensuring a great time for your neighbor
...as well as a portable version:
Alas, when the marketing punch was lost, Craftsman had to release them as plain old, poorly-functioning attachments that were unfortunately inferred to be taken seriously.
And while not really a 'dud', a worthwhile study at the tail end of Craftsman's golden era started to raise a few eyebrows:
...and in the same catalog:
And here they even snuck in a 90-day guarantee:
And just in case you missed any of the limited guarantees in any of the individual tool sections, they have a neat and tidy reminder that covers all the bases:
A just in case anyone started to wonder if the Craftsman name wasn't quite up to snuff, there was the confident reminder at the end of the catalog to assuage all fears:
And here is the guarantee from 1933:
So there you have it. I love Craftsman tools. However, in this world it is important to remember that nobody/nothing is going to be perfect. Some things just tend to serve as more humorous reminders of the beautiful fragility of life.
Now go out there and enjoy it to the fullest (hopefully not using any of the tools above, except that awesome hand saw
)
Last edited:
kbuhagiar
Well-known member
The 'duds'...
Dud #8
Craftsman 6" Metal Turning Lathe
Now before you get out your ropes and pitchforks, remember that there were several lathes before this one, and more robust, that Craftsman labeled as hobbiest lathes.
This is not a hobbiest lathe, this is a metal turning lathe. According to Craftsman. According to everyone else, its either "don't ever touch one" or "stay far, far away" or "don't waste your time with that piece of ****" or "the headstock spindle breaks just by looking at it" or "avoid at all costs". Unless it costs you $50, because for some reason, folks will still scramble to pay a good $200-$300 for one.
Actually, it is even worse than you think.
I paid $150 for one 25 years ago. Found it in the classified ads (remember those?) and was thrilled with the notion of my very own lathe for under $200. Spent countless hours trying to use it, it was pretty much worthless.
ckadams00
Well-known member
Dud #6
Chain-saw Attachment
From the 1961 Catalog. Very short lived. Ya think? Just one thing to remember here folks-
Just because you can...doesn't mean you should.
I have actually seen two of these - one online and one in person. The first time I saw it I thought it was a really bad idea some homeowner had rigged up. I soon learned it was a really bad idea some engineer had rigged up. Chainsaws and circular saws can be dangerous enough on their own - you don't need to mangle them into a shiny silver circus of death.
Seriously, it looks like something Jason would use in Friday 13th.
Question though - I was born in '67 so I can't answer - is it fair to do a straight dollar appreciation on these tools? Anyone who was "of purchasing age" in the 50/60's care to chime in on this? - were you really purchasing a tool that was comparable to a few thousands of dollars today or - based on what was available and other factors - did some of these prices seem more reasonable at the time?

ckadams00
Well-known member
Red Leader I always forget to thank you for the history lessons, BTW. You do a great job on these!
kbuhagiar
Well-known member
Red Leader I always forget to thank you for the history lessons, BTW. You do a great job on these!
I second that - Red Leader, thanks for all of your efforts!
tinbender 66
Well-known member
Fun stuff! A drill motor table saw.
.
OP
Red Leader
Well-known member
Okay...any guesses?
Here is a teaser shot:

Anybody?
Well then....
Dear Garage Journal,
I'm very excited to introduce you to the newest member of the 1950's Craftsman Garage family...
The Red Star Multiplex 40A


A while back I had spotted this saw in a C/L ad and called on it. The seller was looking for more info about it and was trying to find a value for it. When he figured out what he wanted to sell it for, I was instantly priced out of it. However, I kept watching it. It went down...down...down...and finally got to a price point in my ballpark! I made him an offer and the deal was done!
A little history on the Red Star Products Corporation:
Red Star got started sometime in the 1930's and was in business up until 1948. Most of their saws are considered to be from the '40s. In 1948 they were bought out by Delta and Delta started putting their badges on the machines and selling them as a Delta Multiplex. They were identical to the Red Stars other than the badges slapped on. Eventually Delta transitioned to a slightly different design, dropped the enclosed cabinet base, and released saws such as the 30C. To this day, Delta still uses the turret-arm design in their radial saws, a design pioneered by Red Star. This saw is the grand daddy of them all...where it all started. To me, it is the pinnacle of radial saw engineering and the finest example of the turret arm design.
Very little is known about the actual Red Star Products company. To my knowledge, no one has figured out how to date the saws, or have any extensive knowledge about when Red Star offered which products. If you know any information, please get a hold of me! I'd love to hear your story!
Okay, back to the saw.
So I picked her up today and loaded her in the back. I knew getting home it was just going to be me unloading, so I had to get a little creative.
What I started with:

Getting the base out:

A shot of the base:

As you can see, nature and time have taken their toll on this once magnificent machine.
More shots of the rust:


The base especially has a quiet, restful yet forgotten mystique to it. It reminds me of old, vintage cars that come to reside in fields and slowly melt back into their surroundings - the sheet metal starts to wither away and it makes you wonder just how it got there? What was it's story?
Its almost as if left alone for another 60 years, this saw would be comfortable just returning back to the earth. I'm glad I found it when I did. My care-taking of this tool will be more one of an attitude of preservation than restoration. The tool has seemingly, and almost comfortably, resigned itself to the next life and I'm here to say, "Not yet!"
It will be my greatest challenge to date.
Next up was getting the heavy part out:

As goofy as it may seem, here is how I did it:

It is a statuesque tribute to a once great time that our current world has all but forgotten:

I then attached the head unit:

Do you want to know how big that saw blade is? It's big.

Here are some shots of the finer details that showcase why some old tools are just the greatest:


I'll really have my work cut out for me with this one. The good news is that the base completely comes apart, so I'll be able to wire wheel the outside and then disassemble to get to the inside. I might even be able to do parts of it using electrolysis.
The great part is that even though this tool is about 60-70 years old, pulling the saw carriage through the ways is completely smooth with absolutely zero play. Love it
So that is the new addition! And now I have some tools to sell!
Here is a teaser shot:
Anybody?
Well then....
Dear Garage Journal,
I'm very excited to introduce you to the newest member of the 1950's Craftsman Garage family...
The Red Star Multiplex 40A
A while back I had spotted this saw in a C/L ad and called on it. The seller was looking for more info about it and was trying to find a value for it. When he figured out what he wanted to sell it for, I was instantly priced out of it. However, I kept watching it. It went down...down...down...and finally got to a price point in my ballpark! I made him an offer and the deal was done!
A little history on the Red Star Products Corporation:
Red Star got started sometime in the 1930's and was in business up until 1948. Most of their saws are considered to be from the '40s. In 1948 they were bought out by Delta and Delta started putting their badges on the machines and selling them as a Delta Multiplex. They were identical to the Red Stars other than the badges slapped on. Eventually Delta transitioned to a slightly different design, dropped the enclosed cabinet base, and released saws such as the 30C. To this day, Delta still uses the turret-arm design in their radial saws, a design pioneered by Red Star. This saw is the grand daddy of them all...where it all started. To me, it is the pinnacle of radial saw engineering and the finest example of the turret arm design.
Very little is known about the actual Red Star Products company. To my knowledge, no one has figured out how to date the saws, or have any extensive knowledge about when Red Star offered which products. If you know any information, please get a hold of me! I'd love to hear your story!
Okay, back to the saw.
So I picked her up today and loaded her in the back. I knew getting home it was just going to be me unloading, so I had to get a little creative.
What I started with:
Getting the base out:
A shot of the base:
As you can see, nature and time have taken their toll on this once magnificent machine.
More shots of the rust:
The base especially has a quiet, restful yet forgotten mystique to it. It reminds me of old, vintage cars that come to reside in fields and slowly melt back into their surroundings - the sheet metal starts to wither away and it makes you wonder just how it got there? What was it's story?
Its almost as if left alone for another 60 years, this saw would be comfortable just returning back to the earth. I'm glad I found it when I did. My care-taking of this tool will be more one of an attitude of preservation than restoration. The tool has seemingly, and almost comfortably, resigned itself to the next life and I'm here to say, "Not yet!"
It will be my greatest challenge to date.
Next up was getting the heavy part out:
As goofy as it may seem, here is how I did it:
It is a statuesque tribute to a once great time that our current world has all but forgotten:
I then attached the head unit:
Do you want to know how big that saw blade is? It's big.
Here are some shots of the finer details that showcase why some old tools are just the greatest:
I'll really have my work cut out for me with this one. The good news is that the base completely comes apart, so I'll be able to wire wheel the outside and then disassemble to get to the inside. I might even be able to do parts of it using electrolysis.
The great part is that even though this tool is about 60-70 years old, pulling the saw carriage through the ways is completely smooth with absolutely zero play. Love it
So that is the new addition! And now I have some tools to sell!
Last edited:
M. Blue 240
Well-known member

Attachments
Cranehead
Member
The great part is that even though this tool is about 60-70 years old, pulling the saw carriage through the ways is completely smooth with absolutely zero play. Love it
Wow, as much as I love my Dewalt the picture of the ways above really looks cool. Are those ball bearings in the carriage?
TC
OP
Red Leader
Well-known member
Wow, as much as I love my Dewalt the picture of the ways above really looks cool. Are those ball bearings in the carriage?
TC
Yep, those are large open balls that function as ball bearings for the carriage.
In this picture:
You can see that the balls are the interface between the carriage and the arm. Both the carriage and the arm also contain a set of rods (as evidenced in the shot about with the carriage) that the balls use as rails to ride on. When there is any noticeable wear in the pull stroke of the saw, you simply turn those rods about an 1/8th of a turn and BAM, you have a completely fresh and new surface for the bearings to ride on. After examining the rods, it appears as though they have never been turned for wear and the saw still feels buttery smooth after about 70 years. Which means that if I had to turn the rods for wear, I'd get about 560 years out of the current system (1/8th turn every 70 years) and then when the rods finally bite the dust, I'd just go out a get new replaceable rods
Course by the time I'm 600 years old hopefully I'll still be able to make it to the hardware store
That is, in my opinion, just one (and one of the best mind you) of the many reasons why the engineering on this saw is pure genius.
I also really admire the DeWalt round arm saws (which are also known to be some of the finest radial arm saws ever made), but when the ways on the saw wear out, you have to get them re-machined which (from what I've heard) is a multi-hundred dollar operation.
Still though, you cannot top a good DeWalt or Red Star saw in the RAS dept.
Last edited:
Firefyter-Emt
Well-known member
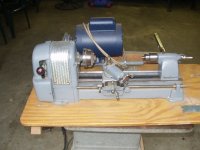
Hey.... now quit picking on the little 109 lathes, they are cute! Here is my little lathe, before & after shots of course.


The sad part, is even though the one I have is a bit better than the newer one you show, they, in fact, did make even WORSE ones towards the late 50's and into the 60's! I once refurbished a wood lathe that not only lacked a morse taper, heck... it lacked THREADS! That's right, it had a "D" shaft and a set screw.... I can bet that was fine tuned, eh!
The sad part, is even though the one I have is a bit better than the newer one you show, they, in fact, did make even WORSE ones towards the late 50's and into the 60's! I once refurbished a wood lathe that not only lacked a morse taper, heck... it lacked THREADS! That's right, it had a "D" shaft and a set screw.... I can bet that was fine tuned, eh!
Last edited:
ckadams00
Well-known member
Awesome/
Wondering how you are gonna tackle that cabinet - you are a real optimist Red Leader!
Wondering how you are gonna tackle that cabinet - you are a real optimist Red Leader!
machine_punk
Well-known member
I'm not sure if you notice, RL, but that is NOT a Craftsman saw...so, I am going to have to drive over there and remove it from your premises. Hee Hee. Just kidding.
I've been thinking, as I look at the OUTRAGEOUS prices people are asking for those newfangled sliding crosscut miter saws (new or used), that if I came across the RIGHT radial arm saw, that might be the better answer. Yours looks like the right radial arm saw.
Cool find. Looking forward to seeing it, after receiving the 'RL' treatment.
M_P
I've been thinking, as I look at the OUTRAGEOUS prices people are asking for those newfangled sliding crosscut miter saws (new or used), that if I came across the RIGHT radial arm saw, that might be the better answer. Yours looks like the right radial arm saw.
Cool find. Looking forward to seeing it, after receiving the 'RL' treatment.
M_P
Stick Figure
Well-known member
that if I came across the RIGHT radial arm saw, that might be the better answer.
M_P
You missed a free one (working looked decent) from the Oakland craigslist yesterday... I was tempted, but didn't want to make the drive, and didn't really have more room.
For the base, I would go buy a kiddie pool, battery charger, and some scrap metal for electrolysis.