To avoid these ads, REGISTER NOW!

Between 265 & 485 SQ/FT 1950s Craftsman Garage retro remodel

Workspaces sized between 265 and 485 squarefeet.
OP
R

Red Leader

Well-known member
Joined
May 15, 2011
Messages
2,689
Location
Denver, CO
Looks like a fun saw project ahead of you. I looked twice but must have missed it - what diameter is that blade, anyways?

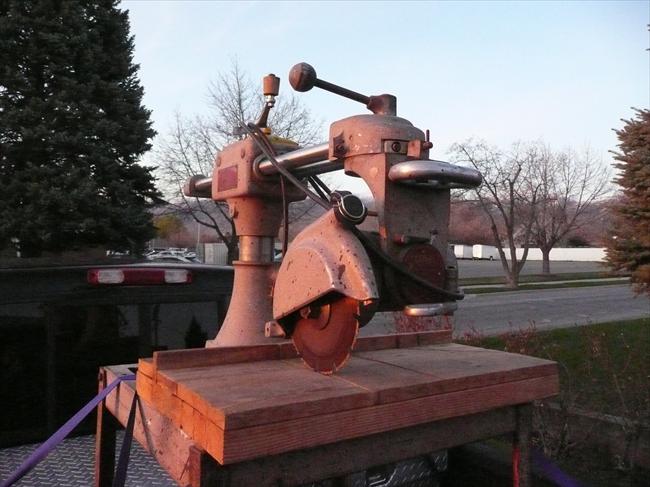
The blade that is actually on this saw, oddly enough, measured out to be 13". The Red Star 40A came with a standard 12" blade and blade guard with an optional 14" blade guard. Looks like this one has the optional blade guard, as there is a little bit more room in there, seemingly for a larger blade, which makes me super happy because I wanted a saw big enough that would allow me to cut 4x4s.

Awesome/:rocker:
Wondering how you are gonna tackle that cabinet - you are a real optimist Red Leader!

Yes, the cabinet is going to be a delicate operation. The good news is that only 1 side is significantly pitted to the point of it being compromised. That side was shown in the pictures above, so that is the worst of it. What I am thinking will be to rig up a electrolysis bath and carefully remove the rust on each individual piece of the stand. It will be extremely helpful that the stand comes apart (bolted together rather than welded) so I can manage it with electrolysis. The electrolysis is the absolute least invasive method for removing rust. Instead of grinding the sides down until the metal is flat and making it significantly thinner/weaker by removing good metal, the electrolysis will take care of the rust and they I'll be able to fill in the pits with Bondo to maintain near the original thickness. I'm thinking about picking up some of that Bondo that is reinforced with fiberglass to add just a little more strength to solidify the cabinet. The corner pieces are not as pitted and are thicker sheet metal so I'm not super worried about the structural integrity. To be honest, with the right resources it would probably be easier to just cut and bend new sheet metal sides since they are basically squares, but since I am trying to preserve as much of the original saw as possible, I'd first like to explore this route. Plus I have no metalworking tools or skills. Plus it sounds like a fun challenge:)

I'm not sure if you notice, RL, but that is NOT a Craftsman saw...so, I am going to have to drive over there and remove it from your premises. Hee Hee. Just kidding.

I've been thinking, as I look at the OUTRAGEOUS prices people are asking for those newfangled sliding crosscut miter saws (new or used), that if I came across the RIGHT radial arm saw, that might be the better answer. Yours looks like the right radial arm saw.

Cool find. Looking forward to seeing it, after receiving the 'RL' treatment.

M_P

I know - it actual has nothing to do with my garage build. It is not Craftsman, and it is not even from the 1950s. Heresy! :D

Radial saws are pretty cool. They have fallen out of favor but if you get a good one and set it up correctly it can be very accurate as a crosscut machine. You are right - new, most of these saws equated to thousands of dollars when purchased. There is probably no other tool that has a sharper decline in resale value than a RAS. Most people just don't use them anymore. For most of the work people would use them for, a miter saw took care of 99% of that. When you want constant repeatability and need to cut something bigger or wider, a RAS can have its merit. When I worked in the stair company, I used a RAS every day. No way would I try and throw 30lb 8ft boards up onto a miter saw. We used the miter saw for the trim work on open-end stairs.

I'll enjoy having a miter saw in the shop at some point, too.
 
To avoid these ads, REGISTER NOW!

mdbeck1

Well-known member
Joined
Mar 7, 2010
Messages
2,297
Location
Norman, OK
The blade that is actually on this saw, oddly enough, measured out to be 13". The Red Star 40A came with a standard 12" blade and blade guard with an optional 14" blade guard. Looks like this one has the optional blade guard, as there is a little bit more room in there, seemingly for a larger blade, which makes me super happy because I wanted a saw big enough that would allow me to cut 4x4s.

I've got an old RAS in my wood shop (no pics). If I remember correctly it's got a 10" blade and will cut right through a 4X4 at 90 degrees. I believe that it just barely does cut it but anything over a 10" blade will make short work of a 4X4.

...and there's not a better tool for cutting dados in a sides of a set of book cases. You can see how deep you are going and make sure that they are perpendicular to the sides. Try doing that with a motorized miter box.

...but the motorized miter box (MMB) does have it's place... Decks, trim, .... anything that requires just cutting a 2X6 or less in two is great. ...and I can move it to the area being worked.

When I set the RAS up I built a stand on the end that will hold the MMB at the right height and depth to use the same fence as the RAS. It makes it real nice to throw a board up and cut an angle on the end.
 

Wingnut65

Well-known member
Joined
Apr 21, 2010
Messages
3,170
Location
Tampa Bay, FL
Congrats on getting your Red Star! :thumbup:

The base will take work, but that is half the fun. It wouldn't be a challenge if it looked like it was right out of the showroom.

My first thought is that if the sheet metal was so bad and too thin, it would be very easy to make new panels. All they have are a few corner breaks on each side and one has a hole cut in. That base would have been very economical to build at that time or now.

The electro process would work well. I was thinking of a vinegar bath or Evapo-Rust. Both have worked well for me on my lathe restor. The base can be set on its side in a tub of four 2x's and sheet plastic. At least those were my first thoughts of tackling it. getting the rust of one way or the other first, before trying to disassemble would probably be a help to loosen the bolts. Not that I'm telling the Pro how to do his job, just thinking out loud...
 

Hotrod1959

Well-known member
Joined
Dec 13, 2011
Messages
47
Location
SF bay area California
Ok

I had to go digging for the inspiration for your cabinet doors, but over on OWWM ther are two threads with shop made bases


http://www.owwm.org/viewtopic.php?f=1&t=87267&start=0&hilit=cream+of+the+crop


http://owwm.org/viewtopic.php?f=1&t=87267&p=756892&hilit=stands#p756892


And one that migh be perfect fit for your shop doors

file.php
What a work of art! Definitely on my wish list for my garage.
 

carbons4

Well-known member
Joined
Jan 19, 2012
Messages
92
I found or re discovered a gem of my own this last weekend. 24-25 years ago my friend had given me a old cabinet saw from his parents old farm.I had no markings, the motor was missing but the arbor still raised and tilted. The biggest thing was the table was warped, he said from being in a fire. The cabinet did not look like it had been. He always claimed it was a wards. I brought it home and stuck it in the corner of the garage. I drug it home the other day and was looking at it again. After comparing it to several pictures on OWWM, it is a 40's Delta Unisaw. The "sealed for life bearings" still spin free and smooth to this day. Had always thought about finding a table top that would fit but now am thinking about trying a hand at straitining it myself.
 
OP
R

Red Leader

Well-known member
Joined
May 15, 2011
Messages
2,689
Location
Denver, CO
I found or re discovered a gem of my own this last weekend. 24-25 years ago my friend had given me a old cabinet saw from his parents old farm.I had no markings, the motor was missing but the arbor still raised and tilted. The biggest thing was the table was warped, he said from being in a fire. The cabinet did not look like it had been. He always claimed it was a wards. I brought it home and stuck it in the corner of the garage. I drug it home the other day and was looking at it again. After comparing it to several pictures on OWWM, it is a 40's Delta Unisaw. The "sealed for life bearings" still spin free and smooth to this day. Had always thought about finding a table top that would fit but now am thinking about trying a hand at straitining it myself.

That is fantastic! Unisaws are great cabinet saws! I definitely would like to see pictures! Any tags that may be present could help in dating the saw.

You should research something called 'Blanchard Grinding' - and see if that is a possibility for your saw. If the table top isn't warped terribly, it might be a lovely option and you'd get to keep the original table. A lot of places can actually taken enough off that they also have to re-mill the miter slots deeper, but it can be done.


PICTURES PICTURES PICTURES!!
 
OP
R

Red Leader

Well-known member
Joined
May 15, 2011
Messages
2,689
Location
Denver, CO
Congrats on getting your Red Star! :thumbup:

The base will take work, but that is half the fun. It wouldn't be a challenge if it looked like it was right out of the showroom.

My first thought is that if the sheet metal was so bad and too thin, it would be very easy to make new panels. All they have are a few corner breaks on each side and one has a hole cut in. That base would have been very economical to build at that time or now.

The electro process would work well. I was thinking of a vinegar bath or Evapo-Rust. Both have worked well for me on my lathe restor. The base can be set on its side in a tub of four 2x's and sheet plastic. At least those were my first thoughts of tackling it. getting the rust of one way or the other first, before trying to disassemble would probably be a help to loosen the bolts. Not that I'm telling the Pro how to do his job, just thinking out loud...

I'm tracking right there with you. It would be very easy to make new panels. Since I have the makings for electrolysis, I'll try that to see if I can salvage the original panels.

I'll see if I can loosen up any of the nuts/bolts first but if they are giving me trouble I will just do like you said, just rotate the entire thing on it's side in the bath.
 
OP
R

Red Leader

Well-known member
Joined
May 15, 2011
Messages
2,689
Location
Denver, CO
That saw is a work of art. And it looks indestructible. I love old tools.

For being somewhere around 66 years old, it has aged pretty gracefully. One of the prime reasons is that the entire saw (both turret arms, saw head and bracket, table, etc) are all cast aluminum, so where the paint is flaking off it, it appears shiny and new.


And trust me, it is still a heavy beast:)
 
OP
R

Red Leader

Well-known member
Joined
May 15, 2011
Messages
2,689
Location
Denver, CO
I've got an old RAS in my wood shop (no pics). If I remember correctly it's got a 10" blade and will cut right through a 4X4 at 90 degrees. I believe that it just barely does cut it but anything over a 10" blade will make short work of a 4X4.

...and there's not a better tool for cutting dados in a sides of a set of book cases. You can see how deep you are going and make sure that they are perpendicular to the sides. Try doing that with a motorized miter box.

...but the motorized miter box (MMB) does have it's place... Decks, trim, .... anything that requires just cutting a 2X6 or less in two is great. ...and I can move it to the area being worked.

When I set the RAS up I built a stand on the end that will hold the MMB at the right height and depth to use the same fence as the RAS. It makes it real nice to throw a board up and cut an angle on the end.

On some radial saws there is a little more motor clearance than others, so you can get away with a deeper depth of cut. On the Parks/Craftsman RAS I have, the max depth is somewhere around 2.5". Just for kicks I threw a 4x4 up on the table of the Red Star and it was about 2mm away from clearing it with that 13" blade. So a 14" should be fine.

(some of) The smaller Comet radial saws have an offset motor design connected through a belt to the saw arbor so while they may be only an 8" blade, they actually have the depth of a 10" ras, and even more than some. Those are also cool saws!

12067-B.jpg
 
Last edited:

peelman

Well-known member
Joined
Jan 13, 2011
Messages
198
Location
Seymour, Indiana
I've got an old RAS in my wood shop (no pics). If I remember correctly it's got a 10" blade and will cut right through a 4X4 at 90 degrees. I believe that it just barely does cut it but anything over a 10" blade will make short work of a 4X4.

...and there's not a better tool for cutting dados in a sides of a set of book cases. You can see how deep you are going and make sure that they are perpendicular to the sides. Try doing that with a motorized miter box.

...but the motorized miter box (MMB) does have it's place... Decks, trim, .... anything that requires just cutting a 2X6 or less in two is great. ...and I can move it to the area being worked.

When I set the RAS up I built a stand on the end that will hold the MMB at the right height and depth to use the same fence as the RAS. It makes it real nice to throw a board up and cut an angle on the end.
Agreed. I picked up a cheap MMB over a year ago and its a great little utility saw. but having a RAS (and more importantly the room for a RAS) is on my wish list.
 

carbons4

Well-known member
Joined
Jan 19, 2012
Messages
92
Both of those Radial arm saws are great. Everything used to have style as well as built to last. Yea I know what Blanchard grinding is. Used to do it at old job. No table needs a blacksmiths touch before it could ever be ground. IT"S WARPED. Been doing a bit of research and hoping it has the iron content I think it does. Basicly heat it in a bonfire, clamp it to a jig, bury it in hot DRY sand for a day. Might have to repeat process couple times THEN it can be re ground.
No markings on it what so ever. The toggle switch and construction were the best give aways for dating it if other peoples dates are correct on their info.
I have seen one of those big old Radial Arm Saws few years back and the guy told me it had been in daily use since his dad bought it new YEEEAAARS ago.
Made to last.
 

mdbeck1

Well-known member
Joined
Mar 7, 2010
Messages
2,297
Location
Norman, OK
On some radial saws there is a little more motor clearance than others, so you can get away with a deeper depth of cut. On the Parks/Craftsman RAS I have, the max depth is somewhere around 2.5". Just for kicks I threw a 4x4 up on the table of the Red Star and it was about 2mm away from clearing it with that 13" blade. So a 14" should be fine.

(some of) The smaller Comet radial saws have an offset motor design connected through a belt to the saw arbor so while they may be only an 8" blade, they actually have the depth of a 10" ras, and even more than some. Those are also cool saws!

12067-B.jpg

Okay, okay, I'll charge the battery on the wife's digital camera and see if I can get a picture this afternoon/evening. Like I said. I'm pretty sure I cut a 4X4 without having to rotate it, but just barely (left about 1/16" IIRC).

Geeze this is a tough crowd.
 
OP
R

Red Leader

Well-known member
Joined
May 15, 2011
Messages
2,689
Location
Denver, CO
Okay, okay, I'll charge the battery on the wife's digital camera and see if I can get a picture this afternoon/evening. Like I said. I'm pretty sure I cut a 4X4 without having to rotate it, but just barely (left about 1/16" IIRC).

Geeze this is a tough crowd.


:) What kind of RAS do you have? The blade depth issue came to light once I started using one. If you can make a pass on a 4x4 with a 10" blade that is fantastic and I'd love to see your setup.
 

Amazzen

Well-known member
Joined
Nov 24, 2011
Messages
168
Location
Southern Ontario, Canada
Congrats on getting your Red Star! :thumbup:

The base will take work, but that is half the fun. It wouldn't be a challenge if it looked like it was right out of the showroom.

My first thought is that if the sheet metal was so bad and too thin, it would be very easy to make new panels. All they have are a few corner breaks on each side and one has a hole cut in. That base would have been very economical to build at that time or now.

The electro process would work well. I was thinking of a vinegar bath or Evapo-Rust. Both have worked well for me on my lathe restor. The base can be set on its side in a tub of four 2x's and sheet plastic. At least those were my first thoughts of tackling it. getting the rust of one way or the other first, before trying to disassemble would probably be a help to loosen the bolts. Not that I'm telling the Pro how to do his job, just thinking out loud...

I totally agree with Jeff....

The fiberglass reinforced bondo will not help you if you want to keep the original metal thickness and I don't recommend it. If it was an old car, I choose metal replacement over bondo any day and especially when the panels can be easily reproduced.

Ditto on the "not that I'm telling the Pro how to do his job" bit.

Either way, you've managed to save another piece of history once again!
 

zuk123

Well-known member
Joined
Mar 25, 2012
Messages
957
Location
Houston TX via Chicago, Phoenix, LA, and San Diego
Hey RedLeader! Been lurking here for a while. Actually tried to register just to post in your thread, but had some trouble. Got it sorted though.

Love the garage, and love the tool restorations.

There will be a Foley Belsaw planer coming up for auction in the Austin TX area. It is not the one you most desire though. But I thought I'd pass it along as this thread has the Craftsman resto guys following it ;-) The model is 306.9123. The Craftsman badge is missing, (2 holes above the Sears model plate.) It doesn't look like the one you showed in the brochure. It does look complete. As soon as the auction goes live I'll post links. In the mean time, I can post some pics if anyone is interested (and you don't mind the OT pix in your thread.)

Frankly though, except for its rarity, I'm not sure why it is so desirable to you. I don't think it has the **** look of the other vintage tools you have. Granted, I haven't seen an example of a planer that DID have the curves and details that characterize the rest of the vintage tools. For some reason, they all seem to be square boxes...

Keep up the good work, it is an inspiration to me to finish some of my projects!

zuk
 
OP
R

Red Leader

Well-known member
Joined
May 15, 2011
Messages
2,689
Location
Denver, CO
I totally agree with Jeff....

The fiberglass reinforced bondo will not help you if you want to keep the original metal thickness and I don't recommend it. If it was an old car, I choose metal replacement over bondo any day and especially when the panels can be easily reproduced.

Ditto on the "not that I'm telling the Pro how to do his job" bit.

Either way, you've managed to save another piece of history once again!

I'm definitely no pro! I would describe myself more as a student - a student of old tools, restoration, fabrication, woodwork, etc. I have yet to really master anything. And with the metal fab in particular, I have zero experience, which is exactly why I post the questions I do. My metal working skills equate to sticking metal strapping in a vise and taking a hacksaw or a dremel to it. I know Paul is gonna bust my chops over that one:D I really do want to expand my metalworking tools and skills! One thing at a time, though. That time will come.

So does the fiberglass reinforced bondo or the jelly bondo add any strength? There is only one panel that seems to be more severely affected than the others. If I can use the stronger bondo to smooth it out and to give it even just a hair more strength, I can be okay with that.

I agree that metal replacement is the most substantial solution, but the panels aren't rusted through (yet!) so I'd like to give them a chance. It does bring me great comfort to know that if they do ever die on me in the future, I can easily make them or get them made.

As it has been mentioned before, they aren't making any more old tools. For every one that goes to the scrapper, that is one less tool and one less piece of history, of Americana, left in this country. I know that all cannot be saved, but in this particular case, with the Red Star...radial saws have already lost their place in home shops which is a huge strike there, not to mention the relative overall condition of the saw...it was a prime candidate for the scrap heap. Which is all the more reason why I am very excited to save it. The good (really, really good) news is that the saw actually powers on! If the blade is stuck just a tiny bit it will just sit there and buzz (so I'm thinking there are definitely some electrical issues that will need to be sorted out) but if it is unhindered it does get up to speed and takes forever to stop spinning - the bearings are super smooth, with is crazy to think after realizing how old this saw it.

While Red Stars are not necessarily rare, they are uncommon at best and a relatively complete example should be saved. Plus it will make an incredible addition to the shop when restored and tuned, with the right blade.
 
Last edited:

novaboy009

Well-known member
Joined
Mar 22, 2010
Messages
119
Location
Pittsburgh, PA
The problem with bondo is that it will go "pop" in a few years when the rust starts working it's way back out. You'll want to look into por-15 or eastwoods rust preventive paint if you go that route......
 
To avoid these ads, REGISTER NOW!
OP
R

Red Leader

Well-known member
Joined
May 15, 2011
Messages
2,689
Location
Denver, CO
Hey RedLeader! Been lurking here for a while. Actually tried to register just to post in your thread, but had some trouble. Got it sorted though.

Love the garage, and love the tool restorations.

There will be a Foley Belsaw planer coming up for auction in the Austin TX area. It is not the one you most desire though. But I thought I'd pass it along as this thread has the Craftsman resto guys following it ;-) The model is 306.9123. The Craftsman badge is missing, (2 holes above the Sears model plate.) It doesn't look like the one you showed in the brochure. It does look complete. As soon as the auction goes live I'll post links. In the mean time, I can post some pics if anyone is interested (and you don't mind the OT pix in your thread.)

Frankly though, except for its rarity, I'm not sure why it is so desirable to you. I don't think it has the **** look of the other vintage tools you have. Granted, I haven't seen an example of a planer that DID have the curves and details that characterize the rest of the vintage tools. For some reason, they all seem to be square boxes...

Keep up the good work, it is an inspiration to me to finish some of my projects!

zuk

You know, you raise a good point. I think the reason why I was drawn to that planer is that I really get a kick out of really extremely rare Craftsman tools. If there is a Craftsman tool that has never been seen in the wild, or photographed, or documented, wanting to try and find one...is like crack haha:lol:

But, as the shop is getting friendlier to non-Craftsman tools (they all play together real well:)), I might be looking in other directions, towards tools that I really admire for their beauty and function.

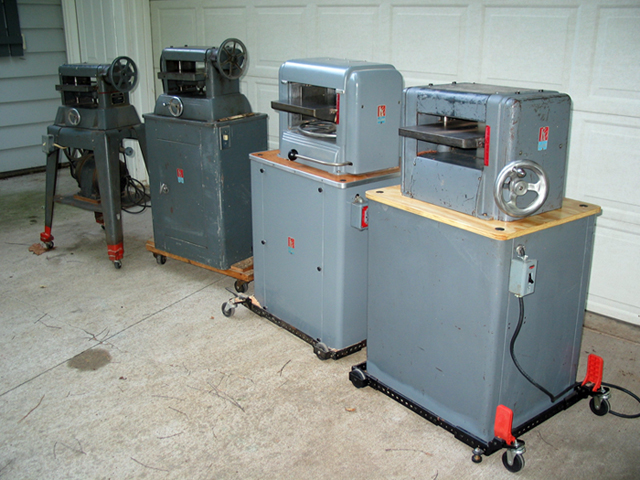
One such tool is the line of Kniesley/Yager/Foster planers:

7951-E.jpg


I am starting to get particularly fond of the K2100 or K2200:

K2100:
IMG_7770.jpg


K2200:
IMG_9172.jpg


I have the K2000, which is a 10" planer. I like the ones above because they are 12 3/4" and have a 4" capacity, which would be a little better for my shop. Plus the belts/pulleys are enclosed on this. Our little guy is just grabbing everything under the sun right now and I feel that it might be prudent at some point to upgrade to a planer with enclosed belts:)

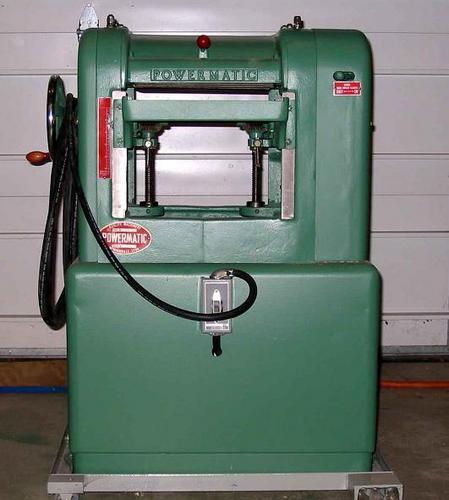
If I absolutely couldn't find one of these, I'd 'settle' for a PM100:D
283-A.jpg


Thanks for your compliments on the garage as well!
 

carbons4

Well-known member
Joined
Jan 19, 2012
Messages
92
"If I absolutely couldn't find one of these, I'd 'settle' for a PM100"
Yea, I would settle for a Powermatic too.
 

zuk123

Well-known member
Joined
Mar 25, 2012
Messages
957
Location
Houston TX via Chicago, Phoenix, LA, and San Diego
Hey Red Leader! At the risk of thread-jacking, here is something I picked up this week at auction.

It is a bit of an odd duck. The motor is not likely to be the original, but a similar model saw WAS sold by Sears as a Craftsman in 1933. Likely made by Walker-Turner, the SJ-30 had "Craftsman" cast into the arm. Mine is marked "SJ-31" and seems to have a newer model head and gearbox on it, but absolutely no makers marks that I've found so far. (The W-T thread and Craftsman thread on OWWM were helpful, and have great ideas for how it should look.)

I have a bunch of more urgent projects, so will have to put this aside for now. As a goal, full resto (the mechanics are smooth and move freely, I think this was in use until recently-given the homemade belt guard and orange extension cord plug.) I think I'd like to trade the motor for something more appropriate, either W-T or craftsman from the mid '30's. It came with a **** curved leg stand, and I might like to re-create that too.

I love the old machine restorations, both yours and others. But I need to get the garage and shop organized and cleaned up before tackling another resto. (and get my own thread;-)

Cheers,

zuk
 

Attachments

  • 2012-04-03_15-52-08_637 (Custom).jpg
    2012-04-03_15-52-08_637 (Custom).jpg
    137.6 KB · Views: 113
  • 2012-04-04_15-08-33_264 (Custom).jpg
    2012-04-04_15-08-33_264 (Custom).jpg
    82.7 KB · Views: 103
  • 2012-04-04_15-08-44_408 (Custom).jpg
    2012-04-04_15-08-44_408 (Custom).jpg
    84.9 KB · Views: 99
  • 2012-04-04_15-10-51_850 (Custom).jpg
    2012-04-04_15-10-51_850 (Custom).jpg
    96.5 KB · Views: 99
  • 2012-04-04_15-09-40_461 (Custom).jpg
    2012-04-04_15-09-40_461 (Custom).jpg
    115.5 KB · Views: 98
OP
R

Red Leader

Well-known member
Joined
May 15, 2011
Messages
2,689
Location
Denver, CO
Hey Red Leader! At the risk of thread-jacking, here is something I picked up this week at auction.

It is a bit of an odd duck. The motor is not likely to be the original, but a similar model saw WAS sold by Sears as a Craftsman in 1933. Likely made by Walker-Turner, the SJ-30 had "Craftsman" cast into the arm. Mine is marked "SJ-31" and seems to have a newer model head and gearbox on it, but absolutely no makers marks that I've found so far. (The W-T thread and Craftsman thread on OWWM were helpful, and have great ideas for how it should look.)

I have a bunch of more urgent projects, so will have to put this aside for now. As a goal, full resto (the mechanics are smooth and move freely, I think this was in use until recently-given the homemade belt guard and orange extension cord plug.) I think I'd like to trade the motor for something more appropriate, either W-T or craftsman from the mid '30's. It came with a **** curved leg stand, and I might like to re-create that too.

I love the old machine restorations, both yours and others. But I need to get the garage and shop organized and cleaned up before tackling another resto. (and get my own thread;-)

Cheers,

zuk

Zuk,

Very good find! That is a early to mid 1930s W/T scroll saw, as you had described!

It may not be common knowledge, but unlike most tools these days, most old tools back then were offered without a motor (as well as with one). It was assumed that the general level of expertise allowed one to furnish their own motor and rig up their own electrical and switch, with appropriate heaters and plug. That level of expertise is not common today anymore.

This saw most likely would have come with a Companion motor back then, but either the original motor died or was used on another tool or came without an original motor. The Craftsman motor on there looks to be early/mid 1960s. The color I recognize from motors I've seen on power bronze tools from the 1950s, but the logo didn't come into play until around 1960 (earlier on the Accra Arm RAS and later on some other tools like the 8-inch table saw).

The head is a mystery! At first it reminded me of the router attachment available for the jig saws, but it looks completely different. Might be worth a scan through the old catalogs, or posting on OWWM for more trained minds. It is possible that it could have come off a later saw, or possibly not even a Craftsman.

Either way, those old jig saws are bulletproof and HEAVY. Parts for the SJ-30 type scroll saw are not quite as common as some of the other, later scroll saws, but still around. If you need parts, you will probably (most definitely:D) get some help from posting a WTB in the OWWM classifieds.

Thanks for your compliments on the tools and restos, although I feel like I really haven't done that much with the tools. I have vowed to not fully restore any more tools until I get the garage squared away because I am too likely to destroy the restorations moving junk around in the garage (as I did with my '46 Craftsman grinder). I can get the tools up and running, but leave the full restore until everything else is done.

Speaking of old tools, I'm about to put some old ones up in the Classifieds here for anyone interested. I need to clear some room!

Thanks for sharing!
 
Last edited:
OP
R

Red Leader

Well-known member
Joined
May 15, 2011
Messages
2,689
Location
Denver, CO
The problem with bondo is that it will go "pop" in a few years when the rust starts working it's way back out. You'll want to look into por-15 or eastwoods rust preventive paint if you go that route......

What if I was to use a rust 'neutralizer' which I do have?

I was thinking bondo just for the pits...it wouldn't constitute an entire layer over the metal, but I suppose it will be a challenge either way.

I'm really looking forward to it!
 

Firefyter-Emt

Well-known member
Joined
Sep 29, 2005
Messages
171
Location
CT
To expand on the motor's a little bit, it was also very common to have just one motor that was used on many tools. This is kind of a throw back to the days of gas motors to run washing machines and the use of things like hit or miss engines. It was very common to have the one power source to run many tools. Sears used to sell this special motor mount's that would act as a pivot, but would lift off and could be placed on another tool with a spare mount base. I am pretty sure I still have one kicking around here.
 
OP
R

Red Leader

Well-known member
Joined
May 15, 2011
Messages
2,689
Location
Denver, CO
To expand on the motor's a little bit, it was also very common to have just one motor that was used on many tools. This is kind of a throw back to the days of gas motors to run washing machines and the use of things like hit or miss engines. It was very common to have the one power source to run many tools. Sears used to sell this special motor mount's that would act as a pivot, but would lift off and could be placed on another tool with a spare mount base. I am pretty sure I still have one kicking around here.

In addition, Sears used the 'one motor' deal as a marketing strategy too. You could buy their Accra Arm RAS, then throw a pulley on the arbor shaft and use it to power a sander, jointer, anything!

Don't know if I'd want to be lugging around a jointer to throw up onto the RAS table (not to mention bolting it down) all the time, though:)
 
OP
R

Red Leader

Well-known member
Joined
May 15, 2011
Messages
2,689
Location
Denver, CO
Well dangit I threw out my back today getting screws into the underneath of the workbench table. I knew I should have used the ratchet and lag bolts!!!:(

I can at least show you guys pictures of what I was doing right before that happened:D Pictures to come soon.

Garage will now be on a standstill for the next few days.


:sad:
 

shopnut

Well-known member
Joined
Feb 22, 2006
Messages
4,237
Location
Florida
Threw your back out! And you're a young guy, aren't ya? Just wait until you do that about twice a month!

Take it easy tomorrow and enjoy the holiday. There's always next week to get back on track.

Wishing you a speedy recovery.
 

smschriefer

Well-known member
Joined
May 28, 2009
Messages
842
Location
Yorktown, VA
Sorry to hear about your back and I hope it feels better soon. As a chronic back injury sufferer, I advise you to treat your back with respect. You are much too young to have issues. I know you don't want one, but maybe pick up a engine hoist (cherry picker) to help lift some of the heavier arn in the shop.

I had a banner day yesterday at a flea market. :thumbup: I got 2 Craftsman jig saws, 6 1/2" Craftsman circular saw, a Craftsman dual motion sander, Craftsman 90 degree drill sanding/buffing attachment, a jig saw case (Craftsman crown design), a circular saw case (Craftsman crown design), a Kennedy cantilever box, a Craftsman carpenters box from the 50's, a Craftsman coping saw, a Craftsman scraper (crown design), a V series 3/8 drive ratchet, a 3/8 Snap On ratchet, 1/4 Snap On ratchet, a Plumb combination wrench and various other tools (15 or so) as well as 25 pounds of screws for the unheard of sum of $45!!! I can't wait to go again next week. There were a ton of Craftsman sockets, both V and VV for $.25 each. I would have bought more stuff, but I ran out of time. :rocker:
 
Last edited:

Grandad

Active member
Joined
Jul 3, 2011
Messages
44
Location
My little piece of heaven in Australia
Yes, please do take care Dave. "Throwing your back out" by reaching sounds more muscular than spinal.
Rest will fix it.
Use it as a reminder that being young and fit can lull you into a false sense of security that you can do things you really shouldn't try. It can become a good thing to have happen if you learn from the experience and may help you avoind more serious issues in the future.
Cheers
Jim
 

bluebolt

Well-known member
Joined
Dec 28, 2008
Messages
5,447
Location
Benton LA
I had a banner day yesterday at a flea market. :thumbup: I got 2 Craftsman jig saws, 6 1/2" Craftsman circular saw, a Craftsman dual motion sander, Craftsman 90 degree drill sanding/buffing attachment, a jig saw case (Craftsman crown design), a circular saw case (Craftsman crown design), a Kennedy cantilever box, a Craftsman carpenters box from the 50's, a Craftsman coping saw, a Craftsman scraper (crown design), a V series 3/8 drive ratchet, a 3/8 Snap On ratchet, 1/4 Snap On ratchet, a Plumb combination wrench and various other tools (15 or so) as well as 25 pounds of screws for the unheard of sum of $45!!! I can't wait to go again next week. There were a ton of Craftsman sockets, both V and VV for $.25 each. I would have bought more stuff, but I ran out of time. :rocker:

$45 for all! You ****!
Looking for anything you might trade those Crown items for?:D
 

smschriefer

Well-known member
Joined
May 28, 2009
Messages
842
Location
Yorktown, VA
$45 for all! You ****!
Looking for anything you might trade those Crown items for?:D
Sorry Bluebolt, I was excited to find what I did. I like the Crown items and anything older. If I find anymore items, I will keep you in mind. Send me a PM on items you are searching for and I can keep a lookout for you. I'm in Virginia, so don't forget the shipping costs. :beer:
 

Wingnut65

Well-known member
Joined
Apr 21, 2010
Messages
3,170
Location
Tampa Bay, FL
Sorry to hear about your back, Dave. Like Steve said, take it easy and let it get back to health.

I didn't realize how valued the C-Man Crown design is. Now I need to go back through all my tools to see if I have any more. And, Steve, I agree on the $45 You **** Award!
 
OP
R

Red Leader

Well-known member
Joined
May 15, 2011
Messages
2,689
Location
Denver, CO
Sorry to hear about your back, Dave. Like Steve said, take it easy and let it get back to health.

I didn't realize how valued the C-Man Crown design is. Now I need to go back through all my tools to see if I have any more. And, Steve, I agree on the $45 You **** Award!

Thanks for the thoughts guys. The day before I strained it I did a LOT of screwing into studs with 2 1/2" screws that required an insane amount of effort to drive in (even with the pilot hole). So I think I was already sore, just didn't realize it. Plus, from a time that I fell on the ice on the sloped driveway a few months back probably all made it happen. I was stretching out pretty far and screwing upwards trying to use a lot of force with a bad fulcrum point.

The good news is I'm feeling a lot better. Its kinda like my back is saying "I'm healing fine but don't push it", kinda weird how I can almost hear it.

Needless to say, some lag bolts are on my shopping list for attaching the bench top on. No upward force required there. Also, I'm seriously thinking about moving to the square bit screws - anyone have experience with them? After screwing in a zillion screws in the garage I'm getting tired of the phillips desgin and how it slips with less than a perfect interface.

Here is the work I was doing - I'm working on getting the vertical stringers up for the future tool bench headboard.

P4073029-vi.jpg

P4073030-vi.jpg

P4073031-vi.jpg


Once done with that, I'll move on to cutting the corners (no pun intended:D) of the front edges, attach the rest of the table top around the back stringers then sand the top. Once sanded, finish and order the trim for around the edge and route the channel for attaching the trim.

Also got one more piece up trim up on the shelves and glued.

It is slow going but I'm grateful that it is going:)

And by the way, Happy Easter!
 

tinbender 66

Well-known member
Joined
Mar 23, 2011
Messages
2,294
Location
Western Washington State
Take it easy on that back young feller:)!!

As for screws, I always try to use either square drive or torx (star) drive ones. They are somewhat forgiving if you can't get perfectly straight on them. The ones I used the most of were deck screws. Not cheap but worth it. Also, I run them in with my 18V Dewalt impact. No pain.

Rest that back up!!!
 

novaboy009

Well-known member
Joined
Mar 22, 2010
Messages
119
Location
Pittsburgh, PA
Using the really good Bosch tips for driving decking screws in helps a lot. Dull, cheap bits make the job downright impossible. And make sure you're using pilot holes so you don't kill yourself driving them.
 
To avoid these ads, REGISTER NOW!
Top Bottom