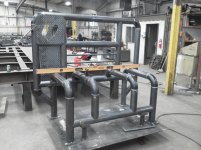
few things ive done at work latley built some pretty cool headache racks for oilfield trucks made out of 3.5 sch 40 pipe all the sadles and plates were lazer cut, fit so well it was like cheating, I had to cut the sadles on the elbows along the back with the torch but not a problem with a good template.

You are using an out of date browser. It may not display this or other websites correctly.
You should upgrade or use an alternative browser.
You should upgrade or use an alternative browser.
Show us your welding projects
- Thread starter neonnblack
- Start date
WakonTonka
Well-known member
That is one of the finalists for me too. Then of course we need to get a tubing notcher. Tools!
WakonTonka
Well-known member
That is some fine welding there. Maybe even ZTFab-ish!
zmotorsports
ALLIANCE MEMBER
Just started my rear bumper/tire carrier for my 2011 Jeep JKU Rubicon last night.
Here are a few pics of the progress.
Mike.


Here are a few pics of the progress.
Mike.
E.rodz
Well-known member
attempting to fabricate a huge intercooler for the twin turbo system going on my 63 belair.


StumpXJ
Well-known member
Got another front bumper done, this time its on my daily driver Jeep.


zmotorsports
ALLIANCE MEMBER
Got another front bumper done, this time its on my daily driver Jeep.
]
Stump, looks great. It appears there are a lot of bumpers being fabbed lately.

Mike.
StumpXJ
Well-known member
Thanks Mike, yours is looking great too! I didnt even see your post above mine until now. ")
Firefighter315
Well-known member
Stump, looks great. It appears there are a lot of bumpers being fabbed lately.
Mike.
Thanks Mike, yours is looking great too! I didnt even see your post above mine until now.
Both are great! I think I will tackle a rear with a swingout sometime this fall or winter. Gotta have a winter project to satisfy my Jeep project addiction I guess.


zmotorsports
ALLIANCE MEMBER
Both are great! I think I will tackle a rear with a swingout sometime this fall or winter. Gotta have a winter project to satisfy my Jeep project addiction I guess.
Another Jeepaholic huh?
Mike.
StumpXJ
Well-known member
Do it!
I built my Rear Winch bumper/swingout about 6 months ago on my weekend rig. (never mind the spare... its mounted now. )

I built my Rear Winch bumper/swingout about 6 months ago on my weekend rig. (never mind the spare... its mounted now.
)
WakonTonka
Well-known member
Looking sweet, post more as you can and of course, we have to know more about how much grunt you get out of your ride when you are done!attempting to fabricate a huge intercooler for the twin turbo system going on my 63 belair.
I am seeing more welding here now that a good thread is going, I also hang at welding web http://weldingweb.com/index.php where there are some killer fabricators too.
Last edited:
few things ive done at work latley built some pretty cool headache racks for oilfield trucks made out of 3.5 sch 40 pipe all the sadles and plates were lazer cut, fit so well it was like cheating, I had to cut the sadles on the elbows along the back with the torch but not a problem with a good template.
I understand the headache rack but what are the piping for ? None of the headache rack stuff that the farmers use around here have anything like that.
attempting to fabricate a huge intercooler for the twin turbo system going on my 63 belair.
Who did you get the cores from?
IONH
Well-known member
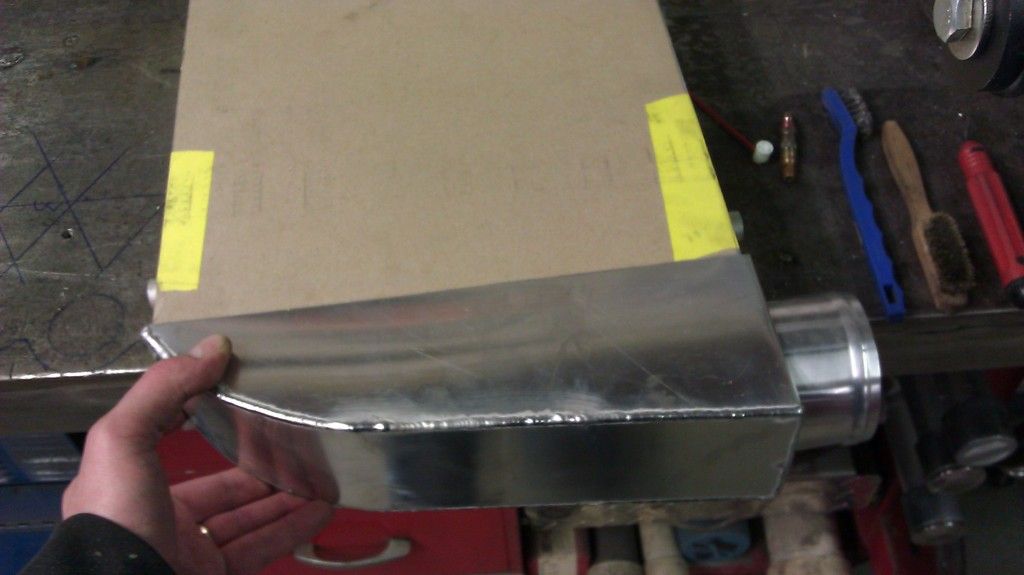
Finished up the exhaust I had been working on yesterday.
I had bolted the flanges together when welding the pipe on to avoid warping or at least minimize it. Unfortunately, they still spread a bit in the middle. I'm going to solve this with a second gasket and some RTV on all gasket surfaces.

I had bolted the flanges together when welding the pipe on to avoid warping or at least minimize it. Unfortunately, they still spread a bit in the middle. I'm going to solve this with a second gasket and some RTV on all gasket surfaces.

roberts56
Member
Wow nice welds and attention to detail since prob done w a stick welder. I recognized the Sherco R converter and knew you had to be in the RP. Awesome design and assembly, and wow "armored plate top". Gonna be one heavy beast of a table but serve you well for many years. Keep up the good work. I'm down in Gen San.
Thanks Steve F, glad you liked the table design and assembly. hahahaha, its not a Sherco R converter, its a Turco. Oh yes those armored plates are so darn heavy, moving and working on each panel gives me back pains. LOL

Glad to have another friend from RP !!!!!
Firefighter315
Well-known member
Another Jeepaholic huh?
Mike.
 my name is Erik and I'm a Jeepaholic.......
Do it!
I built my Rear Winch bumper/swingout about 6 months ago on my weekend rig. (never mind the spare... its mounted now.
Nice job! Did you do the exo yourself? I've never had an XJ, but have always thought they'd be fun to work on. My first was a '97 TJ and my current one is a '94 YJ. I much prefer the YJ. I actually want to do a swing out/drop down combo if I can get around to getting some plans on paper. That and bite the bullet on the bender I mentioned above.
StumpXJ
Well-known member
Yeah, I did the exo a few months ago. Build a go-trikes bender, thats what I use, and it works great!
Thanks, ~ Stump
Thanks, ~ Stump
zmotorsports
ALLIANCE MEMBER
Few more updated pics from my Jeep rear bumper/tire carrier build over the weekend.
Mike.


Mike.
JonBoehman
Well-known member
Looks very nice wanna build one for my JK? Lol! What was the total cost involved in that bumper. I've been debating building one over buying one. I want one like the Hanson for the front.
zmotorsports
ALLIANCE MEMBER
Looks very nice wanna build one for my JK? Lol! What was the total cost involved in that bumper. I've been debating building one over buying one. I want one like the Hanson for the front.
Thank you. I looked at the LoD and the Shrockworks rear bumpers and liked their styling and the fact that it could be a bolt on deal and the Jeep wouldn't have to be down for any length of time but I decided to build my own for two reason. One, because I can, plus make it a little different than any other one out there and secondly, cost. I am into it a fraction of the cost of a mass produced bumper/carrier.
Some of the ones I looked at were in the $1600.00-$1800.00 dollar range for powder coated with backup lights.
I am into steel $130.00 (3/16" P&O). I then spent $120.00 for the spindle/pivot mount, "D" ring mounts, weld-on push-pin and Destaco toggle clamp and LED backup lights. I will be into powder coating ~$125.00, which puts the total cost just under $400.00.
Time wise I am sitting at approx. 20 hours right now with probably about 3 more hours left tonight to add the bottom pieces and weld the "D" rings on. I also need to fabricate a "tramp stamp" to cover the ugly ventilation exhaust on the tailgate.
Mike.
WakonTonka
Well-known member
..... the spindle/pivot mount, "D" ring mounts, weld-on push-pin and Destaco toggle clamp and LED backup lights. .
I like it Mike!
Where do you source the parts (above). Always like to know where to get stuff so that I can look for solutions to problems as they come up. Thanks!
GreenGooey
Active member
- Joined
- May 25, 2010
- Messages
- 36
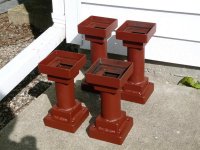
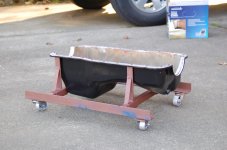
I was tired of plastic oil-catch-drain-things that were too small and leaked so I built this.

It'll hold a few gallons of whatever fluid I'm draining in to it. I have a plastic insert to thread into the elbow and some tubing that drops down to an empty container on the floor.
When it's done draining I kick it back under the bench.

It'll hold a few gallons of whatever fluid I'm draining in to it. I have a plastic insert to thread into the elbow and some tubing that drops down to an empty container on the floor.
When it's done draining I kick it back under the bench.
Slupie
Well-known member
I was tired of plastic oil-catch-drain-things that were too small and leaked so I built this.
It'll hold a few gallons of whatever fluid I'm draining in to it. I have a plastic insert to thread into the elbow and some tubing that drops down to an empty container on the floor.
When it's done draining I kick it back under the bench.
That is just a great idea. I'm going to have to make myself one these in the future.
StumpXJ
Well-known member
Bumper looks awesome Mike! Nice job...
zmotorsports
ALLIANCE MEMBER
I like it Mike!
Where do you source the parts (above). Always like to know where to get stuff so that I can look for solutions to problems as they come up. Thanks!
The spindle mount kit was purchased from A to Z Fabrication. Their prices are not bad on builder supplies. The specialty fasteners, Destaco toggle clamp and the weld-on pull pin were purchased from McMaster Carr.
Bumper looks awesome Mike! Nice job...
Thanks Stump, I appreciate that. Your bumpers look great too.
Mike.
zmotorsports
ALLIANCE MEMBER
I was tired of plastic oil-catch-drain-things that were too small and leaked so I built this.
It'll hold a few gallons of whatever fluid I'm draining in to it. I have a plastic insert to thread into the elbow and some tubing that drops down to an empty container on the floor.
When it's done draining I kick it back under the bench.
That is a great idea and very well executed. Nice finished product.
Mike.
bauschracing
Well-known member
Re: The BENDER, no not the BENDER on Futurama
Bent up some 1 inch mild steel for updates to my mig and tig carts and bent up some 1 inch chrome molly for some fab. a arms for a mustang drag car. Bends look great and bent 8 sections and all were identical. It is a bit slow, but the price was right. I would recomend building one of these even if you don't have a clue as to what you would do with it.
Mike
Yeah, thanks Mike for the info and the update to come. I have seen a few of these benders come up in my reading, it is always nice to be able to "view" the results page, you know what I mean?
Bent up some 1 inch mild steel for updates to my mig and tig carts and bent up some 1 inch chrome molly for some fab. a arms for a mustang drag car. Bends look great and bent 8 sections and all were identical. It is a bit slow, but the price was right. I would recomend building one of these even if you don't have a clue as to what you would do with it.
Mike
A couple years ago I made a couple beds for my boys. Well, now the gf wanted them to become bunk beds. When I made the beds, I had already had a bunk bed conversion in mind, so it wouldn't take much to do the conversion.
So I made up these adapters from some 1-1/4" x 1/8" angle and some 2-1/2" exhaust tube. This is all stuff I had laying around. The angle came from the scrap bin at work, and the exhaust tube was left over from an intercooler project.
I cut 64 pieces of angle, mitered at 45°. Ugh, that's a lot of cutting in the band saw. I then cleaned up the miter cuts in the mill for a perfect fit and angle. Ugh, a lot of milling.
The exhaust tube was cut to length in the lathe, making for perfectly square cuts. The head board end tubes are 1-1/2" shorter since the head boards are 1-1/2" taller than the foot boards.
Once the larger squares were tack welded together, holes were drilled in the 4 corners to allow the adapters to be screwed onto the top and bottom of the bed legs.
Sand, grind and flap-disc a bunch to smooth out any sharp corners and edges, then weld.
Finish off with some primer and a couple coats of gloss black, and this is the end result.
I haven't had time/material to make a proper ladder and fence yet, so I threw together a fence real quick, and used a step ladder (the $20 one from the hot deals index) for now.
Excuse the mess, it's the kids' room.
Attachments


machine_punk
Well-known member
WOW! Great projects, everyone. It is finally time to add my own project. While I have been trained to use TIG on thin sheet steel, I don't currently have a welder, but I needed some welding done for a current project.
Here is what I need to lift--The Baileigh combination shear/brake/roll--weighing in at just over half a ton at 1200 pounds...
View media item 16966
My final solution was to start with a 2-ton hoist and add a spreader bar. Since I needed as much headroom as possible (lifting a 3-foot-tall machine onto a 3-foot tall bench), I didn't want to use chains to connect the spreader bar with the hoist.
I looked the 2x4" square tubing up in the load tables and figured out that I wanted 2x4x1/4" rectangular tube (probably a bit of overkill, but I wanted to rate the ends of the spreader bar at 2 tons...to match the hoist lifting capacity).
I wanted to go as simple as possible, so I just cut a couple of sections of the same rectangular tube out at an angle, to weld on top as a bracket. A friend of mine helped me complete the project, by welding it together with a stick welder.
Here, you see the spreader bar set on the legs for my new bench, with the engine hoist's lifting bar and the lifting straps in place...
View media item 18484
Here is the end of the lifting bar in its normal configuration...with a chain and hook bolted in place, instead of the spreader bar...
View media item 18486
And a back view of the engine hoist bar, temporarily bolted in place on the spreader bar...
View media item 18485
M_P
Jamesbbh
Well-known member
Did a little work to the 1960 apache last night:
Needed to get this tank (originally in-cab)

To fit in between these framerails(removed to also install C-notch)

Not too many in progress pictures but some final pics- removed 28-1/4" from the center and welded the end back on. Then shortened the arm on the sending unit and used a synthetic wine cork as the floater(to install on the "new" top of the tank)


Also didn't like the look of the exhaust exiting out from under the fenders so cut/repositioned them and welded in place.

Needed to get this tank (originally in-cab)
To fit in between these framerails(removed to also install C-notch)
Not too many in progress pictures but some final pics- removed 28-1/4" from the center and welded the end back on. Then shortened the arm on the sending unit and used a synthetic wine cork as the floater(to install on the "new" top of the tank)
Also didn't like the look of the exhaust exiting out from under the fenders so cut/repositioned them and welded in place.
4Tigers
Well-known member
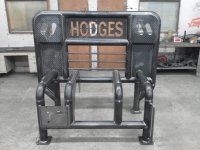
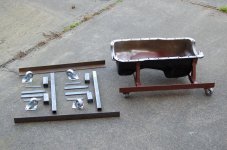
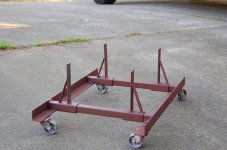
Welded up a roll around engine storage stand I wanted to show the wife how inner shield welded before changing over to gas We will weld another this week end The bars move and support the engine under the oil pan I have about a dozen of them.pictures by the wife
Attachments

WakonTonka
Well-known member
The spindle mount kit was purchased from A to Z Fabrication. Their prices are not bad on builder supplies. The specialty fasteners, Destaco toggle clamp and the weld-on pull pin were purchased from McMaster Carr.
.
Many thanks, I'll go see what they have.
zmotorsports
ALLIANCE MEMBER
Many thanks, I'll go see what they have.
No problem, glad to help.
Mike.
Zumo
Active member
No too proud of this but it's the first thing I have welded in almost 20 years. And that was when I was in school in the Navy. I did this with my new HF 90 amp wire welder.
Anywho, I am just trying to figure out the welder and decided to try and build a little trike. Once I am done I will also powder coat it for fun.

Anywho, I am just trying to figure out the welder and decided to try and build a little trike. Once I am done I will also powder coat it for fun.
Firefighter315
Well-known member
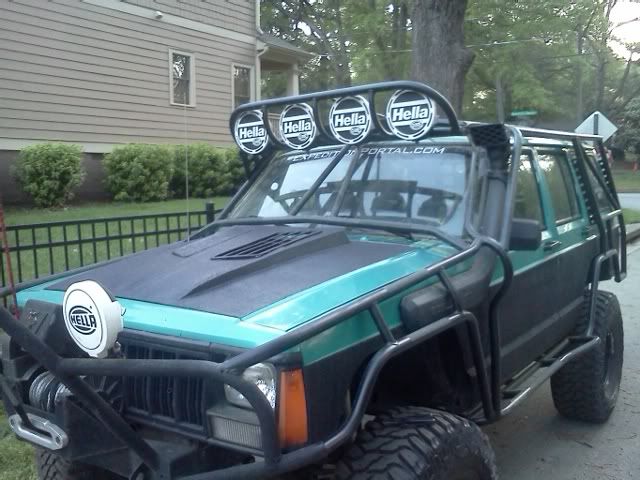
Finished the light bar this week I posted back on page 30. Very happy with it. It is incredibly bright. The lighting photos here are with bar supplying the only light. No other ambient light at all.


AussieDan
Well-known member
The light bar looks great!
I understand the headache rack but what are the piping for ? None of the headache rack stuff that the farmers use around here have anything like that.
These go on large kenworth semi trucks for the oilfield. It gets a pto winch down inside of it. These are about medium duty of the ones I have built. I some made out of 4" sch 80 pipe to go on huge kenworths that arent even street legal to go to saudi arabia, they had a mount on each side for 44" sand tires.
Firefighter315
Well-known member
The light bar looks great!
Thanks! It took more time than I anticipated, but was a fun project to do. It will be even more fun to put it to use!

Lippyp
Well-known member
I'll second that on the light bar, very nice and I like the way its really low profile. I need to make one for my '01 blazer and I hope it turns out half as nice as yours.