
You are using an out of date browser. It may not display this or other websites correctly.
You should upgrade or use an alternative browser.
You should upgrade or use an alternative browser.
Show us your welding projects
- Thread starter neonnblack
- Start date
SiGmA_X
Well-known member
ME87 - I think I will be borrowing that design for the parts washer dolly! I have the same parts washer (no comment  ) and some spare expanded and angle and casters! I was going to make legs, but what you did is far easier, and the stability of the unit isn't the issue, its the mobility. Sweet!! Thanks!
I want to post up my first projects for some feedback. I bought my 211 on Friday the 13th, it was a self birthday present to me, the best kind of birthday present! First up was a cart. I didn't have mag squares at the time, so I made do.


Next was a tire rack. Now, this is a work in progress. I under spec'd the reinforcement and it just can't hold 700lbs of tires without a better wall mounting method. That will be dealt with this weekend and with a little luck, I'll have a tire rack instead of a pile of scrap!
Rigging the bandsaw to cut the angles I needed


You can see I got a bit of warp even before loading it up. I think this was due to only supporting the rack on the ends with the jackstands. That, that was annoying. I wanted to use 8 stands vs 4, but our floor was poured by a backyard crew on a Friday after beer time I think. Its a 24x36 pad and it has a form going down the middle, and both slabs are lower in the middles than at the edges. So, 4 stands spanning the 2 slabs equates to being in all sorts of different planes. Likely what I'll do in the future is buy a laser level and shim the jackstands, but we'll see. I normally make smaller objects than a 12ft rack. I'd love tips on that aspect as well if you have some!
The plan is to add 2-2x6's top and bottom between the support poles of our shop structure, and screw the rack to the poles with 3/8" bolts, and then use a number of smaller screws to mount the rack to the new 2x6's. We shall see how it goes. With a little luck, that will go smoothly Saturday, and I can commence building a bandsaw stand. I'm not quite done drawing it up, but it will raise the bandsaw about 8", give it a slightly wider/longer stance, and casterize it.
) and some spare expanded and angle and casters! I was going to make legs, but what you did is far easier, and the stability of the unit isn't the issue, its the mobility. Sweet!! Thanks!I want to post up my first projects for some feedback. I bought my 211 on Friday the 13th, it was a self birthday present to me, the best kind of birthday present! First up was a cart. I didn't have mag squares at the time, so I made do.
Next was a tire rack. Now, this is a work in progress. I under spec'd the reinforcement and it just can't hold 700lbs of tires without a better wall mounting method. That will be dealt with this weekend and with a little luck, I'll have a tire rack instead of a pile of scrap!
Rigging the bandsaw to cut the angles I needed
You can see I got a bit of warp even before loading it up. I think this was due to only supporting the rack on the ends with the jackstands. That, that was annoying. I wanted to use 8 stands vs 4, but our floor was poured by a backyard crew on a Friday after beer time I think. Its a 24x36 pad and it has a form going down the middle, and both slabs are lower in the middles than at the edges. So, 4 stands spanning the 2 slabs equates to being in all sorts of different planes. Likely what I'll do in the future is buy a laser level and shim the jackstands, but we'll see. I normally make smaller objects than a 12ft rack. I'd love tips on that aspect as well if you have some!
The plan is to add 2-2x6's top and bottom between the support poles of our shop structure, and screw the rack to the poles with 3/8" bolts, and then use a number of smaller screws to mount the rack to the new 2x6's. We shall see how it goes. With a little luck, that will go smoothly Saturday, and I can commence building a bandsaw stand. I'm not quite done drawing it up, but it will raise the bandsaw about 8", give it a slightly wider/longer stance, and casterize it.
rkevins
Well-known member
on your welding projects, how to you clean the metal before you prime and paint it, I'm thinking of building a trailer and want the paint to stay on
ME87 - I think I will be borrowing that design for the parts washer dolly! I have the same parts washer (no comment
Here are your major dimensions. I used the cheapest castors Harbor Freight had. 2 Stationary, 2 that swivel. Bolt Spread shown is the same for both styles.

WakonTonka
Well-known member
on your welding projects, how to you clean the metal before you prime and paint it, I'm thinking of building a trailer and want the paint to stay on
- Remove all oil or grease with a solvent like MEK or Acetone
[*]Use a scotchbrite or equivalent to rough up the surface to give the primer something to bond to
[*]Apply a rust converter like: CRC 18418 Rust Converter Rust Converter- this will stop the rusting process and leaves a primed surface
[*]Two coats of primer, respect the cure time (aka: "RTFI")
[*]Paint at least two coats of your color choice
Let us know how it turns out (with pics of course!)
Last edited:
A**holes Garage
Banned
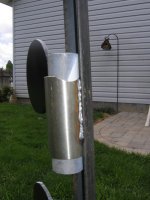
Portable plasma carrier;


Last edited:
AussieDan
Well-known member
Very nice! Seems like the bracket that holds the filter would be a great place to mount a carry handle.
A**holes Garage
Banned
Very nice! Seems like the bracket that holds the filter would be a great place to mount a carry handle.
That bracket is just a little off center and rearward. I just use the handle of the Plasma cutter.
Firefighter315
Well-known member
on your welding projects, how to you clean the metal before you prime and paint it, I'm thinking of building a trailer and want the paint to stay on
- Remove all oil or grease with a solvent like MEK or Acetone
[*]Use a scotchbrite or equivalent to rough up the surface to give the primer something to bond to
[*]Apply a rust converter like: CRC 18418 Rust Converter Rust Converter- this will stop the rusting process and leaves a primed surface
[*]Two coats of primer, respect the cure time (aka: "RTFI")
[*]Paint at least two coats of your color choice
I generally do this, minus the rust converter step. I've had good luck with a quality primer coat on top of the bare metal when it is cleaned and scored properly. A very fine grit flap disc usually works great on my projects. I also prefer Acetone to MEK, but only because the odor doesn't seem to linger as long.
 As with all paint jobs, the top coat is only as good as the bare surface prep and bonding coat or primer coat prep.
WakonTonka
Well-known member
I generally do this, minus the rust converter step. I've had good luck with a quality primer coat on top of the bare metal when it is cleaned and scored properly. A very fine grit flap disc usually works great on my projects. I also prefer Acetone to MEK, but only because the odor doesn't seem to linger as long.
I too have omitted the rust converter step depending on what it is I am painting. However, when the question is about ultimate durability I always use it. I should have mentioned that a good organic vapor cartridge-fitted respirator is a MUST. With any solvent really, but these two are wicked. Take precautions
gbsmithy08
Well-known member
- Joined
- Mar 2, 2012
- Messages
- 62
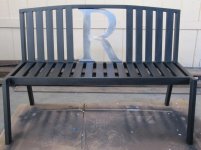
Here is a Bench I built for my Grandparents that I will be installing this wknd. It is made out of 1x2x.065 tubing and the "R" is out of 16 ga. Stainless Steel.
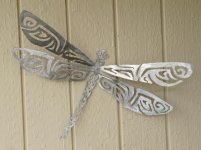
Also here is a couple cut outs I did with my Plasma over the last couple of wknds. They are all made out of 16 ga. Stainless Steel.
Also here is a couple cut outs I did with my Plasma over the last couple of wknds. They are all made out of 16 ga. Stainless Steel.
Attachments

StumpXJ
Well-known member
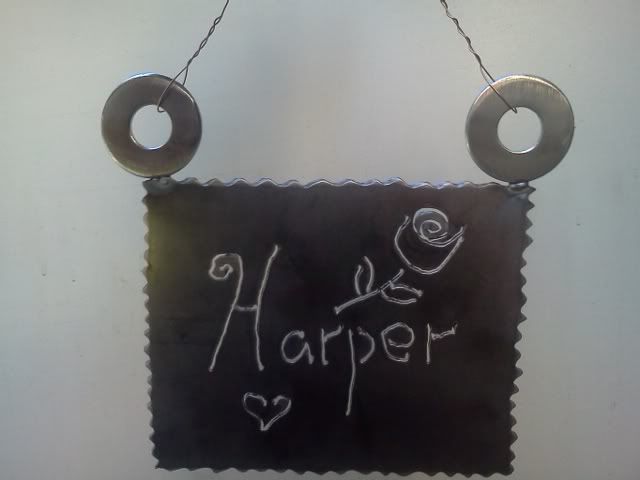
Nice work gbsmithy08! I was playing with my plasma the other day and made a little sign for my 15 month old daughters room. Im not an artsy sort of guy, but plasma's make it fun.
AeroNautiCal
Well-known member
Here is a Bench I built for my Grandparents that I will be installing this wknd. It is made out of 1x2x.065 tubing and the "R" is out of 16 ga. Stainless Steel.
Also here is a couple cut outs I did with my Plasma over the last couple of wknds. They are all made out of 16 ga. Stainless Steel.
They're lovely!

gbsmithy08
Well-known member
- Joined
- Mar 2, 2012
- Messages
- 62
Thats a great sign. This is how it all starts by just making some simple cutouts for home and next thing a friend then its all over your going to welding shops and visiting welding internet sites to get bigger and better welding equipment. HAHA. Enjoy it.Nice work gbsmithy08! I was playing with my plasma the other day and made a little sign for my 15 month old daughters room. Im not an artsy sort of guy, but plasma's make it fun.
gbsmithy08
Well-known member
- Joined
- Mar 2, 2012
- Messages
- 62
They're lovely!
Thanx.
Here is a Bench I built for my Grandparents that I will be installing this wknd. It is made out of 1x2x.065 tubing and the "R" is out of 16 ga. Stainless Steel.
Also here is a couple cut outs I did with my Plasma over the last couple of wknds. They are all made out of 16 ga. Stainless Steel.
I like the 2 plasma cutouts, very nice. My wife would love the sun, I think I will try to copy yours for her.
Thanks
ruby76
Well-known member
First welding project to attach my T-tops to the luggage rack:


Used an old Arc welder - and cold rold steel banding and angle iron from home depot. Had to match the locations and angles of the "T" in the roof. Had no idea what I was doing but it has held now for several years at highway speeds
Now THESE qualify as amature welding - I'd love to get another welder - the arc welder I used was "taken back" by my father to give to my brother-in-law, unfortunately I thought it was mine.
Last edited:
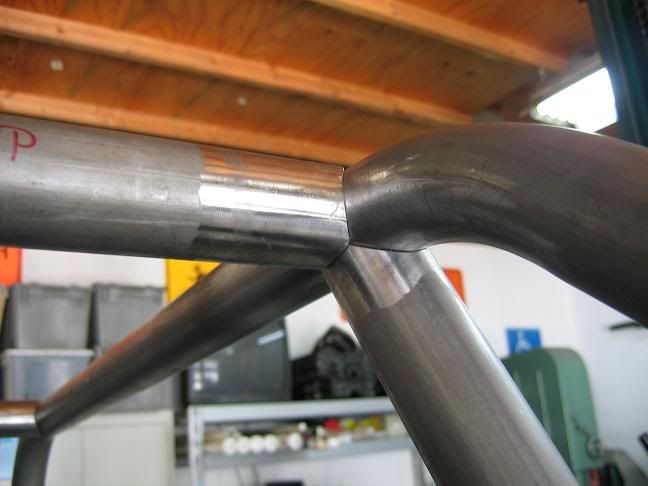
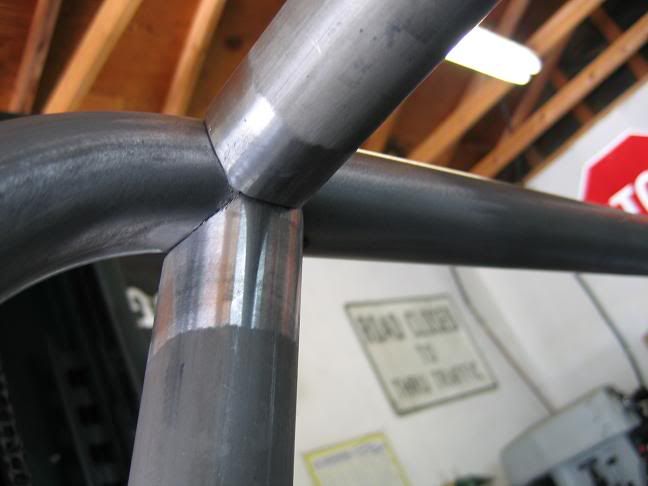
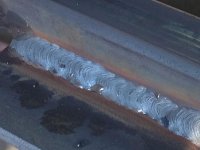
Looks great!!! 'Stack o' Dimes'!Tight fit-up doesn't just help...it is crucial for consistent welds.
Here are some pics of how tight I make my tube junctions on roll cages.
W_A_Watson_II
Well-known member

The Stake Bed I'm building for my 1946 Dodge Power Wagon, back from the sand blaster and ready for priming and paint.
Here is a before blasting picture:

zmotorsports
ALLIANCE MEMBER
The Stake Bed I'm building for my 1946 Dodge Power Wagon, back from the sand blaster and ready for priming and paint.
Here is a before blasting picture:
Looks great.
 I like the radius on the corners and the resessed corner marker lights. Great job. Post up some pics after paint please.
Mike.
zuk123
Well-known member
I should have mentioned that a good organic vapor cartridge-fitted respirator is a MUST. With any solvent really, but these two are wicked. Take precautions
Read the precautions on the cans. Both of these solvents are common, but REALLY nasty. To use them in an industrial setting, all kinds of special precautions are needed. Especially the MEK. Avoid it if possible. Low flash point, high toxicity... I saw a trash can catch on fire that had some MEK soaked scraps in it. It was like a 2 foot across welding torch! It ROARED! One of our guys had the b@lls and presence of mind to quickly drag it out the roll up door, and turn it upside down to try to stifle it. The heat and fire burned a hole in the asphalt pavement. We would have lost the whole shop if not for the easy exit. (As an aside, it was a terrible place to work, dangerous and miserable. OSHA violations, poor management, etc, and within a year they were out of business.)
I use denatured alcohol as a degreaser prior to paint. Less odor, less toxic, not as flammable. Does a great job. Sometimes on large frameworks, I apply it with a paint cup gun as a wash down. As a bonus it takes off all your sharpie marks.
Protect yourself. Those solvents add up, and eventually you can become sensitized to them to the point where you almost can't ever use them again because the smallest exposure triggers adverse effects. I always try the least nasty stuff first, and work up the the big boys if needed. I haven't cracked open a can of MEK in over 10 years.
Nice projects all!
zuk
W_A_Watson_II
Well-known member
Looks great.
Mike.
Thanks Mike. Here is the post painting picture, hope to install it on Monday.


steel 35
Well-known member
Brian_B_
Well-known member
Not really a "project". This is what happens when you get bored and there is scrap around. 


machine_punk
Well-known member
Cool idea for the paint can rack! Viva la Boredom.
BD1
Well-known member
BRIAN B . Neat oh ! Good idea. That design could be modified for all kinds
of storage goodies.
Is that round stock ? Looks like it maybe 1/4''. I gotta see what pieces I got laying around. Thanks for sharing.
of storage goodies.
Is that round stock ? Looks like it maybe 1/4''. I gotta see what pieces I got laying around. Thanks for sharing.
Brian_B_
Well-known member
BRIAN B . Neat oh ! Good idea. That design could be modified for all kinds
of storage goodies.
Is that round stock ? Looks like it maybe 1/4''. I gotta see what pieces I got laying around. Thanks for sharing.
Those are mig wire spools (the metal ones). Some cut up flat bar and a round rod (from the scrap bin).

The base has a bit of weight or it would tip over. I think its a piece of 3/8" flat bar. The rest of the little pieces are 1/4". Its just what was laying around.
The racks both turn too.
Its all just tacked together and rattle canned. It only took a few minutes to make.
BD1
Well-known member
Mig spools . DUH ! For some reason I didn't see it. I gave one to the neighbor for her bird cage. I still like it.
For some reason I didn't see it. I gave one to the neighbor for her bird cage. I still like it. Brian_B_
Well-known member
Mig spools . DUH !
Told you it was scrap!
I have a chunk of rail road iron that will eventually be an anvil.
I am working on a shot bag stand and a wheeled tool tray for under the vehicle.
I have an idea for an air tool wall rack and some other stuff for my home garage.
Lots of stuff can be made from scrap.
ford33
Well-known member
Now is the time to sign-up for that community college welding class.
For the past two years I've tried to register at my local community college for a welding 101 class. My timing for registration was always off. This is a popular course and full-time students sign-up on opening day and fill the course in a day or two. Well, today my timing was perfect. They just started registration and I was able to get into the course today. I am very happy.
For $450 I get a 4 hour class, taught on Saturday for 16 weeks (Aug - Dec). The instructor limits the class to 14 people and teaches welding safety and the basics of oxy, MIG, TIG and arc welding. I am new to welding and feel that a formal course would set me on the right path and prevent bad habits from forming.
If you are considering a welding class, now is the time to sign-up at your local school.
International VMX Star
Member
- Joined
- May 30, 2012
- Messages
- 18
Some scrap put to good use.


Last edited:
International VMX Star
Member
- Joined
- May 30, 2012
- Messages
- 18
The float bowl on the right if you held it up to a light looked like a "star map", on the left one I fabricated because I could not find a piece of round bar large enough to machine a billet one.


binder man
Well-known member
International VMX Star
Member
- Joined
- May 30, 2012
- Messages
- 18
Here's mine. Feel free to give me pointers. This was at work miller cp300, eye bars for M and W wheel pullers if anyone knows what that is
Very nice work, I did mine with my small Miller XP130 mig, I also have a much more industrial Millermatic 200, on the hitch in my post above it has a little tig welding on the square tube as well. The aluminum float bowl I did that weld with my Hobart HF 250 TR, an older design it weld wonderful, much of this is due to the Hobart pedal design.
Didn't get any shots of the actual assembly process but I welded together and put up my TV mount in the garage today.


Still have to mount the box to the wall and tidy up a few wires and run a receptacle up above the TV in the ceiling.
Still have to mount the box to the wall and tidy up a few wires and run a receptacle up above the TV in the ceiling.
e-tek
Well-known member
I'd love to get another welder - the arc welder I used was "taken back" by my father to give to my brother-in-law, unfortunately I thought it was mine.
WTF???????

Jamesbbh
Well-known member
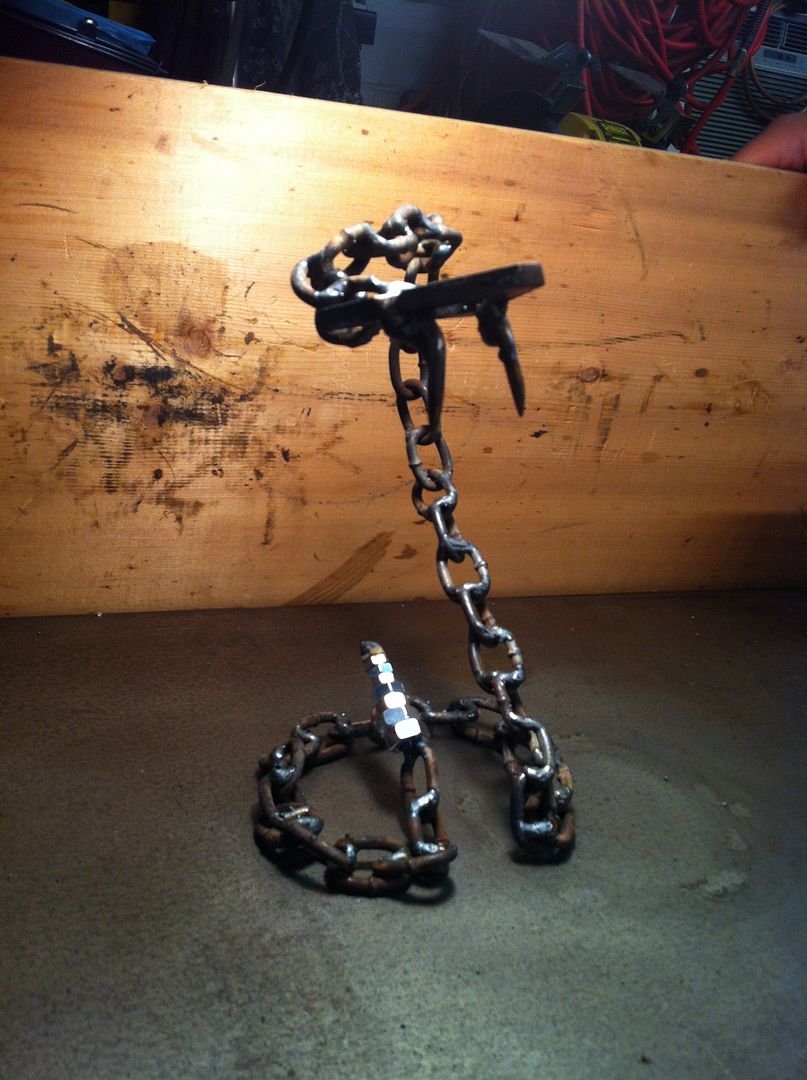
Little something I made from a piece of chain I had laying around the other night. 

binder man
Well-known member
Very nice work, I did mine with my small Miller XP130 mig, I also have a much more industrial Millermatic 200, on the hitch in my post above it has a little tig welding on the square tube as well. The aluminum float bowl I did that weld with my Hobart HF 250 TR, an older design it weld wonderful, much of this is due to the Hobart pedal design.
This old cp mig is old as hell. Very picky, noone else likes running it say it changes to much for them. I think it might be there set up, as it is very picky.
I have a miller suitcase tig sitting in my garage I have yet to break out and try. Traded a dana 60 I gave 100 bucks for. Welder's brand new, can't wait to get in the worl of TIG.