To avoid these ads, REGISTER NOW!

Vise restoration procedures, techniques, and parts acquisition...

Outlawmws

Well-known member
Joined
Aug 9, 2011
Messages
39,279
Location
The Badlands
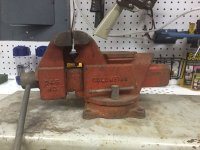
How long do you all feel regular Rustoleum takes to dry enough to be put in service. The Can says dry in 24 hours, which is a bad joke. My experience so far is a week minimum to handle (after three decent coats in hot weather) and it can still be dented pretty easily with a fingernail. It does not sand at this point either.

So how long does it take to get hard? I don't remember the hammered paint being like this. I am talking the regular paint spray can paint here.

Hot weather alone won't cure paint much faster; Have you set it out in the sun? Preferably on some metal? If it's not sunny, heat lamps...

Sometimes if you do several coats and wait too long, one coat will seal the other and not allow the undercoats to dry. Either fast re-coats, or let it dry completely...
 
To avoid these ads, REGISTER NOW!

MrMark

Well-known member
Joined
Jan 25, 2010
Messages
4,626
Location
Southern Cal.
These were pretty fast recoats, 2-4 minutes apart. The can says to recoat within 1 hour or after 48 hours, probably for exactly the reason you stated. I put it in the sun but not on metal, I need to hang the parts off wire to paint them and let them dry.

I like the color "sunrise red" and sheen but the drying time is pretty ridiculous.

I've heard some on here state it takes a year to get completely hard.
 

Outlawmws

Well-known member
Joined
Aug 9, 2011
Messages
39,279
Location
The Badlands
These were pretty fast recoats, 2-4 minutes apart. The can says to recoat within 1 hour or after 48 hours, probably for exactly the reason you stated. I put it in the sun but not on metal, I need to hang the parts off wire to paint them and let them dry.

I like the color "sunrise red" and sheen but the drying time is pretty ridiculous.

I've heard some on here state it takes a year to get completely hard.

Mark, get it in the sun, between the heat and the UV (I'm not exactly sure which is more important), it should help dry it out. (I did a small Colombian I welded up a couple of weeks ago in a rustolium red, and a day or two in the sun made all the difference in the world...)
 

C.BRAXMAIER

Well-known member
Joined
Apr 17, 2012
Messages
160
Here's some photos of a Kurt machinist vise I restored:

20120116-213617.jpeg


Diassemble and dump it in a tank of washing soda and use the eletrolytic rust removal technique (it removes the paint too)

20120116-213630.jpg


Paint it with rustoleum hammertite paint

20120116-213639.jpg


Reassemble the parts (rebuild kit available through Enco)

20120210-190323.jpg


20120210-190329.jpg


Link to the restoration:

http://totravelisbetterthantoarrive.wordpress.com/2012/02/10/kurt-vise-restored/

Daus

WOW, looks great im gonna have to try that nice job..:beer:
 

Outlawmws

Well-known member
Joined
Aug 9, 2011
Messages
39,279
Location
The Badlands
Short version:

Materials needed:

Plastic bucket/container

A battery charger (preferably an older "dumb" one with a real transformer)

Spa chem PH + (spa/pool chemical) or washing soda (Arm and Hammer?)

Some iron/steel (NOT SS!) for an anode (rebar works great)

Some iron wire to connect to the submerged parts, (small parts I often suspend in the bucket from a cross bar and the wire)

And set it up like this:

I often use a 5 gallon plastic bucket, and fill it near full with water 4-to 4-1/2 gal?) not critical...

throw in about a handful of the PH+ or Washing soda.

Set up some anodes, (you can use wire to connect them together)

Make sure the part does not/will not touch the anodes, and connect the charger leads. turn it on and look for bubbles to start forming on the part.

If bubbles are forming on the part, go work on something else or go watch the game…

4-8 hours later check on it. it will likely have the water surface covered with a nasty red scum/foam, you can scrape/lift this off if desired.

As the water evaporates over days/weeks, of use (or non use) just add water, you don't need to add the PH+ it does not evaporate...


tons of info available on line, just Google "electrolysis rust".

Last comment anything in the "soup" needs to be iron or common steel; no plating, chrome, copper (wire) and definitely not SS!

The left over residue is an iron rich soup and is safe enough to add to your garden for iron/alkaline loving plants...

diagram.gif
 

Outlawmws

Well-known member
Joined
Aug 9, 2011
Messages
39,279
Location
The Badlands
So, Question for all the Vise Phreques here; I think we need a "database" for original colors of vises. The question comes up all the time. so do we do it here in this established thread (Which is more focused on repair than painting), or in a dedicated thread?
 

Catalyze

Well-known member
Joined
Feb 7, 2011
Messages
1,369
Location
New Mexico
I would think that a dedicated thread since trying to dig through some is sort of hard when they pages start piling up.
Craig
 

PCO6

Well-known member
Joined
Dec 25, 2008
Messages
4,573
Location
Newmarket, Ontario
So, Question for all the Vise Phreques here; I think we need a "database" for original colors of vises. The question comes up all the time. so do we do it here in this established thread (Which is more focused on repair than painting), or in a dedicated thread?
This would be a good thread for information on original vice colours ...

Everything you need to know about bench vises ... http://www.garagejournal.com/forum/showthread.php?t=62716&highlight=VICE+MOZ

mjozefow compiled a LOT of good information about vices by different makers and put it one thread.
 

Outlawmws

Well-known member
Joined
Aug 9, 2011
Messages
39,279
Location
The Badlands
So, Question for all the Vise Phreques here; I think we need a "database" for original colors of vises. The question comes up all the time. so do we do it here in this established thread (Which is more focused on repair than painting), or in a dedicated thread?

I would think that a dedicated thread since trying to dig through some is sort of hard when they pages start piling up.
Craig

This would be a good thread for information on original vice colours ...

Everything you need to know about bench vises ... http://www.garagejournal.com/forum/showthread.php?t=62716&highlight=VICE+MOZ


mjozefow compiled a LOT of good information about vices by different makers and put it one thread.

Good comments and I was leaning to a separate thread, but PC06 had a good suggestion also.

More opinions please! (Looking for a consensus)
 

phy6

Well-known member
Joined
Nov 18, 2007
Messages
275
Location
Maryland, It's a Wet Heat.
Re: vise colors, we could really use a wiki for this kind of stuff, just like Dayid's info...I sent an email to GJ.

Has anyone tried using a skim coat of bondo/rage/jb weld to cover up cast iron sand pits/hammer dings/saw marks before painting?

Also, I was wondering about these alternative refinishing possibilities:
  • TiN coating
  • DLC coating
  • Chrome plating
  • Copper plating

I like to use my vises, but I myself don't plan on pounding on them and sawing into them like the previous owners did over the past 80 years. I'm hoping my place is more of an active retirement home for these relics, where they are used respectfully and not abused as anvils or presses.

So I guess I'm partial to a finish that sticks out. I REALLY dig the orange and yellow paint that was on my Prentiss 23. Maybe I'll pick up some House of Kolor pearl and a bunch of clear. :spit:


In any case, all our vises are going to look the same in 2092 as when we got them--rusty, flaking and beat up with bent handles. Might as well have fun with them now.
 

phy6

Well-known member
Joined
Nov 18, 2007
Messages
275
Location
Maryland, It's a Wet Heat.
Vice1.jpg

I think this came from an art exhibit on how to make things completely impractical. However if it didn't have the anvil part on the back, I can see it being not too terrible. I guess the chrome could flake off if the cast iron / cast steel flexed.
 

cegreen

Well-known member
Joined
Feb 27, 2010
Messages
63
Location
New Jersey
Paint it with rustoleum hammertite paint

20120116-213639.jpg

So Rustoleum and Hammertite are two different brands of hammered finish paint.

That is, there is Rustoleum hammered finish paint, and there is Hammertite hammered finish paint, but there is no such thing as "Rustoleum hammertite paint"

I like the look of the paint on your vise - but which paint (and color) is it?

Thanks.

-Chris
 

phy6

Well-known member
Joined
Nov 18, 2007
Messages
275
Location
Maryland, It's a Wet Heat.
So Rustoleum and Hammertite are two different brands of hammered finish paint.

That is, there is Rustoleum hammered finish paint, and there is Hammertite hammered finish paint, but there is no such thing as "Rustoleum hammertite paint"

I like the look of the paint on your vise - but which paint (and color) is it?

Thanks.

-Chris
I think hammertite is an adhesive.

Hammerite Paint
 

SwampCat

Well-known member
Joined
May 15, 2009
Messages
293
Just picked up a Athol 323 1/2. I am thinking restoration on this one, its seen VERY LITTLE use. Does anyone know what the original color was? Looks to have been rattle canned in black,slide and all:shocking: 
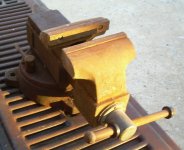
I will get some before and after pictures. THANKS SwampCat.
 

SwampCat

Well-known member
Joined
May 15, 2009
Messages
293
So, Question for all the Vise Phreques here; I think we need a "database" for original colors of vises. The question comes up all the time. so do we do it here in this established thread (Which is more focused on repair than painting), or in a dedicated thread?

So did this ever come to be ?
 

Burgerkong

Well-known member
Joined
Apr 17, 2010
Messages
2,501
Location
Markham, Ontario, Canada
Just a question: I have a bunch of range hood ducting that are galvanized steel, I'm assuming I can use them as anodes too? Was reading that encircling the rusted part with steel plates/sheets yields better and faster results?
 
To avoid these ads, REGISTER NOW!

Outlawmws

Well-known member
Joined
Aug 9, 2011
Messages
39,279
Location
The Badlands
Just a question: I have a bunch of range hood ducting that are galvanized steel, I'm assuming I can use them as anodes too? Was reading that encircling the rusted part with steel plates/sheets yields better and faster results?


:headshake

:see: Thou shalt not put ANY plated or stainless steels in the Etank!
 

Outlawmws

Well-known member
Joined
Aug 9, 2011
Messages
39,279
Location
The Badlands
:(

I will resort to finding some scrap steel plates in the basement then. Bummer. Google tells me it should work, just that it'll introduce zinc into the solution?

It's not a "Just".

Zinc is a Heavy metal. Heavy metals are bad pollutants, and if you are traced as the source, you will see heavy stiff fines... at least...

Electrolysis is a nice clean, environmentally safe, way to remove rust done right. Done wrong it can become a cleanup nightmare.
 

diggerwolf

Member
Joined
Oct 4, 2012
Messages
14
Location
Van Alstyne, TX
My first post - actually found this forum while researching how to restore an old vice.

My grandfather died about ten years ago and his old vise has been in my storage shed since. Decided it was time to clean it up and put it to use. It is covered in years of dirt and grease. It is a Columbian. I will post pics later.

My question is about removing the dynamic jaw. From reading these forums it appears that it should just screw out? I tried that and the handle gets very hard to turn about halfway down the slide. I assume it is simply old grease and rust making it hard to turn but I'm afraid to keep going without a little guidance.

I don't plan to fully restore it as some of you have done but I want to disassemble, clean, and reassemble it for use.
 
Last edited:

demographic

Well-known member
Joined
Oct 24, 2010
Messages
824
Location
The Duchy of Grand Fenwick, otherwise known as Gre
My first post - actually found this forum while researching how to restore an old vice.

My grandfather died about ten years ago and his old vise has been in my storage shed since. Decided it was time to clean it up and put it to use. It is covered in years of dirt and grease. It is a Columbian. I will post pics later.

My question is about removing the dynamic jaw. From reading these forums it appears that it should just screw out? I tried that and the handle gets very hard to turn about halfway down the slide. I assume it is simply old grease and rust making it hard to turn but I'm afraid to keep going without a little guidance.

I don't plan to fully restore it as some of you have done but I want to disassemble, clean, and reassemble it for use.

There might be an amount of posts you have to make before you can post pictures, thats to lessen the amount of spammers trying to sell us random **** and Ugg Boots.
Once you have got through that number you can usually fire pictures up and we love to see them, trust me on that.
Some vices (or vises if you are a merkin and spell Bonnet as Hood) have a washer or circlip, C pin or even a split pin that stops the dynamic jaw from being fully removed.
Fire a pic up and I'm sure one of us will know the way to take it apart, hell it miight6 even be me i9f its a Brit vice.
 

Outlawmws

Well-known member
Joined
Aug 9, 2011
Messages
39,279
Location
The Badlands
My first post - actually found this forum while researching how to restore an old vice.

My grandfather died about ten years ago and his old vise has been in my storage shed since. Decided it was time to clean it up and put it to use. It is covered in years of dirt and grease. It is a Columbian. I will post pics later.

My question is about removing the dynamic jaw. From reading these forums it appears that it should just screw out? I tried that and the handle gets very hard to turn about halfway down the slide. I assume it is simply old grease and rust making it hard to turn but I'm afraid to keep going without a little guidance.

I don't plan to fully restore it as some of you have done but I want to disassemble, clean, and reassemble it for use.

Probably just gunk/rust, either on the screw or on the slide.

Screw it back in, and use a wire brush/wheel on the outer surfaces of the slide that sticks out the back, and hit it with WD-40 or similar when done with that.

Turn the thing upside down, and you should have access to the back end of the main screw. hose that down with penetrant or degreaser depending on what the screw looks like and what its loaded up with. use a stiff tooth brush and turn the screw some while unloading the gunk from the threads, once mostly loosened up you should be able to unscrew it completely and get the screw out for a proper cleanup.
 

thundermug

Well-known member
Joined
Sep 10, 2012
Messages
1,173
Location
usa
I recently acquired a 40s/50s 4.5" Wilton machinist that was missing both lockdown handles. I bought dome nuts, but they didn't look right. There's probably fifty ways to make new handles. I cold forged steel bars so the ends mushroomed. Made them longer at 5" instead of 4", which I think was the original length. Don't know for sure. The project was quick and easy.

Next time I do this, I think I'll use spring steel. Just for the hell of it.

http://sphotos-b.**.fbcdn.net/hphotos-snc6/229951_602655038132_1044218235_n.jpg

http://sphotos-a.**.fbcdn.net/hphotos-snc6/199619_602655182842_1721927132_n.jpg
 

diggerwolf

Member
Joined
Oct 4, 2012
Messages
14
Location
Van Alstyne, TX
There might be an amount of posts you have to make before you can post pictures, thats to lessen the amount of spammers trying to sell us random **** and Ugg Boots.
Once you have got through that number you can usually fire pictures up and we love to see them, trust me on that.
Some vices (or vises if you are a merkin and spell Bonnet as Hood) have a washer or circlip, C pin or even a split pin that stops the dynamic jaw from being fully removed.
Fire a pic up and I'm sure one of us will know the way to take it apart, hell it miight6 even be me i9f its a Brit vice.

Working on post count... It's Sat afternoon and I'm about to clean as best as I can while its assembled then hopefully get some good pics.
 

coleman10

Well-known member
Joined
Nov 12, 2012
Messages
871
Location
Fort Lauderdale, FL
"Stamped Steel Slide" Vises:

These vises are an odd cross between an exposed screw and a rectangular slide. Columbian and Desmond-Simplex are the ones that I have seen that use this style of cunstruction. They are considered by many (myself included) to be a medium duty vise (compared to a heavy duty USA/Euro vise, they will outclass a cheap import by a huge margin). I will be using the Columbian 3.5" that Selkirk has asked me to restore for the pics.

The steps for one of these is essentially the same as for an exposed leadscrew vise. The challenge with these is simply getting the crimped anti-reversal ring off of the damn screw.

P5240019.jpg

For this job, I use a screwdriver, wedged into the split in the ring. Then I twist the flat-head driver, and it will give me a bit of room. Then I insert my special tool, and spread it open the rest of the way.

th_P5240020.jpg

Normal pliers work too, but require more cussing. :thumbup:

I'll show my method for re-crimping when I actually do it tomorrow. :beer:

Wilton Vises: To follow within a week or so. Got a nice C-2 for this demo.

Just got a Columbian D45 M3 from my dad. I estimate it to be roughly 40 years and old and remember it well when I was a kid. I'd love to restore it and hand it down to my son when the time comes. Everything works well and is nice and tight/smooth. Amazing since I know my dad never once lubricated it. It does have a bit of rust on it, unfortunately. I can easily extend the dynamic jaw out all the way so the vice separates into two, but I'm left with the lock ring. The inside of the slide has some rust in it, so I'd like to preserve the inside, too, but I'm fearful of not being able to get the lock ring back on.

I didn't see anywhere in this post where it describes how to reclamp the lock ring.

Is there any other way to clean up the inside of the slide without taking off the lock ring?

Any help is appreciated!

Thanks!
 

mic88

New member
Joined
Aug 22, 2014
Messages
1
Hey fellas. 1st post here... I picked up a big old vise today and trying to figure out what it is. Looks too old to be an Asian import, but I can't find any name on it at all.
Any info would be appreciated. Thanks!!
 

Attachments

  • vise1 (800x450).jpg
    vise1 (800x450).jpg
    63.2 KB · Views: 103
  • vise 2 (800x450).jpg
    vise 2 (800x450).jpg
    57.5 KB · Views: 97

coleman10

Well-known member
Joined
Nov 12, 2012
Messages
871
Location
Fort Lauderdale, FL
I'm finally getting around to restoring my Columbian D45 vise and will probably tackle it within the next few days. I was able to free up the screws holding in the jaw inserts. What's the best method for cleaning up the jaw inserts? I don't think I saw that mentioned anywhere. Mineral spirits and a brush?

Also, any recommendations for Columbian red paint? I see a lot of talk about Wilton green, but no recommendations for other makes. I have one nice, clean spot of original paint left on mine. Looks like a candy apple red.
 

Attachments

  • IMG_4184.JPG
    IMG_4184.JPG
    72 KB · Views: 80

land

Active member
Joined
Dec 4, 2013
Messages
29
Location
Lafayette, LA
Just got a Columbian D45 M3 from my dad. I estimate it to be roughly 40 years and old and remember it well when I was a kid. I'd love to restore it and hand it down to my son when the time comes. Everything works well and is nice and tight/smooth. Amazing since I know my dad never once lubricated it. It does have a bit of rust on it, unfortunately. I can easily extend the dynamic jaw out all the way so the vice separates into two, but I'm left with the lock ring. The inside of the slide has some rust in it, so I'd like to preserve the inside, too, but I'm fearful of not being able to get the lock ring back on.

I didn't see anywhere in this post where it describes how to reclamp the lock ring.

Is there any other way to clean up the inside of the slide without taking off the lock ring?

Any help is appreciated!

Thanks!

I have the exact same vice, except in much worse condition. I took mine apart to clean it up, and when I attempted to remove the retaining ring it broke. I ended up using a split ring locking wash to replace the retaining ring because I was unable to find a replacement retaining ring online.
 

Jaryd_ZA

New member
Joined
Nov 22, 2014
Messages
3
Location
Cape Town, South Africa
Good morning from Cape Town, South Africa

I am restoring and old rectangular slide vice that i inherited from my grandfathers workshop and require some advice.

The lead screw turns in and out nicely and but does not open the dynamic jaw, i need to pull the dynamic jaw open manually.

I have taken the entire unit apart now to degrease and repaint and and would like to know if there might be a part missing in the area inside the slide that opens the dynamic jaw.

Best Regards,

Jaryd
 

Attachments

  • WP_20141122_001.jpg
    WP_20141122_001.jpg
    146.3 KB · Views: 94
  • WP_20141122_002.jpg
    WP_20141122_002.jpg
    146.3 KB · Views: 82

drivesitfar

Well-known member
Joined
Oct 23, 2013
Messages
36,034
Location
Pacific Northwest
Jaryd: welcome to Garage Journal and our Forum. it's a great place to learn and teach others what you know so i hope you stick around.

as far as your Grand dad's old vise it looks like a keeper and happy to see you are cleaning it up to do so.

since this is an older thread there is a newer Vise Repair 101 thread you can post pictures of and it might get more attention. also there are already answers on it that will help you. the link for that thread is in my signature so only a click away.

i'm guessing you are missing the sleeve or pin that holds the screw in the dynamic jaw to make it work correctly. here is a picture of a sleeve from one of my old vises so you can get the idea. with the spring in the picture a lot of European vises had a spring and either a clip or pin holding the dynamic in place. as far as Grand Dad's old vise goes it looks like it's in good shape other than your issue.

good luck
 

Attachments

  • WP_20131130_024.jpg
    WP_20131130_024.jpg
    104.6 KB · Views: 67
  • WP_20131130_028.jpg
    WP_20131130_028.jpg
    117.8 KB · Views: 72
  • WP_20131130_027.jpg
    WP_20131130_027.jpg
    153.4 KB · Views: 72
  • $(KGrHqN,!qcFIhs8y2eLBSJouClLYw~~60_57.jpg
    $(KGrHqN,!qcFIhs8y2eLBSJouClLYw~~60_57.jpg
    96.8 KB · Views: 68
Last edited:

mike_paxton

Well-known member
Joined
Dec 15, 2013
Messages
905
I bought an older Wilton Mechanic vise with 6" jaws and a jammed handle on 11/21/14. (Pics 1-3 are as it was "found").

I have taken it apart and wire wheeled everything and all looks good with exception of the missing pipe jaws and one broken wing on the main nut, which was the real reason the handle was jammed.

There is a nice thread on a same type vise up on GJ that matches the numbers on mine ( i.e.110019 on the dynamic jaw, and 111034 on the main part of the vise) and can be found at http://garagejournal.com/forum/showthread.php?t=210687

In that thread, someone took great pics showing how the main nut should look like and also showed tape measurements against the main nut to show size. (pics 5-7).

Main culprit to my vise restoration is the one broken wing (pic 4 shows a good main nut with wings on both sides, while mine has only one wing left).

Any ideas on how best to get the main nut on mine repaired or replaced?

One add'l question. Most of the main nuts I've worked with are pinned to keep them secured in one place. I didn't see any pins on main nut on this vise, so was it held in place by the design of it inside the vise cavity and aided by the two wings?

Thanks for any advise, as this one came from a closed service station around this area and so I'd like to get it working again, just to maintain it's history.
 

Attachments

  • MainNut4ATape.jpg
    MainNut4ATape.jpg
    8.3 KB · Views: 561
  • MainNut5ATape.jpg
    MainNut5ATape.jpg
    8.1 KB · Views: 560
  • MainNut3A.jpg
    MainNut3A.jpg
    6.6 KB · Views: 562
  • DSCN4423.JPG
    DSCN4423.JPG
    86.9 KB · Views: 37
  • DSCN4425.JPG
    DSCN4425.JPG
    125.4 KB · Views: 42
  • DSCN4422.jpg
    DSCN4422.jpg
    89.8 KB · Views: 56
  • MainNut6ATape.jpg
    MainNut6ATape.jpg
    8.8 KB · Views: 562

Outlawmws

Well-known member
Joined
Aug 9, 2011
Messages
39,279
Location
The Badlands
Jaryd, is there a hole in the solid part of the threaded main screw? if so you are missing a pin. if not, a collar with set screws. (hardware store item) I suspect the former, since there looks to be a washer for between the spring and the pin (cotter pin will do) a piece of tubing can be notched to compress the spring while the pin is placed visa the notch.


Mike, we need a pic of the inside of the base where the slide/nut goes. Also, one from the bottom of that piece wouldn't hurt.
 

mike_paxton

Well-known member
Joined
Dec 15, 2013
Messages
905
Jaryd, is there a hole in the solid part of the threaded main screw? if so you are missing a pin. if not, a collar with set screws. (hardware store item) I suspect the former, since there looks to be a washer for between the spring and the pin (cotter pin will do) a piece of tubing can be notched to compress the spring while the pin is placed visa the notch.


Mike, we need a pic of the inside of the base where the slide/nut goes. Also, one from the bottom of that piece wouldn't hurt.

Outlawmws:

Here's the pics of the bottom of the base, then pics looking into the cavity where main nut I believe should be located. I did set the damaged main nut into cavity, to give you a view of it installed. Last pic is to show the main nut with only one wing.

Hope this helps!!!
 

Attachments

  • WiltonMachistView1.JPG
    WiltonMachistView1.JPG
    128.8 KB · Views: 35
  • WiltonMachistView2.JPG
    WiltonMachistView2.JPG
    138.8 KB · Views: 35
  • WiltonMachistView3.JPG
    WiltonMachistView3.JPG
    145.6 KB · Views: 34
  • WiltonMachinistBottom.jpg
    WiltonMachinistBottom.jpg
    81.4 KB · Views: 37
  • DSCN4470.JPG
    DSCN4470.JPG
    108 KB · Views: 33
To avoid these ads, REGISTER NOW!
Top Bottom