To avoid these ads, REGISTER NOW!

Framing Question: Top Plate on Angled Ceiling

Bull

Super Moderator
Joined
Dec 12, 2005
Messages
16,189
Location
MA
I received some great help here last winter that empowered me to frame out a triangular opening for my barn's attic. I am in need of some framing help again.

I am framing out what will become a long shelving unit on the raised portion of my upstairs barn floor. Let's call it a loft area, for lack of a better term. The shelves will hold books, primarily. The unit will also keep people from falling off the edge of the floor to the open staircase on the other side.

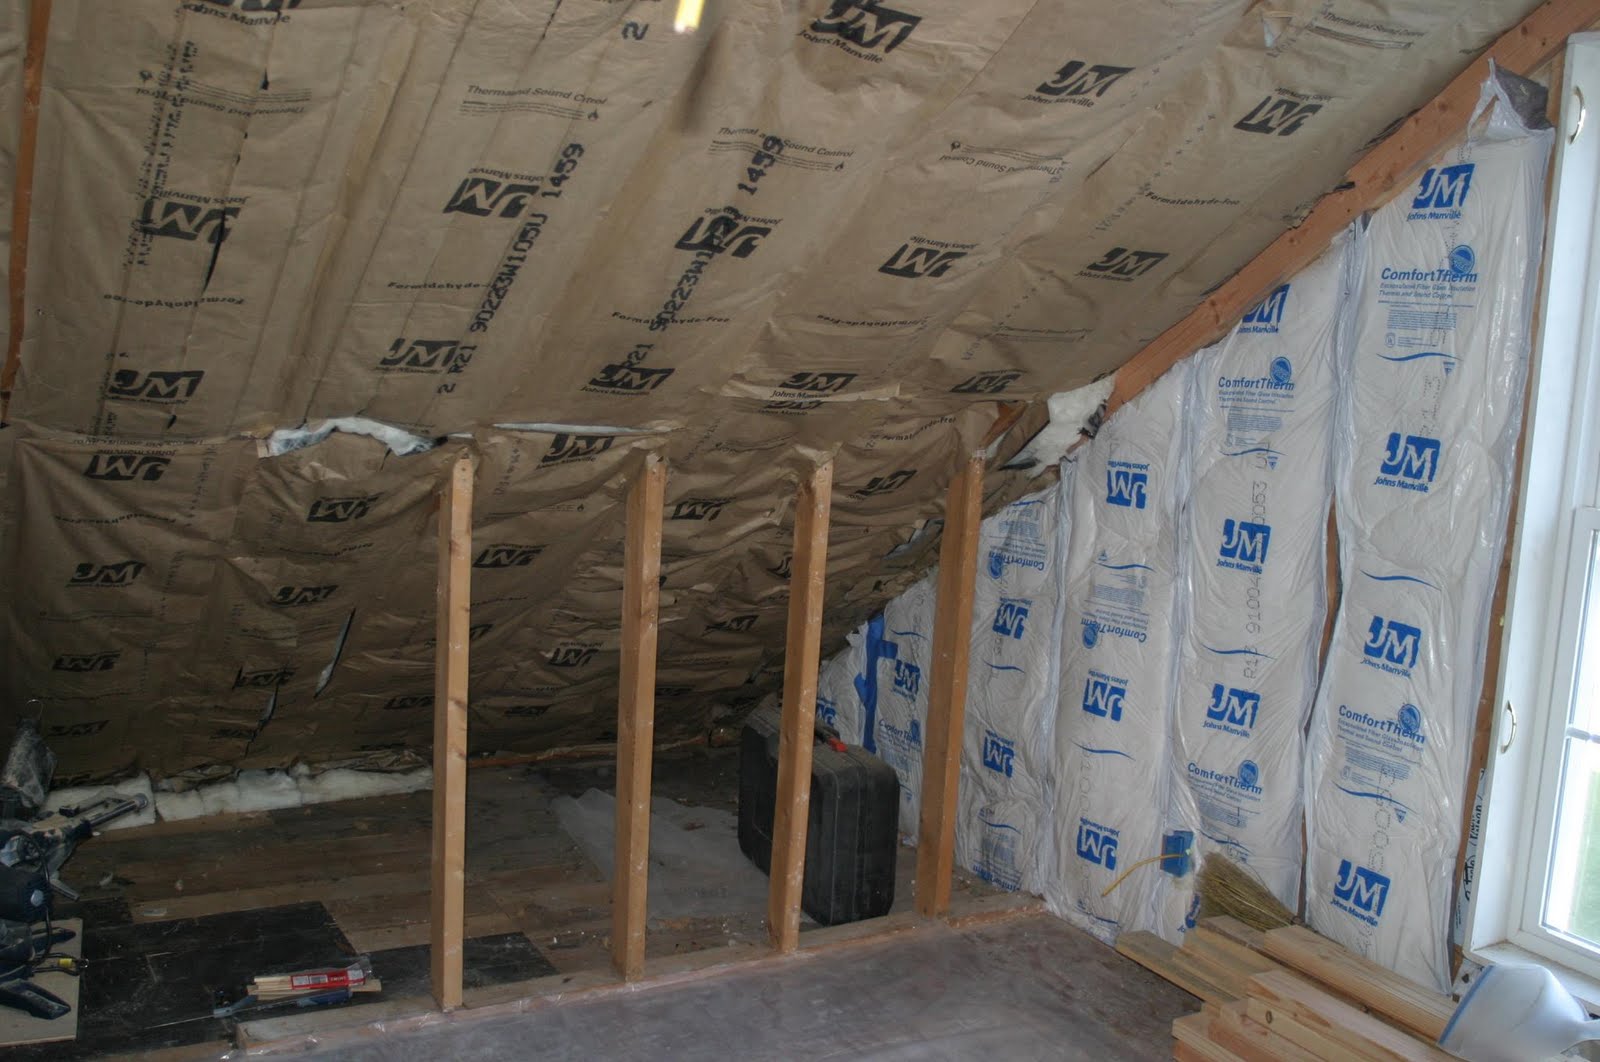
Now, I will have two bottom plates, one for the back of the shelving unit and one for the front. I will then need two corresponding top plates, attached to the angled ceiling, for my studs to connect to. I could probably monkey some way of determining the locations for the top plates, using trial, error, sweat, swears, and an assortment of wood scraps, levels and pencils. But, I am sure there is a right way to do it.

So, with my bottom plates in place, what is the best/easiest/most proper way to determine the positioning of the top plate so it is directly above the bottom plate?

Here is the space in question. You can see the first bottom plate in place.
100_7784.jpg
 
To avoid these ads, REGISTER NOW!

D.J.

Well-known member
Joined
Sep 16, 2009
Messages
1,116
Location
New Haven IL
Bull take a four foot level and run it up from the stairwell and mark the intersecting spot on the angled ceiling and to check use a plumb bob of the side of your 2 by.
 
OP
B

Bull

Super Moderator
Joined
Dec 12, 2005
Messages
16,189
Location
MA
I held a 4' level against the stairwell and then used a pencil to try and mark the spot on the insulation facing where the edge was up top. The problem was that only a small portion of the level was contacting the stairwell, which made it tend to want to be out of level. Between trying to level and steady that with one hand and drawing a scrawl on crinkly insulation paper with the other, I had little faith that I was getting more than a ballpark of where the back side of the top plate should be. :willy_nil
 

PA-Buckeye

Well-known member
Joined
Jun 26, 2012
Messages
100
Location
central PA
I was going to suggest taping a cheapo laser pointer at various pointsalong the wall, mark where it hits above with a sharpie and then connect the dots.
 

pop pop

Well-known member
Joined
Apr 1, 2010
Messages
2,859
Location
Virginia
I held a 4' level against the stairwell and then used a pencil to try and mark the spot on the insulation facing where the edge was up top. The problem was that only a small portion of the level was contacting the stairwell, which made it tend to want to be out of level. Between trying to level and steady that with one hand and drawing a scrawl on crinkly insulation paper with the other, I had little faith that I was getting more than a ballpark of where the back side of the top plate should be. :willy_nil

Doesn't it have a bubble in the vial?
 

Wadd2

Well-known member
Joined
Jul 9, 2012
Messages
52
It'd be worth it to go buy a 6' level. Never thought I'd use one until I bought one and now I use it more than the 4' just for the accuracy. Otherwise the plumbob is a good tool as stated.
 
OP
B

Bull

Super Moderator
Joined
Dec 12, 2005
Messages
16,189
Location
MA
Doesn't it have a bubble in the vial?

Come on. I am pretty incompetent when it comes to carpentry, but yes, I do know my level has a bubble! :D Trying to keep that bubble dead to nuts between the lines while steadying the level and scribing a line on the crinkly kraft paper didn't give me a feeling of accuracy.

Now, when the fellow mentioned a laser, the dim bulb in my skull started to glow a bit brighter. I actually do own, but rarely use and so forgot about, a Ryobi laser level jobby. It's like this:
ell001-ss.jpg


So, I placed that on the end of the bottom plate closest to you in that picture above. I adjusted it so that the laser was going down the middle of the 2x4 plate, up the wall, and onto the ceiling. I then positioned a 2x4 top plate so that the laser was going through the exact middle of its length. Screwed that into place. So, I now have part of the top plate in place, although I need to add another section to get the length I need.

Here is another question: do I even need a top plate? Because, I found this pic on Google after searching for "how to frame a knee wall," since I think that is basically like what I am doing.
IMG_6579.JPG


So that guy has no top plate, and just has the studs meet the rafters above. Is this what I should do? My rafters are 24" on center.

I found that the angle I need for the ends of my studs will be 38 degrees, to match that of the rafters. I also discovered that at this angle, the tops of the studs will overhang the top plate because the angled cut makes them wider than the 2x4 plate they are butting up against. This presents questions about how to compensate for this.

Remember, my ultimate goal here is to frame something out that I can then trim/outfit to be a set of adjustable shelves for books, the whole piece also sealing off the dangerous stairway from that raised loft space.

I am terrible when it comes to visualizing steps ahead in a job like this. I appreciate the help thus far.
 
Last edited:

ddawg16

Well-known member
Joined
Jul 11, 2008
Messages
21,005
Location
S. California
I would do a top plate.....but since it's not going to be load bearing....you only need one....

In your case, it looks like your rafters are 24" OC...if they were 16" then I would say you could just nail the studs against the rafters....but 24" is a bit wide for walls.

The advantage of the top plate is that you can pre-nail the studs to it before you put up the wall....in other words...once you know the distance....fab the wall and then just lift into position.

Here is a pic of my upstairs....the master bath has vaulted ceilings...so all the walls connect at an angle.....not the best example....I was just documenting the solar tube I just installed.

P8110002.jpg
 
Last edited:

ydna

Well-known member
Joined
Jul 23, 2012
Messages
66
You can use a 2x6 for the top plate. Then it will be big enough for the angled cut on the studs.

Someone with more experience will be able to answer my next question, should he nail the bottom of the studs to the bottom plate tight, or leave a half inch gap so they can slide up and down on the nails? Like in a basement. I mean, is there any way this knee wall will want to move up and down and be fighting against the roof?
 

tcianci

Well-known member
Joined
Feb 7, 2009
Messages
4,242
Location
Walpole, Ma
From the looks of things, you have strapping over the insulation running perpendicular to the rafters. The strapping is where you will attach your ceiling finish. Project the edge of the stairwell up with a level and determine what "bay" (as in what space between the strapping) the wall will fall in. Infill that bay with 1x6 or 1x8 ledger board. This will provide the solid surface that you need to project your plumb point up to, give you an easy attachment point for the top plate of the wall and give you a "nailer" for your ceiling finish on either side of that kneewall.
 
To avoid these ads, REGISTER NOW!
OP
B

Bull

Super Moderator
Joined
Dec 12, 2005
Messages
16,189
Location
MA
From the looks of things, you have strapping over the insulation running perpendicular to the rafters. The strapping is where you will attach your ceiling finish. Project the edge of the stairwell up with a level and determine what "bay" (as in what space between the strapping) the wall will fall in. Infill that bay with 1x6 or 1x8 ledger board. This will provide the solid surface that you need to project your plumb point up to, give you an easy attachment point for the top plate of the wall and give you a "nailer" for your ceiling finish on either side of that kneewall.

Sounds good, Bob. The wider but thinner top plate clearly has advantages to my 2x4 plate. Ugh, I hate moving backwards, but I guess I will remove that first section of top plate that I installed tonight. I was happy to be making some progress, but I should have waited to see what info came from this thread!
 

DekeT

Well-known member
Joined
Aug 12, 2011
Messages
2,234
Location
USA
Another idea is to build the knee wall short of the rafter but tall enough to achieve a railing height. several advantages to that. You will eliminate the acute angle on the ceiling which will be difficult to drywall paint and keep clean. You can have an overlook to your shop which I think would be awesome. Airflow throughout the shop will be better. Also a heck of a lot easier to build.

If you must build it to the ceiling then building a wall slightly short and using shims to connect tightly to the rafter as you put the level on it to check for vertical.
 
Last edited:

pop pop

Well-known member
Joined
Apr 1, 2010
Messages
2,859
Location
Virginia
You could also rip a 2X at the 38 degree angle and attach to the roof, giving a flat bottom the correct width. Add another plate on top of your wall and fit it under the ripped 2X
 

trbomax

Well-known member
Joined
Mar 21, 2010
Messages
2,556
Location
starvation lake,mi.
Another idea is to build the knee wall short of the rafter but tall enough to achieve a railing height. several advantages to that. You will eliminate the acute angle on the ceiling which will be difficult to drywall paint and keep clean. You can have an overlook to your shop which I think would be awesome. Airflow throughout the shop will be better. Also a heck of a lot easier to build.


I like this idea.
 
OP
B

Bull

Super Moderator
Joined
Dec 12, 2005
Messages
16,189
Location
MA
The idea about framing a knee wall/shelf that doesn't actually go as high as the ceiling is interesting. I'm not sure what the best option is, but I want to frame this thing out tomorrow.

Leaving the wall short, there would be no grand view of my shop below. Looking over that edge, all you can see are the stairs and an exterior wall.

If I install a pellet stove downstairs, I believe the heat will get upstairs whether I leave the wall short or tie it in to the ceiling. On the other hand, if I try to run some kind of AC in the upstairs, all that cold, dense air is just going to sink right to the lower level if I leave everything open.

Blagh. I hate decisions.
 

camarotoolman

Banned
Joined
Mar 12, 2011
Messages
2,372
Location
cocoa Fl.
Find a straight 2x6. Angle cut the edge,to match the pitch of your roof. Cut studs to lenght with correct angle. Pull up bottom plate, Lay out centers, nail it all together on floor, set it up. Nail b.plate, plumb with level. nail top plate. Both my house and garage have this type of loft.
 

NUTTSGT

Super Moderator
Staff member
Joined
Sep 14, 2009
Messages
51,087
Location
Northern Central Ohio
Bull, were you planning on closing the entire upstairs off with a door ? If not, I'd rather have a short wall than a floor to ceiling wall.


A short wall should be plenty strong once the drywall is on it to help stiffen it up, especially if the wall is "L" shaped like it might be in your picture.
 
OP
B

Bull

Super Moderator
Joined
Dec 12, 2005
Messages
16,189
Location
MA
Bull, were you planning on closing the entire upstairs off with a door ? If not, I'd rather have a short wall than a floor to ceiling wall.


A short wall should be plenty strong once the drywall is on it to help stiffen it up, especially if the wall is "L" shaped like it might be in your picture.

It's a good question. Because of the positioning of the stairs and the angled roof, if I installed a door at the top to close off the space, it would have to be a sort of Hobbit-door, shorter than standard and angled at the top. I could live with that if it was necessary to cool the upstairs; this is a barn after all, not a house.

I haven't committed one way or the other to the door issue. I'm sort of figuring things out as I guy. Leaving the wall short, I block myself from being able to add a door later, though, whereas with a full wall I could put one in or not, once I decided.
 

willymakeit

Well-known member
Joined
Apr 27, 2009
Messages
1,244
Location
Springfield Mo.
Use a plumb bob, no batteries. To make your life easier with the plumb bob, use the correct line which is a flat braid vs. a twisted line otherwise it will spin forever.
Mark the bottom of the rafter , snap your line. You will need to determine how much of the snap line will need to be exposed [slid down the slope], unless you bevel rip your plate to match the slope.
Its easier to do than explain. Hope this helps.
 
OP
B

Bull

Super Moderator
Joined
Dec 12, 2005
Messages
16,189
Location
MA
Framing out the whole shelving unit would take more time than I want to spend right now. I am trying like the dickens to get this space drywalled within the next week or two MAX; I am sick of the slow pace of this whole spiel. I built the barn in '07!

So, I just framed a wall that will allow me to make the area safer, and allow me to drywall the ceiling and gable wall. I screwed a second 1x8 header so that in the future I can finish the shelf project, if I decide to go that route. But I **** so bad at working with wood, maybe I will just buy some book shelves and put them against the wall.

100_7785.jpg


100_7788.jpg


Sorry the second pic is blurry. You can see that the distance between the left and right corner studs and the ones next to them is not standard; all the others are at 16" on center. This is because I don't know what I am doing. I put my corner studs first. Then, I found the halfway point between them, and put a stud on that spot. I then measured 16" on center to the left and right for my remaining studs. This left me with a space of about 19-20" for those last bays. I didn't know what a real, actually competent carpenter would do, but I just left the bays large.

How perfect do real carpenters get their framing? This stuff drives me nuts. When I installed the bottom plate, I used a level to try and keep it on the same plane as the edge of the beam below it, in the stairway. When placing the studs, I used a 2' level to get them plumb and level. But, if I now lay a 4' level across the front and then the rear of the studs, you can see that they do not all stand perfectly in line with each other. Some are a bit forward, others a bit set back. And, if I lay a 4' level diagonally across the stairway beam and a couple of the studs, the level does not sit perfectly flat in all spots. I assume it is because I have no talent for this, but maybe part of it is also that lumber is not perfectly straight? Do pros worry about this, or make it look good in the finish stage?

Nothing like a little carpentry to make me feel the warm glow of inadequacy.
 

Alchymist

Well-known member
Joined
Mar 1, 2009
Messages
4,423
Location
Central PA
Most likely your wall studs have a crown, an some were crown in and some were crown out, making for a wavy wall. Should look them over then install them all with the crown in the same direction.

As to the studs, I start on one end, space them 16" and let the last space fall where it may as long as it's less than 16". If this means 4" away, so be it.
 
OP
B

Bull

Super Moderator
Joined
Dec 12, 2005
Messages
16,189
Location
MA
Most likely your wall studs have a crown, an some were crown in and some were crown out, making for a wavy wall. Should look them over then install them all with the crown in the same direction.

As to the studs, I start on one end, space them 16" and let the last space fall where it may as long as it's less than 16". If this means 4" away, so be it.

Years ago, I learned how to select lumber at the store by sighting it from different angles. But, I did not know about installing the pieces so the crowns are all on the same side. Good to know for the next project.

Do you mark the crowns after sighting the full piece of lumber? Because, to me, it's harder to detect a crown once the pieces have been cut shorter. :dunno:

Thank you for the explanation of your stud-layout process. It makes sense.
 
OP
B

Bull

Super Moderator
Joined
Dec 12, 2005
Messages
16,189
Location
MA
Ditto what Alchymist said.
I have 45+ years in Carpentry and even I still don't get it right every time.
Bull, carry on. You are doing just fine.

Good to get some encouragement, since I never give it to myself. Thank you. :)
 

little d

Well-known member
Joined
Nov 13, 2009
Messages
815
Location
NW Oklahoma
Bull,
when I crown lumber, I stack it crown up or crown to the right everytime, that way when i pick it up I know with out having to check it again but like oldguy said, **** happens.

On laying out a wall, floor, ceiling or what ever, decide what end you like to work from (I lay out from the left) and stick to it through out the build. It doesen't sound like much but is one of the things ya don't notice that makes your work easyer. The reason most moderan building uses 16" and 24" centers is because of standards. Sheathing and materals run in 2' increments, generaly speaking, starting at 4'. When ya lay out, the first stud, joist starts flush with the end, the next "centers" on 16" or 24" and so on, because if you join sheathing you want both peices to join on a stud, joist so, the layout mark is moved (burned) left or right depending on how you lay out 3/4" of an inch, I put an X so I know what side of the line to nail the stud, joist.
Your knee wall looks damn good and if ya use a 12' sheet of drywall youll come out great with about a foot of waste, if ya use 2 8', your gona end up with about 2 1/2' of waste per sheet, or about 5'.
 
To avoid these ads, REGISTER NOW!
Top Bottom