To avoid these ads, REGISTER NOW!

Compressed air cooler?

PT Doc

Well-known member
Joined
Nov 12, 2010
Messages
3,197
I missed out on the zoro cyber Monday sale. In hind sight, a compressed air dryer would have been nice. I have thought about piecing together a cooler and fan setup as many have documented on this site. Then I was looking at compressed air dryers online and saw a new unit for $400. Unit handled 21 cfm but max pressure was 125 psi. Now I don't need more psi then that and the reviews stated that guys have been running 175 for years through this. Intake temps were not listed and I doubt that the unit would like 300 degrees coming in to it. I'd like to plumb this unit in between stage 2 and the tank. I'm not sure if this is worth the cost even though it would not be much trouble and the bonus would be dry cool air in the tank.

On the more cost effective side, although quite ghetto, I was also thinking about creating a fairly large coil and placing this in a typical small dorm fridge. Could store some drinks on the door and that is a plus. I guess that it would likely need to run all the time so that you would have the coolness whenever needed. This might not be cost effective in the end. Assuming that 2 small holes were drilled in the side of the fridge, 1 for copper in and then for for out. Would the cold need to be isolated so that it wouldn't leave the confines of the fridge through both the in and out copper runs? I guess that it should be isolated so that the fridge can stabilize temps and not run too much when the compressor is not in use.

This is obviously not a needed project but more of an idea that might be effective and fairly cheap since these dorm fridges are likely under $75. Any helpful thoughts about the copper coil in the fridge would be appreciated. Thanks in advance for not turning this into " you're a d-bag thread."
 
To avoid these ads, REGISTER NOW!

Jere

Well-known member
Joined
Oct 26, 2011
Messages
708
I like the idea, I think I would use some kind of auto cooling device instead of coils (like a trans cooler or something). Maybe stick that in water in the fridge to help with efficiency of the cooler. Mini fridges sell cheap or free on CL too. Maybe make the fridge a top open too hold a larger bucket with water and drop the cans in the water to depending on the temp of the water
 

Tim The Tool Man

Well-known member
Joined
Mar 1, 2012
Messages
1,520
Location
Lehigh Valley, PA
A frig cools differently than a dryer. It would cool the in initial minute or so but then heat up in the frig pretty quickly and there is no way it would be able to keep up. A muck bucket filled with ice water and a coil run through it would be more efficient as long as you keep adding ice - but it's hardly practical.
 

pcmeiners

Well-known member
Joined
Aug 13, 2009
Messages
8,087
Location
In the only town in Pennsylvania, Bloomsburg.
It is not economical running any refridge dryer directly from a compressor. An air cooled aftercooler coil and then a refrigerant air dryer is the way to go, otherwise your electric bill will be exorbitant without pre-cooling the air before it hits the refridge cooler. A household refrigerator will not handle the heat output of a compressor, unless your talking about an air brush compressor.
If you want dry air with professional looking results it does not come cheap. The cheapest air cooled core which will cool 21 cfm costs over $100 on Ebay (that is when your lucky), and you have the mounting and plumbing costs.
 
OP
P

PT Doc

Well-known member
Joined
Nov 12, 2010
Messages
3,197
Trapping heat the fridge says it all. No cheap solution to this non problem for me. Seems like the compressed air dryer that uses refrigerant is not a bad deal in the end. Thanks for the input.
 

Tim The Tool Man

Well-known member
Joined
Mar 1, 2012
Messages
1,520
Location
Lehigh Valley, PA
http://route60garage.blogspot.ca/2009/04/wtf-is-franzinator.html

http://www.shopfloortalk.com/forums/showthread.php?t=8431
There are many posts about this animal it does work don't knock it until you build one.
Mine works well. Google "franzinator out of 2" pipe"

T

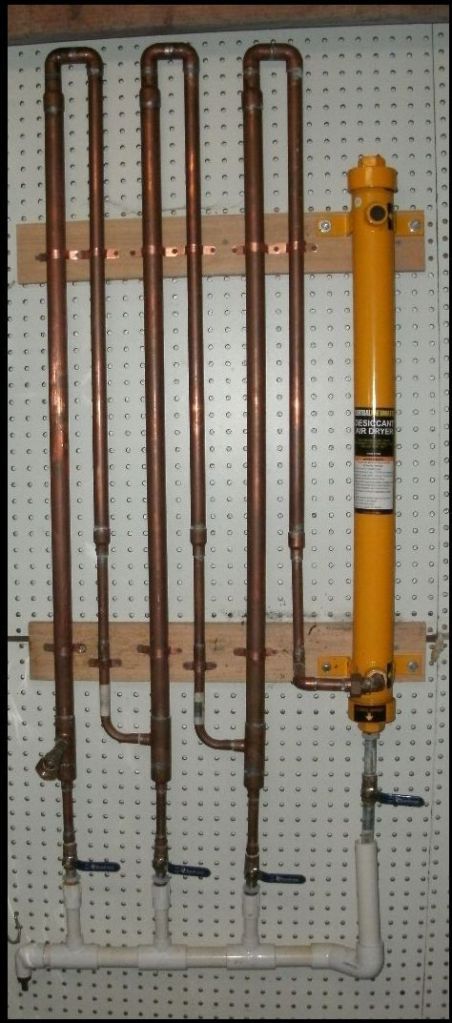
Yes these do work. I built one before I knew the idea was already on the net... Here is mine:
venturi_zps5fe3e9fb.jpg
 

Bunk

Well-known member
Joined
Oct 25, 2008
Messages
262
Location
Alexandria, VA
Anyone build one of these as a "non-welded" type?

I am in the process of collecting parts to. The 2" x 1/2 npt reducers and Tee were not available locally, so had to order, should be here any day now. I haven't figured out how I want to acttach it to my compressor (CH 6hp/60 gal) yet either.
 

Lurker

Well-known member
Joined
Apr 17, 2010
Messages
55
Location
Central Ohio
I am in the process of collecting parts to. The 2" x 1/2 npt reducers and Tee were not available locally, so had to order, should be here any day now. I haven't figured out how I want to acttach it to my compressor (CH 6hp/60 gal) yet either.

I'm not sure about the discharge into the 2" Tee; drawings and text say the discharge is supposed to be in the center of the 2" pipe, but the 1/2" street elbow isn't long enough to allow that. The only pics I've found of the epoxy joints do not show a Tee.
 
To avoid these ads, REGISTER NOW!

Bunk

Well-known member
Joined
Oct 25, 2008
Messages
262
Location
Alexandria, VA
Yeah I was unclear about how to accomplish that myself, until I spent some time poking around the plumbing section at the bigbox store. My plan is to plumb a 1/2npt street elbow into the 1/2npt port of my 2x1/2x2 Tee. Then I found these copper pex elbows that are just about the right size to be epoxy/jb/glued into the id of the street elbow. There is plenty of room to get it into place after having installed the street elbow into the Tee. I'll take some pics when my parts show up.
 

CNGsaves

Well-known member
Joined
Sep 26, 2012
Messages
13,233
Location
KS and OK
Cuirious of the "hybrid" by Tim The Tool Man how often the dessicant drying material needs changed out? Is that a cartridge design where you just throw away and get another, or can you replace with dry dessicant media and then oven dry the dessicant you took out and use again later?

Do the "pure" Franz methods actually work? Real world examples?
 

Tim The Tool Man

Well-known member
Joined
Mar 1, 2012
Messages
1,520
Location
Lehigh Valley, PA
Cuirious of the "hybrid" by Tim The Tool Man how often the dessicant drying material needs changed out? Is that a cartridge design where you just throw away and get another, or can you replace with dry dessicant media and then oven dry the dessicant you took out and use again later?

Do the "pure" Franz methods actually work? Real world examples?

I have the loose stuff you need to catch in a bucket. The dessicant needs rejuvinating every so often, really depends on how much I am using my compressor. I don't use it every day unless I am building some furniture for a client or doing automotive work. I'll check it every month or so and if I am going to spray some paint. To rejuvenate the dessicant I just need to cook it in the oven on a cookie sheet for an hour or so before I go to bed. Then I leave it over night and it is good as new.

My Frazinator really does work well. If I am running a significant volume of air each of those drain valves will have fluid in them. When I am painting I'll just barely crack them open and there will be a constant drip of water coming out. I am happy with it.

The only change I should make one day is to move the plumbing on it so it sits between the first and second stage of my compressor pump.

So it does work well, I am pleased with it, and my air volume at the hose is just fine for the work I do.
 

Big-Foot

Well-known member
Joined
Jan 30, 2005
Messages
1,951
Location
Midlothian, TX
I've used a 6 gallon pail full of ice water with 30' of copper tubing coiled up in it. I put a moisture trap on the output side and let it hiss a little.. Seemed to work well enough for painting a couple of cars in my garage/shop..
 

LG63

Well-known member
Joined
Sep 7, 2012
Messages
1,003
I’ve been kicking around aftercooler/moisture separators ideas for some time now and I think the setup in this thread, Post #134 is about as cost effective as any I’ve seen. Total cost with fan, plumbing, and moisture separator would be in the $300 range, but in terms of bang for the buck I think it’s the best approach for small compressors.

http://www.garagejournal.com/forum/showthread.php?t=50946&highlight=compressor+cooler&page=4

These coolers are available thru Zoro/Grainger and with a $50 coupon you could get one for less than $200. Having the cooler right after the compressor gives you the greatest temperature difference relative to ambient and therefore the most effective heat transfer. (as compared with trying to cool the air in copper tube downstream of the tank)

With this cooler and a simple moisture separator after the tank I think you’d be set unless you live in a swamp.
 

MP&C

Well-known member
Joined
Oct 21, 2009
Messages
4,418
Location
Leonardtown, MD
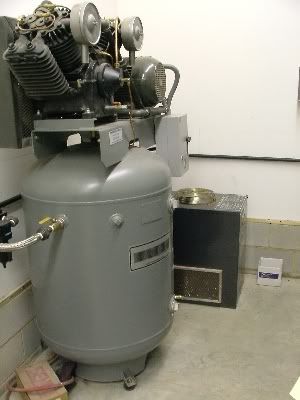
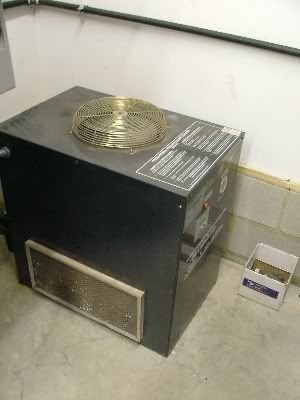
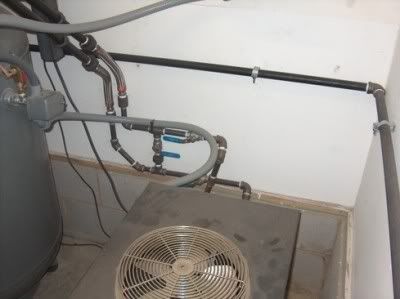
I've got a Pneumatech refrigerant dryer (used, ebay, ~500 IIRC). I chose to dry the air before it hits the tank, so I removed the line on the compressor going from the compressor head to the tank, and re-routed it through the dryer. The pipe coming off the compressor gets hot enough you can't hold your hand on it, and the one returning to the tank is cold to the touch. Never had any issue with too much heat (knock on wood). I also installed the bypass valves in case there is any issue with the dryer, I didn't want an air system down.


Picture185.jpg


Picture186.jpg


Picture055.jpg


The pressure switch on my compressor did have an extra set of contacts, so I also wired in the dryer so it comes on when the compressor does.
 
OP
P

PT Doc

Well-known member
Joined
Nov 12, 2010
Messages
3,197
I've got a Pneumatech refrigerant dryer (used, ebay, ~500 IIRC). I chose to dry the air before it hits the tank, so I removed the line on the compressor going from the compressor head to the tank, and re-routed it through the dryer. The pipe coming off the compressor gets hot enough you can't hold your hand on it, and the one returning to the tank is cold to the touch. Never had any issue with too much heat (knock on wood). I also installed the bypass valves in case there is any issue with the dryer, I didn't want an air system down.


Picture185.jpg


Picture186.jpg


Picture055.jpg


The pressure switch on my compressor did have an extra set of contacts, so I also wired in the dryer so it comes on when the compressor does.

By any chance do you know what your air temp is going into the dryer? Seems most have a low 120* intake temp spec.
 

MP&C

Well-known member
Joined
Oct 21, 2009
Messages
4,418
Location
Leonardtown, MD
No idea, but when the compressor runs a bit during heavy usage you can't keep your hand on the one pipe. I would think that would be more than 120...
 
To avoid these ads, REGISTER NOW!
Top Bottom