
Bennie
Well-known member
Requested by Charles!
This will no doubt take a few days to finish this post. I'll get it started with some pictures. Please excuse whatever mess there may be. This is a work in progress. It's up and running but there are a few changes yet to be made.
First off, thanks GJ. I found you guys when I was researching this this project. sewerzuk started a great thread and it was extreamly helpful. Thank you sewerzuk! My Dad was a hugh help as well getting everything setup. Thanks Dad! I hope people will be able to use this info to help with their own projects.
Where to start???? I have been working on this project for over a year. I originally broke it down in to 3 sub projects.
1. Collecting / filtering / storing oil.
2. Converting the boiler to burn waste oil. - so easy
3. Installing / setting up the system. - SOOO many hours...
My filtering consists of a piece of window screen first (I can't believe how much this does. I am constantly replacing it.), then I pump it in to a 275 gallon tote and filter it with a 10 micron filter from northern. I made the funnel and it works really slick. Since it screws in to the standard 2" NTP barrel opening it obviously does not move and doubles as a great place to drain oil filters. I have a few friends saving oil for me and I have given them 30 gallon barrels with the same funnels. I have gotten some pretty crappy oil from certain people. Some people seem to have a 50/50 oil water mixture going on. If you leave it outside when it's below freezing you can then pour the oil right off the top.")

This pump is from my Grandpa. He used to use it to pump his old oil on to the gravel road back in the day. I just added the FILTER.

The entire setup is out in my shed. It's setup like an outdoor wood boiler. The supply tote is up in the loft and gravity feeds to the boiler. You can see the copper tubing feeding off the bottom. The real flue is the one on the left. The other stuff is just extra.

Most of the copper tubing is coiled on top of my hot water tote to preheat the oil. It works very well, however, it's cooled down a bit before it actually makes it through the float tank and to the burner. More work need to be done on that. You can see all the spray foam used to help insulate the tote. You can also see some of the plumbing. The 2 pipes headed away from the camera are the loop that goes to the house. The large iron pipe is outgoing and pulls from the top of the tote. The smaller return pex goes to the bottom of the tote. The other pex with the red tape is coming from the boiler and dumps at the top of the tote. The return line to the boiler is fed off the drain on the bottom of the tote. I used a boiler corrosion treatment in the water but no anti freeze. There is about 260 gallons of water in this tote.

Right after the tote preheat the oil goes through a screen water filter from Menards. It works well and also does a good job of seperating some of the water. I have a small bucket hanging below it so I can easily drain it whenever I want.

There is a lot going on in this pic. You can see the circulator pump to the left of the boiler. It runs whenever the boiler is running. My Dad put the small air compressor together. It's a 3 gallon tank, a big compressor, a .5hp motor and a well switch. It is VERY quite because it is totally under driven. It kick on at 20psi and off at 30psi. There are a few kinks to work out of it so right now I'm running of the big compressor. I mounted the compressor and boiler on an aluminum base together so if they ever need to get moved you can just roll a pallet jack under them.

I converted a $100 craigslist Burnham V7 boiler with a Wayne burner. http://www.ckburners.com/ Thanks Craig!
I bought a combustion analizer to setup the burner. It came with a draft gauge too. These are things that are absolutly needed when you are setting up a waste oil burner.
A few notes here. I installed an outlet on the side of the aquastat so that I can just unplug the burner or circulator pump for servicing. Makes life a little easier. I added a time delay relay on the burner so it preheats for however long you want before firing. This may or may not be needed, if it's needed it's because my oil is NOT 50*F so allowing the nozzle block to absolutely heat to 180*F before firing can't be a bad this. My float tank is just to the right of the burner. I am pulling oil from the middle of it and have a drain on the bottom of it. I drain it a little every so often because any water in the system will settle here. Up on top I have a barometric damper and a whole house water filter. The boiler was a little nasty so rather than nastyfying 300 gallons of water I just installed the filter. It has worked great and is probably not needed anymore.

Here is the main circulator pump that runs 24/7. The house is fed with 3/4" pex. Yes, I now know that's not "big enough", but I don't think it will be a problem. There is only so much heat I can pull off the water and it seems to keep up.

Once the hot water makes it to the house it goes through 3 heat exchangers. The first one is the sidearm for the water heater. It's a 105 gallon Marathon water heater. I added a bypass so I can bypass the exchanger but I can't imagine why I would need to.

Here is the mixing valve I added for domestic hot water.

This is the second heat exchanger. I was manufactured in 1962, is 4" in diamter and 7ft. long and weights a ton. There is 46ft. of 1/2" copper inside of it. The output side is connected to the end cap and heads over the the infloor system, more on that later....

Here is the manifold for the last heat exchanger. The last heat exchanger is a water to air unit installed in the furnace plenum. It 16"x18"x3" and rated at 50Kbtu @ 140* and 100Kbtu @ 180*.


Here's the infloor system. As you can see it was originally installed with an electric boiler. Nothing has been disconnected but my Dad and I added a lot of plumbing to this board. There is a mixing valve installed and now instead of looping through the electric boiler it loops through the #2 heat exchanger. The purpose of the exchanger is to keep this system as untouched and "by the book" as possible. The system is pressureized and has antifreeze in it, the main boiler system does not. The infloor system has 2 zones. One zone is for heating the garage, the other zone is for heating the 2 lower levels of our 4 level split.

The main thermostat works just like it always did with one exception, the "heat" wire in now hooked up to the "fan only" contact in the furnace. When the thermostat calls for heat it just turns the fan on now. I added a second thermostat as backup. This thermostat is set lower and will actually call for heat if something fails in the boiler system. I installed a relay in the furnace that will interupt the "fan only" input if this thermostat calls for heat. Maybe nothing bad would happen if they were both calling at the same time but this way my funace is for sure safe.

Probably missed a few things. One thing I can say is that you can't really over do it with thermometers and ball valves. When a problem pops up the last thing you want to worry about is draining a punch of smokin' hot water when an extra valve could have been installed. It's very easy to read the system when you have thermometers everywhere. I can see exactly what the temp drop is across each heat exchanger as well as the infloor system. My infloor system originally didn't even have thermometer.
To date I have under $2,000 in this system (not including the combustion analizer). I have burned about 275 gallons of oil so far. It literally puts a big smile on my face every time I take a nice hot shower thinking about how I turned off the water heater back in October. The house is 3,400sqft. and the garage is 980sqft. Garage is kept at 62* always. It's been as cold as 0* out and the system doesn't seem to care.
This will no doubt take a few days to finish this post. I'll get it started with some pictures. Please excuse whatever mess there may be. This is a work in progress. It's up and running but there are a few changes yet to be made.
First off, thanks GJ. I found you guys when I was researching this this project. sewerzuk started a great thread and it was extreamly helpful. Thank you sewerzuk! My Dad was a hugh help as well getting everything setup. Thanks Dad! I hope people will be able to use this info to help with their own projects.
Where to start???? I have been working on this project for over a year. I originally broke it down in to 3 sub projects.
1. Collecting / filtering / storing oil.
2. Converting the boiler to burn waste oil. - so easy
3. Installing / setting up the system. - SOOO many hours...
My filtering consists of a piece of window screen first (I can't believe how much this does. I am constantly replacing it.), then I pump it in to a 275 gallon tote and filter it with a 10 micron filter from northern. I made the funnel and it works really slick. Since it screws in to the standard 2" NTP barrel opening it obviously does not move and doubles as a great place to drain oil filters. I have a few friends saving oil for me and I have given them 30 gallon barrels with the same funnels. I have gotten some pretty crappy oil from certain people. Some people seem to have a 50/50 oil water mixture going on. If you leave it outside when it's below freezing you can then pour the oil right off the top.
This pump is from my Grandpa. He used to use it to pump his old oil on to the gravel road back in the day. I just added the FILTER.
The entire setup is out in my shed. It's setup like an outdoor wood boiler. The supply tote is up in the loft and gravity feeds to the boiler. You can see the copper tubing feeding off the bottom. The real flue is the one on the left. The other stuff is just extra.
Most of the copper tubing is coiled on top of my hot water tote to preheat the oil. It works very well, however, it's cooled down a bit before it actually makes it through the float tank and to the burner. More work need to be done on that. You can see all the spray foam used to help insulate the tote. You can also see some of the plumbing. The 2 pipes headed away from the camera are the loop that goes to the house. The large iron pipe is outgoing and pulls from the top of the tote. The smaller return pex goes to the bottom of the tote. The other pex with the red tape is coming from the boiler and dumps at the top of the tote. The return line to the boiler is fed off the drain on the bottom of the tote. I used a boiler corrosion treatment in the water but no anti freeze. There is about 260 gallons of water in this tote.
Right after the tote preheat the oil goes through a screen water filter from Menards. It works well and also does a good job of seperating some of the water. I have a small bucket hanging below it so I can easily drain it whenever I want.
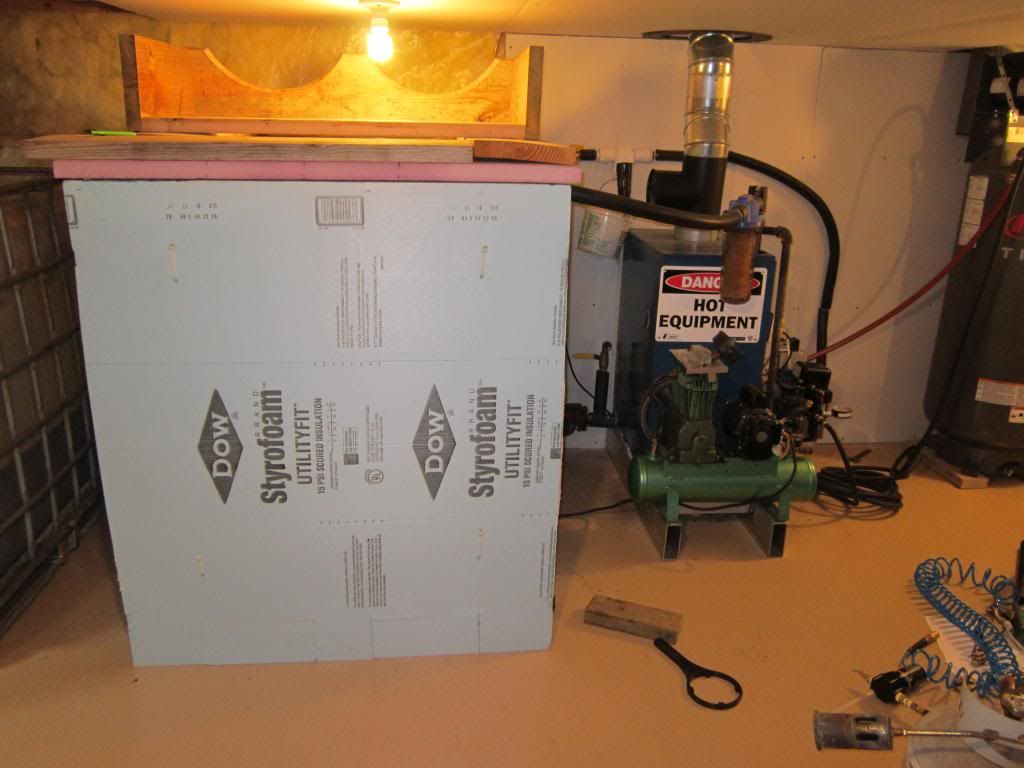
There is a lot going on in this pic. You can see the circulator pump to the left of the boiler. It runs whenever the boiler is running. My Dad put the small air compressor together. It's a 3 gallon tank, a big compressor, a .5hp motor and a well switch. It is VERY quite because it is totally under driven. It kick on at 20psi and off at 30psi. There are a few kinks to work out of it so right now I'm running of the big compressor. I mounted the compressor and boiler on an aluminum base together so if they ever need to get moved you can just roll a pallet jack under them.
I converted a $100 craigslist Burnham V7 boiler with a Wayne burner. http://www.ckburners.com/ Thanks Craig!
I bought a combustion analizer to setup the burner. It came with a draft gauge too. These are things that are absolutly needed when you are setting up a waste oil burner.
A few notes here. I installed an outlet on the side of the aquastat so that I can just unplug the burner or circulator pump for servicing. Makes life a little easier. I added a time delay relay on the burner so it preheats for however long you want before firing. This may or may not be needed, if it's needed it's because my oil is NOT 50*F so allowing the nozzle block to absolutely heat to 180*F before firing can't be a bad this. My float tank is just to the right of the burner. I am pulling oil from the middle of it and have a drain on the bottom of it. I drain it a little every so often because any water in the system will settle here. Up on top I have a barometric damper and a whole house water filter. The boiler was a little nasty so rather than nastyfying 300 gallons of water I just installed the filter. It has worked great and is probably not needed anymore.
Here is the main circulator pump that runs 24/7. The house is fed with 3/4" pex. Yes, I now know that's not "big enough", but I don't think it will be a problem. There is only so much heat I can pull off the water and it seems to keep up.
Once the hot water makes it to the house it goes through 3 heat exchangers. The first one is the sidearm for the water heater. It's a 105 gallon Marathon water heater. I added a bypass so I can bypass the exchanger but I can't imagine why I would need to.
Here is the mixing valve I added for domestic hot water.
This is the second heat exchanger. I was manufactured in 1962, is 4" in diamter and 7ft. long and weights a ton. There is 46ft. of 1/2" copper inside of it. The output side is connected to the end cap and heads over the the infloor system, more on that later....
Here is the manifold for the last heat exchanger. The last heat exchanger is a water to air unit installed in the furnace plenum. It 16"x18"x3" and rated at 50Kbtu @ 140* and 100Kbtu @ 180*.
Here's the infloor system. As you can see it was originally installed with an electric boiler. Nothing has been disconnected but my Dad and I added a lot of plumbing to this board. There is a mixing valve installed and now instead of looping through the electric boiler it loops through the #2 heat exchanger. The purpose of the exchanger is to keep this system as untouched and "by the book" as possible. The system is pressureized and has antifreeze in it, the main boiler system does not. The infloor system has 2 zones. One zone is for heating the garage, the other zone is for heating the 2 lower levels of our 4 level split.
The main thermostat works just like it always did with one exception, the "heat" wire in now hooked up to the "fan only" contact in the furnace. When the thermostat calls for heat it just turns the fan on now. I added a second thermostat as backup. This thermostat is set lower and will actually call for heat if something fails in the boiler system. I installed a relay in the furnace that will interupt the "fan only" input if this thermostat calls for heat. Maybe nothing bad would happen if they were both calling at the same time but this way my funace is for sure safe.
Probably missed a few things. One thing I can say is that you can't really over do it with thermometers and ball valves. When a problem pops up the last thing you want to worry about is draining a punch of smokin' hot water when an extra valve could have been installed. It's very easy to read the system when you have thermometers everywhere. I can see exactly what the temp drop is across each heat exchanger as well as the infloor system. My infloor system originally didn't even have thermometer.
To date I have under $2,000 in this system (not including the combustion analizer). I have burned about 275 gallons of oil so far. It literally puts a big smile on my face every time I take a nice hot shower thinking about how I turned off the water heater back in October. The house is 3,400sqft. and the garage is 980sqft. Garage is kept at 62* always. It's been as cold as 0* out and the system doesn't seem to care.
Last edited: