
You are using an out of date browser. It may not display this or other websites correctly.
You should upgrade or use an alternative browser.
You should upgrade or use an alternative browser.
Starting my 2 car garage....
- Thread starter Cjm005
- Start date


I like how the corrugated steel looks. Definitely will be durable!
How are you mounting it? screwed into the studs?
Wood screws made for them. I try to catch the studs when possible but they really have no load on them so they are pretty secure.
55cadillacking
Well-known member
Welcome to the GJ and I am looking forward to seeing what you are able to accomplish with your double garage. You have a pretty good laundry list of things to do. I think our garages have quite a bit in common. Feel free to check mine out to see if there is anything you like. I have the same Craftsman storage cabinetry, but in the black/grey colour.
Are you going to add some sort of trim to the top of the corrugated steel?
Good luck!
Are you going to add some sort of trim to the top of the corrugated steel?
Good luck!
Are you going to add some sort of trim to the top of the corrugated steel?
Yeah, was thinking some wood trim painted red? Suggestions?
ShumanSS6.0
Well-known member
Looking good! I'm planning the same look. After diligent research on this site (i.e. non-stop drooling), there are a couple options I am considering; 1) 2x6 painted for a chair rail approach. Simple, cheap and installed fairly quickly. 2) notching a 2x2 or 2x4 to "cap" the steel, slightly more time consuming but clean look. Go as light grey on the paint as you can, I didn't see what you have for lighting but in a small area like this a little light will go a long way. Keep it up!
BRIANBB
Well-known member
My wifes uncle is putting the same tin around his shop. He put plywood on the walls screwed to the studs then was able to use screws wherever he needed.Trim board on top and base board under it so the tin sits on top of it.
Wood screws made for them. I try to catch the studs when possible but they really have no load on them so they are pretty secure.

redairrdstr
Active member
Really like the tin, where did you get it from? Looks like you'll have a nice setup!
Really like the tin, where did you get it from? Looks like you'll have a nice setup!
Home Depot, actually.
Kevin54
MEMBER EMERITUS
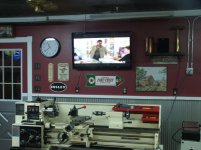
The tin looks good. I did mine a while back behind my lathe and mill. I'll finish up the rest of the walls this summer.
On thing I did to finish off the top of the tin was to use (2) 1" x 2"'s and made an "L" shape with them and fastened them to the wall to cover the top. At the bottom, I just used 5 1/2" Colonial baseboard. The little holes will catch dirt but I can always close that off with a little caulk. If I would have thought at the time, you can get wood pieces that fit the tin. I could have used that to close off the holes.
If you go to www.houzz.com and type in corrugated metal, you will find a lot of houses and garages that will give you some more ideas. There are also quite a few member on here that have used it. This site is where I got my ideas from. I think I may also use it to finish off the wall above my workbench, between the workbench and overhead cabinets.
Out of curiosity, how are you cutting yours? I first started with a circular saw, then tried a jigsaw, but found them too noisy. I ended up just using snips and could cut them faster and straighter that the power tools.
Looking forward to you posting up some more pics.

Attachments
chevshack
Member
j channelYeah, was thinking some wood trim painted red? Suggestions?

