To avoid these ads, REGISTER NOW!

Custom subwoofer enclosure

shoot summ

Well-known member
Joined
Jun 8, 2010
Messages
2,960
Saw 54Fordpanel's fiberglass console build and thought I would share the custom sub enclosure I made for my Wife's car over Christmas break.

I really didn't want to do the complete sound system install on her car, I was going to take the easy way out and have someone do it, after I got the estimate I decided I could do a better job for a whole lot less.

The car is a 2005 BMW Z4, it was a nice sized trunk, I didn't want to consume it all with a normal MDF subwoofer enclosure so I did some web research and found a number of sites that gave great details on how to custom form one.

The first step after deciding where to put the box is to tape off the area in preparation of making a fiberglass plug. I spent a couple of hours taping off the area I intend to use, I also paid close attention to filling areas that may keep the box from sliding out. I filled in the floor of the compartment as I couldn't reconcile how I would tilt the box out. I also padded around the taillight cover as there is a pretty good bump in on the outside of it. I laid down a couple of layers of tape, was being really careful as all of the sites warn about getting resin on the carpet, then it dawned on me I don't care as the enclosure will cover it, kept taping anyway. There is a nice amount of space in the side pocket.

All taped up:
IMG_06111_zps2f559777.jpg

IMG_06121_zps5aa77874.jpg


I got in a hurry and started glassing before I used any type of mold release, wasn't a big deal but I would use something next time, glassing:

IMG_06131_zpsc812b294.jpg


So this morning I rushed out to the garage to pull out the plug, the epoxy resin set up nicely, I tugged on that mother for 45 minutes before it finally decided to turn loose, brought most of the blue tape with it. Spent a fair amount of time building up the glass inside the enclosure, and trimming it.

IMG_06141_zps1722da3c.jpg


I removed a good portion of the tape although there is some that will be there permanently. I trimmed up the plug and set about making the mounting rings, Routing MDF is just plain nasty, got the rings made, and mounted:
IMG_06151_zps5718bb42.jpg


Test fitting and trimming:

FBAF65DC-BC9A-4078-89C2-FB6D561919DA-30978-0000305FC75AB99E.jpg


Fleeced, an old stretchy work out shirt was stretched and stapled over the enclosure then I used resin on it. Once it cured I filled in the backside with more glass and resin:
F7F08827-C650-4D92-A4DB-079A891AF03E-30978-0000305FD7790417.jpg


More fitting:

2043DA24-5A47-47FF-9EB2-618A6C616A64-30978-0000305FE02A31E3.jpg


After some additional smoothing and glassing I covered the box in carpet, and mounted the sub:

Finished sub box:
BEF589FE-CCCE-47A3-9B9E-22C72B4B4F6E-33110-0000344E4785123B.jpg


Then I installed the enclosure in the car, 10" sub makes the little car thump:

DD0B1811-D02C-439D-B26B-DC3654743790-33561-000034C6B430E8F3.jpg
 
Last edited:
To avoid these ads, REGISTER NOW!

Tribalvision

Well-known member
Joined
Jan 2, 2012
Messages
610
Location
Bensalem Pa
Nice Job on the box. It looks like it belongs there.
I remember those days of taping everything off. I used spray glue and glued non stick aluminum foil down before I glassed my box.came out easy.

That box looks similar to the one I made for my friends S2000
 
OP
S

shoot summ

Well-known member
Joined
Jun 8, 2010
Messages
2,960
Nice Job on the box. It looks like it belongs there.
I remember those days of taping everything off. I used spray glue and glued non stick aluminum foil down before I glassed my box.came out easy.

That box looks similar to the one I made for my friends S2000

Thanks, I actually had a similar box in our S2000 for an 8" sub, where I came up with the idea. I bought it on the S2000 forum though.
 
OP
S

shoot summ

Well-known member
Joined
Jun 8, 2010
Messages
2,960
Looks excellent. I am becoming more and more fond of these OE looking installs.

It would have been way easier to just make an MDF box to go at the front of the trunk space. It would have ruined the usable space in the trunk, and looked like ****. I really dig the fact that this looks like it was made for the car, and tucks in nicely. All said I ******* about $250-$300 for materials, and about 30-40 hours of labor into this. I used epoxy resin which drove the cost up, but was way easier and less hazardous to work with.
 

03protege

Well-known member
Joined
Sep 13, 2012
Messages
3,104
Location
Louisiana
It would have been way easier to just make an MDF box to go at the front of the trunk space. It would have ruined the usable space in the trunk, and looked like ****. I really dig the fact that this looks like it was made for the car, and tucks in nicely. All said I ******* about $250-$300 for materials, and about 30-40 hours of labor into this. I used epoxy resin which drove the cost up, but was way easier and less hazardous to work with.

It is not easy or cheap, especially if you think your time is worth money, but when it is all said and done and you have a perfectly made item and all the satisfaction from doing it yourself it is well worth it. At least in my experiences.

Any shots of where you mounted the amp?

Edit: just noticed I can see the Alpine amp in the last picture.
 
OP
S

shoot summ

Well-known member
Joined
Jun 8, 2010
Messages
2,960
It is not easy or cheap, especially if you think your time is worth money, but when it is all said and done and you have a perfectly made item and all the satisfaction from doing it yourself it is well worth it. At least in my experiences.

Any shots of where you mounted the amp?

Edit: just noticed I can see the Alpine amp in the last picture.

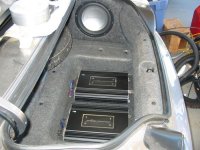
There was a mount against the front wall that the "everest bus" mounted to. When I scrapped the stock system this unit came out as well. The spot was ideal to mount the amp so I modified the stock mount for the amp.

91CF5619-325E-4384-A071-51C0A421B1F3-33561-000034B97862E5E0.jpg


With a coat of Plastidip:
AD9BF1ED-38F1-41CE-AB51-A08D7D68CE76-33561-000034B97E50D7EA.jpg


Amp installed:
592F735B-DF91-4353-B28C-447397D51327-33561-000034C6A63EC1D1.jpg

I mounted the crossovers where the stock amp mounted, all of the wiring was in place there to use:
AA31BAA5-F2BE-419E-8A05-268A19E4E2D6-33561-000034C6AD1AB1E4.jpg
 
To avoid these ads, REGISTER NOW!

Tribalvision

Well-known member
Joined
Jan 2, 2012
Messages
610
Location
Bensalem Pa
here's a photo of the box I made for the s2000. It was a 10" sub

I mounted the amps in the tire well and made a new top panel with venting around the sides so the amps could breathe
 

Attachments

  • s2000_110.jpg
    s2000_110.jpg
    83.4 KB · Views: 42
OP
S

shoot summ

Well-known member
Joined
Jun 8, 2010
Messages
2,960
Nice work! I appreciate what you did there, very professional looking enclosure and installation..... :thumbup:

Not nearly as nice as your console, I'm sure you found this as well, but it's addictive!

here's a photo of the box I made for the s2000. It was a 10" sub

I mounted the amps in the tire well and made a new top panel with venting around the sides so the amps could breathe

Very nice!

Ours was on the other side, there was a guy on the S2K forum building them and selling them for awhile. I mounted the amps where the spare tire goes. Made a mount where I stacked a JL 300/4 and a JL 250/1 in there. Still had a fair amount of trunk space left.
 

Schurkey

Well-known member
Joined
Oct 27, 2011
Messages
2,378
Location
The Seasonally Frozen Wastelands
So...how do you calculate the volume of the subwoofer enclosure versus the specifications of the subwoofer driver?

The way you describe it, the volume of the finished enclosure is totally random. That can't be correct...can it???
 
OP
S

shoot summ

Well-known member
Joined
Jun 8, 2010
Messages
2,960
So...how do you calculate the volume of the subwoofer enclosure versus the specifications of the subwoofer driver?

The way you describe it, the volume of the finished enclosure is totally random. That can't be correct...can it???

I had a rough idea what it would be, less than 1CU FT, but more than .5CU FT, I bought a woofer for small sealed enclosures in that range. I tried to expand it as much as possible without going too far, that is why the driver isn't angled at the top, needed that additional volume. To measure it I used packing peanuts and a cardboard box that measured .5 CU FT, fill the box, dump peanuts into woofer enclosure, repeat until full. Turns out I have about .75 CU FT which is in spec for the woofer I bought. So it wasn't totally random, it was somewhat random within some planned specs...
 
Last edited:

03protege

Well-known member
Joined
Sep 13, 2012
Messages
3,104
Location
Louisiana
So...how do you calculate the volume of the subwoofer enclosure versus the specifications of the subwoofer driver?

The way you describe it, the volume of the finished enclosure is totally random. That can't be correct...can it???

Fill it with small items, packing peanuts, real peanuts, sand, marshmallows, hell even water will work.

Then poor into square box, and calculate using a square formula based on the dimensions of the box and depth of the filler material.

If the box is too small you can add Polyfill (pillow stuffing for custom pillows and quilts)

If the box is too large you can just glue a block of styrofoam in there.
 
OP
S

shoot summ

Well-known member
Joined
Jun 8, 2010
Messages
2,960
If that was ur 1st time laying 'glass, I must give credit where it's due... Well done, and a great fitment. Keep up the good work

Thanks, first time for something like this although I have dabbled with glass for other things in the past. Epoxy resin really makes it easy, no odors, easy to mix with the West system.
 
To avoid these ads, REGISTER NOW!
Top Bottom