To avoid these ads, REGISTER NOW!

EpoxyGuard Flooring At Costco 100% Solids - My Project

3baysofplay

Active member
Joined
Mar 25, 2008
Messages
40
When I originally posted the thread on this product I was considering using this for my three car garage. I finally bit the bullet a few weeks back and ordered two kits in the light gray, which should allow for a little thicker coverage since the product promises 10mils when one kit is used for a 2.5 car garage.

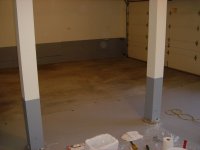
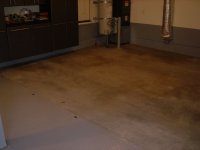
I started by moving everything out of the garage, I still have to move my toolbox and wife’s pottery wheel since they are heavy as heck. I then went on to clean the floor with lacquer thinner on the oily spots. I had also degreased them a few times before. Next, I treated the whole floor with Zep driveway and concrete cleaner. One gallon was more then enough when mixed with two gallons of hot water in a garden sprayer. I sprayed a small section of the floor and then went over it with a stiff "deck brush" I bought at home depot. I then used a hose to thoroughly rinse the floor. I squeegeed the concrete with an eighteen-inch Home Depot foam squeegee, then let the floor dry overnight. The next night I used the Epoxy Guard acid solution (1 container mixed with 4 containers of water) and poured it from the bucket out on the concrete. I used the deck brush once again and rinsed out the garage again followed by the squeegee to clear the water.

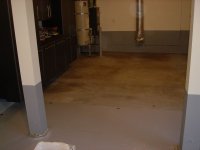
I let the floor dry for two days, and went over some spots with a wire wheel on a drill. I blew out the floor with an electric leaf blower, and will be laying down the epoxy tomorrow morning. Here are some before photos. I will get some “AFTER” photos up tomorrow.
 

Attachments

  • IMG_2035.JPG
    IMG_2035.JPG
    68.7 KB · Views: 268
  • IMG_2040.JPG
    IMG_2040.JPG
    57.2 KB · Views: 244
  • IMG_2056.JPG
    IMG_2056.JPG
    59.3 KB · Views: 214
  • IMG_2057.JPG
    IMG_2057.JPG
    58.8 KB · Views: 213
  • IMG_2060.JPG
    IMG_2060.JPG
    50.1 KB · Views: 265
To avoid these ads, REGISTER NOW!
OP
3

3baysofplay

Active member
Joined
Mar 25, 2008
Messages
40
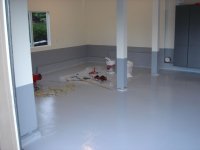
Ok I had a few issues when I moved the toolbox while it was raining outside. I got some more water on the floor which I had to let dry. I fired up the propane torpedo heater and let the garage dry a bit more. Tonight I taped up under the garage door threshold, and a line down the middle of the garage, with 3M Duct Tape (low residue) which the manufacturer recommended on their phone line.

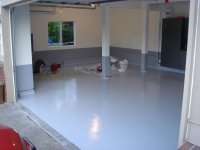
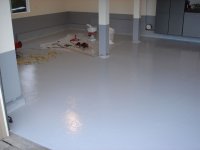
The garage was about sixty-three degrees when I finally got to doing the first half. I mixed part A (very viscous, like clay) with part B (like vegatable oil consistency), and blended for 3 minutes in the bucket with my 1/2 inch corded drill and mixer paddle. Once I got it mixed, I commenced to pouring on the floor. I used the notched trowel on a broom stick to spread it first and after trying the 9" roller that came with the kit I brought out my 18" roller to get the job done. One kit covered well on half my gargage. I did this with all the doors and windows shut, odor not too bad. I decided no flecks after looking at it all laid out. Golf shoes ($2 Goodwill) SUPER HANDY!!
 

Attachments

  • DSC00035.jpg
    DSC00035.jpg
    41.7 KB · Views: 288
  • DSC00032.jpg
    DSC00032.jpg
    25.5 KB · Views: 182
  • DSC00029.jpg
    DSC00029.jpg
    28.1 KB · Views: 256
  • DSC00028.jpg
    DSC00028.jpg
    21 KB · Views: 286
  • DSC00026.jpg
    DSC00026.jpg
    34.4 KB · Views: 201
  • DSC00020.jpg
    DSC00020.jpg
    31.8 KB · Views: 249
  • DSC00011.jpg
    DSC00011.jpg
    36.5 KB · Views: 271
OP
3

3baysofplay

Active member
Joined
Mar 25, 2008
Messages
40
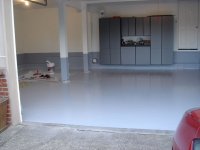
I had some texture from the roller I used, it was a 1/2 nap. I think if I did it again I would go with a smoother roller to get less texture. Overall, so far I really like the look of the floor. It is still wet, so I will take some pictures after twenty-four hours when it is cured. Then I can get to the other side, and finally move my garage back in from my living room. Garage sure looks bigger without all that stuff in it. Next house will have a 5-6 car garage. I am thinking three car with tandem.
 
Joined
Sep 2, 2006
Messages
16
Looks great!! I just ordered the same kit and hope to start my project next weekend. I hope my floor comes out as nice as yours.
 
OP
3

3baysofplay

Active member
Joined
Mar 25, 2008
Messages
40
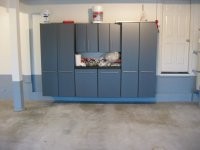
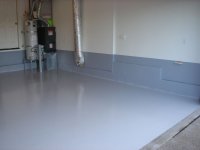
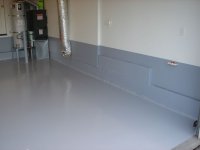
Ok the floor is finished. It has been 48 hours since I spread the second half. I used the 9" smoother roller on the second half. The one that came with the kit. I still noticed roller marks, and it took longer, but there was no fuzz or anything coming off of this roller. There is a lot of suction on the roller as you are trying to roll along. Here are some more pictures. I am going to start moving stuff back in now.
 

Attachments

  • DSC00043.JPG
    DSC00043.JPG
    64.2 KB · Views: 288
  • DSC00042.JPG
    DSC00042.JPG
    44.6 KB · Views: 236
  • DSC00041.JPG
    DSC00041.JPG
    50.8 KB · Views: 275
  • DSC00040.JPG
    DSC00040.JPG
    57.8 KB · Views: 110
  • DSC00039.JPG
    DSC00039.JPG
    58.1 KB · Views: 125
  • DSC00038.JPG
    DSC00038.JPG
    57.2 KB · Views: 147
OP
3

3baysofplay

Active member
Joined
Mar 25, 2008
Messages
40
Here are a few more pics:
 

Attachments

  • DSC00048.JPG
    DSC00048.JPG
    47.1 KB · Views: 205
  • DSC00047.JPG
    DSC00047.JPG
    40.3 KB · Views: 128
  • DSC00046.JPG
    DSC00046.JPG
    49.8 KB · Views: 136
  • DSC00045.JPG
    DSC00045.JPG
    72.1 KB · Views: 165

thundercow

Well-known member
Joined
Nov 17, 2007
Messages
96
Location
Austin, TX
It looks nice, for sure. The thing about using chips is that the chips "randomize" the appearance of the floor by disquising imperfections. This is a very nice solid color floor.
 
OP
3

3baysofplay

Active member
Joined
Mar 25, 2008
Messages
40
How long did it take to cure? How long before you were able to walk on it, and park on it?

The maufacturer says you can put light traffic in 16hrs and in 24 hrs heavy traffic. I waited two days before bringing my heavy toolbox or anything else in there just to be safe.
 
OP
3

3baysofplay

Active member
Joined
Mar 25, 2008
Messages
40
It looks nice, for sure. The thing about using chips is that the chips "randomize" the appearance of the floor by disquising imperfections. This is a very nice solid color floor.

Yeah the reason I thought of doing chips was that I wanted to disguise any imperfections. Conversely, the reason I thought of not using chips was a cleaner appearence, easy to find dropped nuts/bolts, and fear or screwing it up and being stuck with it. I decided only after I had laid the epoxy, and it looked good enough to my eye that way. If it had been really sloppy I would have gone with the chips for sure.

BTW - on the issue of being slippery, I think it is much less slippery than the bare concrete was when it got wet. It looks slippery, but seems to have some grip to it. I elected not to use the grip enhancer additive included with the kit, but I don't live in a place where we get much snow or ice. Just lots of rain.
 

ironroad 9c1

Banned
Joined
Sep 3, 2005
Messages
758
Location
Gum spring,VA
yea mines not too slippery and i cleared half and the other half is just as glossy with one coat,but i didsome tesing and droppednuts and bolts are not a problem to fnd with a med applicaion of chips , mainly because you eye catches the bolt cause it sticks up off the floor it in no way blends in with the chps.
 
To avoid these ads, REGISTER NOW!
OP
3

3baysofplay

Active member
Joined
Mar 25, 2008
Messages
40
What is the pot life of EpoxyGuard after mixed? I can't find that info anywhere online.

I think it was like 15-20 minutes if you leave it in the bucket. It will harden very quickly in the bucket. What the manufacturer recommends is that you pour it out on the floor right away, and then you have 45-50 minutes to work with it. I was able to get the kit spread with no problem during the allotted time. The weather was cool when I did it however, maybe 60 degrees inside.
 

SCutchins

Well-known member
Joined
Sep 16, 2008
Messages
54
Is that paint on the bottom part of the walls or epoxy? I just posted about this, wondering how to coat the little walls around my garage, although your walls look so much smoother than the walls in my garage.
 
OP
3

3baysofplay

Active member
Joined
Mar 25, 2008
Messages
40
Is that paint on the bottom part of the walls or epoxy? I just posted about this, wondering how to coat the little walls around my garage, although your walls look so much smoother than the walls in my garage.

The same grey paint on the walls, is used on the concrete stem walls. They were very rough before I painted them. I used a very high quality (Benjamin Moore Fresh Start) primer prior to painting them and the combination of the primer and the paint resulted in very smooth walls that turned out a lot better than expected.

I am really glad I chose to paint them rather than using epoxy as it took almost eight hours with a brush to primer and paint them, there is no way I could have gotten that done with the epoxy. I had to do a lot of dabbing and filling with the paint in the concrete to get a good finish, the pot life of epoxy would never have allowed for it.
 

roger55

Well-known member
Joined
Mar 19, 2006
Messages
595
Location
Fort Collins, CO
To the top with hopes of an update on how the floor is holding up.

Thanks


I used it in my single-stall paint room.

The acid they give you is ****. I tried a small amount and it doesn't etch at all. It's a waste of time. I ended up grinding the floor to prep it.
I also trashed the flakes they gave me. Using flakes without sealing them in with a clear epoxy or urethane to me is crazy.

I had heard that using it without a primer can lead to lots of bubbles so I used a quikrete water based epoxy from Lowe's for a primer.

The stuff doesn't self level worth a darn. The roll marks remained. But I don't care since it is a paint room and wasn't going for looks.

It seems to be a tough epoxy and that's what I wanted for that room.
It is holding up well to the rough use.
 
OP
3

3baysofplay

Active member
Joined
Mar 25, 2008
Messages
40
Just an update about how this is holding up. I was a little disappointed that it came up in two places, one where my wife's front left tire parks, and two, where my front left tire parks. Manufacturer sent me out a repair kit that I will use soon to patch it up.

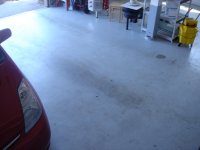
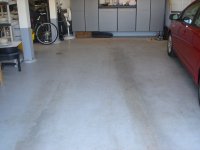
Also, this coating seems to really hold dirt/rubber/marks etc. I have clear brown/black lines where my cars roll into the garage on their tires. It doesn't look anything like the pictures anymore and I wonder if other coatings also do this. I mop it regularly but haven't used a lot of solvents on it. I did spill some solvent recently on it when I was painting, seems to take off much of the the tire tracks and goo.

I have used jack stands, floor jacks, including doing a whole vehicle suspension replacement on one car. It did leave some marks. Overall still nicer than my floor was for sure, but not a lifetime coating that is indestructible, and it won't look like the day you laid it down a year later.

I will post some pictures soon.
 

cansari

Well-known member
Joined
Mar 26, 2009
Messages
48
I'm thinking of using the same product (epoxy-coat). I wonder if the tire lift could have been prevented by diamond grinding? Also, if tire marks do not wash off completely (or clean off relatively easily with chemicals), that might be a deal killer for me. Can you provide some more info on this issue and well as photos. Thanks
 
OP
3

3baysofplay

Active member
Joined
Mar 25, 2008
Messages
40
I am attaching a couple of pictures so you can see. I have not mopped it in a week, the parts that don't come up well are the tires tracks, plus it just doesn't get shiny clean anymore.

You can also see the chipped part. I do think that better prep might help on lifting, for instance diamond grinding. I just did it like they recommended it, but of course it may have not been enough for my application.
 

Attachments

  • DSC00001-1.JPG
    DSC00001-1.JPG
    81 KB · Views: 138
  • DSC00002-1.JPG
    DSC00002-1.JPG
    88.9 KB · Views: 132
  • DSC00003-1.JPG
    DSC00003-1.JPG
    90.7 KB · Views: 120

roger55

Well-known member
Joined
Mar 19, 2006
Messages
595
Location
Fort Collins, CO
Like I said, the acid they give you is worthless. It wouldn't etch my concrete at all. Toss the acid, and the flakes and use the aluminum oxide in your blast cabinet but not on the floor. I ended up grinding and priming with Quikrete water based epoxy and have had no issues with adhesion.
I think the EpoxyGuard is heavy duty stuff but if you want good looks too, go with the Wolverine system. It self-levels way better and you can use flakes since it uses a clear topcoat over them. Gallon for gallon the Wolverine and EpoxyCoat are similar in price.

For my paint room (aka abuse room), the EpoxyGuard fit my needs just fine. For the rest of my shop where I wanted a nice look, I went with the Wolverine primer coat, color coat and urethane clear coat (over flakes) system.

In retrospect though, if I could turn back the clock, I would have used Wolverine (primer and color coats) for my paint room but not put the clear topcoat on it. The cost would have been about the same and the Wolverine really is a better product.
 

cansari

Well-known member
Joined
Mar 26, 2009
Messages
48
Wow, I am even more concerned about the epoxy after looking at your photos.
 
To avoid these ads, REGISTER NOW!
Top Bottom